Features of the technology
Tip extensions on natural nails are a completely safe and painless procedure. Anyone can do it on their own, just knowing some rules and having instructions in front of you, which you can find below.
To extend a nail using tips you don’t need many tools, and the first time will only take a couple of hours. But the result obtained with acrylic or gel extensions with tips will exceed all positive expectations!
@viki_nail_chelyabin
@super_nails_mk
@alina_rosenails
@belotskaya_nail
@luyba1210
@tatyana_bogacheva_nails
Also, for nail extensions on tips, special glue can be used, and the products themselves are disposable.
This technique is used when extensions on natural plates using forms are impossible or very problematic.
This happens in such cases:
- severely bitten nails, without a free edge;
- breaking off the natural tips of the nails;
- uncomfortable sides on the nail plates.
@zuhra_nail_beauty
@m_a_n_i_c_u_r_e
@nails.ageeva
@reneo.manicure
pros
Not only among masters, but also among users, there are both supporters and ardent opponents of extensions using tips. Moreover, the price for both types of extensions is approximately the same. The positive features include the following:
- Only with them can extensions be applied to very short nails. Extension onto forms requires a minimum length of the free edge (usually at least 1 cm). This is the length to which the future free edge of gel or acrylic is attached in order to stay on the nail. Tips are glued to nails of even minimal length; in fact, a free edge is not required at all;
- When extending nails with tips, a special “stress zone” is formed in the area where your own nail transitions to the extended gel tip. It is subject to maximum stress and is very fragile. Minimal pressure on it can cause complete chipping of the extended free edge. In the event that the master is not very experienced and has poorly strengthened this area, the likelihood that you will not be able to wear gel nails for even a week increases. Therefore, if you contact such a master, it is better to choose nail tips, as in the photo;
- The extension is so simple that even a beginner can handle it. After watching training videos, a manicure lover will be able to extend nails using tips for herself and her friends. After all, the most difficult thing in such a manicure is to tightly glue the tip to the nail plate.
- Due to the fact that the tips are plastic, the free edge is very dense. It is strong and quite thick. Breaking such a nail is problematic, in addition, it will not crack or split;
- Complex plate shapes, pipe type, as well as with holes, etc. it is often possible to create exclusively on tips due to their high strength and ease of working with them;
- Another important advantage is that it is less traumatic than when extensions are made using forms. The most common cracks in plates, especially long ones, occur in the area of the smile line, across the plate. If the nails are extended onto forms, then such a crack, when directed towards the nail bed, can be very painful and cause injury. If the extension is done using tips, then with such damage, it will simply come off. Although the damage must be severe enough to ruin such a manicure.
https://www.youtube.com/watch?v=r52FPK0FWWE
Tips are also a favorite option for many because they allow you to create beautiful extensions, as in the photo, even if your own nail shape is not very good. In addition, only they allow you to obtain nail plates of extreme length. For nails on forms, as can be seen in the photo in the material, the length is limited.
Types of tips and which ones to choose
Types of tips are divided into several categories:
- By appointment. It all depends on what kind of manicure you are going to do. For example, for a classic French style, thicker tips are chosen; for building up and covering the plates with colored gel, transparent tips are chosen; if you are going to decorate the tips only with a design, you choose colored ones or use ready-made solutions that just need to be covered with clear varnish.
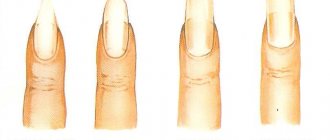
- According to the form. The difference in tip shape is important, and the choice depends on your preferences and the individual characteristics of natural marigolds. The classic version of tips is most similar in appearance to natural nails. Other tips for modeling nail plates are non-contact, tapered, “American” and for almond-shaped nails.
Tips of different shapes
- By color. The color range of products is very wide. There are transparent options, nude, colored - matte, glossy, with a pattern, with a design, French tips to create a smile.
Multi-colored tips for extensions
- Based on manufacturing materials. In production, when producing tips, three materials are usually used. These are polyflex, ABS plastic and nylon.
Tips made of different materials
When choosing and purchasing tips, pay attention to the following points and details:
- Products must be intact, without nicks, chips, rough surfaces or scratches.
- Consider what shape and thickness the blanks should be so that the design on artificial nails looks natural.
- Choose high-quality tips so that they are strong. Even though the purchase will cost you a little more, the item will be much more reliable.
- When choosing template sizes, try to guess the size. It’s okay if they are a little larger than the nail, so the shape will fit better on the manicure.
- If you are going to do your own manicure with tips all the time, buy sets that will definitely have templates that are ideal for you.
@rimma.nails.vbg
@tvoy_maniikur
@jusi_nailart
The most common types of tips:
Tips-tips
These are disposable products that are attached to the edge of a natural nail using a special glue that comes with them.
Most often, one set of such templates includes products of different sizes, so that you can choose the shape individually for your manicure.
The technology of extensions using tip tips is very simple, the template does not reach the cuticle area, so you do not have to struggle with glue for a long time, trying to adapt the tips to the cuticle.
Tips for extensions
Upper forms
These are special reusable forms of different sizes. The material is laid out inside the product, pressed against the nail, under the cuticle, and dried in a lamp. Holding the tips of the plates, the tips are removed and the nails are given the correct shape with a file.
Liquid tips
These forms are also reusable, but unlike the upper forms, here you give the future nails an outline, a base layer. Then, after drying in a lamp, the liquid tip is removed and the nail is laid out in layers of gel, drying each layer.
Classic tips
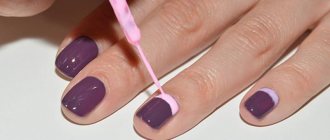
These are disposable products on which glue is applied. It is easiest to grow your nails with classic tips; this action does not require you to have any specific skills in nail design. You just need to select the tips of the correct shape, apply glue and firmly fix the shape on the nails. The excess length is cut off with a regular nail file. To apply the glue, use the brush that comes with the kit.
How to properly and quickly stick tips on your nails.
And so we will assume that we have chosen the tips for ourselves, now how to stick them on.
To do this, you will need glue for tips, you can use any, but I advise you not to use glue with a strong hold, it is more difficult to remove, but if, God forbid, you get caught on something, it will come off along with the nail, and this is already a disaster for anyone whatever you wish. By the way, personally, this is why I prefer nail extensions to gluing tips.
You will also need a standard manicure set, disinfectant liquid, an artificial nail file and a tip cutter. The varnish is at your discretion, if the tips with a pattern are a transparent fixative. The main thing is not to apply a thick layer of varnish on the tips, as you can easily damage them and the design on your nails.
We glue the tips onto the nails.
We do everything as usual step by step:
We adjust the tips to the nail, they should fit tightly and be as if one piece with your nail.
We prepare the nail as for a classic manicure, trim the cuticle, you can read about this here.
We process the nail with a file so that it becomes slightly rough and does not shine, and degrease it with a disinfectant solution.
We take the previously prepared tip and apply a thin layer of glue to its inner side; thin, thick glue will not stick.
If the glue says that it should be applied to the nail, then also apply the glue to the nail in a thin layer , and then carefully slide the tip onto the nail from the tip to the cuticle, the main thing is that there are no air bubbles left under the tip. When you reach the cuticle in this way, align it with it and press it firmly against the nail for a few seconds. The harder you press, the tighter it will hold - this is an unspoken rule.
You can apply thin glue to the joints of the nail with the tip, but this is not necessary; if you did everything correctly, you will automatically get a bead of glue together at the joint, which will then become invisible.
There is always a drying time on your glue, have patience and better increase it by 10 minutes - this is my advice to you from my own experience.
How long does it take to dry glued tips?
Next, you need to shorten the glued tips to the length you need. You only need to use tip cutters, they won’t split the tips and be sure to leave a couple of millimeters for filing your nails, however, if you have a lot of experience, you can do less, leave less, torment yourself and your nails less, it will be more reliable.
How to care for glued tips?
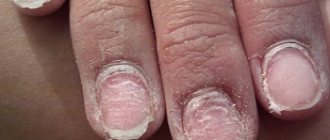
You can wear tips for a long time, but I advise no more than three weeks and do not go through correction. Why did I decide this - when you remove the tips, you will see for yourself that under the tips the nail loses its color, becomes dark, as if dead. After which the nails necessarily require restorative physiotherapy. After three weeks of wearing tips, a mandatory correction is necessary, and it is very easy to undermine the nail - you need it. Moreover, if you glued the tips yourself and didn’t spend any money, let’s better spare the nails.
While wearing tips, be sure to take care of the cuticle, moisturizing it with special oils.
How to remove tips from nails yourself.
If you have never seen tips removed in a salon, it is better not to do this yourself, as there is a high risk of tearing your nails.
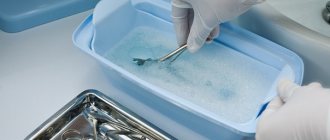
And yet I’ll try to tell you. The main thing is to know what base your glue was on - acrylic or helium, in order to choose the right liquid for dissolving the tips. Yes, girls, it’s dissolution; almost all liquids for removing tips contain acetone; it softens the tip and the glue underneath it almost completely and for a very long time.
It takes about forty minutes to complete one nail, so it is better to use an artificial nail remover like EzFlow Artificial Nail Remover.
This wash also contains caring components that somehow soften the effect of acetone on the skin and cuticle.
And this is the technology for removing tips.
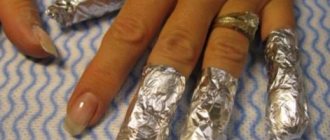
To speed up the process of removing the tip, lightly file its surface, then moisten a cotton pad with the remover and wrap it around your finger, and then around the cotton pad and nail with aluminum foil.
From time to time you will have to moisten the cotton pad with remover. are also sold in the form of a container with a sponge system called Artificial Nail Remover. According to the manufacturer, this liquid does not injure nails, although it is based on the same acetone.
To remove a tip with this liquid, just place your nail in the center of the sponge and roll your finger there until the tip dissolves.
My dear readers, now you know what tips are, how to stick them on your nails yourself, wear and care for them, and also how to remove them from your nails. And if you still don’t want to do this, go for it. For the rest, I recommend Japanese manicure; it best preserves and heals our nails, and looks great.
Required tools and materials
Of course, for nail extensions using tips, you will need the tips themselves that you choose.
You will also need:
- lamp for drying nails;
- glue for gluing tips;
- a manicure machine or several nail files with different abrasives;
- tip cutter, which removes the excess length of the tip;
- buff for filing artificial ends;
- pusher for moving away contact areas (cuticles and side ridges);
- brush for applying gel (acrylic, biogel, etc.);
- lint-free wipes that will not leave small lint on artificial plates;
- degreasing liquid;
- acidic or acid-free primer;
- base, to create durable nails;
- a topcoat used on artificial plates to give a shine or matte finish.
Before applying the top, you can use a colored gel coating, so that later you can proudly show off your perfect manicure, saying, “Wow, how good I am at doing my own nails!”
Tools for nail extension with tips
@kashlanskaya_nail
@nail.art.studio_kovrov
What is needed for nail extensions using tips?
When starting to do nail extensions, you need to prepare all the tools and materials that may be needed in the process of performing work aimed at modeling them.
List for regular, classic extensions:
- Tips.
- Special gel-based adhesive.
- Nail cut is a professional tool for cutting the length of tips.
- Brushes for working with gel or acrylic, depending on the material used for modeling.
- A set of abrasive files with varying degrees of hardness.
- Buff.
- Brush for sweeping away dust and sawdust.
- Primer.
- Gel or acrylic for extensions.
- UV or LED lamp.
- Liquid for removing the top layer of gel after baking.
It is also worth purchasing an antiseptic preparation for treating tools and hands, cuticle oil and nourishing cream. If the manicure doesn’t end with simple extensions, you should prepare materials for decorative design in advance, depending on personal preferences.
Preparation
Before you add nail extensions, you need to do a regular manicure. For this:
- Remove cuticles, remove pterygium, trim nails.
- Using a file with a fine abrasive or buff, remove the top shine of natural nails and remove dust from the nails.
- Coat your fingers with a degreaser.
- Apply primer to the plates and wait for it to dry in the open air. For gel and acrylic coatings, applying a primer is mandatory.
- Apply the base and then dry it in a lamp. Regardless of whether you are inclined towards gel or acrylic extensions, the sticky layer of the base does not need to be removed.
The next stage will be the actual nail extension using tips.
@yulianikolaychik9780
@nail.art.studio_kovrov
Building process
After waiting another 5 minutes after gluing until the nails are completely dry, we begin the extension procedure.
- Before you extend your nails with gel tips, you should select the desired length and trim the nail. There are special nail scissors for tips, which are called heliatin.
- We carefully file down the border between real and artificial nails.
- Carefully remove any remaining glue.
- We cut off the top layer of the tip so that its surface becomes rough (the gel will adhere better).
Please note that scissors are strictly contraindicated for tips. They should either be cut down or use a special tool called nail cut. With its help, the tips will be carefully cut and not damaged.
- Apply a layer of gel to the nail plate. The distance from the cuticle should be 1 mm.
- Place gel-coated nails under an ultraviolet lamp. Keep them there for exactly 3 minutes.
- Next we apply a layer of modeling gel and also let it dry.
- Shape your nails using a nail file.
- Finally, coat the nails with a gel finish.
The nail extension procedure first appeared in the 60s of the last century and over the past years has taken a strong position and unprecedented popularity among other types of manicure. Today, nail extensions take relatively little time and are accessible to everyone. It is a very easy process to apply nail extensions using tips. By following the instructions step by step, you can quickly get the hang of extensions and start learning and practicing more complex methods. And caring for such nails is very simple. You should not forget about the cuticles and treat them with oil, and also periodically coat them with colorless varnish to add freshness to the manicure.
Extension technology step by step
The presented instructions tell you how to do nail extensions using classic (disposable) tips:
- Select templates of the required size and, for convenience, lay them out in front of you in the order of gluing.
- Glue the tips onto your nails using special glue and pressing the shape firmly, holding it from above and below.
- Using a tip cutter, cut off the excess length of the nails and file down the free edges.
- Apply camouflage on top, model the natural tubercle and shape of the nails, dry them under the lamp. To apply gel (or acrylic), use a special brush.
- Remove the sticky layer from the gel.
- On false nails, the camouflage lays flat, but you still need to trim it, removing thickness and length if necessary.
- Apply topcoat and colored varnish with decor as you wish.
Your manicure on tips is ready!
@seeyour.nails
What are tips
Tips are a synthetic material shaped like a nail. It is elastic, wears for a long time, lengthens the nail plate. The shape and length are selected individually.
The procedure for gluing tips takes much less time than nail extensions and costs much less. Therefore, many women prefer this procedure, which can still be performed independently at home.
This process also has a number of advantages:
- The nail does not become heavier.
- With a short length of natural coating, you can achieve the desired result.
- When used correctly, it does not harm its own coatings.
- Hides imperfections of the nail surfaces.
- No special work skills required.
- Long-lasting wear that does not require special care.
- The varnish base applies easily.
- Can be removed at home.
There are also negative aspects of this procedure that need to be studied before gluing false nails:
- The material is not breathable, so long wearing is not allowed. It is recommended to rest your fingers to avoid thinning, brittleness and yellowing of your nails.
- If you choose bad glue, the pad can come off at any time, which will not be very pleasant in the midst of a party.
- Also, many people do not like the material because of the thickened end.
- If the shape does not fit, the fitting process will take some time.
Care Tips
To ensure that your manicure pleases you and those around you for as long as possible, follow these tips:
- Regularly apply cream to the skin of your hands, thoroughly rubbing it into the cuticle area.
- Always use gloves when handling household chemicals.
- Avoid steaming your palms too often.
- During the cold season, do not go outside without gloves.
- Do not hit your nails on hard surfaces or try to pick anything out with them.
These are the basic tips for caring for extended manicure, which every self-respecting girl should adhere to.
@seeyour.nails
@nails_sanam
@nails_rokcsi
Basic subtleties of working with tips
In order for nail modeling to take place at the highest level, you should pay attention to the following features of working with the substrate:
- The structure of each tip consists of three parts: the free edge, the contact zone and the fixation line.
- The numbering of the substrates from 1 to 10 determines the size of the product, where 1 is the widest and 10 is the narrowest width. This characteristic is indicated on the tip of the tip, which is sawed off during modeling.
- Before you start fixing the tips, you should trim the free edge of the natural nail as much as possible.
- The tip should not be located on the nail plate for more than 2/3 of its area.
- For convenience in working with tips, it is recommended that you select the size of the substrate for each nail individually and lay them out in the appropriate order in front of you.
- When fixing, you should carefully apply glue to the contact area of the tip and press it to the nail for adhesion for 15-20 seconds.
- Modeling the shape and length of the tip is carried out only after it is securely glued to the nail plate.
Properly selected artificial plates fit perfectly on the nails, and with professional extensions, it is impossible to distinguish between natural nails.
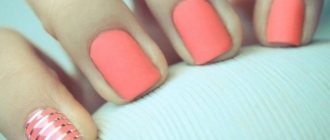
Photo ideas
Manicure with tips is a very reasonable choice for girls who value their time. This design turns out no less beautiful than extensions using forms, and much less time is spent on its creation.
Below you will find the best photo ideas for manicures made using tips, as well as beautiful photo examples of manicures using ready-made tips.
@nails_rokcsi
@nails_rokcsi
@anastasia_bekhter
@chuunaills
@anushv_nails
@nailstudio_laranovsk
@ideas_____manicure