02/04/2016 / Manicure and pedicure
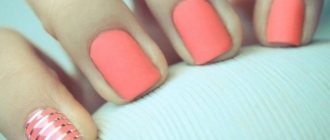
Nail design is performed using various techniques, of which there are many now. Back in the 30s, lunar manicure was invented, which is now at the peak of popularity. Christian Dior introduced this type of manicure at his fashion show. Performing this nail design at home is not difficult if you have some tools for a French manicure.
1934 is the year the Revlon brand of water-insoluble varnish was founded. At that time, women did not apply varnish to the entire surface of the nail, as this was considered bad manners; as a result of this coloring of nails, moon and French types of manicure appeared.
Lunar manicure is also called “anti-French”, “reverse French”. These names come from the coloring technology: in the classic French version, the free tip of the nail is painted, and in the lunar version it is lunula, from which the name of this design comes. Lunula is a section of the nail at the base, shaped like a month or moon.
This technique can be performed using various materials: ordinary varnish, paint, gel polish. The unpainted area of the nail can be decorated in a contrasting color or a color that supports the overall style, and the lunula itself can also be of any shade. The choice of colors depends on the imagination of the master and is based on the compatibility of tones.
Performing a moon manicure with gel polish (shellac)
Performing a manicure using the “reverse French” technique with gel polish involves the use of a certain list of tools:
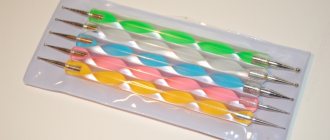
· base and top coating; · UV lamp for drying nails; · two gel polishes of different colors; · orange wood manicure sticks; Remover – liquid for removing the sticky layer from the nail plate; · stencils of round or semicircular shape; · beveled gel brush; · file for nail modeling; · degreaser (can be replaced with remover).
Step-by-step instructions for moon manicure with shellac
First, give your nails the desired shape using a nail file and remove the cuticle. If necessary, the cuticle is removed with special means, such as gel or professional scissors. Remover removes the oily layer from the nail. After this step, you can no longer touch your nails, as you can disrupt the further adhesion of the gel polish to the surface of the nail plate. Irregularities in the nail are polished with a buff.
Applying base coat
Once your nails are prepared, you can proceed directly to application. First, apply a thin base coat. It is a thick transparent nail polish. It dries in the same way as gel polish in a UV lamp exactly as long as it should according to the instructions. For example, the company CND, which produces gel polishes and manicure bases, recommends drying its base for 30 seconds. It is most convenient to use Shellac when painting, since careful preparation of the nail is not required before application, which significantly saves time.
First stage
After drying the base, apply a thin layer of the main color, which will be the color of the lunula, to the entire nail plate and dry. To obtain a more saturated and dense shade, the gel is applied again.
Second phase
You need to wait until the gel has completely dried, after which you can attach the stencil. This is done at the bottom of the nail cuticle.
Third stage
Then the free edge of the nail plate is covered with the desired shade. If the lunula turns out darker than the main color, then this situation is corrected with an angled brush dipped in remover. Color gel usually takes longer to dry than base. Drying takes 1-1.5 minutes. If the master has sufficient experience, then it will not be difficult for him to draw the lunula “by hand”.
Fourth stage
When all layers of gel have dried, you can safely remove the stencil. Next, the resulting result is secured with a top coat, which adds shine and durability to the manicure. It dries as quickly as the base, about 30-40 seconds.
If the design requires it, then before applying the top coat, the nail can be decorated with rhinestones, stickers, painting, stamping and other decorative elements.
Stencils for moon manicure
How to make a moon manicure with gel polish if you can’t apply clear and even lines? Very simple, using special stencils. Stickers for applying lunar manicure can be round, acute-angled or almond-shaped. Stencils are sold in sets of 10, 20 or 100 pcs. Each stencil can be used once.
The application method is as follows: glue the stencil onto the dry surface of the nail so that it fits tightly to the nail. Pay attention to the edges of the nail - if you glue the stencil poorly, smudges will form when applying gel polish.
After placing the stencil correctly, cover the free edge of the nail with gel polish of the desired color. Remove the stencil and dry the layer under a UV lamp. If necessary, repeat the procedure if you think the color is not saturated enough.
If you don’t have the opportunity to buy stencils for moon manicure, you can make them yourself. Take regular masking tape and fold it in several layers. Then, using sharp scissors, carefully cut out the required arc. The bend can be deep, asymmetrical, angular, etc. For each manicure, you can create new anti-french templates yourself.
Moon manicure step by step with photos (other options)
Do-it-yourself lunar manicure can be easily done at home; just become familiar with the technique.
Moon manicure correction
If the hole was made using beige or transparent gel polish, then the overgrown nail will not be very visible. You can wear this manicure for 2-3 weeks. At the same time, the nails will look neat, and no one will notice that the manicure has not been updated for a long time.
There is another interesting correction option. The regrown part of the nail is an arch at the base. To hide it, simply apply a different color of gel polish to the area. Keep in mind that the color should be combined with other shades.
In the case when the hole is painted in any other shade, the regrown part of the nail will become noticeable quite quickly; correction will have to be carried out within one week after coating. You can use the previously described method. If you want to change the design completely, then you will have to remove all the gel polish. To do this, dissolve the layer using a special liquid, then the material can be easily removed with a sponge.
Advantages of gel polish over regular coating
Gel polish has a great many advantages, which is why most girls love it. The first thing worth noting is its durability, which allows you to forget about refreshing your manicure for two weeks. The second is strength, which prevents the coating from cracking or chipping due to mechanical damage. Third, it is absolutely harmless; shellac compacts and strengthens the nail plate.
It is thanks to these qualities that many masters use gel polish when performing lunar manicures. However, it is not suitable for every nail painting technique. At home, it’s still easier to use regular varnish, and there’s no need to buy a UV lamp separately.
Moon manicure on short nails
Currently, the trend of spreading natural beauty is developing. “Pumped up” lips, bright makeup, false eyelashes and, at the same time, false nails are slowly becoming a thing of the past. Hollywood stars are increasingly appearing on carpets and in everyday life with neat manicures on short nails. This is not only practical, but also natural and harmonious.
Moon manicure on short nails should be used with caution. Choose a design that will not visually shorten your nails further. The ideal option would be an acute-angled hole. You don't have to do it on every nail. Focus on a few.
Use flesh tones. They will suit any outfit and style of your clothing. Avoid highlighting short nails with bright colors. If your nail plates are too short, then it is better to extend them. It is not necessary to greatly increase the length, just make an oval shape and a small hole, then the manicure will look much prettier.
Moon manicure using foil
Manicure using foil appeared relatively recently, but has already become popular. This type is characterized by average complexity of execution if all the necessary tools are available:
· base coat; · cotton buds; · foil for nail art (can be replaced with thin food grade); · varnish of the desired color; · fixative; · wooden sticks for manicure.
How to do a moon manicure with foil
Step 1
First you need to treat the cuticle - remove it or simply move it aside. For better adhesion to the material, the oily shine is removed from the nails, but this step is not considered mandatory. The foil is cut to the size of the lunula or divided into small rectangular strips.
Step 2
A thin layer of base is applied to the nail plate and dried, but not completely. The foil is pressed to the base of the nail and leveled so that it lies in an even layer. When the foil sticks to the base, the excess parts are cut off. The foil is positioned so that cracks and bumps do not form, otherwise the result will be far from the desired one.
Step 3
The surface of the nail not occupied by foil is painted over with varnish; you can also touch the foil, but be sure to leave a clear joint line. The quality of the material for such a manicure is very important, because if it is at its best, then problems, as a rule, do not arise. The applied layer of varnish is dried and a fixative is applied. You can admire the resulting beauty for 3-4 days.
Original ideas for lunar manicure
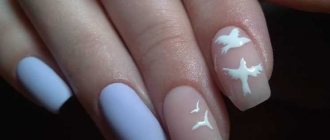
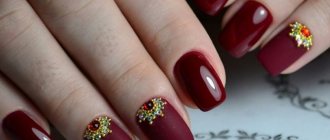
You can highlight the hole not only with the help of a different color of gel polish. The photo shows a moon manicure with gel polish, which was made using small broths and rhinestones. To highlight and create a bright accent in the manicure look, glue several rhinestones along the edge of the hole. This manicure will look bright and elegant.
A lunar manicure will become original if you highlight the hole with glitter or broth. Anti-French made using rubbing looks very unusual. This powder, when rubbed into the nail, forms a smooth, mirror-like surface. Shades can be different: gold, silver, mirror of various colors.
It is not necessary to do a moon manicure on all nails. One or two nails on each hand can be decorated using drawings or acrylic stucco. The main thing is to maintain color harmony. Drawings, decorations and relief shapes should be combined with the base coat of gel polish on the remaining nails and the color of the holes.
A rounded hole can be complemented by a second layer that will go a little higher; you can make it with matte varnish or highlight it with rhinestones. The additional frame does not have to be round; it can be made in the form of an arrowhead or a fancy wriggling snake. Such additions look original and funny.
Moon manicure design options and ideas
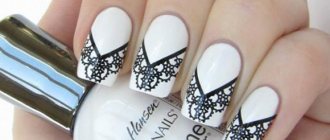
An unvarnished lunula looks advantageous in combination with a bright nail surface. This painting is carried out in only three stages: preparation, application of a transparent base and a color base. The stencil must be attached directly to the base; the lunula is not covered with color. The free end of the nail is highlighted with an accent color.
Moon manicure with a transparent hole
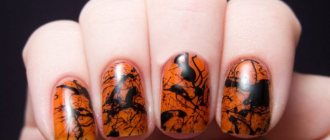
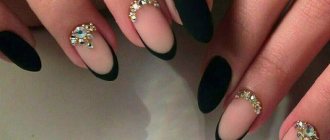
A manicure done at home according to all the rules looks no worse than a salon one. To perform a lunar manicure with foil, you need to acquire special foil in advance, since food foil will not look good with all types of varnish. It is also worth choosing a color scheme for your manicure in advance; gold or silver foil with black, dark red or purple varnish is at the peak of popularity now.
Fashionable moon manicure
The lunula can be bent in both directions and both options will be correct. To get the desired result in the salon, you should explain to the specialist what should be the result.
Reverse moon manicure
In addition, you can make the lunula not round, but triangular or straight, and you can also draw it with a brush; such options will make the moon manicure beautiful and unusual.
Beautiful moon manicure
Reverse French manicure is popular among celebrities, which is why it is called Hollywood French all over the world. Only the Russians gave it the name lunar manicure. A subtype of this manicure is the image of several crescents on the nails. They are located at the base of the nail, at the tip and in the middle. The technology is the same as for classic anti-french, except that the stencils are glued not in one, but in several places.
Moon manicure with stripes
Decorate already decorated nails with a lunar manicure with various designs on the nails, rhinestones, stickers, and decorative elements. Moon manicure on short nails looks just as elegant as on long nails.
Moon manicure with a pattern
Moon manicure with rhinestones
What is a moon manicure?
The name “lunar manicure” comes from part of the nail plate - the lunula. It is this that stands out with a shade of a different color, different from the background coating.
Moon manicure with gel polish is a nail design that is very popular not only among young people. Many women prefer anti-french to the usual classic jacket, because it looks unusual and original.
This type of manicure first appeared in the 30s of the 20th century, and it was called reverse French. It was customary not to paint the base of the nail, the lunula, with varnish. It stood out against the background of the main color of the varnish. This manicure was forgotten and not used for several decades, until Dita Von Teese showed general interest in it in 2009. Lunar manicure has reappeared in its new guise on the catwalks of world-famous fashion houses.
The nail hole is usually covered with a lighter shade of gel polish. With a blue base you can use a light blue shade, with red - beige, with black - white. Color combinations can be the most unexpected. It all depends on the image and your imagination. When choosing a color scheme, rely on the time of year, your style, the color of your skin, eyes or hair.
Lunar manicure can be complemented by design: sparkles, patterns, sequins, rhinestones and modeling. What exactly to choose depends on the purpose of the manicure. A wedding option should be elegant, a casual one should be comfortable and classic.
How to do a moon manicure: stages
Before you start doing a manicure, you need to get your hands and nails in order. Make a special bath with the addition of sea salt and aromatic oils, and carry out the procedure for cleaning your nails.
Depending on your personal preference, push back or remove your cuticles. Of course, it is better to cut it off or remove it, lubricating it with a special softening agent. Indeed, in this technique, special attention is paid to the cuticle; before you apply varnish or shellac, it should look flawless.
After completing the first stage, thoroughly degrease each nail to avoid the appearance of bubbles and unevenness. To do this, you can use alcohol or nail polish remover.
Cover the nail plate with a base coat to protect the nail from the harmful effects of polish and extend the durability of the manicure. When it is completely dry, you can begin applying the decorative coating. If this is your first time doing a lunar manicure, step-by-step instructions will be very helpful.
How to do a moon manicure: stages
The first and easiest way to draw a lunar manicure is using special self-adhesive stencils. Just don’t confuse moon stencils with French manicure stickers! They are radically different in shape. Stencils for moon manicure are round and allow you to draw a perfect rounded “smile” at the base of the nail.
For beginners, it is better to use stencils to create a lunar manicure.
There are two types of lunar manicure - classic and the so-called lunar eclipse (or reverse lunar manicure). To create a lunar covering you will need:
- Orange wood sticks;
- Nailfile;
- Nail polish remover;
- Base coat;
- Self-adhesive stencils;
- Two multi-colored varnishes;
- Top coating;
- Moisturizing oil.
- Step one. It is necessary to carefully prepare the nail plate. To do this, use nail polish remover to wipe off the old coating. Please note: the liquid should not contain oil, otherwise your new manicure will not last long, since oil prevents the polish from adhering to the nails properly. Using a slightly sharpened orange stick, push back the cuticles, thereby lengthening the nail bed. Using a file, give your nails the desired shape. Then apply a base coat to your nails and wait until it dries completely.
- Step two. Cover all nails evenly with the varnish that you chose to draw the hole (base of the nail). Dry the varnish completely so that it does not become deformed during the process of drawing the “smile”.
- Step three. The most important step. Place the stencils on your nails so that they cover approximately 3mm of the nail at the base. If you wish, you can stick the stencils on the convex or concave side, doing a regular or reverse moon manicure. Press the stencils firmly so that the varnish does not flow under them.
- Step four. Apply the second selected polish to your nails, partially covering the stencils and achieving a perfectly even coating. Don't forget to paint the tips of your nails thoroughly so that the polish stays on your nails longer and doesn't chip. Also pay special attention to the side parts of the nails - they should be covered with varnish up to the side ridges of the skin, since only in this case the “smile” line at the base of the nail will look complete and harmonious.
- Step five. Without waiting for the polish to dry completely, pick up the edge of the stencil and slowly remove it from the nail. If you overdry the varnish, the “smile” line will become too convex and may crack, and if you do not dry it enough, the varnish may spread. You should have a perfect transition between the varnishes.
- Step six. The final stage of creating a lunar manicure. After all layers have completely dried, apply topcoat on top. You can also experiment with the top by choosing a top coat with sparkles, glitter or mica. After the top has completely dried, rub moisturizing oil into the cuticle for a more well-groomed appearance.
Step-by-step instructions for creating a moon manicure with stencil stickers
A woman, like her hands, must always be flawless and beautiful. Well-groomed and beautiful nails are one of the important points in self-care. To do this, we go to numerous salons, select and decorate nails to suit our mood, holiday, season and evening outfit. We come up with and try something new.
- Choosing colors for lunar manicure. For a beautiful lunar manicure, you will definitely need two varnishes of different colors, which should be combined with each other. One of the colors of the lunar manicure should be bright; gold and silver of a wide variety of materials are especially popular: from ordinary varnishes to gels, shellacs and even foil for manicure. The second color should shade and combine with the first - be more muted and preferably matte.
- Nuances of hygienic manicure. Before you start designing your nail plates, it is important to pay special attention to the manicure and cuticles. Since the lunar cavity is actively played out in the design of lunar nail manicure, work with the cuticle must be carried out flawlessly. No burrs, uneven or torn edges, cuts, etc. - everything must be carefully processed before you start doing a moon manicure at home.
- Step-by-step application of varnishes: moon manicure.
- The base is a bright varnish we have previously selected. We apply it to the nail plate first, preferably in two layers, and dry it thoroughly;
- the easiest way to do a lunar nail manicure at home is to use special stencils, which you can first buy in a store or make yourself in the desired shape;
- We glue the prepared strips onto each nail in such a way as to outline the lunar cavity, the so-called quarter of the moon;
- Apply a second polish to the remaining part of the nail, so that if possible it does not overlap the pasted stencil. Dry it thoroughly and fix it - the lunar manicure of nails with varnish is ready.
We invite you to familiarize yourself with: Hand and nail care: useful masks, baths, hand cream
Several methods are used to create:
- Drawing with a brush;
- Using foil;
- Stencils;
- Layout with rhinestones.
In any case, with such a manicure, the hands of its owner look very neat and can be combined with different styles of clothing, and will also suit any event.
Speaking directly about what this design is, it looks like a clearly drawn line, reminiscent of a half moon in shape. It is most often located at the bottom of the nail and is done in a contrasting color. Some masters simply make a division in the form of an arc between the free edge of the nail and the area near the cuticle.
The first stage of work is, of course, preparatory. While there, you should thoroughly wash your hands, perhaps even take a bath with sea salt. After which the skin of your hands will become soft and you will reduce the likelihood of injury to your hands when trimming your manicure.
If you have a special device, then you can easily process not only the nail plate, but also the cuticle, which will visually lengthen the nail.
After preparation, let's move on to step-by-step actions that will help make your hands perfect:
- Give the nail the desired shape;
- We wipe the nail with a primer so that the gel lays down well and is evenly attached to the nail;
- Apply base coat;
- Now you need to dry it in an ultraviolet lamp for at least one minute;
- Now we cover the nail with colored gel, which will be our base, and dry it in a lamp for 2 minutes;
- Then apply one or two more layers on top. The fact is that the color does not always apply evenly the first time, so do this several times to even it out. We also dry each layer for a couple of minutes;
- Next, using a stencil or using gentle movements, draw a hole at the base of the nail using a contrasting color gel. If you use adhesive material for drawing, carefully remove it before putting your nails into the lamp;
- We finish by applying a top coat (sometimes called a finish), which we dry in the same way in a lamp;
- Now remove the sticky layer using a cotton pad and nail polish remover.
IMPORTANT! Professionals have a little trick, namely using a buff to erase the glossy surface from the nail and even out its structure. This is done before applying the primer.
This option looks very democratic and simple in its implementation. It also makes your nail visually longer. Therefore, this version of the moon manicure looks very beautiful on short nails. It is performed similarly to a classic moon manicure with two contrasting colors, but here your hole should remain colorless.
- The entire nail is covered with colored gel polish, and the shape of the hole should remain transparent.
- In order to do it as correctly as possible, cover your nail with two layers of a colorless base coat, which dry for a few minutes each;
- Carefully cover the hole shape with stencils;
- We proceed to applying colored gel polish; before putting it in the lamp, remove the stencil;
- Apply another layer and dry;
- Finally, cover the entire manicure with a top coat and dry it in a lamp for a couple of minutes.
To avoid mistakes and bleeding, work on each nail in turn. If you notice slight unevenness when removing the stencil, use a thin brush and use it to even out the shape of the hole.
All of the above techniques can be done with gel polish, shellac and regular nail polish.
With some experience, a lunar manicure is not difficult to perform, and the easiest way to do it is using a special stencil - similar to the one used for a French manicure. Such ready-made stencils - nail stickers - are sold in many cosmetic stores, but if you have difficulty finding them, you can use ordinary construction tape, which is used to cover doors and windows during repairs. This tape is easy to stick, but also easy to remove from the surface, unlike regular adhesive tape.
So, we will need a base for the varnish, the actual varnish of the color you like and a fixer, as well as the above-mentioned stencils or tape. For convenience, instructions for performing a lunar manicure are presented step by step.
It is quite clear that our nails should look well-groomed and beautiful, regardless of whether they are painted or not. Therefore, the first and most important step is to clean them and give them a hygienic manicure. Take a bath with sea salt, carefully push back the cuticles, give your nails the desired shape by filing them oval or square. It is also worth polishing the nail plate itself so that the polish lays evenly and smoothly.
It is better to first wipe the nail with nail polish remover to completely degrease the nail plate, then the base will lie more tightly. As a base for the polish, you can use a nail strengthener, a clear polish, or a beige or pinkish shade. The main condition is that it dry completely. There is no need to rush, it is better to wait for the base coat to dry completely.
We suggest you read: How to reduce wrinkles on the forehead at home
Lunar manicure at home: tips
If you are firmly confident in your abilities and creative abilities, then you can try to create one of the moon manicure options yourself.
For work you will need the following materials:
- Stencils.
- Tassels.
- Base coat.
- Finish coating.
- Contrasting color varnishes.
Process description:
- First, make a steaming bath for your hands and give your nails an oval shape, leaving the optimal length.
- Then, using nail polish remover without acetone, degrease each nail.
- Apply base coat.
- Once the base is completely dry, apply the color you chose for the hole and wait until it dries completely.
- Cover the hole with a stencil and paint the remaining part with a contrasting tone.
- When the last layer of varnish has dried, the sticker can be removed and the nails can be covered with a layer of topcoat.
If you really want to do such a manicure right now, but there are no stencils in sight, then you can try to do without them. True, this requires very great care, since the slightest mistake will have to completely redo the entire nail. Choose the thinnest brush for such work and remember that without patience and extreme care it is impossible to perform a lunar manicure.
- A very important point in the design of lunar nail manicure is the color scheme. Carefully choose the color palette and texture of varnishes.
- When you do a lunar manicure at home, take note of a little trick: after covering your smile with varnish, do not wait for it to dry. On the contrary, immediately remove your smile. Drying evenly, the varnish can come off in a large piece and catch part of the base - this will, without a doubt, ruin the moon manicure.
- If you decide to add decorative elements in the form of rhinestones to your lunar nail manicure, apply them exclusively along the color combination line, do not use this technique in the center of the nail plate. The central elements in a lunar manicure can be stickers designed for this purpose. But in any case, do not combine these two decors in one nail plate design - everything should be in moderation.
- Be sure to fix your lunar manicure with an additional strengthening layer, especially if the base you choose is not matte. This way, you will avoid unnecessary scratches and keep your moon manicure fresh longer.