The article answers possible questions from those who are removing extended nails at home for the first time. Before you start removing gel or acrylic nails, you should find out what and how to do, evaluate the result, and analyze the pros and cons of existing methods.
IMPORTANT: Manicurists recommend removing artificial nails two to three weeks after extensions to avoid disrupting the natural process of nail growth.
Removing extended nails does not require special knowledge, skills, tools, or materials. The process is quite simple and does not require the participation of a specialist.
IMPORTANT : Before you start removing artificially extended nails, remember what material the master used. The removal methods for gel and acrylic are different!
Nail Remover Tools
To remove gel nails, you need the following tools:
• nail clippers or crankcase; • a rough nail file (abrasiveness (grit) - 80/80, 80/100) or a manicure cutter.
To remove acrylic mass from the nail plate you will need:
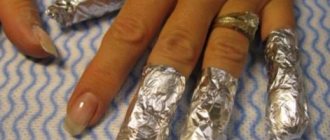
• manicure nail clippers or cutters; • acrylic remover or any acetone-based product (acetone); • cotton sponges; • aluminum foil, cut into squares 8x8 cm. Number of squares - 10 pcs; • pusher, orange stick or flosser.
Removing acrylic nails: reviews
As most girls admit, most often the same mistake is made - when the native nail grows, it seems that the acrylic one is very easy to remove: just pick it up and that’s it. It's an illusion! Acrylic is very tightly adhered to your original nail, and there is no other way to remove it except by dissolving it. Therefore, under no circumstances try to rip off the material, as you will tear out a piece of your nail. Acrylic can only be removed using the above method or in a salon.
What do girls say who have already tried removing their nails on their own using acetone? Reviews indicate that the procedure is simple. Most girls managed to get rid of acrylic at home the first time, without damaging their own nails.
How to remove gel nails yourself? Removal instructions
IMPORTANT : Gel overlays do not soften under the influence of solvents! They need to be cut down. It may take 5-10 minutes to treat one nail plate.
1. To reduce the area of cutting, nails must be shortened with nail clippers or a nail clipper. This must be done very carefully so that the gel does not crack or injure the natural nail plate.
IMPORTANT : When shortening artificial nails, be extremely careful. When removed, the free edges of artificial nails can shoot off, injuring the eyes. To protect yourself, place your hands in a clear plastic bag or use safety glasses.
If the gel layer is thick enough, first cut it down to the desired thickness as shown in the diagram.
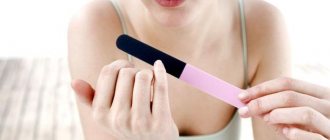
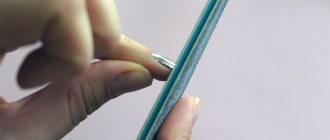
2. Using a coarse file with large grain or a manicure router, file off the gel material from the nail.
IMPORTANT: To remove the gel, glass files, a metal tool with a notch, European stone, or a buff are not used.
IMPORTANT: When cutting, a lot of dust is generated. It is worth taking care to protect the respiratory tract.
Rules for filing the gel coating (for filing): • start with your left hand (for right-handers); • hold the nail file between your middle and thumb; • pressure on the file is applied with the index finger; • protect your fingers in contact with the file with adhesive tape. Fingers will not slip and get injured; • the finger from which the gel is cut off is held or fixed; • From time to time, the removal of the gel must be controlled so as not to damage the natural nail plate.
IMPORTANT: A 0.5 mm thick layer of gel should remain on the original nail plate.
3. After removing the nails, polish the nail plate with a buff or polishing file. Before starting sanding, it is recommended to apply olive oil to the nail.
IMPORTANT: While polishing the nail, move the tool in one direction so that the nail does not heat up.
4. At the end of the procedure, it is recommended to cover the nails with strengthening varnish.
How to remove a biogel manicure?
To get rid of such manicure, a special liquid is used to dissolve the biogel. The extended tip is cut off with scissors or removed using nippers, and then the removal procedure is carried out similarly to the removal of acrylic nails.
If you need to remove extended nails, you can order this procedure at the Manicurof salon. Highly qualified masters will do everything carefully and quickly so as not to damage your nail plate. To make an appointment with a specialist or clarify the cost of services, you need to call us at the phone number indicated on the website.
How to remove acrylic nails without consequences? Removal instructions
Method I: Using nail remover or acetone-based product.
1. Remove the free edge of the base with nail clippers or a carpenter.
2. When adding extensions, acrylic overlays are coated with a special compound that needs to be cut off, otherwise it will prevent the base material from softening during the removal process.
3. Apply a sponge soaked in acrylic remover or acetone-based nail polish remover to each nail. The sponge can be cut to the size of your nail.
IMPORTANT: Before treating the nail with liquid, it is recommended to lubricate the cuticle with Vaseline.
4. Secure the sponges to the nail plates by tightly wrapping them with foil. This prevents the liquid from evaporating and retains the heat necessary for the chemical reaction to begin.
5. Remove the foil with sponges after 30-40 minutes. If the acrylic continues to hold, repeat the procedure (10 min.)
6. Remove any remaining coating using a pusher or an orange stick.
7. Polish your nails with a polishing file or buff. Apply healing varnish.
Method II. Sawing off the acrylic layer.
The process is identical to removing gel nails.
Method III. Using dental floss.
1. Using a pusher or wooden stick, lift the entire lower edge of the acrylic plate (from the cuticle).
2. Place dental floss under the bottom edge of the nail.
3. Slowly and carefully advance the thread while slightly lifting the acrylic plate.
4. After removing the artificial coating, the natural nail plates are polished.
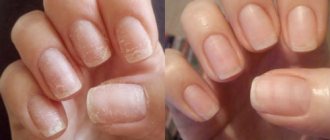
IMPORTANT: Regardless of the method of removing artificial nails, the natural nail plate requires close attention and care during the recovery period.
Something about removing nail extensions
Since we are talking about removing artificial nails, we will try to clearly define the timing when it is best to do this, because some girls like artificial nails so much that they wore them and would wear them forever. But any dense layer on the nail plate does not allow it to breathe normally and impedes the access of light. All this leads to a deterioration in the condition of your nails.
Since acrylic is considered the densest, it is recommended to wear this manicure for no more than three weeks. During this time, your nails will not suffer so much from lack of air and their protective forces will not be weakened, which will allow your own nail plates to quickly recover after removing the artificial manicure.
Gel extension material is more porous and elastic, so it does not hinder the access of fresh air to your nail plates as much and therefore does not have such a negative effect on them. Gel manicure extensions can be worn a little longer than acrylic ones. Usually, in 4-5 weeks your nails will not have time to become thinner and weaker from lack of air.
As for biogel, it is very similar to gel, but due to its natural base it is more gentle on your nails. It is precisely because of its natural origin that biogel is used to strengthen one’s own nail plates. This manicure can be worn longer than regular gel.
But no matter what material for extended nails is used in your manicure, the question arises of how to remove extended nails. It is much better and safer to carry out this procedure in a salon. The master will carefully remove the extended nails, trying to protect your own nail plates from damage as much as possible. In addition, the salon can perform a set of procedures to restore your own nails.
Cuticle oil: effect on nails
In the process of removing artificial coating, in addition to the native nail, the cuticle also suffers. The skin around the nail plate dries out and cracks.
Cuticle oil is a nourishing agent that • moisturizes, • saturates with vitamins, • prevents peeling of the skin around the nail, • activates the growth of the nail plate, • improves blood circulation.
Cuticle oil is used every evening until the nails are completely restored. The product is rubbed into each nail in turn. Remains on hands until completely absorbed. The nail restoration process takes several weeks.
You can make your own cuticle oil. The basis of any product for caring for the nail plate and surrounding skin is essential oils. To eliminate thinning and splitting of the nail plate, bergamot, patchouli, and ylang-ylang are used. General strengthening of nails will be ensured by the use of lemon, eucalyptus, chamomile, lavender, rosemary, thyme, and tea tree. An alternative to essential oils can be 5-6 drops of lemon juice.
Use essential oils in combination (2-3 types). This will speed up the recovery process.
Add a few drops of your favorite essential oils to vegetable oil (olive, hemp). The required amount of vegetable oil is 25-30 ml. Vegetable oils can be mixed, for example 15 ml of grape seed oil and 10 ml of jojoba.
It is advisable to add 1 capsule of vitamin E to the oil mixture.
Acrylic removers
How to remove eyelash extensions at home
Acrylic is a long-lasting, durable polymer compound that is applied to the nail plate. The material is obtained from powder (polymer powder) and liquid (liquid monomer). Acrylic nail liquid is called liquid. When interacting with the powder, the liquid begins to activate the polymerization of the powder, and the resulting mixture hardens.
Before removing acrylic nails, you should stock up on a special product - a remover. Liquid for acrylic nails has a composition that contains acetone, vitamins, oils, antifungal elements, etc. The product softens and dissolves the polymer material, as a result, the acrylic coating is easily removed. Among the effective liquids are:
- SEVERINA X-Stronge (price – from 60 rubles per 100 ml);
- Jina (from 100 rubles for 60 ml);
- Domix Green Professional Tip Remover (300 rubles for 200 ml);
- Planet nails (330 rubles for 200 ml);
- TNL Professional (300 rubles for 500 ml), etc.
Domix Green Professional Tip Remover
Products can be purchased in stores specializing in professional cosmetics, and can also be ordered online.
Additional Information. Dissolve and remove the coating using ordinary nail polish remover, which is based on acetone. But the method is harmful to the nail plates. After the experiment, the plates lose their elasticity and whitish spots appear on them.
Removing nails: tips and reviews
Ekaterina, 25 years old, Rostov-on-Don
A friend uses foil with already fixed sponge squares to remove the acrylic coating. Very comfortably.
Anna, 30 years old, Moscow
At the dacha I had to remove the gel myself. The process is quite labor-intensive. Requires attention, strength, patience. But everything went well! If you can’t get to the master, you can work hard.
Anastasia, 22 years old, Pavlovsky Posad
I removed acrylic nails using an acetone bath (on the advice of a friend). Horror! The pungent smell of acetone and dry hand skin.
The next experiment was with sponges and foil. Simple and accessible. The main thing is not to forget to cut off the top coating from the acrylic.
The layers came off quickly, the nails practically did not need restoration.
An interesting method with dental floss - you have to try it!
Let's start the procedure
So, how to remove acrylic nails at home? First, use pliers to cut off the overgrown piece of acrylic nail. Remember that this material is very hard and elastic. If you don't act carefully, you can end up with a piece of acrylic in your eyes. Do not rush, or better yet, wear clear glasses. The next part of the procedure is filing off the finish, that is, the top shiny coating on the nail. The master places this layer to fix the acrylic, and until it is removed, you will not dissolve the acrylic with anything. Slowly file off the finish from each nail; without this layer, the nail will look rough.
Once the finish is filed off, you can begin removing the nails. If you have a special solvent, then you simply wash off the acrylic from your nails. You'll have to tinker with acetone, and here's how to proceed:
- Wet the cut sponges generously with acetone.
- Apply the sponge to your nail and immediately wrap it with foil - without this trick, the acetone will evaporate very quickly.
- Leave your nails under acetone for 30 minutes. During this time, the acrylic will soften and turn into a jelly-like substance.
- Open each nail one by one and quickly, using a sharp nail file, pick up the softened acrylic, it will come off easily and quickly.
- If pieces of acrylic remain, wipe the nail with acetone and then sand it.
- Wash your hands and lubricate well with nourishing and moisturizing cream. This is a very important stage of the procedure. The salon technicians spend at least 10-15 minutes on it. There is no need to tell how acetone has a harmful effect on the structure of the nail, and therefore, after exposure to this aggressive substance, you need to not only polish your nails, but also lubricate them with cream or special oil. That's it, nails are off! You can get a new manicure or give your nails a rest.
How to remove extended nails at home?
Removal of extended nails is usually recommended to be done in a salon. The method of removing the result is more aggressive than the extension itself, since the risk of accidental damage to the nail bed is much higher.
If you remove gel nails yourself, pay attention to the features of their fixation. Since extensions can be performed on forms or tips, the method of removing them also varies.
As a standard, there are two methods for removing extended nails:
- Hardware. The technology involves the use of a special manicure apparatus with rapidly rotating cutters, with which the master quickly cuts down the dense artificial coating. The device is shaped like a regular pen, so it is convenient to use. Due to the large amount of nail dust, a compact vacuum cleaner must be placed under the work area to instantly suck it up. It is not recommended to use the technique at home, since removing extended nails yourself, especially with a non-working hand, will be problematic, which increases the risk of damage to the upper stratum corneum.
- Chemical. The technique involves the use of a special liquid – remover, which is applied to a cotton pad and fixed as a compress on the fingertips. However, a file is first used to remove the gloss from the surface so that the solution penetrates deeper. Most often, this method is used at home because it is safer and there is no risk of accidental damage to the nails.
Removal of extended nails in a salon is most often carried out using a machine, since it takes much less time and there is no need to spend money on purchasing a remover.
If you want to remove the previous decorative coating yourself, it is better to use the second option. Thus, the risk of mechanical damage to the nail bed is minimal. But keep in mind that this method also has its own subtleties, since you don’t need to leave the compress on your nails for long, otherwise it will ruin the condition of your natural manicure.
What will you need?
If you decide to use chemical technology to remove nail extensions, it is first recommended to take into account how the extension was originally performed.
Most often, the extended length of the manicure is attached to forms - paper backings, which are then separated. However, sometimes salons use tips that are fixed with special manicure glue. To remove them, another solvent is used.
Features of tip removal depend on the composition you use, so for proper removal of the work, pay attention to the recommendations prescribed by the manufacturer.
The technology for removing plates built up on molds is always standard; it will require:
- File;
- Remover;
- Cotton pads;
- Scissors;
- Foil (or manicure fingertips);
- Orange stick or metal pusher;
- Bafik;
- Essential oil.
If, after removing the previous decorative coating, you want to re-perform extensions or simply apply pigment, you can prepare additional tools and consumables:
- Liquid for softening cuticles;
- Nippers or nail scissors;
- Degreaser;
- Primer;
- Materials for extensions;
- Gel polishes – base, pigments, top;
- Cleanser for removing the sticky layer.
An ultraviolet or LED lamp is used to dry gel polishes, since they always require mandatory polymerization.
All instruments must be pre-disinfected. In salons this is done using an oven, but at home you can simply treat them with an antiseptic to remove pathogenic microflora.
Step-by-step instruction
Before removing extended nails, you can make a steaming bath for your hands to soften the nail bed and cuticle and make it more convenient to work with them. You can add sea salt or essential oils to the water.
Also free up your work area so that nothing prevents you from properly treating your nails by removing the previous decorative coating.
Then follow the step-by-step instructions:
- Use a file to sand the nail plate to remove the glossy layer. This will ensure deeper penetration of the remover, which will increase the effectiveness of its use.
- Cut the cotton pads in half or into quarters and treat them with the solution.
- Place cotton pads on the extensions; it is not recommended to touch the periungual area, since the aggressive composition can ruin the health of sensitive skin.
- Secure the compress with foil or special manicure fingertips. When using foil, it must be folded 4-5 times in a dense layer to ensure a tight fit to the cotton pad.
- After 10-15 minutes (the exact time is indicated in the manufacturer’s instructions for the remover), remove the compress.
- Use an orange stick or metal pusher to gently scrape the gel base from the nail. Do not use too much force to avoid accidentally damaging it. The base layer can be partially left on the plate.
- Using a pusher, remove the remnants of gel polish from the nails, sand them, additionally go over the end, there may also be pigment remnants on it.
- Apply essential oil to the entire nail bed, paying attention to the cuticle to nourish the matrix. This will help you restore the normal microflora of your manicure, preventing its thinning, peeling and other defects.
Typically, this procedure takes girls about an hour, but beginners in the manicure industry can do it longer.
If you want to get a manicure and reapply a decorative coating, you do not need to treat the nail bed with oil. On the contrary, you need to degrease it, then apply a primer and begin the decorative coating.
But first make sure that after removing the extensions, there is no damage or fungal infection left on the nails that could have formed when the gel base peeled off. In this case, the cosmetic procedure must be rescheduled, since it can only be performed on clean, healthy nails.
When removing tips, a special softener is used, which is applied in the area of the side rollers and cuticle, which ensures its flow under the tip. Gradually, the manicure glue softens and moves away from the surface.