Differences between gel and biogel
There are not as many differences between them as it might seem at first glance. The biogel contains slightly less polymers, which do not have a very good effect on the nails themselves. But building up with its help still cannot be considered harmless. Just as with any extension, the nail plate is covered with a layer of various gels, which blocks access to oxygen. And it is because of this that the protective layer of the nail weakens. It is these qualities that can damage the plate, make it weaker, and it can become deformed. In view of this, girls with very weak nails are not recommended to do any type of extension, no matter what gel is used.
If we talk about operation, there are no special differences here either. These nails are strong and should be able to withstand any damage. The biogel remains bright until it is removed, no scratches are visible on it, and it does not change color. When it comes to correction, then dealing with biogel is much easier than with acrylic. It is very easy to make any design drawing on it.
Biogel is intended not only for nail extensions, it is also used to cover the nail plate so that the nails grow and do not break, that is, it serves as a kind of strengthener. But what we mean is strengthening the free edge of the nail due to the thickness of the gel. It is precisely because it becomes thicker and more resistant to any damage that it becomes more difficult to break.
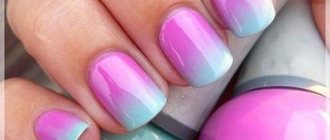
Photo gallery of biogel nail designs
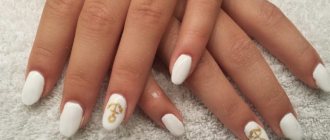
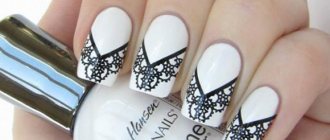
Nails extended with biogel are practically indistinguishable from natural tips. The maximum naturalness and laconicism of such a manicure will appeal to many girls. Neat nails of moderate length can be decorated with any design, showing your individuality. Giving preference to natural shades and discreet delicate compositions, you will only emphasize the exquisite beauty of women's fingers. Our small photo gallery will be a source of inspiration and encouragement for you.
Traditionally, our article ends with another video lesson on how to use biogel not only to build up, but also to repair a broken nail. In an effort to improve your appearance, do not forget about your health. Remember, the true beauty of a woman is in her naturalness!
Strengthening nails
The strengthening procedure should begin with a hygienic manicure. At the very first stage, you need to remove the top layer of the nail, then apply a degreaser, and then a primer on it. Once it dries, you will need to apply the base biogel. This layer must be dried in an ultraviolet lamp. Then apply biogel, which is designed for leveling; after the lamp, this layer will be perfectly smooth. The last step is to apply the finishing biogel, which will give your nails shine and protect them from any damage. After the strengthening procedure itself, if desired, you can begin to create any design. Various designs using colored biogel will look beautiful.
Why use biogel
After the biogel strengthening procedure
The advantage of biogel over other means is that it allows the nail plate to breathe. It decorates your nails without damaging them. Extension with this material takes two hours. After applying the composition, no recovery is required. It helps both strengthen nails and protect against negative influences. When coated with gel, the plates remain elastic.
Strengthening with this material can be carried out immediately after a manicure with gel. The product is durable and bright, does not lose color saturation for a long time. Drawings are made on top of the biogel and the design is complemented with sparkles or rhinestones. The monochromatic coating also looks beautiful. Biogel can be purchased in a variety of colors.
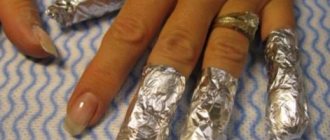
A special liquid is used for removal. If the layer turns out to be dense, first go over it with a buff. This makes the surface porous. Then the removal solution is applied to a napkin, pressed against the nail plate, and tightly wrapped in foil. After 15 minutes the material is ready for removal. If necessary, the surface of the nail plate is again treated with a buff. The gentler the removal, the greater the effect of strengthening.
Biogel extensions at home
If you decide to extend your nails yourself using biogel, then you will need to spend a little money on purchasing materials for this. Gel for nail extensions and for strengthening their tips have differences; if you decide to strengthen the free edge of the nail, then you need a composition just for this. Among other things, to extend your nails with biogel at home, you need some more items:
- File.
- Grinding for cutting off the top layer of the nail plate.
- A brush to remove dust after filing your nails.
- Orange sticks.
- Primer or primer.
- Degreaser.
- Forms for nail extensions or tips.
- S-biogel for extensions of one color.
- Biogel for creating drawings, if they are planned.
- Brushes and dots for design.
- Biogel top (top).
- Polisher for trimming extended nails.
- UV lamp.
Some believe that biogel nail extensions are not very durable, and that the gel itself may peel off. But if all stages of the process are completed correctly, then you can safely go through about a month with the finished manicure, until the next correction.
Step-by-step instruction
Step-by-step instructions for applying the composition are as follows:
- Preparing the nail plate. First of all, your own nails and the skin around them are treated with a degreasing agent. To avoid the biogel getting under the cuticle, it is moved back, the nails are given the desired shape with a nail file, and with the help of a buff, the nails are polished and the gloss is removed. Next, use a brush to remove any dust formed after sanding. Then the fingers are degreased again.
- After the preparation process is completed, a little primer is applied to the plate. In this case, you need to try not to touch the cuticle. The next layer is bonder. It will prevent the occurrence of detachments and increase the wear time of the biogel.
- After the base has dried, a disposable form is attached under the nail, and the edges are glued together.
- Then, to achieve the desired length, biogel is applied to the plate to a special mark on the forms using a special brush. After which the nail is placed under a UV or LED lamp to dry the coating.
- After the first layer has dried, a second layer is applied and again placed under the lamp until completely dry.
- Next, the nails are corrected using a file.
- Then the finish is applied - the coating.
- A degreasing agent removes the sticky layer.
In order to remove such beauty at home, you will need a special liquid that will soften the material within ten minutes. To do this, you need to wet cotton pads with it, apply it to your nails and secure with foil. Biogel can be easily removed without cutting.
This material heals nails, allows you to enjoy a beautiful manicure for a long time and is easy to use even at home. That is why the fair half of humanity increasingly chooses it to care for their hands.
The process of nail extension with biogel
A few days before the procedure, it is advisable to remove the cuticles. It is not recommended to do this before the extension itself, as the material may peel off from the nail. You need to cut your nails very short; you can use clippers to speed up the process. You will also need to sharpen the nail to give it a beautiful shape. Remove the top layer on the nail plate, but you don’t need to grind it down too much, it’s advisable to just achieve a smooth surface. After all of the above, you need to degrease the nail. But it is important to slowly apply the degreaser so that it completely covers the surface. The next step is to apply the primer, but before further action you need to wait until it turns white, this is literally a few seconds. After this you need to glue the tips. It is important to take into account this point: after applying all the previous layers, you cannot touch the nail; if this cannot be avoided, then you first need to glue the tip, and then degrease and apply a primer.
Now you need to apply Gel S in two layers to form a beautiful nail plate. Then place your nails under the lamp for three minutes. Shape your nails and sharpen them to the desired shape. After this, apply the finishing biogel, and if you have a drawing in your project, then it should be done at this stage, and then dried under a lamp. If you do French, then you can use white biogel for extensions, and carry out the rest of the procedure with regular gel.
Nail extensions with biogel at home are quite simple to do. The main thing is to follow all the requirements so that your nails last longer in everyday life.
Biogel - what is it?
What does biogel consist of?
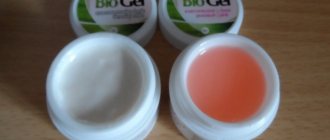
Biogel has become an incredibly popular cosmetic product for manicure not only in manicure salons, but also for home use. Biogel is most often sold in small round jars and resembles jelly in appearance. The second name of biogel is biosculptural gel. The main components of this cosmetic product are:
- proteins. 58% high-quality biogel should consist of healthy proteins that will care for the nail plate, prevent delamination, and strengthen the nail;
- resin from African teak wood. The resin of this tree is characterized by increased durability, which explains its presence in the biogel;
- vitamins E, A. It is the presence of vitamins that explains the beneficial effects of the gel on nails.
If you think that nail extensions with biogel can somehow ruin the natural structure of your nails, then you are deeply mistaken. Biogel can only further strengthen nails and protect them from negative environmental influences. This composition can be easily and safely removed from the nail. For girls who suffer from the eternal problem of breaking and peeling nails, biogel extensions can be the ideal solution.
What is the difference between biogel and extension gel?
Nail extension gel is a polymer material that becomes hard under the influence of ultraviolet rays. Biogel is more elastic and “alive” in its structure. The differences between these two nail coatings are as follows:
- When the gel is applied to the nail, it bonds with the nail, with all its cracks and depressions. When applying biogel, such a connection occurs at the molecular level. This is possible due to the content of natural components in the biogel (teak wood resin);
- A nail extended with biogel seems more natural, “alive”, it bends in the same way as natural nails. But nails that have been extended using gel are harder and can create a feeling of a foreign body on the fingers, a feeling of pressure on the nails. Gel nails are more often susceptible to mechanical damage and chipping;
- nails that are extended using gel require modeling using filing. This process is accompanied by the spread of dust, which both the master and the client are forced to breathe. Nail extension using biogel does not require such a procedure;
- with the help of gel you can grow incredibly long nails, but biogel will allow you to increase your own length by 1-2 mm;
- It is much easier for a “newbie” to get used to nails extended with biogel than to gel nails;
- In order to remove the gel from the nails, you need to file it off. This is quite long and laborious. Biogel is removed from nails using a special liquid with acetone by soaking for 10-15 minutes;
- Nails with biogel should be carefully protected from most chemical solutions and household chemicals, as this can damage the manicure. Gel nails are much more resistant to such products;
- nail extensions using biogel are allowed even for pregnant and lactating women due to the natural composition of this coating and lack of toxicity;
- After removing the biogel, the nails do not require restoration. On the contrary, they can become stronger and healthier. But after removing the hard gel, your natural nails will need “resuscitation.”
Pros and cons of covering nails with biogel
Let's look at all the disadvantages and advantages of nail extensions using biogel. It is worth immediately noting that this procedure has much more advantages than disadvantages. The advantages of nail extensions with biogel include:
- the procedure for creating a manicure using biogel has a fairly simple technology;
- the client will not breathe unpleasant fumes or dust during nail extension with biogel;
- biogel has an amazingly positive effect on the health and appearance of the nail;
- the nail continues to “breathe” under the biogel layer;
- the process of removing biogel from nails is not aggressive;
- nails that are coated with biogel continue to maintain their natural elasticity and natural appearance;
- nail extensions with biogel at home is an excellent manicure option for girls who suffer from constant brittleness and splitting of nails, their excessive thinness;
- biogel is a natural composition that, due to its hypoallergenicity, can be used by pregnant women or women who are breastfeeding.
It is quite difficult to identify obvious contraindications to biogel nail extensions or the disadvantages of such a manicure. Among the possible disadvantages, the following features can be noted:
- biogel may “suffer” from interaction with acetone-containing liquids and household chemicals;
- with prolonged contact with water, biogel can change its qualities, since this composition is not 100% water-repellent;
- If you want hard and very durable nails, then biogel will not suit you. To create such a manicure, it is better to choose acrylic;
- the cost of extensions with biogel is usually higher than extensions with other compounds;
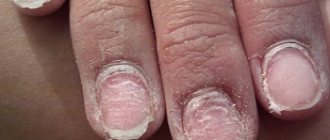
- A contraindication to applying biogel to nails is fungus or psoriasis.
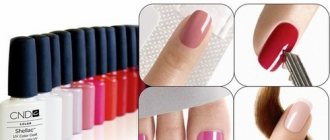
Types of biogel for nails
If you cover your nails with biogel at home or in a beauty salon, then it is best to use proven and fairly well-known brands. There is always a temptation to buy biogel for extensions cheaper in Chinese online stores, but don’t be surprised if the quality of the manicure turns out to be different.
- Biogel is transparent. This type of biogel is used as a base, a preparatory coating that hides minor irregularities on the nail.
- Biogel sculpture. This type of biogel has a beige color, the color of the natural nail plate. Using this gel, nail extensions are performed, its shape is changed, and an aquarium manicure is performed.
- Biogel Royal Sealer. This type of biogel is perfect for a top coat in a French manicure. It is designed to whiten the nail and give it shine.
- S-coating. This type of biogel is distinguished by its increased rigidity. It is most often used to add length to the nail.
- UV biogel. As is already clear from the name, this type of biogel is designed to protect our nails from the harmful effects of sunlight. If you are going on vacation to hot countries, then you can safely choose this type of coverage. The nail plate will acquire a healthy color and beautiful shine.
- Biogel colored. This type of biogel contains some color pigment, which allows you to create various types of manicure.
How to remove biogel from nails
Why many women adore biogel nail coating is the ease of removing this coating. You won't need to long and persistently file off a layer of gel from each nail and breathe in the dust. All you need is a special biogel remover or any nail polish remover that contains acetone. The order of your actions will be as follows:
- generously moisten a cotton pad with biogel remover and place it on the nail;
- To make the product work faster, wrap your finger in a small piece of foil. In specialized stores you can also purchase special caps-clips for nails;
- build the same “fur coat” for each nail;
- wait 10-15 minutes.
- Unfold your fingers and easily remove the gel layer.
How to remove?
Extension with biogel is a fairly simple process; it is not too difficult to remove it from the surface of the nail; you just need a special liquid for this. First, you need to use a rough file to disturb the finishing layer, then apply liquid to the cotton wool, apply it to the nail and wrap it in foil. After about ten minutes the biogel will get wet, and after that it will be easy to remove it with an orange stick. Then you will still need to sand the surface of the nail with a buff. The nail plate is not injured after these procedures, so materials can be applied again. The procedure for removing nails does not take very long, about twenty minutes.
How to strengthen your nails at home
If the problems of the nail plates are serious, for example, a fungus has settled on them, it is important to visit a doctor in time and choose the right treatment. If there is no serious cause for concern, you can try to restore the health of your nails at home.
Massage
Nail massage
Massage for hands and nails should be done regularly, at least 2-3 times a week. For this purpose, you can use both massage oils (special solid or regular base oils from the pharmacy) and a simple hand cream.
Using massage movements, gently rub the product into the area of the nail plate, cuticle, and fingertips. The massage quickly gives the desired results, especially if you perform it before bed and then wear cotton gloves at night.
Paraffin therapy
Paraffin therapy
This method is comprehensive for solving all problems of the nails and hands. It consists of using molten paraffin - pure or with the addition of essential oils. Mixtures for paraffin therapy are sold in professional cosmetics stores.
After thoroughly washing your hands and drying your skin, apply cream and then melted paraffin. Next, put plastic bags and warm mittens on your hands. Leave paraffin on your hands for up to 25 minutes, sessions are carried out regularly in a course of 10 procedures.
Masks
An equally effective way to restore nail plates is to use nourishing masks:
Masks for healthy nails and hands
Firming mask with lemon and olive oil: heat ½ teaspoon of lemon juice and a tablespoon of olive oil in a water bath, apply the mixture to the nails, put on cotton gloves, leave the mask overnight.
Wax mask for strong nails: melt beeswax in a water bath, dip your fingertips into the warm wax, then immediately into (cool) water. Wear gloves and leave overnight.
Baths
Nail baths have similar properties to creams:
Heat 200 ml of red wine, add a spoonful of salt (iodized). Immerse your fingers in the bath for 15 minutes, then rinse off the wine and use hand cream.
Another bath recipe: dissolve ½ tablespoon of gelatin in a glass of water, cool the mixture, and keep your fingers in the gelatin for 15 minutes.
Ointments and oils
Prepare an ointment based on melted wax (4 g), mashed boiled yolk, then dilute it with peach oil until the ointment reaches the desired consistency. Use daily to strengthen the nail plate.
The second ointment recipe: mix olive oil and honey (a spoonful at a time), beat in the raw yolk. Rub the ointment into the nail area twice a day, rinse off after 5 minutes.
Other folk methods of strengthening nails
Folk ways to strengthen nails
- In a liter of warm water, dilute a spoonful of sea salt and 5 drops of iodine, keep your fingers in the water for 20 minutes. Then wipe it off and apply cream. Do it 2 times a week.
- Squeeze lemon juice, combine a spoonful of juice and a pinch of salt, apply with a brush to your nails for 20 minutes. Then wash off. Repeat 2 times a week.
- Combine ½ teaspoon of red pepper, a teaspoon of hand cream, 10 drops of water, lubricate your nails with the product, rinse after 15 minutes. Do it no more than once a month.
Almost every fashionista has her own recipes for strengthening her nails. This video presents a home method for treating and strengthening brittle nails:
Correction
Many girls ask the question: “Is it possible to make a correction, or do I need to remove all the material and apply it again?” Some experts recommend taking it off and doing it again, as those layers remain, and you end up with layering. Others recommend making corrections after three weeks. According to their advice, you need to cut off the top layer of biogel and then apply it to the regrown part. But after several corrections, it is still recommended to completely remove it and build it up again.
How to apply biogel on nails
It’s just as easy to apply this gel yourself at home as in the salon. It is important to choose the right products and ingredients, and there will be step-by-step instructions to help you follow them and then everything will work out great. Before you get started, you need to prepare the following:
- composition that degreases the surface of the nail;
- antiseptic (any);
- the biogel itself;
- primer and bonder;
- finishing coating;
- buff, brush and nail file;
- brush for applying gel;
- ultraviolet lamp.
Once everything you need is in place, you can begin the application procedure itself.
- Fingers are treated with an antiseptic, so they are degreased.
- Cuticles are removed and nails are treated with a file to remove excess unnatural shine. The surface of the nails is cleaned with a buff to create a matte appearance.
- The gel is applied from the cuticle to the edge, after which the layer is dried under the lamp for two minutes and a new layer is applied, which is also dried.
- The sticky layer that forms when the gel is applied is removed, this is done using a cleanser, i.e. a degreaser.
After the base layer has been applied and dried, you can begin to apply a special varnish and create all sorts of designs and ornaments. The entire process of applying biogel is perfectly demonstrated in the video.
Editor's choice: Manicure with roses: options for spectacular coating
Reviews
Reviews about biogel extensions are mostly good. Many girls are happy that their nails are protected, at the same time they are strengthened, and after removal they do not deteriorate at all. Much, of course, depends on the quality of the gel itself and on the artist who carries out the biogel extension procedure. If he has a lot of experience in this matter and knows how to carry out all the processes well, then the nails will not break or be damaged for a long time. And if you remove the biogel incorrectly, the removing liquid can harm the health of the nails, after which the healing process may be delayed. Biogel is not able to make long nails, as it is considered a soft material; only dense materials, such as acrylic and other types of gel, can handle this.
Advantages and disadvantages of gel coating
The structure of the gel used for modeling is similar to a natural nail. That is why the extension procedure has become so popular. Gel nails are shiny, durable and beautiful. If the work is done professionally, they cannot be distinguished from natural plates.
If you have any doubts about whether to do gel nail extensions at home, study the advantages of this material:
- The gel does not irritate the skin of the fingers.
- After polymerization, it is able to transmit light and air, which provides the plates with natural conditions and protection from diseases.
- There is no unpleasant odor when working with the material.
- The gel has a high level of adhesion.
- They are very convenient to work with due to the following properties: self-leveling, flexibility, versatility and strength after drying.
Despite the obvious superiority of the gel over other materials, it is not without its drawbacks. It is worth noting that modern formulations have a minimal set of disadvantages:
- A solution has not yet been developed to remove the old conventional coating. Therefore, when the time comes to make a correction, you just have to cut down the material, which takes a lot of time and does not feel very pleasant.
- If the artificial plate is damaged, the material will have to be cut off and the gel extension procedure will be carried out again, but only on one plate.
Recently, there has been a tendency to prefer conventional gel to its biologically based analogues. This material is used to strengthen natural plates. With its help, it is impossible to increase the length or make corrections. But biogel extensions are considered absolutely safe, because... does not require cutting.
Composition of a standard extension kit
Proper gel extensions at home can only be done if you have all the necessary tools and materials. You can buy a starter modeling kit as a whole or assemble it in parts. In any case, it must contain the following elements:
- UV lamp.
- Disinfectant composition.
- Lint-free wipes.
- Gel.
- Top coating.
- Files for natural and artificial nail plates.
- Brush.
- Tips or forms.
- Cutter for cutting tips.
- Primer.
To apply gel nails, you will also need design materials. Their number and type depend on the type of nail decor chosen. If you are doing a classic French coat, then just buy a camouflage and white coating.