Initially, a spectacular transition from one color to another was introduced into fashion by fashion designers. Masters decorated skirts, dresses, and fashion accessories with a gradient. Over time, manicurists began to use a smooth color transition, creating stunningly beautiful nail designs. Today, gradient manicure or Ombre is popular among fashionistas all over the world. And thanks to the wide selection of gel polishes, every girl has the opportunity to decorate her nails on her own without leaving home.
Ombre gel polish
What is Ombre
There probably isn’t a single fashionista who hasn’t done Ombre on her nails or hasn’t seen this effect on a friend’s nails. Moreover, many of us have seen and admired a beautiful multi-color manicure, but did not think about the name of such a design. So, the gradient or Ombre effect is a smooth transition from one gel polish color to another. The versatility of the technology lies in the free choice of color palette. If desired, you can combine shades of the same color or select different colors, mixing them together.
Gradient in light colors
To make an ombre on your nails with gel polish, you can use a manicure brush or a small piece of sponge. Both methods are inexpensive and can easily be tried at home.
Options with patterns and designs
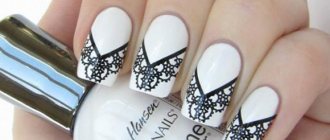
It may seem impossible and pointless to place a design on top of a gradient. But many clients want to additionally decorate 1-2 fingers on their hand. In order not to block the beauty of the smooth transition of colors, a certain set of techniques is used. The drawings are created in a minimalist style and do not overload the overall design. They are placed on the ring and middle fingers.
What patterns are most often used together with a gradient:
- Stamping is the easiest and fastest way to apply patterns. Choose a plate with thin lines, loosely filling the plane so that the gradient is visible. Modern gel paints allow you to imprint the smallest engraving elements on the nail. Fine line designs have an airy, ghostly appearance and only add depth to the design. This method is suitable for beginners and masters of quick salon design. Suitable for everyday life with any style of clothing, depending on the ombre color.
- Floristry with thin lines.
- Dots - with the ball of the tool, they draw fancy patterns of dots, placing them on the side surface of the nail or at the end (you can use dots of different diameters to create an imitation of a French manicure).
- Inscriptions – located horizontally or vertically on the nail plate. If the ombre is created from dark shades, use white text color. The transparent base of the inscription does not overlap or spoil the appearance of the gradient.
- Volumetric monograms are created using special pastes that allow you to draw a volumetric curl from the first stroke and dry well in the lamp. They do not have a sticky layer and are not covered with topcoat. Therefore, before drawing the monograms, it is necessary to cover the ombre with a finishing layer.
- Butterflies with gel paste - using the same material, butterflies are drawn against a gradient background. Only the outlines of the wings are drawn so that the main background can be seen underneath them. Mirror designs are popular, when the left wing of a butterfly is drawn on the ring finger, and the right wing on the middle finger. Then, when connected, instead of fingers you will get the image of a large butterfly.
- Crystal flowers are created by drawing the thin lines of the flower’s outline. After drying in a lamp (30 seconds), the petals are filled with a transparent top. The work is done with a thin paint brush. The main difficulty is to distribute the top inside the petal without going beyond the contour. Experts recommend drying for 10 seconds, each petal separately. The top is laid out on the nail in the form of tall drops, which creates volume in the design and, like a lens, enlarges the background with a gradient.
Drawings, done correctly and in small quantities, decorate the main background - a gradient. At the same time, its beauty is not violated. Such designs are suitable for women and girls of any age, they look gentle and are appropriate in different life situations.
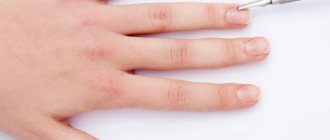
Preparation
Before starting the procedure, you need to prepare the necessary tools and materials.
For an Ombre manicure you will need:
- Set of files, buff, scissors.
- Gel polish palette.
- Base and finish.
- A manicure brush or a small piece of foam.
Ombre in red tones
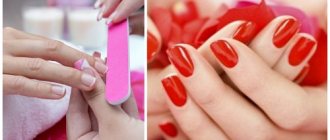
The first step is to give the nail plates the desired shape. Then carefully process the edges with a nail file and the surface of the plate with a buff. Buff is a fine-grained wide file that carefully removes the top layer from the nail, providing the necessary roughness for good adhesion of the gel polish to the nail. Also at this stage we remove the cuticles.
After treating the nails with a buff, we wipe each plate with a degreasing compound. Cover with base. To ensure high-quality adhesion of the gel polish to the nail surface, the base should be dried under a UV lamp.
Do not dry the base layer in the air or under the sun. To get a flawless Ombre manicure with gel polish, the base needs to be dried as efficiently as possible.
Beige and flesh colors in manicure
What is needed for a manicure
Ombre with a gradient transition is done on natural or extended nails. To perform it, different techniques can be used. The easiest way for beginners to make a gradient is to use an ordinary sponge, which must first be cut into small pieces. This technique is well suited for painting natural nails. To do this, take a new kitchen sponge or a fine-grained sponge specially designed for creating gradient transitions. Materials for ombre manicure:
- foam sponge;
- transparent/white base;
- fixative;
- 2-4 colored varnishes;
- foil/sheet of paper;
- sticks with cotton wool;
- nail polish remover.
Application technology
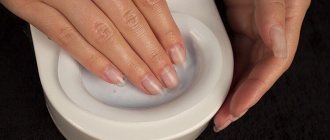
The easiest way to apply a gradient effect is using a piece of foam rubber. In order not to smear the periungual surface, it is necessary to protect the skin with a thick cream or a piece of tape. When using cream, it is important to ensure that oil does not get on the nail plate. If grease gets in, the gel polish will not stick to the surface and all efforts will be in vain.
So, the step-by-step instructions recommend that you first prepare a color palette. Pour a small amount of two gels onto the foil. Using a toothpick, carefully mix them at the borders of contact. Paints mixing with each other will give a new color in the central part of the palette. Then carefully dip the sponge in the mixed gel polishes on the foil and transfer the imprint to the nail plate. The photo shows how the two colors harmoniously combine with each other, creating a beautiful manicure design on the nail.
Using a brush
To get a flawless Ombre manicure on all nails, as shown in the photo, it is recommended to use a new piece of foam after each print. This will allow you to create an ombre gel polish without smudges or gaps. After decorating all the nails, cover the plates with the finish and dry it thoroughly under a UV lamp.
Vertical ombre
The effect is formed separately on each nail bed, while the lightening is performed by a smooth color transition from one side of the working surface to the other. This technique visually lengthens the nail.
Two or more varieties of varnish are used, sometimes with different textures. This method of coating looks original not on all fingers, but on two, for example, and the rest will be painted in harmonious shades.
The gradual transition of colors from the little finger to the thumb looks beautiful.
Ombre tassel
There is another technique for creating a gradient manicure - using a manicure brush. This technology is durable. The artist has to manually paint each nail separately, constantly wiping the brush to remove excess gel.
Drying nails
The step-by-step methodology is as follows:
- After the preparatory stage, we apply gel polish of the lightest color from those selected to the nails.
- Dry the first layer in a lamp.
- Apply a small amount of dark varnish to the middle of the nail. Shade the stripe at the bottom. Dry it.
- Apply to the top of the nail and blend the gel in the center of the nail, creating an Ombre effect.
- Dry the gel polish. Cover with finishing gel.
Ombre sponge
Many girls claim that the gradient with a brush often turns out uneven, with gaps. However, the result depends on the skill and experience of the master. If it is difficult for a novice specialist to do an Ombre manicure with gel polish with a brush, it is recommended to give preference to technology using foam rubber.
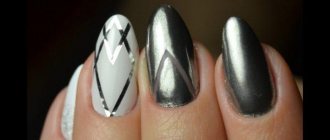
Iridescent "Ombre"
If you are going to attend a festive event, a brilliant gradient can fully express your good mood.
Let's take a closer look at creating an iridescent effect.
- Apply the base coat and dry it.
- Next, coat the nail with colored gel polish, if your design requires it. The nail plate can be left natural.
- Using a brush, paint with pigment up to the middle of the nail. In this case, at the base the layer should be dense, and closer to the center - stretched.
- Apply the second pigment color in the same way, starting from the end of the nail. Each layer should be thin and dense enough, without gaps.
- We fix the finish with a coating.
This gradient will look great when using silver and golden shades - this is an interesting combination, with a special twist.
Secrets from the professionals
- To make ombre nails with gel polish, it is recommended to use no more than three contrasting colors.
- A gradient created from three different shades of the same color looks stylish.
- A manicure with a smooth transition of colors and shades on different nails looks impressive. For example, the design begins with a dark nail design on the big finger, and ends with a light gel on the little finger.
- To preserve the beauty of an Ombre manicure for as long as possible, you should use transparent gel polish as a basis. It will allow you to periodically add color to the regrown part of the nail plate.
Learn more about the technology for creating Ombre manicure on nails with gel polish by watching the video.
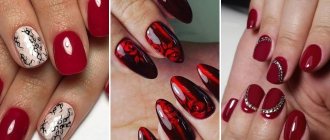
Nail art options
There are several types of ombre manicure. Some of them create a stunning look on the nails by smoothly transitioning shades of the same color, others play on contrasting tones, and others create an ombre effect on fingers painted in a similar palette. Ombre with sparkles looks interesting and original. To achieve this, shiny elements are applied to the top of the nail using a sponge on the base color. All types of nail art with gradient transitions have one thing in common - they look amazingly beautiful on the hands. Let's look at the features of popular ombre techniques.
Smooth transition from light to dark
Color transitions using ombre technology can be carried out within one shade (from light to dark). This type of nail art can be horizontal (it is performed with a transition of colors from the base of the nail to its tip) or vertical (shades change into each other from left to right). For a gradient flow of colors, use either 1 varnish, which is diluted to obtain less bright shades, or 2 nail coloring products of a similar tone. For this type of manicure, scarlet and soft pink, light green and pale light green, light blue and turquoise are suitable.
If you want to make a gradient transition in one palette, then prepare several varnishes that are similar in color. Next you need to go through several steps:
- First, do a hygienic manicure and lubricate your hands with cream.
- Then paint the nail plate with a transparent base.
- On a sheet of foil, paint stripes with different varnishes that are similar in palette.
- Next, take a sponge and dip it in this blank of different shades and apply it to the nail, patting it lightly.
- To design each finger, you need to draw new stripes on the foil, dip the sponge in paint and reprint them onto the nail plate.
- After painting all your nails, let them dry thoroughly, and then use a cotton swab with acetone to remove excess paint.
- The last stage of this design will be to apply clear varnish to the entire surface.
Two-color contrast transition
To perform an ombre manicure, 2 contrasting colors can be used. To make a two-color contrasting transition, first choose two well-combined varnishes. So, lilac and yellow, dark blue and orange, light green and scarlet look harmonious together:
- The first stage of this type of gradient begins with completely painting the nails in one of the selected shades, which, according to your idea, will cover the tips.
- When the first layer dries, the sponge is moistened with a different color and applied from the base to the middle of the nail plate.
- Next, use a brush with nail polish remover to stretch the second layer to the length of the nail.
- When everything is dry, cover the surface of the nail plate with a hardener.
A two-color contrasting manicure looks elegant and bright, so it’s suitable for both everyday life and creating a festive look.
- First aid for frostbite on hands or feet. Symptoms and signs of frostbite and how to provide first aid
- Smoothie with banana and oatmeal
- How to make hair thicker and thicker at the hairdresser and at home
Transition of colors on each finger
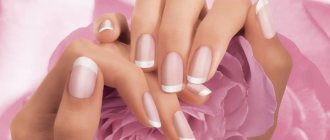
The gradient transition of colors on each finger looks unusual, but harmonious, provided that the shades are chosen correctly. The technology of this nail art is that each finger of the hand is painted with a color specially selected for it, which differs only by a few tones from the shade of the others. In this case, a more saturated color is applied to the thumb, and the most delicate and light tone is applied to the little finger. The border between shade transitions is not clear, but blurred.
So, a gradient manicure made using 5 shades of beige (from brown to light nude) will look impressive on your hand. It will be easy to make a smooth gradient of colors on each finger at home. To perform this ombre technique, you need to choose one polish with a rich color. Let's take a quick look at how to make the transition from red to soft pink on your hand:
- First, degrease and cover all nail plates with base. Then paint the thumb red.
- Then pour a little scarlet varnish into a glass plate and add 1-2 drops of white thinner to it, stir. Use the resulting mixture to paint your index finger.
- Next, again add 1-2 drops of white thinner to the already lightened red varnish and paint the next finger with it. We do this every time before applying paint to the next nail. By adding a light product, we lighten the red tint, turning it first into a less saturated scarlet, and then into a soft pink.
Multicolor Gradient
Rainbow nail art looks bright and impressive. To create this type of ombre, up to 5 colors can be used. The shades of varnishes are chosen either in the same or in a contrasting palette. To create a multi-color gradient, you will need a sponge on which strips of different varnishes will be applied one above the other, and then a sponge with paints will be applied to the nail and the overlay of shades will be adjusted using it. Detailed instructions for performing a rainbow manicure are given below.
How to do an ombre manicure with gel polish?
Salon treatments are now becoming available to perform at home. Now in specialized boutiques you can purchase everything you need to apply gel coating to your nails yourself. The easiest way, of course, is to make a monochromatic coating. However, among other various ways to design your nails in an original way, ombre is one of the easiest to do yourself.
How to do an ombre manicure step by step? To create it, you don’t necessarily have to go to the salon. Any idea you have with ombre will be very easy to bring to life on your own - even a beginner can create a gradient. So, if you have decided for the first time to try to give yourself a beautiful manicure with a design, an ombre effect coating will be a very good idea to start with. However, before proceeding directly to the procedure, make sure that your cosmetic bag contains everything you need for such a home manicure.
- You need two gel polishes with which you are going to make a drawing. It is best to buy these polishes at the same time in one store - it is important that they match each other and create exactly the combination that you want to see. Of course, for a good smooth transition, one of the varnishes should be two or three shades lighter than the other. You shouldn't take varnishes that have almost no difference in color intensity, but you also shouldn't take too contrasting colors.
- An ordinary sponge that you don’t mind cutting and staining with varnish. It is with a sponge that it is easiest to create the desired print. The second option is to create a transition with a brush, however, in most cases, this should be done by a professional to ensure it turns out really well and evenly.
- You will also need all the necessary equipment for a DIY manicure with gel polish: a base and fixing coat, as well as a lamp for drying. The prices for lamps and similar varnishes may be relatively high, but your investment will quickly pay off - because you will save on trips to the salon.
- Also prepare everything you need for a regular manicure - scissors, a nail file and cuticle nippers.
It is worth considering that under no circumstances should you steam the skin of your hands and nails, and should not lubricate them with oil or moisturizer. All this affects the structure of the nails, making it more porous - accordingly, the gel polish fits worse on the nail and does not last as long as it should.
So, the procedure should start with the most ordinary manicure:
- Trim your nails to the length you want and file them. Now the square shape of nails, as well as excessively long pointed nails, have gone out of fashion. It is better to choose a medium length and a soft oval shape for your nails.
- After shaping your nails, push back the cuticles and trim off any excess cuticles.
- Wipe the nail plate flat with a soft file until the nails become matte. This is necessary so that the base coat of the gel adheres better to the nail.
Once you have made your hands beautiful and well-groomed, you can move on to the creative process - applying a colored coating. This should be done without haste and in stages.
- Apply a clear base coat to your nails and dry them under a lamp for a couple of minutes.
- Now apply one layer of gel polish. Choose whichever of the two shades you purchased that you like best. This color will be the basis for the gradient. After applying the first layer of color coating, the nails also need to be dried sequentially again.
- Now try to cut out small pieces from the sponge that are approximately the same size as your nails. On a separate sheet of paper, mix both varnishes to create a transition between them. Then blot these polishes using a sponge and print a gradient on each of your nails in turn. Don't forget to dry your nails under the lamp every time.
- You need to be careful when imprinting colors on your nails. Make the line strictly horizontal and try to ensure that the transition begins and ends the same on all nails. If the ombre does not work out on some nails, you can either wipe off this layer of varnish while it is fresh, or dry it and put another one on top. If you apply a third coat, it should be a final attempt to adjust the design, otherwise the coating will be too thick.
- Having made a design that you are satisfied with, apply a top-dressing varnish, dry it under a lamp and enjoy your fashionable manicure.
There is another way to achieve a similar effect - by spreading the paint with a brush. You can do this with a brush from one of the varnishes, although the best option would be to purchase a specialized thin art brush.
This method is a little more complicated and is suitable mainly for those who already have experience in painting their own nails. However, this method also has advantages. Firstly, you can adjust the transition line directly using the wet varnish, and it will be easier for you to make it symmetrical on all nails. In addition, with a sponge you will inevitably stain the skin around it, which will then have to be washed. So, how to create the desired transition with a brush?
- First, take one polish and apply it evenly at the base of the nail. Make sure the color almost reaches the middle of the plate.
- Now take a second polish of a different color. Start applying it from the tip of your nail.
- When you reach the middle with the second polish, use small movements to blend the two polishes on the nail to create a soft transition line. If you do everything carefully, the effect will be the same as with a sponge.
A fashionable ombre manicure will perfectly decorate any nails and will undoubtedly become a bright highlight in your look. If you are tired of boring and monotonous designs, you should definitely try a gradient manicure. You can create this ombre manicure both at home and in the salon. Don't be afraid to take on the design yourself—the creative process is sure to be fun.