Rating: 4.7/5 (43)
A manicure set is a desired gift for every woman. Our mothers and grandmothers, having received one, took care of it, were proud of it, and passed it on to inheritance. But sometimes they used only a few tools, because they did not know the purpose of the others . Today we have more opportunities to familiarize ourselves in detail with all the necessary tools for manicure.
Complete list of manicure tools
Today there are many devices, machines and other devices for professional manicure. But the classic edged manicure is not going to give up its position. Next, we will analyze in detail what professional tools are needed for a manicure, and compile a complete list of the basic set, which no woman can do without.
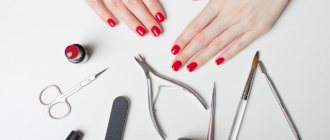
First, let's list the necessary tools for manicure (description with photo):
- Short straight scissors with a wide cutting part for cutting the nail.
- Knipser, or manicure tweezers, for trimming nails. Compact and convenient.
- Thin scissors rounded for cutting cuticles.
- Nail clippers for cleaning the periungual fold.
- Scraper (hatchet, spatula) – a double-sided tool for moving and cleaning cuticles.
- Pusher – a spatula with a silicone tip for more gentle pushing back of the cuticle.
- Files to give shape to nails.
- Polishing blocks (buffs) to give the nail plate a glossy shine.
Basic Tools
There are two types of manicure - European and edged. They require different sets of tools. Thus, when performing a European unedged manicure, as the name implies, tweezers, nippers or scissors are not used. Whereas in a classic edged manicure, these tools perform extremely important roles. So, for a classic edged manicure you need the following tools:
Set of tools
- Scissors;
- Nippers and/or tweezers;
- Files;
- Cuticle pusher;
- Polishing buff;
- Manicure brush.
These materials and equipment for manicure represent the minimum required to create a high-quality and safe manicure at home. Depending on ease of use, you can also purchase a cuticle trimmer or other tools. But this is just a matter of convenience. If you intend to do not only a simple manicure, but also nail design, then you will need tools such as:
- Dots - a special device for creating circles and dots of different diameters using nail polish;
- Thin brushes designed for applying patterns and prints;
- Wide brushes for obtaining streaks and shifting shades, applying various kinds of abstract images;
- Brushes for acrylic, if your design plans include acrylic painting;
- Stamping kit for creating a quick and fairly complex design in one step;
- Toothpicks and needles for working on wet surfaces;
- Stencils for French and lunar manicure, as well as others.
Manicure stick
Tools for design and manicure must be individual. If someone other than you uses them, it is necessary to boil them after each use to avoid the transmission of infectious and viral diseases through blood. All types of manicure (edged to a greater extent) are accompanied by microtraumas, sometimes invisible to the eye, so the risk of infection is very high. But when starting to work, even with individual manicure tools, they should be treated with antiseptics.
[yandex2] [google2]
How to use manicure tools at home
A home manicure technique differs in that we do it ourselves. It is impossible to grab a nail and do a manicure. But there are general techniques and rules for using tools at home:
- keep the tools at a certain angle to the nail at each stage of the manicure;
- A high-quality manicure should not be deep, but smooth, without inflammation.
Sequence of carrying out and rules of work:
Nail formation
Using scissors or a clipper, mark the length. Carefully trim the nail, holding the scissors perpendicular to the surface , this way you prevent delamination. The nail clippers are initially positioned at the correct angle, so it is very convenient to trim the nails of small children.
We shape it with a diamond-coated nail file. A laser file with a sealing effect is a godsend for problematic peeling nails . The file has two sides with different patterns for different nail thicknesses. When working, the file must be held perpendicular to the end of the nail. At a certain point, the file simply stops cutting, which means the end of the nail is already perfectly smooth. Next, your hands should be softened in the bath.
Removal of cuticle and periungual ridges
The most delicate and traumatic moment.
- Use a scraper to lift the cuticle. First, carefully pass the side with the spatula at the base of the nail. Without undue pressure on the nail root. With excessive force, the nail can easily be damaged at the base. Then it grows back with a wavy surface, which is difficult to correct even over several years. When working, the spatula practically lies on the nail. We work with elastic pushing movements from the edges to the center.
- With the other part of the scraper - a hatchet - we finally pass under the cuticle to make sure that all the overgrown skin has come off well. First we clean the middle part. Then we pass along the side rollers from the middle to the edge. Carefully remove the keratinized particles from under the cuticle. The angle of the tool is also very important - the wide part of the hatchet should be parallel to the nail. The tool has a sharp tip, and under no circumstances should it rest against the surface of the nail.
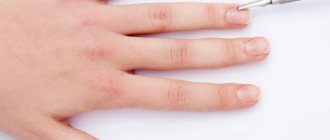
- The scissors are thin, with rounded blades , reminiscent of a surgical instrument. They cut off the thin part of the cuticle near the hole itself. You need to act delicately, taking into account many factors, including the location of capillaries near the surface. Aerobatics is when the cuticle is trimmed with one very thin strip or ribbon. You must act carefully, with gentle movements, in increments of no more than 2 mm. The cutting surface is perpendicular to the surface being processed.
- Use nippers to remove the toughest part of the cuticle – side bolsters. Using small bites at an angle of 90°, remove keratinization on both sides of the nail. Don't bite the side ridges too deeply. You can injure your nail.
Creating the perfect nail hole line
A pusher with a silicone tip is not an essential , but it is convenient. After all the manipulations with the cuticle, gently move it again. The elastic tip does not cause discomfort in newly trimmed areas.
Nail polishing
Polishing provides shine even without special coating. Buffs, as a rule, have several surfaces with different abrasiveness. First, work with the harder side, removing all irregularities from the nail plate. Then gradually move to the shallowest side. This way you seal the surface of the nail, making it perfectly smooth. Work the polishing buff without applying excessive pressure, moving smoothly over the entire surface from the cuticle to the edge of the nail. And remember that nail polishing, especially with the help of special means, can be done no more than once a month.
Accessories for design
The choice of materials and tools for nail design - creating patterns and decorations - is huge. Conventionally, all these funds are divided into 2 categories:
- To create a flat manicure. This group includes foil, stickers, ribbons and other materials for nail extensions that do not rise above the main coating.
- Tools for 3D design. These are voluminous beads, rhinestones, bouillons, intertwined threads. They may protrude above the surface of the nail.
Stickers, ribbons and foil
The most popular design accessories:
- Stickers are drawings on a durable adhesive base. They are applied to dry varnish and covered with a quick-drying transparent layer.
- Ribbons. There are different textures (from fabric to metal) and colors (plain, patterned, fabric design). They also have a sticky base and are applied to a dry coating.
- Foil. This is a special film with amalgam coating. The master applies it to the painted nail and presses lightly. The foil print is secured on top with transparent varnish.
- Hair color milk chocolate
- Brewer's yeast for weight gain
- Atheroma - what is it and photos of the tumor, causes of appearance, removal methods
Glitter powder
It is not necessary to have a shiny polish in your arsenal - you can always add a little brightness to your nails with the help of a special powder. Small glitter comes in small plastic packages and can have different shapes: round, square, triangular, diamond. Glitter is applied to the top coat of varnish using a brush.
You can also add shine to your nails using special rubs. This is a fine powder with different shades. It is applied to a painted and dried nail and rubbed in using a sponge. Remaining powder can be easily removed with a brush.
The most popular rubbing effects are metallic, holography, chameleon.
Beads and rhinestones
Colored glitters and films can be used alone or mixed with other design components. The most popular accessory for decorating nails is rhinestones. They are attached to a small drop of varnish, acrylic or embedded in gel. Rhinestones give a manicure design a special charm.
The beads are slightly larger than rhinestones and will rise noticeably above the surface of the nail plate. Professional masters use them only for decorating manicures that will be worn for no longer than 7 days. Beads are attached to acrylic or topcoat. There is also a smaller version of beads on sale - broths. They are used in the “Caviar manicure” design.
Stamping
If you don’t have the skills of an artist, you can always use ready-made drawings.
Stamping is a method of applying patterns to nails that does not require additional painting.
This is a nail art tool kit equipped with a stamp, stencil and scraper. Before applying the design, coat your nails with polish of the desired color.
Apply some paint to the stencil. Holding the scraper at a 45° angle, remove excess varnish. Press the stamp firmly onto the stencil with paint and roll it back and forth and on the sides a little. Use the stamp to create decorations on your nails by pressing it onto the desired area. Remove any remaining polish from the skin with a lint-free cloth.
Base and top coat
To ensure that the gel polish sticks well, a base coat is used. This is the first transparent layer that evens out the nail plate, hides minor imperfections and bonds the polish to the surface.
It is better to apply the base coat with a flat brush and dry it in an LED lamp for about a minute.
The top transparent coating is called topcoat. Its purpose is to fix the entire manicure and protect the varnish from external damage. The top can be matte (creates a coating without shine), with a sticky layer (this must be removed with a lint-free cloth) and without stickiness. It is recommended to apply the topcoat after creating the design. It is advisable to purchase the top and base from the same company.
Nail restoration products
With frequent use of gel polish, nails can peel off, become brittle and dull. The following tools will help fix the problem:
- Keratin masks. They contain liquid keratin, medicinal oils and vitamins. The base should be applied to clean nails and left for 5-7 minutes. Rub in the remaining mask with light movements.
- Strengthening varnishes. They contain calcium, wheat proteins and other beneficial substances. The varnish is applied once every 2-3 days to clean nails. The treatment course is 10–15 days.
- Restorative oils . They additionally contain vitamins and minerals. Such products not only strengthen the nail plate, but also make the cuticle softer and more pliable. The oil should be rubbed into the surface of the nail every day. The treatment course is 7–14 days.
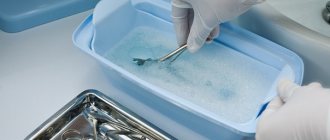
How to disinfect and sterilize manicure instruments
Many people believe that instruments for individual use do not need to be sterilized. But in vain, because skin particles can remain on them and bacteria can multiply. In addition, without regular cleaning, tools will quickly become dull and fail.
For beauty salons, there are strict instructions on how to sterilize manicure instruments . The general process includes not only sterilization of the instruments themselves, but also disinfection of the room, the master’s clothing, and work surfaces. For sterilization, a special unit is used - a sterilizer for manicure instruments (sterilization is the process of destroying fungal and bacterial spores).
Let's look at how to properly handle manicure tools and care for them at home after use.
Processing of manicure tools is carried out in several stages:
- wash tools with soap;
- immerse in a disinfectant solution in an open form;
- place in the oven preheated to 200° for 20 minutes;
- remove tools after the oven has cooled completely;
- This procedure should be carried out at least once a month.
We also disinfect the files - we spray them with disinfectant spray. After this, the file should dry completely.
What you need for a manicure: list of materials and other types of tools
In addition to the above-mentioned nail care tools, you may also need other types of manicure tools. Thus, a blunt wooden spatula is used to push back cuticles, and a narrow cleaning stick is needed to remove dirt from under the nails. What you need for a manicure - a list of everything you need is given below. A short list of manicure materials is also offered that will make the task of caring for the nail plate easier.
Before a manicure, you need to soak your fingers in water with a special solution. For these purposes, a small bath is needed.
All manicure tools, even if they are not used by other people, should be disinfected with alcohol or cologne before each use, otherwise infection can occur.
A thick brush won’t hurt in your arsenal of tools. It is convenient to shake off the remains of filed nails from your nails and fingers. The brush should be made of natural hairs, as artificial bristles are too rough and can scratch the skin and nails.
In addition, you can also get a strip of suede cloth and use it to polish your nails.
Needle and toothpick. Perhaps, in nail art, a needle and a toothpick are the main working tools. It is them, in addition to brushes, that are used for the decoration of nails. Always remember that a needle is a sharp instrument, and therefore it must be clean, without traces of rust. It, like other instruments, should be regularly wiped with alcohol. As for the length and thickness of the needle for nail design, the best option would be a moderately thin needle of medium length.
A toothpick is a simple tool; it’s worth buying a whole jar right away. Experienced nail art masters do not use needles and toothpicks; instead, they use a thin short brush.
When painting nails, needles and toothpicks are used mainly for mixing drops of paints and varnishes.
Gel pen. The most ordinary gel pen will do, but you need to choose pens with thick gel, as they are better for drawing. This method of drawing is very convenient because the gel is easy to remove from the nail if the drawing does not work out.
Tweezers. The tweezers should be very small and have flat ends so that they are easy to work with rhinestones.
Sharpening a manicure tool
Sharpening a tool is a real jewelry job. Craftsmen who sharpen tools with high quality (especially professional ones) study for a long time and are highly respected.
Sharpening can be manual or mechanical. Mechanical is faster. But manual sharpening provides an individual approach to each tool. The master examines the tool, takes into account the width of the blades and the direction of travel of the cutting part. He often carries out instrument restoration. The cost of manual sharpening is much higher , but you should not skimp on this procedure. A well-sharpened tool lasts a long time and reliably.
In order for tools to last longer, they should be properly cared for - placed with the sharp part facing up . Even a fall on the floor can ruin the movement of the cutting part.
Selection of scrapers
Cutting tools
The name scrapers includes a whole range of manicure tools that vary in appearance and purpose. The most popular and widely used of them will be described in this section. They are not essential items in manicure, but their presence will make the procedure easier and faster, and the result more professional and aesthetic.
Manicure clippers
Manicure blades, properly called pushers, are used to push back the cuticles from the nail plate. After this, it can be cut off or dissolved with a remover. Pushers come in rectangular and oval shapes. The first is suitable if the base of the nail is more or less straight and the nail is rectangular. The latter are more suitable for round nails.
There are also pointed narrow blades - spears. They are needed to remove dirt, dead epithelial cells and remaining nail dust from under the nail after filing the free edge. The tip of such devices is usually rounded, and therefore the likelihood of injury, if used carefully, is very low.
There is another, rather rarely used, type of tool - a scraper. They are mainly used for nail psoriasis or mycotic lesions. How to use manicure tools from this group is clear from the name - they simply scrape off dead cells from the surface of the nail plate. On healthy nails it is used only as a last resort.
[yandex3] [google3]
How to choose the right manicure tool
1. You can’t skimp on manicure tools. The rule for them is: the more expensive, the better.
2. The choice of tools is purely individual , depending, among other things, on the size of the master’s hands. All instruments must be made of high-quality medical steel. Convenient and easy to use. With all the variety of choices in online stores, craftsmen prefer to get acquainted with the instrument individually.
3. Tools can be purchased in a set, or individually. The manicure set is convenient on the go. It should close well and securely hold tools. Please inspect the case before purchasing. If it is not stitched carefully, then the contents will not be of the highest quality. All cutting parts must be in individual cases. If you buy individually, the total cost is less, so you can buy higher quality tools.
4. What to look for when choosing:
- Visual inspection. Manicure tools must have an absolutely smooth surface. Visible chips, nicks and roughness are not allowed.
- Tool operation. Silent, easy movement will ensure convenient and high-quality work. Cutting part. When closed, the cutting strips of the scissors or tweezers should meet perfectly. Hold the instrument up to the light - when closed, the sharp tips should meet perfectly at one point and not overlap each other. Try cutting thin paper - if it tears or is chewed, it is better to discard such a tool.
- The scraper is also selected according to the size of your nails. The width of the shoulder blade should not be larger than the nail on the little finger. Also, the handle of the tool should be rough and not slip when working.
- Files are selected according to the condition of your nails. They come in different shapes and different abrasiveness. There is a special marking for files - abrasiveness is measured in grit. The highest value (1200 grit) is for gentle polishing buffs. Also, if you have problem nails, you should avoid using iron files. It is better to use glass or ceramic coated ones.
What tools do you use for manicure? How do you check their quality and care for them? Perhaps you have your own preferences and honored manicure workers? Share your opinion with us. We are grateful.
How to apply nail art to nails
Set of brushes
- flat brush for applying foundation or primer
- a sucker brush, similar to a fan, used to create streaks and shading with varnish of different shades and wavy lines
- hair – 20 – 30 mm long, 1 – 2 mm thick, for applying fine lines, curls and other complex designs
- flat brush – up to 4 mm wide, used for two-color strokes, Gzhel type
- petal brush - the same as the previous one, with a beveled edge
- wide round fluffy brush for applying glitter
- thin medium brush – 5 – 8 mm, thickness 1 – 2 mm, for drawing thicker leaves and designs
- thin short – 2 – 4 mm, thickness 0.5 – 1 mm, for drawing the smallest details, for nail art virtuosos
- brush with a foam tip for picking up and applying pictures
IMPORTANT TO KNOW: Pedicure fashion trends 2021: photos of new products, current colors and varnishes
Something else
Dotter – a dotting brush with a metal ball at the end, for drawing drops, dots or commas.
Templates – help you make clear images.
Toothpicks, orange sticks - for cleaning nails, for applying glitter, for creating a marble pattern.
Paper tape - for a geometric pattern, you can cut out geometric shapes from it for a stencil, or use it as a decorative element.
Self-adhesive metallized tape - for “gold” or “silver” design.
Seals for stamping are stamps, instead of brushes, varnish is applied to the stamp and an impression is made on the nail.
Special lamps – UV lamps for polymerization (hardening) of shellac.
Lint-free wipes - for sanding before applying shellac and for removing stickiness after applying gel.
Tweezers – for placing rhinestones
Cuticle Remover Tools
In this section we will look at not only tools, but also materials for manicure at home, used to remove cuticles and shown in the photo. In an unedged manicure, the cuticle is usually either not removed at all, but only moved, or dissolved using a special liquid - remover. This helps keep your nails in good condition without damaging the cuticles, which can cause excessive growth.
DOTS
Removers contain an acid or alkali, which dissolve the cuticle. Therefore, it is very important that when applying the composition does not come into contact with either the nail or the skin of the pre-nail ridges, as this can cause a chemical burn. Available in the form of liquids, creams or gel. After the product has been on the cuticle for about 2 - 10 minutes, the separated skin can be easily scraped off using an orange stick.
When trimming a manicure, trimmers or scissors can be used to remove the cuticle. Trimmers are a tool whose working part is V-shaped with a pointed point at the narrowing, with the help of which trimming occurs. They are convenient because they help not only remove the cuticle, but also treat the pre-nail holes.
Scissors should be chosen that have the thinnest tip possible. Choosing blades that are curved or not is purely a matter of convenience; some people are used to working with curved blades, while others are used to working with straight blades. Scissors, unlike a trimmer, are a rather traumatic way to remove cuticles, as they can easily cut you, especially when doing a manicure on your right hand.
All cutting tools are manually or machine sharpened. Tools of the first type are more expensive, but last longer. Machine sharpened instruments are enough for 15 – 20 procedures. At the same time, it makes no sense to sharpen them, as this can cause deformation of the excessively soft metal from which they are made.
In this article we talked about what files are needed for manicure, as well as about other tools. However, all recommendations are conditional. Therefore, it is very important to choose tools that will be convenient for you to work with.