- 2848
- 0
Manicure with broths is very popular today. Small bouillon beads allow you to create an interesting design that will win the hearts of fashionistas. Today in specialized stores you can buy beads of any color, which allows you to give free rein to your imagination.
And we will offer you a large number of photos for inspiration, and most importantly, lessons on creating an interesting home design using broths with step-by-step photographs and videos with master classes.
Features of manicure with broths
Indeed, the design made from broths is far from the most durable option: already on the 3-4th day the balls begin to peel off. In addition, you still need to learn how to wear this design, because the granules will cling to your hair and clothes, creating inconvenience.
Yes, not the most practical design, but what a spectacular one! It was its originality that prompted nail artists to come up with different ways to “strengthen” such a manicure and make it more practical. So, lovers of unusual nail art, do not be discouraged, but rather get acquainted with these methods!
Rubbed manicure 2021 – fashion trends
Fashionable nail designs, decorated with uniformly rubbed pigment, are not new in modern fashion. However, every year stylists offer more and more new original ideas that can complement both strict business combinations and relaxed casual looks, romantic style and spectacular elegant ensembles. When choosing a finish, it is important to pay attention not only to the instrument itself, but also to the coating, which will serve as a base or an addition. Let's review - manicure 2021 fashion trends with rubbing:
- Mirror manicure with rubbing 2018
. The mirror effect on nails remains a fashion trend. And such a pigment is relevant both on a light base and a dark coating, on which the intensity of the overall color of the nail-art depends. - Manicure with colored rubbing 2018
. Today, original decor with a play of shades remains a stylish choice. The most popular in this case were the “chafer bug” and “northern lights” powders, which are best applied to a dark or bright background. - Plain manicure with rubbing 2018
. A win-win solution for looks in any style would be a monochrome coating with an attractive shine. And a varied selection of pigment shades will help you choose the right option for every day, for going out or for a business look. - Rainbow manicure with rubbing 2018
. Incredible powder with rainbow tints is also considered a fashion trend this season. Holography always looks impressive, even if the overall nail art is restrained and modest.
Manicure rub-in 2021 for short nails
In recent seasons, natural length and soft borders have been considered a trending shape. This decision often becomes an obstacle in choosing decor and finishing. However, in the case of glitter powder, this trend does not carry weight, since the tool does not distort the appearance. Fashionable nail design 2021 rubs includes both delicate pastel combinations and rich deep tones. In the first case, pearl and holographic pigment will be relevant. It is better not to complement romantic ideas with voluminous jewelry. Bright and dark solutions look great in the “Northern Lights” color scheme with rhinestones.
Manicure rub-in 2021 for long nails
Owners of long “claws” can realize the most incredible ideas, because the space allows their imagination to run wild. Manicure 2021 with rubbing is presented in bright and discreet solutions. A good shape for such an instrument for a long length is considered to be a soft square, almond and pointe shoes. The fashion trend this season is the interpretation of space using dark varnish colors and “northern lights” or “chafer bug” pigments. Rhinestones and stones remain popular finishes, especially for coatings in delicate pastel colors. Such decor can be large-scale or laconic.
Methods for applying broths to nails
You can decorate your nails with broth using several technologies. Let's look at the two main ones, which, by the way, can be combined.
Method 1: cover
- Prepare the nail plate and apply the base coat. If you are doing a gel polish manicure, dry the base in a lamp.
- Apply 2 layers of colored coating (varnish or gel polish), and only the first layer needs to be dried, and the second one must be left undried. When doing a gel polish manicure, you can also apply a rubber top coat to the polymerized gel polish; do not dry it.
- Place the broths in bulk or in the form of a planned pattern on the “wet” surface; if necessary, help yourself with an orange wood stick or dots.
- Gently press the broths closer to the nail - now it’s time to dry or polymerize the layer of colored coating.
- Cover the design with a layer of top coat. Paint the edge of the nail well to secure the decor firmly.
Method 2: glue
This method involves performing a manicure using the usual technology:
- Prepare the nail plate and apply the base.
- Apply a color coating (varnish or gel polish) in 2 or 3 layers. Dry or polymerize each one.
- Apply top coat and dry or cure it. The sticky layer can be removed.
- Now apply rhinestone glue to the selected area (or areas) of the nail and lightly “drown” the balls into it. Cure if necessary.
Manicure using gel polish
If you want to wear a similar design on your nails longer—about 2 weeks—use gel polish to create it. You will need:
- UV lamp for home use
- Base coat
- Top coating
- Gel polish in the color of your beads
Apply base to prepared nails and dry for 2 minutes in a lamp. Apply colored gel polish, dry the first layer, and sprinkle beads on the second. Apply topcoat in 2 layers, letting them dry.
Another advantage of this manicure with gel polish is that until you put your hand in the lamp, the polish will not begin to dry out. Therefore, you can slowly adjust the surface of the beads, make it more uniform, fill it, or implement the design you like.
It should be clarified that if your caviar manicure involves the presence of contrast, then you can quite deliberately use gel polish of a radically different color as a base. More on this below.
Manicure ideas with bouillons
Technology isn't everything. See which design ideas with broths have become the most popular!
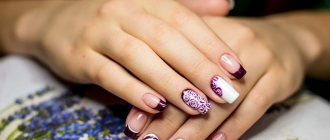
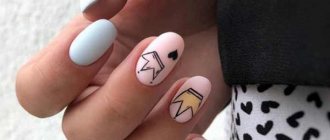
"Caviar" manicure
The balls covering the entire surface of the nail resemble caviar, especially if you choose red or black broths. This similarity gives this design option its name. The “Caviar” manicure is simple to perform: the decor can be poured onto the nail, having first placed some container under the finger so that the broths do not fly apart, and then it is easy to collect them back into the jar, then the decor is pressed onto the nail and then follow the technology. Or you can dip the tip of your finger into a jar of broth, they will stick, and then, if necessary, correct the design with an orange stick.
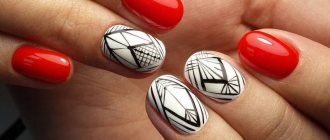
Drawing with bouillons
You can lay out a beautiful pattern on the nail plate with broths, having thought through all the color combinations in advance: coatings with granules and granules among themselves. It is more convenient to make a pattern by gluing bouillons; in this case, you first apply droplets of glue in the form of a pattern to the nail, and then balls. You can also lay out the pattern on a “wet” surface, helping yourself with an orange stick, dots or tweezers.
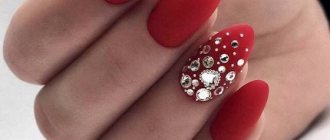
Manicure with rhinestones and broths
Combining different nail decorations in one design is always an interesting process, the result of which is impressive. Our fashionistas especially loved the combination of rhinestones with bouillons; in this case, the manicure turns out to be very unusual, bright and voluminous. And the techniques for applying these decors are identical, so why not experiment?
How to make nail designs with broths at home
A manicure using broths is called caviar, as they resemble scattered caviar. This type of decoration was invented in France. To make a manicure using beads at home, you must first purchase them. Specialized stores in your city or online stores offer a wide selection of decorative items. You will also need:
- the basis;
- colored varnish;
- dots or manicure stick;
- small bowl;
- varnish with a fixative effect or glue.
If you have the opportunity to work with shellac at home (you have all the necessary tools and materials), it is better to give preference to it. Beads planted on this basis will stick much better when fixed with ultraviolet rays. The beads will not get caught on hair and clothes, so they will “last” for about three weeks. An ordinary manicure, even with glue, will not last longer than a week.
- 5 Signs You're Too Old to Drive
- How can a woman receive a pension from age 50?
- How to make friends after 50
How to use broths on nails
Broths for manicure are simply small beads made of glass. They can be of different colors and sizes. Small grains are more like grains of sand or balls up to four millimeters, reminiscent of rhinestones. Their choice is large, and the manicure design with each of these types will be completely different. The variety of colors is pleasing: from metal (silver, gold) to various shades of red, blue, brown. Beads made of gel or acrylic will look amazing. An important advantage of this decoration is that it can be used at home.
You can apply the broths to your nails one grain of sand at a time, placing them in a small unique pattern. You can glue decorations faster, for example, scatter manicure balls all over the plate before the polish dries. In the first case, it is better not to use glue, the beads will be fixed in place. In the second, you can use glue for better adhesion. Important: make sure that the composition is colorless even after drying, and does not give a yellow tint, even if you design your nails with gold. Please note: a fixative applied on top can change the appearance of the manicure, while glue makes it more neat.
- How is coronavirus treated?
- How to check the remaining traffic on Beeline
- Individual pension capital - formation procedure
There are different variations in the use of beads for manicure. Black nail designs are also available in other colors. There is nothing complicated. Even amazing 3D nail designs can be seen in tutorials or in photos. It is better to apply smaller balls on short nails; long ones can be decorated with large ones. Removing nail polishes is easy, but you will have to use more liquid than usual. For this:
- Wet a small piece of cotton wool. Apply to the nail plate.
- Wrap in a piece of foil and wait 10 minutes.
- Scrape off the polish with the beads.
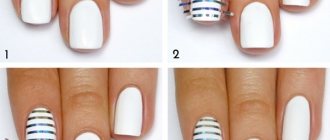
How to do a manicure
Step-by-step instructions for a manicure with a fixative:
- Hands must be fully prepared. Cuticle cutting, filing and degreasing must be carried out without fail for a well-groomed appearance. At this stage you need to come up with the desired design. Will you apply the balls to all or one nail, lay out a design, or scatter them randomly. Consider a color combination: combining several types of broths looks impressive.
- Applying the base, letting it dry and a layer of base varnish. Quickly scatter the balls in the right places. You can dip your finger into a bowl of beads.
- Use a stick to remove unnecessary ones and distribute the rest of the broth evenly. Press down the decorations with your finger so that they are fixed in the wet layer of varnish.
- Apply the final coat correctly. This can be either a varnish with a fixative effect, or gel, acrylic products. For the latter options you need an ultraviolet lamp.
The glue option has several stages:
- Previously prepared nails with dried layers of base and colored varnish are treated with glue. Carefully apply the product to the area of the future pattern or to the entire plate if you plan to simply fill it with balls.
- Next, place the beads on the glue and wait for it to dry. This stage is considered final; no further actions are necessary.