Peculiarities
There are many options for both the base and impregnation of the cake. Biscuit, shortcrust pastry, honey cake - choose what you like best. As for the filling, it is better to use light options - soufflé, yogurt, cream, since there may simply be no room left for a rich buttercream at the end of the banquet. Idea! Simple and tasty - soak the cakes in syrup or cover with melted chocolate.
For cakes, choose a base that is easy to cut - sponge cake, cake, well-soaked shortbread dough. The wafer layer or meringue inevitably becomes deformed and crumbles during the portioning process.
How to Decorate the Popular Red Velvet
Nowadays a cake called “Red Velvet” is gaining popularity on the Internet.
If you are not yet familiar with it, here is the composition of the ingredients for the classic version. Having become popular, it acquired a number of different variants, since everyone who began to prepare it brought something of their own.
Ingredients:
- kefir – 450 ml;
- flour c. With. – 400 g;
- soda – 10 g;
- cocoa – 40 g;
- spread and scrambled eggs 200 g each;
- sugar – 300 g;
- eggs of category 1 – 4 pcs.;
- red food coloring – 40 ml.
For the layer:
- cream cheese (for example, Cremette) – 400 g;
- powdered sugar or ground sugar – 125 g;
- whipping cream – 350 ml.
The cake is made from sponge cakes with cream.
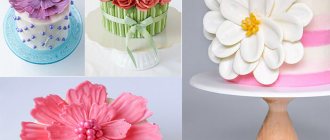
The principle of decorating such a cake is still the same. If you decorate with cream, then by squeezing it out of the bag, we draw flowers or some other figures. You can also use confectionery powder and fruit.
Another option is beauty!
Or like this
The benefits of cooking at home
Of course, you can order a ready-made cake, but if you decide to make it yourself, you will be able to:
- demonstrate your talents;
- choose the best and freshest products;
- get absolute confidence that the cake contains only safe substances;
- save a lot of money on your wedding budget without losing the taste of the dessert.
A good solution for beginners is a thin layer of chopped fruits or berries. Apples that quickly darken or other cut fruits that lose their attractive appearance in the air are poured with jelly.
You can use unusual options. For example, instead of one large cake, place identical cakes or cupcakes on a multi-tiered stand. In this case, the delicacy does not need to be cut, and each guest will receive the same piece.
It's easy to create a cake from candies or cheese wheels. In this case, you won’t even have to go near the stove. If you have experience in making pies, cream cake can be replaced with tall loaves, pies or kulebyaki, which fit perfectly into a village wedding or rustic style.
Unusual DIY wedding cake
In addition to a delicious edible wedding cake, you can also make a fun inedible cake. For example, a cake made of money, or a cake made of flowers or ribbons; in general, you can decorate an inedible cake with anything.
Anniversary cake
For your wedding anniversary, you can make a cake made from sweets or a cool cake made from mastic as a gift. A mastic cake with figures in various funny situations (on a bed, in a boat, etc.) would be fun.
You can combine edible and inedible cake into one whole. Here's an example: a two-tier cake, in which the lower part is quite edible, made of mastic with decorations on the sides of flowers and all sorts of “trinkets”, and the second tier of the cake is made of money rolled into a tube and laid out in a circle, in the middle of such a money circle is poured sweets . The upper part, which is not entirely edible, is removed and placed on the newlyweds’ table, and the edible lower part of the mastic cake is served to the guests. A very unusual way of serving a cake and quite memorable.
You can insert edible figures made of mastic or cream of the bride and groom into the middle of the money circle.
You can make this cake yourself. You can watch video lessons on the Internet and surprise young people with an unusual and cool cake.
Fireworks Cake
A cool cake can be enjoyed both on a wedding anniversary and at the celebration itself. You can make a cake from fireworks, but it will be a little dangerous, so you need to be very careful while constructing it and it is better to give such a cake outside rather than indoors.
Champagne cake
Another interesting option for an inedible cake is a cake made from champagne bottles and chocolate slices or whole chocolate bars. Guests will like this cake even more if each guest can take a piece of this cake with them at the end of the celebration.
Instead of a cake, you can also cover a bottle of champagne with sweets and tie it with a bow and give it to each guest.
Memorable dates
A fake cardboard cake with photographs of the newlyweds and elements from gifts during their relationship will be a wonderful gift for each other from the groom to the bride and vice versa.
A cake as a souvenir from the newlyweds can also be made from multi-colored towels rolled into a tube and decorated with ribbons. But the highlight is that they are printed or have photos or embroidery with the wedding date and the names of the newlyweds. This cake is distributed “in pieces to guests as souvenirs.” It will make a nice and useful gift.
You can order an inedible but cool cake as a gift in a gift shop or look for an idea for such a cake there.
Photos of cool wedding anniversary cakes
Size and weight
Before you start cooking, you should calculate how many servings you will need. This depends on the number of guests, as well as on their taste preferences, because someone eats a spoonful of dessert “for the sake of decency,” while others ask for more. One serving is approximately 150 g.
It is also better to calculate the weight before starting cooking, because the shape of your product depends on it:
- If the cake is heavier than 3 kg, then it is better to make it multi-tiered. This way the structure will be stable and will definitely not fall apart during transportation;
- If the weight of the wedding cake exceeds 5 kg, then a third tier is required;
- The maximum number of tiers that can be prepared at home is five. If you try to make the cake taller, it will turn out unstable;
- Each subsequent tier should be made lighter than the previous one by 2-3 kg;
- The bottom base should be the largest and heaviest. Other intricate options are possible, but their implementation requires extensive pastry experience.
Master class delicious wedding cake
- Beat 4 eggs (in this recipe there is no need to separate the whites from the yolks) with 0.4 kg of sugar.
- In a separate container, mix 370 g of kefir with 1.5 tsp. quicklime baking soda. Mix everything.
- Add red coloring to kefir. You can take food-grade artificial juice, or you can use beetroot juice.
- Add 0.4 liters of vegetable oil to the colored kefir.
- In a separate container, mix 0.45 kg of sifted flour with 2 tbsp. cocoa powder, 3 tsp. baking powder and a pinch of fine salt.
- Mix all 3 preparations into a homogeneous mass, stirring with a spatula. You should have a smooth red biscuit dough.
- Pour the dough into a baking dish.
- Place the biscuit in the oven for half an hour. It should be baked at 180°.
- Cut the sponge cake into 4 parts and leave everything to cool for 2 hours.
- Meanwhile, whip 0.3 liters of heavy cold cream.
- In a separate container, beat 0.4 kg of mascarpone with 150 g of powdered sugar.
- Combine cream with cheese cream.
- Grease each cake with cream.
- Grease the entire surface of the cake with cream.
- Place the cake in the refrigerator for 4 hours, and before serving, decorate it with berries, mint leaves and powdered sugar.
Design and color
A wedding cake can be multi-tiered or solid, depending on the preferences of the newlyweds. The classic round shape is still the most popular , but no one bothers to come up with something of your own: from a star polygon to complex designs in the form of two connected hearts, angels, doves or a flower basket.
Several tiers of a wedding cake do not have to be placed on top of each other. An equally elegant solution is a multi-level stand for each part. This cake looks amazing and is easier to cut.
Brave newlyweds order a delicacy in the form of a suitcase, a giant “love is...” chewing gum, or their own three-dimensional sculpture, but such masterpieces cannot be created independently without experience. However, even with an ordinary rectangular or round shape, the base is given individuality with the help of original decor.
The color of the newlyweds is limited only by the style of the wedding. A time-tested classic - a snow-white cake or dessert in delicate pastel colors of pink, blue, and ivory.
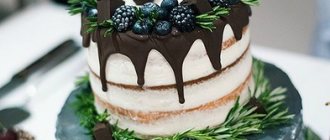
A bolder solution is to use the leading accents of your color wedding - green, purple, red, even black. And a wedding cake with polka dots or stripes will not leave anyone indifferent! Idea! The “naked” cake is very popular. Uncovered on the sides, it appetizingly displays the filled cakes, and berries, fruits and cream become a wonderful addition.
How to make a cake?
How to make a wedding cake with your own hands.
There are several benefits to making your own baked goods. Firstly, by making it yourself, you will know exactly the composition. Even after paying a lot of money to a pastry chef, you cannot be sure that he will completely compose your dessert from high-quality, natural and expensive products.
But when you make it at home, you can buy only the most proven food products that are of high quality.
Secondly, the price of the cake is very steep. Due to their great popularity, professional pastry chefs charge large sums for 1 kilogram of dessert. You need to multiply it by your desired weight. The result is a decent amount.
Thirdly, both you and your guests will be much more pleased with the fact that it was you who baked such a delicious sweet.
In order to create such a culinary masterpiece at home, you need to take care of several things at once.
Adaptations
No pastry chef can work without his tools. If you don’t have professional equipment, it doesn’t matter, for the first time you can replace it with amateur equipment. Then you will have to decide how necessary it is to purchase it.
- molds for biscuit dough (choose split or silicone). They are much more convenient to work with. If you have several forms, the work will go much faster. But there is nothing wrong if you bake in the same form 2-3 times. This will only stretch your time;
- mixer;
- measuring stick;
- sieve;
- board;
- knife;
- brush;
- molds for mastic;
- shoulder blade;
- pots;
- pastry bag.
Grocery list
To create a dessert for a wedding ceremony, you will definitely need to buy a certain set of products:
- eggs;
- flour;
- salt;
- sugar;
- butter;
- cream;
- fruits.
If you don’t know how to make a wedding cake with your own hands, it’s better to use a simple dessert.
Important! Before you immediately make a wedding cake, practice and bake it a few weeks before the celebration. You will have time to try the result and evaluate how tasty it turned out
If necessary, you can correct the recipe by adding additional ingredients.
Step by step plan
By following clear instructions, even a beginner can learn how to cook and get a decent result from their efforts.
- Beat the eggs at high speed with a mixer. To make them whip better, add a pinch of salt.
- Add a small amount of flour, reduce mixer speed and continue beating.
- You have a simple biscuit dough.
- Take a springform pan and place baking paper down (this is not a requirement, although it is much easier to work with). Place the pan with the dough in the preheated oven.
- Baking time is 30-40 minutes (depending on your volume), baking must be done at 180 degrees.
- After the cake is ready, it must be removed from the oven and cooled. Do not use the cake while it is hot, as it can easily become deformed and lose its shape.
- Make a cream filling using cream, fruit and sugar. Place all of the above in the mixer, set the speed to high and beat the products.
- Cut the cooled cake into several pieces and brush your creation with the resulting cream.
- The top can now be decorated in an interesting way.
What will you need?
To make your own wedding cake, you will need the following tools:
- molds for cakes of different sizes, while the sponge cake feels better in a detachable tray, and the cupcake in a silicone one;
- blender or mixer (it is difficult to prepare such a quantity of product with a hand whisk);
- baking paper;
- sieve;
- several deep bowls for mixing ingredients;
- beaker;
- well sharpened knife;
- shoulder blade;
- rolling pin;
- cutting board;
- saucepan for making syrup;
- for jewelry - a syringe or a bag with attachments.
How to bake a cake with your own hands?
Preparation
Before you start making dessert, you need to prepare various materials and equipment. Their set depends on the cake recipe you have chosen. If the dough is biscuit, then you will need molds of different sizes.
A blender is simply indispensable for preparing dough and cream. Bowls are also an integral part of the cooking process. They must have different sizes.
A measuring cup will allow you to correctly measure the amount of certain products. The process of baking cakes cannot be carried out without a rolling pin. If you decide to use mastic as a decoration, then you need to prepare tools that will allow you to work with it.
Recipe
What kind of cake should I make for a wedding? To prepare a delicious wedding cake, you need to decide on a recipe. Let's look at the simplest and at the same time delicious cake.
To prepare it you will need:
Cakes:
- 0.5 kg flour;
- 0.5 kg sugar;
- 0.5 kg butter;
- 0.5 kg almonds;
- 12 eggs;
- zest of one lemon;
- salt and nutmeg.
Cream:
- eggs 6 pcs;
- 0.5 cream;
- lemon juice;
- be sure to add a pinch of salt;
- butter 140 gr;
- gelatin sheets;
- sugar.
This is one of the easiest wedding cake recipes. Even a girl who has never worked with dough before can bake it. Based on the list of products, it is necessary to prepare materials and equipment. They will become assistants in the cooking process.
Step by step guide
Separate the yolks from the whites. Then you need to add sugar and butter to the yolks. Beat all this well and add almonds and the zest of one lemon. It’s good to beat everything again.
The remaining whites must be beaten well with salt into a dense foam. To do this you need a device such as a mixer. Then you need to add the sifted flour and mix everything thoroughly again. The final step will be mixing the protein and yolk mass.
The finished dough must be poured into molds and placed in the oven, heated to 200 degrees. After the cakes are cooked, they will need to stand for 12 hours.
Wedding cakes, recipes with photos.
We've sorted out the dough, now let's move on to preparing the cream. First you need to soak the gelatin plates and melt the butter. Divide the egg into two parts. Then take the yolks and beat with lemon juice and zest. You need to add melted butter to this mixture.
Place the half-ready cream in a steam bath and slowly stir in the sugar. The mixture must be stirred until the sugar is completely dissolved. As soon as the cream begins to become thicker, you need to add dissolved gelatin to it. Mix everything, remove from heat and let the cream cool.
Now you need to assemble the cake. Each cake must be coated with pre-prepared cream. Afterwards, let the dessert soak for at least a couple of hours. Now you can safely start decorating the wedding cake. If you wish, you can use the same cream or any other one that you like.
Decorations
The decor of the wedding cake does not limit your imagination: coconut flakes, icing, marzipan, fondant. You can draw on the cake as if on a canvas, mold figures, install the next tier, which will differ in shape from the previous one.
In addition to edible decoration, there are artificial flowers, figures made of plastic or other material, ribbons and much more. It’s absolutely not necessary to stop at just one thing, but you shouldn’t forget about moderation either. Often, neat creamy lace looks much more elegant than a complex, heterogeneous and multi-colored composition.
Important! It is not recommended to use fresh flowers for decoration that come into contact with the edible part. Firstly, you don’t know what the buds were treated with, and secondly, one of the guests may have an allergy. If you want to decorate the dessert with flowers, then use special mounts or miniature stands for them.
Glaze
The glaze is prepared simply from powdered sugar, butter and vegetable oils , milk, vanilla and a drop of blue food coloring to neutralize the yellowness.
If you wish, you can add a dye of a different color, then the glaze will not be pure white, but any other shade that you wish. If you do not spare the pigment, the glaze will acquire a rich dark color.
Usually the entire surface is filled with glaze, but you can also create all kinds of designs with inscriptions from it.
Colored chocolate
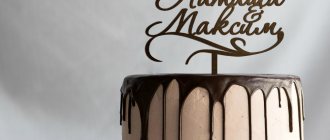
If you love chocolate, but want a bright, unusual shade, then food coloring will come to the rescue again. Add them to regular white chocolate, previously melted in a water bath. The resulting mixture is poured over the top of the cake as a whole, like icing, or patterns are drawn and inscriptions are made.
Idea! The decorative chocolate drips around the edges look extremely appetizing.
Mastic
Mastic allows you to create a wide variety of figures - young people, rings, doves. Flowers sculpted from mastic look very delicate and elegant. Just create the desired shape, remembering how you sculpted from plasticine or polymer clay as a child. Doubt you have the necessary artistic talent? The mastic also looks good if it is applied in a continuous layer. This delicious delicacy is prepared simply - from sugar, proteins and gelatin. You can also add marshmallows melted in the microwave. This mastic looks more impressive, but is more difficult to shape.
Figures
A very cute decoration that will appeal to both children and adults. The figurines can be either classic in the form of the bride and groom, small white birds, hearts, angels, or completely unique, reflecting the hobbies and interests of the newlyweds or the theme of the celebration - a bicycle, a camping tent, a piano.
You can place one large piece in the center or make a whole composition of smaller ones. Chocolate, mastic, cream, and marzipan are used as materials for making figurines.
If there is no time for jewelry work, use ready-made artificial figurines. But if you chose the latter option - one large ready-made plastic figure or several small ones, do not forget to remove them before you start cutting the cake.
Mastic cake for wedding
Making your own wedding cake is not that difficult. And so, a step-by-step master class on making a mastic cake for a wedding at home.
To prepare the cake, we take any inexpensive but tasty recipe and bake the cakes (for example, a sponge cake made from flour mixed with butter beaten with powdered sugar and eggs). You can also make shortbread dough under the mastic. Baking the cake center is simple. It’s better to move on to the process of preparing mastic and covering the cakes with it.
The easiest way to make marshmallow mastic. To do this, you need to take about 100 grams of marshmallow soufflé, a tablespoon of butter and the same amount of lemon juice and 300 grams of powdered sugar.
Soften the soufflé in the microwave (heat for 10 seconds), then mix with butter and lemon juice, then add powdered sugar and knead the mass until it becomes viscous and sticky.
To cover the cakes with mastic evenly and smoothly, you will need a rolling pin, a pastry iron, and a knife (you can use a round one like a pizza knife).
The table is sprinkled with powder so that the mastic does not stick to the tabletop and with a rolling pin we roll out the mastic to 4 mm thick.
Then the rolled out mastic is taken from below and laid out on top of the cake.
A pastry iron rolls the mastic over the surface of the cake. The direction of ironing is from top to bottom.
Using a pizza knife, cut out the fondant around the circumference of the cake.
Next, we make decorations (flowers, figures, inscriptions, etc.) from mastic of a different color. You can purchase special silicone molds for decoration.
Decorating a cake using fondant is very easy. Flowers and other shapes are made as if from plasticine, thanks to the sticky quality of the mastic.
Stand
In addition to the classic stand of dishes located at different heights, there are also completely unexpected solutions - stands in the form of a carriage, a tower, or a waterfall.
The material from which the accessory is made also varies - iron, food-grade plastic, wood. Gold or silver plating is often used, giving the baked goods an aristocratic look. And on a glass stand, the wedding cake will “float” in the air, attracting admiring glances.
The shape of the stand does not have to follow the geometry of the cake. You can easily place square baked goods on an oval dish, and round ones on a heart-shaped tray. The main thing is that the entire cake fits on the stand without hanging over the edge. A good idea is to place special cake mats on each dish. This way you will be sure that the delicacy will not collapse at the edges at the most exciting moment and will not melt even at a summer wedding.
Beads in cake decor
Various kinds of edible beads can be used in the design of a wedding cake, giving it “flirtyness” and enthusiasm. They can either match the cake or have a contrasting shade. Inedible beads can also be used as an original decoration on a wedding cake. For example, these could be pearl threads that can be hung between the tiers, emphasizing the beauty of the confectionery creation.
From candy
A candy cake is an amazing end to an unusual banquet that will delight all guests with its original execution. Making it yourself is very simple.
You will need:
- Styrofoam;
- wrapping paper or thin fabric;
- satin ribbon;
- corrugated paper;
- candies or chocolates in individual packaging (preferably rectangular).
Step-by-step instruction:
- We cut out two circles from foam plastic: one is smaller, the second is larger;
- We cover the foam with cloth or wrapping paper on top;
- We decorate the side edge with corrugated paper flounces, and attach candies one after another on top. It is best to secure them with double-sided tape, but you can also use glue;
- We tie the cake with satin ribbons, and if desired, add any other decor - feathers, beads, bows.
Cake leveling cream recipes
What kind of magic creams are these? You probably already have this question. There are only two most popular types of leveling creams.
“Cream from boiled condensed milk with butter”
It is perhaps the most common, as it does not require much skill or time. It is necessary to mix well 200 grams of soft butter at room temperature and 150 grams of boiled condensed milk. The cream is ready!
"Chocolate ganache"
To prepare it you need:
- 2–3 tablespoons of powdered sugar;
- 30 grams of butter;
- 100 grams of chocolate;
- 110 ml cream (30–35% fat).
Let's start cooking:
- Chop the chocolate and place in a bowl.
- In a saucepan, thoroughly mix the cream with sugar, bring the mixture almost to a boil and turn off (do not boil!).
- Pour the hot mixture into the chocolate, wait a few minutes and mix thoroughly.
- Add butter and stir the mixture again. Ready!
And now, using any of these creams, the cake must be prepared for covering with mastic. It's not enough to just coat the cake. Its surface must be perfectly flat!
- Spread a thin layer of cream over the top and sides of the cake; it will smooth out all the major irregularities. Cool in the refrigerator until the first layer of cream hardens.
- Cover the cake with a second, thicker layer of cream. Try to give the surface as even a finish as possible. Chill again in the refrigerator until firm.
- Heat the knife on the stove (not hot water, it should be dry). Using a hot knife, smooth the cream to an ideal, beautiful and even surface. Place the cake back in the refrigerator.
So, a huge, important stage has been passed! We already have a beautiful, leveled cake! The mastic for a birthday (or other holiday) is also ready, all that remains is to cover our gorgeous, delicious dessert.
Culinary secrets
- Be sure to sift the biscuit flour so that the finished cake is airy;
- Do not beat the yolks in an aluminum bowl under any circumstances - they will darken;
- All products are brought to the same temperature before mixing;
- Fill the baking pan no more than two-thirds full with the mixture, as your sponge cake will rise a lot during cooking;
- Shortbread dough should not be kneaded for too long, otherwise it will lose its softness;
- Strive to ensure that the rolled out shortbread is the same thickness over the entire surface;
- Shortbread dough does not require additional oil on the baking sheet;
- Place the crust in a well-heated oven. Too low or, conversely, too high an initial temperature will worsen the appearance of the product;
- Try not to open the oven door too often, otherwise the middle of the cake will sag;
- The readiness of the dough is checked with a wooden stick or toothpick. When piercing the base, it should remain dry;
- Do not take out the finished cake immediately, leave it to cool a little in the oven that has already been turned off - this way it will retain its fluffiness;
- To make the dough easier to separate from the walls, place the baking sheet in a container with cool water for a few minutes;
- If you haven't tried making any decorations before, such as cream roses from a bag with a tip, be sure to practice before placing decorations on the surface of the cake.
Advice! If you still make a mistake when decorating, don’t be sad. The defect can be hidden with decor.
Delicious wedding cake, step by step with photos
- Separate 20 whites from the yolks. First, beat the protein component by adding a pinch of salt to it. When you get a thick foam, add 10 tbsp to the whites. sugar and a few drops of vanilla essence (to taste). Beat until you get a thick and stable foam.
- Beat the yolks with 10 tbsp. sugar, then pour the whites into them and beat everything with a whisk, moving it in one direction smoothly.
- Add 20 tbsp to the resulting mass. sifted flour, which must be mixed in advance with 1 tsp. baking powder.
- Pour the dough into a baking dish and place it in the oven for half an hour. The biscuit should be cooked at a temperature of 180°.
- When the biscuit is ready, you need to let it cool and rest. It is better to allocate at least 10 hours for this.
- Beat 200 g of butter with 50 g of condensed milk - you will get a cream.
- Cut the sponge cake into 3 layers. Level each of them and soak in syrup from canned peaches (you will need a 1 liter jar of this product). Soak carefully so that the biscuit does not get soggy. Its edges must remain dry.
- Brush each cake with cream and place a few peach slices on top of the cream. Form the cake in this way.
Important! To prevent the cake from sagging, be sure to insert wooden supports into the bottom cakes that are the same height as the cakes themselves.
- Grease the entire cake with cream, aligning all the edges. Place the dessert in the refrigerator for 3 hours to allow the cake to firm up.
- Roll out 5 kg of mastic in a 5 mm layer, and then cover your cake with it, leveling the mastic over the surface using a pastry iron.
- Make fondant decorations for your cake. They can be anything. In this case, you can also use fresh flowers.
How to decorate a cake with bananas, strawberries and oranges: ideas, photos, decoration recipe
Banana is a very nutritious fruit with a lot of vitamins. In addition, it contains a lot of protein, so the product is recommended to be given to children.
Options for decorating with bananas and oranges:
- Make a jelly top. To do this, lay fruit on top of the cake and pour it with frozen jelly. This is all done in a springform pan so that the cake can be removed.
- Flowers. Bananas and oranges can be used to arrange flowers on top of the cake. To do this, the fruits are thinly sliced and laid out in the form of buds or blossoming flowers. Strawberries are generally an excellent berry that makes beautiful flowers. To do this, large berries are cut lengthwise.
- Hill. The fruits are placed on top of the cream in the form of a slide. You can make a fruit mosaic.
- Glade. This option is ideal if you have a few different fruits. It is necessary to divide the surface of the dessert into zones and lay out the fruit.
decorate the cake with bananas, strawberries and oranges
decorate the cake with bananas, strawberries and oranges
decorate the cake with bananas, strawberries and oranges
decorate the cake with bananas, strawberries and oranges