How to make figures of the bride and groom from mastic with your own hands?
Step-by-step instructions with photos or videos of making bride and groom figurines for a wedding photo at home.
Before making figurines of the bride and groom from mastic, you need to actually make the mastic itself. You can prepare it as follows. We will need:
- Soft candies - soufflé, which are usually called "Marshmallow" - 1 pack. For example, like this:
- One tablespoon of water or lemon juice.
- 1.5 cups of powdered sugar. The powder should be as small as possible, without large crystals.
As a rule, soufflé candies consist of two halves of different colors. We need to separate the white halves, put them in a container, add a tablespoon of water (or lemon juice) and put them in the microwave for about 20 seconds. After this time, if necessary, you can tint the mastic with food coloring in the color you need. Now we begin to add a little powdered sugar into the container, while mixing the contents of the container with a spoon. When the mass thickens and is difficult to mix, you need to transfer it to a table previously sprinkled with powdered sugar. Knead and roll the mastic until it stops sticking. All that remains is to carefully and carefully wrap the resulting mastic in cling film and then put it in the refrigerator. She will have to lie there for about half an hour. Now you can take it out and prepare figures of the bride and groom from it. You can use this detailed master class:
Before work, do not forget to stock up on toothpicks to which some parts will be attached. To fasten some parts together, you just need to moisten the desired area with water.
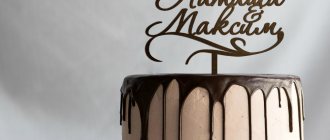
How to bake a cake with your own hands?
Preparation
Before you start making dessert, you need to prepare various materials and equipment. Their set depends on the cake recipe you have chosen. If the dough is biscuit, then you will need molds of different sizes.
A blender is simply indispensable for preparing dough and cream. Bowls are also an integral part of the cooking process. They must have different sizes.
A measuring cup will allow you to correctly measure the amount of certain products. The process of baking cakes cannot be carried out without a rolling pin. If you decide to use mastic as a decoration, then you need to prepare tools that will allow you to work with it.
Recipe
To prepare a delicious wedding cake, you need to decide on a recipe. Let's look at the simplest and at the same time delicious cake.
To prepare it you will need:
Cakes:
- 0.5 kg flour;
- 0.5 kg sugar;
- 0.5 kg butter;
- 0.5 kg almonds;
- 12 eggs;
- zest of one lemon;
- salt and nutmeg.
Cream:
- eggs 6 pcs;
- 0.5 cream;
- lemon juice;
- be sure to add a pinch of salt;
- butter 140 gr;
- gelatin sheets;
- sugar.
This is one of the easiest wedding cake recipes. Even a girl who has never worked with dough before can bake it. Based on the list of products, it is necessary to prepare materials and equipment. They will become assistants in the cooking process.
Step by step guide
Separate the yolks from the whites. Then you need to add sugar and butter to the yolks. Beat all this well and add almonds and the zest of one lemon. It’s good to beat everything again.
The remaining whites must be beaten well with salt into a dense foam. To do this you need a device such as a mixer. Then you need to add the sifted flour and mix everything thoroughly again. The final step will be mixing the protein and yolk mass.
The finished dough must be poured into molds and placed in the oven, heated to 200 degrees. After the cakes are cooked, they will need to stand for 12 hours.
We've sorted out the dough, now let's move on to preparing the cream. First you need to soak the gelatin plates and melt the butter. Divide the egg into two parts. Then take the yolks and beat with lemon juice and zest. You need to add melted butter to this mixture.
Place the half-ready cream in a steam bath and slowly stir in the sugar. The mixture must be stirred until the sugar is completely dissolved. As soon as the cream begins to become thicker, you need to add dissolved gelatin to it. Mix everything, remove from heat and let the cream cool.
Now you need to assemble the cake. Each cake must be coated with pre-prepared cream. Afterwards, let the dessert soak for at least a couple of hours. Now you can safely start decorating the wedding cake. If you wish, you can use the same cream or any other one that you like.
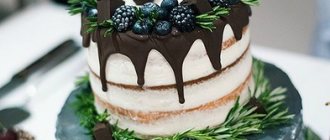
How to make a treat unforgettable - cool figures for a wedding cake
All weddings are similar in one thing: they all require a rich table, decorated with an integral attribute of the celebration - a traditional wedding cake. Traditional doesn't mean boring. The confectionery business has reached such heights that even the notorious cake with swans sometimes looks so that you want to put this beauty in a museum and preserve it for posterity. In addition, there are many options for original wedding cake figures. They can be selected separately in accordance with the theme of the wedding or the ideas of the newlyweds.
To eat or not to eat - that is the question
Wedding cake figurines are made from different materials, some of which are edible and some that are not.
Edible:
Inedible:
Interesting! Read detailed instructions on how to choose the right wedding cake. And also check out the most original dessert options.
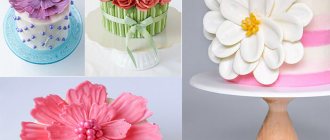
Varieties of sweet mastic
Quite often, figures are placed on a wedding cake made of mastic. Mastic is used not only for making sweet figurines, it is also used to make various inscriptions.
It is a homogeneous viscous mass. Mastic is produced at a confectionery factory, but you can make it at home yourself.
Wedding day cards - which one to choose? 150 photos, best ideas, new products + instructions for creating a wedding card with your own handsWedding in winter: pros, cons and features (+45 photos)
Outdoor wedding - organization ideas, tips and recommendations (62 photos + video)
Homemade mastic has approximately the same consistency as plasticine.
The following types of sweet treats are distinguished:
- Milk mastic. It is made from condensed milk.
- Honey mastic. In this case, a small amount of honey is added to the product. This mastic holds its shape perfectly: it does not crumble like traditional sugar.
- Gelatin mastic. It is used to create intricate compositions.
- Flower mastic. This type of tasty delicacy is used to make flower petals.
- Industrial mastic. It is prepared only in a special production workshop. This product tastes similar to regular sugar mastic, which you can make at home yourself.
According to the samples of the bride and groom
Speaking about wedding figurines, it is impossible to ignore the most common of them - figurines depicting newlyweds.
In most cases, it's just a beautiful couple, standing sedately on layers of sponge cake. However, the classics always have many interpretations.
A couple doesn't have to be boring. Choose funny wedding cake toppers to amuse your guests. The marzipan bride and groom may well be riding motorcycles, sailing on a boat, or just lying on the sofa.
The dessert will become truly special if the newlyweds on the cake resemble the newlyweds in real life. You can focus on their appearance by ordering a cartoon figurine, or you can play up their common hobbies or professions.
You can add a little fun touch to the pomp of the event
For example, collect funny figures of the bride and groom from balloons. They will perfectly decorate the wedding table, and large figures of the newlyweds can become an original decoration of the hall.
Newlyweds made from balloons - this decor will be appreciated by a young couple with a sense of humor who is ready to break the strict “regulations” of the celebration, because the most important thing is fun and good mood on such a wonderful day.
If the figures are placed at the entrance to the hall, then they will sway as if they were alive, and everyone entering, meeting this particular original couple, will receive a portion of a cheerful positive mood. You can complement this “couple in love” with helium balloons of different colors, which will create the feeling of floating in the air.
Singing balloons or an aerial bride and groom walking around the banquet hall will cause a storm of emotions among guests at the wedding celebration. Walking balls are filled with gel and fixed with small weights. Throughout the entire event, they move around the hall from any blow of wind or from a small draft, simply “hovering” above the floor. A good solution is to use balls made from metallized film as decoration. They are much stronger than latex and come in various shapes (heart-shaped, figures, etc.).
Immortal classic
There are things that never go out of style. If we were asked what cakes would be decorated with in 100 years, the answer would be clear - swans, rings, hearts or butterflies. And we wouldn't be wrong.
Confectioners are so skilled at making these traditional decorations that they can probably make them with their eyes closed. It would seem that what new can be invented here?
Forget the stereotype that classics are always monotonous. Do you want swans? Dress them up in a wedding dress and tailcoat, and put a veil and top hat on their heads. Hearts? No problem. Let one of them be with a lock, and the other is trying to pick up a key from a bunch.
Well, if you decide to top the dessert with rings, make them in the form of donuts. Funny figures on the wedding cake will certainly please everyone present at the celebration.
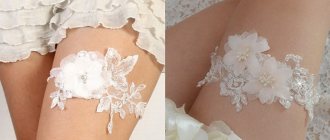
How to make an accessory with your own hands
Wedding props are items of different shapes that are very easy to make. The materials mainly used are: thick paper, cardboard, wooden sticks, glue. Words made of wood and accessories made of felt look original. The process of making props with your own hands consists of several stages:
- Draw a picture, write a phrase. You can use ready-made stencils.
- Cut out a template from paper.
- Glue the drawing onto thick cardboard and trim the edges.
- Glue a wooden skewer to the wrong side.
- Glue the back side again with cardboard. In this case, the stick will be between two layers of cardboard, which will provide additional strength to the structure.
Non-standard approach - cool options
The most extraordinary and creative couples can completely abandon this whole wedding theme. There are so many beautiful creatures in the world worthy of decorating a wedding cake that you shouldn’t limit yourself to any limits. Minions, The Simpsons, princes and princesses from Disney cartoons - all of them have long moved from TV screens to holiday tables.
Cute little animals will look no less impressive on the cake. Bear cubs, kittens, bunnies and other fauna are completely at your disposal. You can make unusual figures for your wedding cake yourself or order them from a professional.
Useful video: master class
Wedding cake figurines made from mastic are not only delicious and cute, but also very easy to make. For example, in literally half an hour you can create a funny figurine of a bride holding her groom in her arms. Watch the video:
Step-by-step instructions below. Let's start with our miracle bride. The basis for it will be a wire frame.
- Bend the wire to make a circle. The diameter is selected depending on the size of the figurine. It is this circle that will become its basis.
- We bend the other part of the wire at a right angle so that the remaining segment is in the center of the circle.
- We wrap the resulting axle with white mastic, creating the silhouette of a dress.
- Let's attach another wire across the frame. We will need it for our hands. We will cover it with flesh-colored mastic. We use the same color for the shoulders.
- The head will also be beige. Let's roll the balls and give it the shape of a face using a special blank. Let's place the head on top of the body.
- Next we will finish the arms. Let's make the forearms and palms, cut off the unnecessary wire.
- Let's add fullness to the breasts with the help of two balls. Cover them with a thin layer of mastic on top.
- The bride can be blonde, brunette or red-haired. We roll the material of the required shade into a sausage and place it around the head.
- For the veil, roll out the mastic very thinly and fold the edges. Put it on your head and give it a neat shape.
- Let's add details. Using a thin brush, paint the face with food coloring.
We sculpt a man in the same way. Watch how to do this in the video below:
Step-by-step instruction:
- We twist the wire as shown in the video. We get a figure resembling a person.
- We wrap the arms, legs and torso of the man with white mastic.
- For the hands, neck and head we use beige.
- Let's color our young man. Don’t forget to emphasize the eyes, nose and lips, and carefully draw out the details of the costume.
- For the tie we use a thin strip of black mastic.
- We cut off the unnecessary wire.
- We place the groom in the arms of the bride.
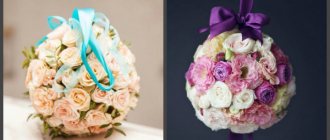
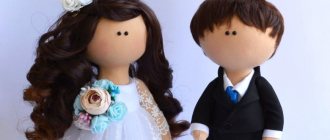
We suggest making your own wedding decorations - figurines of the newlyweds, bride and groom.
The materials you will need are corrugated paper and, of course, wooden balls for the heads of the figures. It is better to take balls with large holes. Our figures of the bride and groom are made without faces, but you can easily draw them yourself with colored pencils (felt-tip pens will not work, but will only blur on the wood).
The work is quite painstaking and delicate, so it is better not to involve children.
Our figures are made from ordinary corrugated (crepe) paper, but you can also make them from corrugated paper ribbons, which have recently appeared in the store - they are more durable.
These handmade wedding figurines can be used to decorate a festive table or the newlyweds’ room.
Tools and materials for wedding figurines of the bride and groom.
— Corrugated paper or paper tape in white, black, pink, light yellow, brown and green
— Two wooden balls with a diameter of 1.5 cm for the heads of the bride and groom figures with a large hole.
— A little white satin ribbon 5 mm wide
— Cord (harness) for arms and legs of wedding figurines of any color
— Glue stick, scissors, auxiliary thread (any)
We make a wedding figurine of a bride from corrugated paper with our own hands.
Making a dress for a figurine of a bride.
Cut a rectangle of white corrugated paper 7x21 cm. Apply glue along the edge of the short side and connect the rectangle into a pipe.
Making legs for a wedding figurine of the bride.
For this we need a 17 cm cord and a piece of corrugated pink paper 5x17 cm.
Apply glue to completely corrugated paper and wrap the cord very loosely in it. Twist the resulting tourniquet a little.
While the glue is still wet, bend it in half and secure it with additional thread. Immediately bend the bride's feet 90 degrees.
Making shoes for a bride's wedding figurine.
For the shoes, cut out two circles from white crepe paper.
Coat them completely with glue and wrap the bride’s feet - you get shoes.
Making the head for the bride figurine.
Insert the figurine's legs into the dress tube so that the bride's legs are completely hidden under the dress. Place folds on top and secure with additional thread.
Coat the protruding part with glue and place the wooden ball on the figurine.
Making handles for the bride figurine.
For the sleeves you need white corrugated paper 3x8 cm. Use scissors to make teeth along the short edges of the paper.
Lubricate the long side of the sleeves along the edge with glue and glue the rectangle into a pipe. It is very convenient to use a pencil.
Make a rope from corrugated pink paper (5x10cm) and 10cm cord. We made the legs in the same way as above.
Insert the resulting tourniquet into the sleeve pipe. Using an additional thread, tie the workpiece in the center. Bend the bride's arms slightly.
Glue the arms under the bride's head. While the cord is wet, you can give it any shape. Glue the handles together. You can use a clothespin.
Making hair for a bride's wedding figurine.
For hair we use light yellow corrugated paper 6x12 cm. Cut the rectangle in half into two strips.
Cut the edges of the strips into “noodles.”
Place the hair of the bride figurine crosswise on the head so that the hair does not go into the face. Glue them with glue.
Straighten your hair and glue it to the ball. Make the bride's hairstyle using glue where necessary. It is interesting to use a toothpick to curl the ends of the bride's hair.
Making a veil for a bride's wedding figurine.
For the veil, take 7x16 cm white corrugated paper. Press the rectangle along the long side together and tie an additional thread around the edge.
Fold the resulting knot inward.
Glue the veil to the head of the bride figurine.
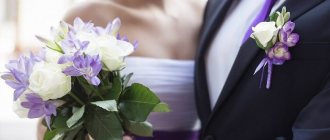
Making a bouquet for a wedding figurine of the bride.
Cut out a 5x3 cm rectangle from green corrugated paper. Cut teeth along one of the long edges of the rectangle.
Glue the rectangle into a pipe.
We squeeze the edge of the pipe together - this will be the base of the wedding bouquet.
Make flowers from pink corrugated paper. Coat small pieces of paper with a little glue and roll them into balls. Then glue the balloons to the bouquet.
The wedding figurine of the bride is ready.
DIY wedding figurine of the groom made of corrugated paper.
Making a jacket for a wedding figurine of the groom.
For the jacket, take black corrugated paper 5x8 cm. Glue the rectangle into a tube.
Pinch the top of the tube and tie with extra thread.
Cut out the shirt right away. Taper the top edge.
Glue the shirt onto the jacket. On the side, along the edges of the shirt, stick pieces of satin ribbon. Burn the bottom edge of the tape to prevent it from fraying.
Coat the top of the jacket with glue and place the head on the groom figurine.
Making sleeves for the groom's wedding figurine.
We make sleeves in the same way as for the bride. For this you will need a 11 cm cord, 5x11 cm corrugated paper for the handles, and 4x9 cm for the jacket sleeves.
Glue the jacket sleeve into a pipe, thread the handles inside the pipe. Make the hands the same as the bride’s.
Secure the workpiece in the center with additional thread.
Glue the handles to the back of the groom figurine under the head. Immediately, while the hand tourniquet is still wet, peel off the glue and give them the desired shape.
Making legs for a wedding figurine of the groom.
For the trousers, cut out a 4x14 cm rectangle from black corrugated paper. Glue it into a tube. For ease of gluing, use a pencil.
Fold the trouser legs in half and glue the central parts together by about 1 cm.
Stuff your trouser legs with torn napkins.
Make shoes for the groom's wedding figurine. To do this, fold black corrugated paper into several layers and glue them together. Cut out ovals from the resulting blanks.
Glue them to the trouser legs.
Glue the trousers as high as possible inside the jacket.
Making hair for a wedding figurine of the groom.
Cut out a 6x10 cm rectangle from brown corrugated paper. Cut “noodles” from one edge.
Squeeze the entire bunch of hair together and glue the groom figures into the hole on the head.
Create a hairstyle by crimping and gluing the hair to your head. The excess can be cut off.
Make a bow tie from a piece of black crepe paper. And use a piece of green and pink paper to make a decoration. Make the flower in the same way as for the bride’s bouquet, crumpling a piece of pink corrugated paper into a ball and gluing it onto the “leaf”.
DIY wedding figurines of the bride and groom made of corrugated paper are ready.
If desired, you can draw faces on the newlyweds' figures using colored pencils.
There is a Russian version of wedding dolls - Lovebird dolls. You can see ready-made versions of these dolls in our store at the crafts fair.
Peculiarities
Traditionally, people try to turn a wedding cake into a real culinary masterpiece. The main trend in recent years has been multi-tiered treats, the top of which is decorated with figures representing the newlyweds or symbolizing the strength of feelings and mutual love between the newlyweds. The figurines are edible and inedible:
- edible ones are made from caramel, mastic, dough, chocolate, marzipan or candy mass;
- inedible ones are most often made from porcelain, plastic, polymer clay or ceramics.
If the newly-made spouses want to preserve the memory of the celebration for many years, then it is better to give preference to inedible decorations, but if you are determined to share the most appetizing pieces of the wedding treat with your guests, then you should choose options for food materials.
Jewelry options
Traditional figurines
The version with figures depicting the bride and groom is considered classic. “Young people” can hug, hold hands, kiss, ride in a wedding car or dance. As a rule, they reflect the lifestyle of the newlyweds and their character.
Most often, the newlyweds are depicted in traditional wedding dresses of black and white colors, but some newlyweds do not look for easy ways and strive to stand out, so their desserts are crowned by a man and a woman in the form of swans, in the costumes of Adam and Eve, small Cupids or in some alternative options. In second place in popularity are figurines of doves, swans and images of wedding rings with hearts.
Cartoon characters
Wedding cakes are often decorated with figures of famous cartoon characters. This option is optimal for those who are tired of the standard canons of a wedding celebration and for those who want to make their holiday truly fun and playful. Young people with a good sense of humor will certainly appreciate the Minions, the Prince and Cinderella, Mickey and Minnie Mouse, as well as Shrek and Fiona and Rapunzel and Eugene.
Such figures will not only set the tone for the holiday, but will also turn it into a little fairy tale with a happy ending.
Humorous
The funniest jokes are based on self-irony and self-criticism, so using humorous decor can cheer up not only young people, but all guests. It is not at all necessary that funny figures should have a great external resemblance to young people; moreover, they are often made into caricatures. For example, brides are very popular. who caught the groom on a bait, or girls who drag a reluctant young man to the registry office.
The benefits of making it yourself
Guests will be happy to support the newlyweds in their desire to conduct an original photo shoot using accessories of different shapes and colors. You can take ideas from the Internet or develop sketches yourself, depending on the theme of the event. The advantages of making it yourself are as follows:
- Low cost. Accessories made from scrap materials are inexpensive, which can significantly save your wedding budget.
- Ease of manufacture. Making your own props is not at all difficult. The accessories mainly consist of a cardboard base and a wooden stick.
- Originality. Wedding photo props allow you to create an unforgettable atmosphere; original photo accessories emphasize the individual style of the newlyweds.