Processing manicure tools
The need to disinfect the tool is dictated by the nail care process itself.
On files, tongs, and cutters, there are particles of biomaterial that may contain bacteria and viruses that can penetrate the body and develop, causing hepatitis, nail fungus, human immunodeficiency virus, and various diseases of the nail plate. Untreated instruments risk infecting not only the client, but also the master himself, so their processing is extremely important and is part of the master’s job responsibilities.
Proper processing of tools includes several stages:
- Direct treatment with disinfectants.
- Cleaning tools.
- Sterilization.
- Proper organization of storage of processed materials.
Processing and washing manicure tools
In order for your nail care tools to always be safe and serve you for a long time, the process of caring for them should include several stages:
- regular disinfection;
- cleaning manicure instruments, including scrapers, nail files;
- sterilization of instruments for manicure and pedicure;
- correct storage.
Disinfection and sterilization are carried out sequentially: the first procedure helps eliminate most of the pathogenic microflora, and sterilization completes the process, destroying viruses and rare types of mycotic infections.
How to sterilize manicure tools?
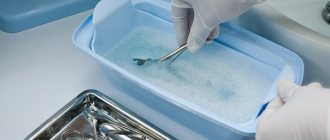
The simplest and most affordable method of disinfection is treating instruments with a disinfectant solution. This method is suitable for those who do their own manicure, using tools only for themselves.
- Take a container that is resistant to chemicals.
- Pour half a liter of clean boiled water into it.
- Add a disinfectant solution, which can be purchased at any medical supply store. The required volume is 5 ml.
- Immerse the tools, cleaned of sawdust and skin residues, in water for 5 minutes.
- Clean the tools again with a brush and rinse under running water.
This method does not guarantee complete sterilization, but is suitable for individual use at home.
For treatment in a salon, special sterilization devices are used. These include:
- Dry heat cabinet. This device kills bacteria and viruses using high temperature. Heat sterilization is suitable for steel instruments that can withstand processing. Nippers, scissors, wire cutters, metal files, cutters are placed in it for 20 seconds and removed immediately after processing.
- Steam sterilizer (autoclave). It is processed using hot steam. For high-quality disinfection, devices are laid out in one row. The duration of the process is 20 minutes.
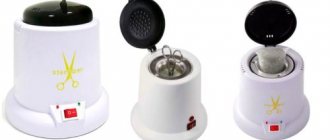
- Ball sterilizer (glasperlene). This sterilizer is used for metal instruments only. The essence of the device is to quickly heat quartz beads (up to 240 degrees) and process tools with them. After this device, you can wash the instrument with a disinfectant solution and use it.
- Ultrasonic container. In this device, the treatment is carried out using ultrasound, where dirt and traces of corrosion are removed using vibration.
- Ultraviolet irradiator. This sterilizer treats instruments with UV rays.
- Chemical disinfection. Chemical sterilization of manicure instruments requires the availability of reagents, premises, special clothing and compliance with safety rules.
The treated instrument must be stored correctly. For this purpose the following are used:
- Kraft bags . These are paper bags that are closed with paper clips and allow you to keep your instruments sterile for three days.
- Thermally sealed bags. The processed devices are stored in them for up to a month, remaining sterile.
- Bags with a closing valve. They maintain sterility for up to 20 days.
Since salons have a high customer traffic and there is no need to store tools for a long time, craft bags are popular.
Manicure tool processing
The process of processing a manicure tool before use is conventionally divided into four stages.
- Disinfection.
- Cleaning.
- Sterilization.
- Storage.
This is exactly the procedure.
First, all instruments are disinfected with special solutions and means. Solutions for use in professional salons are used in medicine to disinfect instruments, devices, medical clothing, and furniture. The drugs are certified and approved by the Ministry of Health of the Russian Federation. They do not cause metal corrosion, do not affect the cutting properties of tools, and do not discolor the surfaces of materials.
What solutions are best to use for disinfection?
To prepare a 1 liter Optimax solution. cold water take 3 tbsp. spoons of the drug. Place the instruments for 20 minutes.
Alaminol 1%. Dilute 10 ml of solution into 1000 ml. water. The prepared solution can be stored in a dark place for 10 days.
Korzolkes Plus, Gigasept, Blanidas Active Enzyme are also used.
To disinfect, place the instruments in the prepared solution, remove them after 20-30 minutes, and dry them with sterile wipes.
When prepared, the disinfectant for instruments is stored in a dark place for 10 to 20 days.
Be sure to wear rubber gloves when preparing solutions, as well as handling instruments.
The solutions have antimicrobial, antiviral and antibacterial effects.
But they do not act on all types of microorganisms. Sterilization is required to kill bacteria, fungal spores, and severe viral infections such as HIV.
After disinfection, the manicure tool must be rinsed with running water and, if necessary, cleaned with a special brush. Depending on the material used, different brushes are used for each tool. Then it is dried with a sterile cloth.
The next stage is sterilization. For this purpose, professional salons use special equipment.
Types of sterilization equipment
Dry heat cabinet
The dry-heat oven is a time-tested apparatus. We place the tools in a cabinet and process them at a temperature of 180-260°C. Processing time 60-120 min. A lot of tools fit inside the device at once. But there are significant disadvantages: it consumes a large amount of energy, at elevated temperatures the quality of the material is lost and the wear of equipment increases.
Autoclave for sterilizing manicure instruments
In an autoclave, sterilization of manicure tools occurs through steam treatment, as in a double boiler. Less time is spent on processing, less electricity is consumed, and the tool is used more carefully. The combination of optimal pressure values, distilled water steam and a temperature of 134°C gives a good effect of destroying harmful organisms. Inconveniences include the use of distilled water and the high price.
Buy Autoclave with delivery throughout the Russian Federation
Glasperlene Ball Sterilizer
Buy Glasperlene ball sterilizer with delivery throughout the Russian Federation
The Glasperlen ball sterilizer treats manicure tools in 15-180 seconds. The machine copes well with a large number of instruments being processed. Ball-type, inexpensive, compact. But the balls must be replaced every six months, otherwise the quartz does not warm up well and loses its properties. An important point: the tool is not processed as a whole, but only its working part. The handle remains untreated. This is not always good.
Choose for yourself which sterilizer to use for manicure tools at home.
Ultraviolet (UV) and ultrasonic (US) machines exist for processing before and after sterilization, but not instead of it. Ultrasonic radiation is used to process those instruments that are difficult to process manually: nail clippers, nail clippers. UV devices are needed not for sterilization, but for storing treated instruments. For long-term storage, instruments are placed in craft bags before sterilization with the date of sterilization indicated. The indicators on the bag change color during heat treatment from beige to blue, and during steam treatment to dark green. You can immediately see whether sterilization was carried out properly or not.
Ultraviolet sterilizer for sterilizing manicure tools
Tools are stored either in a UV cabinet or in craft bags. Kraft bags remain sterile when sealed for 20 days, and when sealed for up to 30 days. Can be stored.
Buy Ultraviolet sterilizer
Processing tools at home
It is equally important to process manicure tools at home. For disinfection, you can use either ready-made solutions and antiseptics, or prepare a disinfectant solution at home. You will need:
- potassium permanganate solution or potassium permanganate -30g;
- sodium tetraborate or borax (boronic acid salt) - 10g;
- medical alcohol - 100g.
Pour alcohol and borax into a small container, close the lid and, stirring, make circular movements until a cloudy liquid is obtained. Add potassium permanganate and stir again until a pinkish solution with a purple tint is obtained. Place the manicure tool in the resulting solution and place in a steam bath for 15 minutes at a temperature not exceeding 50°C.
You can also use the oven as a sterilizer at home. Before processing, first disinfect, then wash the instruments, dry with a sterile cloth, and place them on an open surface on foil so that the instruments do not touch each other. Heat the oven to 180-200°C and sterilize for 15 minutes.
Not all instruments can withstand serious heat treatment. Boiling is a simple way to process it at home. After placing the manicure tools in a container, boil them for 15-20 minutes.
Features of processing files, buffs, nail cutters
Each manicure instrument has its own characteristics of disinfection and sterilization, depending on the material of manufacture and texture.
It is useless to treat buffs with a suede base with solutions; suede is a capricious material that absorbs all bacteria. Even a sterilizer will not be able to completely remove all microorganisms from such material. Therefore, it is better not to use such a tool in the salon. And for home use, it is enough to treat the suede buff with an antiseptic.
Wooden nail files will lose quality and swell if they are kept in aqueous and alcohol solutions. Paper-based files quickly become unusable; for professional salons, you can keep a disposable set of such tools. At home, such instruments are sprayed with a disinfectant solution and stored in sterile wipes, separately from other instruments or in a UV apparatus. Deskosept AF with a spray bottle is suitable for treating nail files after the client.
Attachments for hardware manicure, cutters, are made of different materials and have different depths and softness of the notches. Therefore, in order to properly sterilize cutters for manicure, it is necessary to take into account whether or not the materials will withstand this or that treatment.
It is recommended to wash all cutters, except disposable ones, in a special disinfectant solution. Cleaning should be done manually using a brass or plastic brush under running water. You can also wash it in a washing machine by placing it on a stand. It is allowed to process attachments for hardware manicure with ultrasound; before doing this, rinse each cutter. Corundum, steel and hard alloys can be processed more thoroughly. They will withstand an autoclave or dry-heat oven.
If contact with a fungus is suspected, the instrument is either thrown away or must be placed in a dry-heat oven or enclave for processing.
How to sterilize cutters?
In accordance with the requirements of sanitary standards, manicure cutters undergo several stages of processing in order to completely eliminate the possibility of transmitting harmful microorganisms, bacteria and viruses from person to person.
- Removal of biological dirt: sawdust residues, keratinized skin particles.
- Disinfection. It is carried out using special chemicals or physical methods (incandescence in a dry-heat oven).
- Pre-sterilization cleaning or processing under running water.
- Sterilization in a dry-heat oven, autoclave, ultrasonic sterilizer.
How to get rid of rust
There are many products on the market to get rid of unfortunate rust.
And our store is no exception. We have two effective products in our range.
Prozatochka alkaline oil.
Designed for lubricating and cleaning manicure instruments from rust, carbon deposits and dirt. It is presented in a 10 ml tube, which has a convenient spout for application.
Instructions for use:
Open the pliers and apply oil to hard-to-reach places: connecting and spring mechanisms. Develop the nippers for 2 minutes: imitate their work without closing the blade completely. Set the instrument aside for 10-15 minutes for the oil to take effect. Next, rinse the joint well under running water and wipe the instrument dry.
The oil must be used before sterilization begins.
How are ceramic and corundum cutters processed?
Ceramic cutters are disinfected in an ultrasonic bath with a special solution. To protect the cutter from the negative effects of the device, you can put a special protective cap on it. After ultrasonic treatment, the cutter is washed under running water and then dried in air. The next stage is sterilization in a ball sterilizer or dry-heat oven.
The final stage of working with the tool is to place it in a kraft paper bag.
Corundum cutters do not require special care and can be sterilized along with other metal manicure instruments. The first stage of processing is the removal of residual biomaterial, the second stage is placement in a glasperlene-type sterilizer, where all dangerous microorganisms die under the influence of high temperature.
How to sterilize files and buffs?
Files and polishing buffers are made of plastic materials that will not withstand chemical treatment or heating in a dry-heat oven. An exception is metal files for filing nails, which can withstand heat treatment, but the metal may darken and the file itself loses its attractive appearance. Inexpensive polishing files do not require disinfection. They are thrown away after use. More expensive instruments are processed in an ultraviolet sterilizer.
The easiest way to process is washing under running water, the next step is air drying and treatment with a disinfectant liquid. Soaking in a solution is not a suitable processing method, since a rare nail file will withstand it.
Files and buffs treated with the solution are placed in craft bags or wrapped in craft paper.
Cleaning cutters and attachments
To remove particles of materials, the nozzles are cleaned. This procedure is a preparatory stage for sterilizing instruments.
There are three cleaning methods. This can be done using dental equipment. After washing in water, the cutters are placed in a washing machine and secured to special holders.
Treatment in a dental apparatus lasts about 5 minutes at +90C.
Another option for cleaning cutters is by hand. They are washed in running water using polymer or brass brushes. This is a labor-intensive, but most affordable method. Therefore, it is used mainly at home.
You can use a professional UV sterilizer. It is intended specifically for cleaning cutters, despite its name. Before starting the procedure, the nozzles are washed in water, secured to the holders and the treatment mode is selected. Before purchasing such a device, you should familiarize yourself with its characteristics. Then you will be sure that it is suitable for a certain type of instrument.
How to sterilize manicure instruments at home?
You need to take care of the instrument in a certain sequence. This must be done every time you perform nail care and cuticle removal.
- Wash the tools under the tap using soapy water.
- Place the tongs, scissors, metal file, pusher in a bath of water and disinfectant.
- Perform sterilization. As a sterilizer at home, you can use a pan of boiled water or a kitchen oven. Boil the tools in a saucepan for 20 minutes. If you are using an oven, preheat it to 200 degrees, carefully arrange the tools in a clean metal tray and place in the oven for 15 minutes. Remove the tools and let them cool. Wrap in craft paper. Another method of sterilization is to hold instruments over a fire, but it is difficult to call it simple and safe.
In addition to heat sterilization, chemical treatment can be used. At home, you can clean your tools with vinegar or a 70% alcohol solution. It is also allowed to use a solution of formalin and soda, 6% hydrogen peroxide. You can also purchase special disinfectants for home use, for example: “Bacillol”. You need to immerse the tool in this solution for 5-10 minutes, after which you can use it.
If you don’t have alcohol or Bacillol on hand, use Miramistin or Chlorhexidine, which are found in almost every family medicine cabinet.
Wash files and buffs with running water, dry and treat with a disinfectant solution. If you have soft polishers with abrasive tape glued to the edges, change them more often. This is not only hygienic, but also useful, since in inexpensive buff files the abrasives quickly wear off and do not properly treat the surface of the nail.
In addition to handling tools, hand cleaning is also important. Be sure to wash your hands with soap before starting a manicure. You can use a special antiseptic gel. In the salon, the master is also obliged to offer the client hand sterilization, as well as to wear clean gloves or disinfect his hands.
The workplace must also be clean. If you're doing your nails at home, make sure the counter is clean. Place tools only on a clean surface.
How to sterilize manicure attachments in salons and at home
Disinfection destroys vegetative forms of microorganisms, but it is powerless against their spores. When sterilizing cutters on a manicure apparatus, all known types of pathogenic, conditionally pathogenic and non-pathogenic microbes and spore forms die.
Chemical method
In its pure form, chemical sterilization is the prerogative of industrial enterprises, and sometimes of medicine. It is almost impossible to do this in the nail industry. And that's why:
- the reagents are extremely toxic and require great caution;
- work with them is carried out only in special clothing with respiratory and eye protection;
- the process is completed by neutralizing the surface with distilled water;
- people are required to leave the premises for several hours.
So in salons, manicure cutters are sterilized in special electrical equipment.
Hardware sterilization
The advantage of processing is that the mode and time are set according to the type of nozzle. Therefore, you can sterilize instruments without fear of deformation of the working surface (if you correctly take into account the material used to make the cutters).
- Dry-heat ovens – sterilization with hot air. The exposure is carried out at a temperature of 180-250 ◦C. Time – 30-120 minutes. The cabinet capacity is equipped with shelves and holders for processing a large number of tools. There is a timer for setting the operating time.
- Autoclaves – hot steam treatment. Autoclaving combines high temperature (130-140 ◦C), pressure and steam. Only distilled water is used. To completely sterilize an instrument, 15-40 minutes is enough.
- Glasperlene devices for sterilizing manicure instruments. The new product takes up very little space: it is a medium-sized glass filled with tiny glass beads. It’s just right for a cutter, but it won’t be possible to sterilize many instruments in one session. The temperature regime approaches the oven – 230 ◦C. Treatment lasts from 30 seconds to 2-3 minutes.
Autoclaves are optimal for salon use. But how to sterilize manicure cutters at home , since any of the professional devices are quite expensive?
Sterilization of manicure instruments with alcohol
The use of alcohol and alcohol solutions to sterilize manicure instruments is only permissible when they are for home use and the woman works with them alone. Even under this condition, the instrument must be boiled in distilled water once a month. Then you will not be afraid of fungi and other diseases.
If the instrument is used in a beauty salon, then sterilization with alcohol will be insufficient and the possibility of infection will be high. In this case, it is necessary to use additional devices and instruments: an oven, an ultrasonic sterilizer, etc.
What manicure instruments need to be sterilized?
All manicure accessories can be divided into two large groups: porous (files, buffs) and non-porous (metal tweezers, pushers). Porous items are most often disposable, but there are also reusable items that require special cleaning. Non-porous instruments are reusable and easy to clean.
Cleaning methods based on the ownership of the tool are divided into:
- Porous items – fabric, absorbent and wooden items such as nail files, cotton swabs, orange buds, sponges, paper napkins and towels, and polishing buffs. Most of them are single use items and no sterilization is required. Exceptions include files, but during disinfection it is necessary to ensure that the surface does not become damaged after contact with liquid; if this begins to happen, the file must be disposed of.
- Non-porous instruments are made from metal, plastic, glass and fiberglass. This type includes cutters, scissors, tweezers, etc. All these items require sterilization after each client.
Items that do not come into contact with the client’s skin (gels, acrylics, colored varnishes, gel polishes) do not tolerate various microorganisms, therefore there is no need for the sterilization process for them.
Stages of sterilization
The process of disinfection and sterilization of an instrument requires strict adherence to the instructions, otherwise you cannot guarantee its safety. All processing requires a lot of time, so the master needs to have several sets to work with. Cleaning consists of the following steps:
- After work with the client is completed, the instrument that was used for the manicure procedure is thoroughly washed in running water and soapy water and cleaned of visible contaminants.
- Next, the items are placed in a tray with disinfectant liquid and remain there for the required time (recommended by the manufacturer).
- The instruments are sent to a sterilizer to completely remove all microorganisms from their surface.
- Next, clean items must be packaged in sealed bags to maintain cleanliness until the next use.
Before starting work, open the package with the tool in front of the client and treat it again with a disinfectant or alcohol.
How to properly care for attachments?
Nozzles for milling cutters do not require any special care. It is enough to follow a few rules: upon completion of work with a client, ALL attachments used to perform procedures with this client must be washed, cleaned, sterilized and dried. Even those that were processed only with acrylic or gel! Wash the attachments under running water with a plastic brush. Silicone nozzles are the easiest to clean; diamond and carbide nozzles are more difficult to clean. If you use ceramic pedicure attachments, you will have to use a brass brush rather than a plastic one. Natural polishers just need to be “bathed” in a soap solution. Sometimes the carbide nozzle becomes so clogged with gel or acrylic that no brush can clean it. Then don’t be lazy and carefully clean the teeth of the nozzle with a needle. This procedure will also significantly extend its service life.
Then ALL attachments are sterilized. I recommend using chemical (immersion) sterilization. In a salon environment, this is the easiest, fastest and most reliable method. And, besides, this is precisely what is required by SES representatives in most cases. Take a copy of the certificate or registration certificate of the liquid used from the seller and you should not have problems with checks.
Read the instructions for the liquid and strictly follow the manufacturer's recommendations. Most of these drugs are supplied in concentrated form. From the moment the container is opened, the shelf life of the drug is usually 1 year, and for a diluted solution – 14 days. Don’t skimp and change the solution to a new one after 2 weeks. Depending on the concentration, the tool is kept in it (both the working part and the shank must be completely immersed) from 15 minutes to 2 hours. The higher the concentration, the faster the sterilization occurs, the more aggressive the environment and the shanks of some attachments may darken, and the working parts of natural polishers may turn yellow. Do not overexpose the attachments to the solution - you will not achieve better sterilization, and you may damage the instrument. For example, ceramic bits can become brittle; carbide bits can have the working edges of their teeth dulled due to corrosion...
After sterilization, the nozzles are thoroughly washed under running water and laid out on a disposable napkin, preferably in a medical bowl or stainless steel tray, to dry completely at room temperature. They are then placed in a container with a lid for storage.
Cleaning time for nozzles can be significantly reduced by using an ultrasonic cleaner. Rinse the attachments under the tap and place them in the sink for three minutes - this will be enough time to clean the dirtiest of them. Even old and “dull” attachments get a second life after this procedure. Then rinse again in running water and hold in sterilization.
Do not forget to disinfect the nozzles before working with the client. This can also be done chemically by wetting the working part with an “instant” disinfectant from a spray bottle. After the nozzle has dried (usually 30–60 seconds), you can begin to work.
Do not skimp on sterilization and do not replace it only with disinfection. It's not the same thing. Not all pathogens and fungi die during disinfection. Think about biological safety, first and foremost about your own.
By the way, the client’s confidence increases when he sees that the master uses a sterilized instrument and does not spare time for this procedure.
One more thing. Disposable caps are called disposable because they are thrown away after use, rather than disinfected and used on the next client!
Vitaly Vorobyov05/01/2012 18:21:20reply