Basic terms
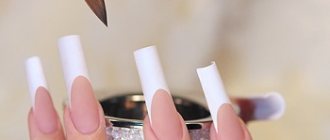
Top forms are a soft plastic product that imitates a natural nail plate and helps create an artificial nail of the desired length and curve.
Unlike conventional blanks, they are installed on the nail, and not under it. Extension on top forms is a procedure for artificially lengthening the nail using top forms and gel material. Extension using this method involves laying out the material inside the form and imprinting it on the natural nail plate.
Polygel is an extension material obtained by combining acrylic and gel formulas.
The product is odorless and has increased density, which makes it an excellent material for modeling artificial nails. Available in tubes or jars with a lid.
Arched nail extension and modeling with gel and acrylic: forms
Tubes for arch extensions.
Arched extension is carried out using:
- Tips. The master selects tips of the desired shape and uses them to create a nail with a C-shaped silhouette. The method is not very common.
- Disposable and reusable bottom forms. The most popular nail. Creating an arch occurs directly on the nail, this will strengthen it and smooth it out if it is thin or uneven. The lower forms are reusable plastic and metal, and disposable, made of foil. They can be purchased at manicure supply stores.
- Tools for compressing the arch. For beginners, it is better to purchase a set of plastic or metal clips that fit on the nails. They hold and model well, but can cause discomfort to the client - they squeeze too much. You need to be interested in his feelings. If you've gotten good at doing arched nails, try buying special tweezers or a hard clip. Using them requires effort. but they're worth it.
Arched forms are reusable.
Arched forms are disposable.
Clamp.
Kinds
Depending on the bend, there are 3 types of upper forms:
- Natural . Light bend, close to natural;
- Classic . More convex in the center of the structure;
- Standard . The most convex. The result is a nail with a slightly drooping tip.
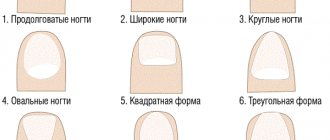
The specific type is selected based on the data of the natural nail - the bending of the transverse and longitudinal arch is assessed, as well as the desired shape of the extension.
- A natural curve is used for the final result, a crisp or rounded square;
- For the future nail shape Almond is standard;
- For an oval – classic.
But this relationship is conditional - you can use any bend, but in some cases this may increase the operating time.
A few important points:
- The upper forms have their own size range, which is determined by the numbers embossed on the plastic. The larger the number, the smaller its size. Depending on the manufacturer, the largest figure may vary. Common numbering of sizes is from 1 to 10;
- Depending on the manufacturer, it can be with or without printed lines. The marks on the plastic are intended to determine the length of the future nail and carefully lay out the material. Forms with markings are offered by dozens of manufacturers, for example, PNB, Formula Profi, Monami, Vogue Nails;
- There are small handles at the ends of the plastic blanks - they help separate the plastic without damaging the artificial nail. Find forms with handles from the brands Monami, Vogue Nails;
- On the upper forms, extensions are done with any type of gel. But most often it is polygel that is used, since it has a dense texture and does not “roll off” from the sides. When choosing a product, pay attention to the brands Canni, Vogue Nails or Patrisa Nail.
The difference between the upper forms and the usual ones
The usual forms mean tips, liquid tips and disposable templates for extensions.
- The upper ones are reusable. After polymerization, the material separates effortlessly and leaves no marks on the workpiece, so it can be used until it loses its bending. Approximate service life – 2 years;
- The upper forms do not polymerize along with the coating, but are removed immediately after the material has hardened;
- The technique of working with forms allows you to save material and create nails that are close in thickness to natural ones;
- The extension procedure is halved and takes from 1 to 1.5 hours including decoration;
- The end result requires almost no modification. After polymerization, you only need to remove the excess and polish the resulting nail.
- Unlike liquid tips, where the material is applied only to 2/3 of the natural nail, top forms involve laying gel over the entire nail plate;
- There is no need to add material after removal.
Description of extension technology on conventional forms:
Nail extension with tips: materials, step-by-step instructions and nuances
Almond shape
Almond-shaped nails are at the peak of popularity. In order for such a manicure to look neat and stylish, you need to put in a lot of effort. The almond shape is rightfully considered the most difficult to execute. It is important to get the proportions right and give the tip the perfect pointed look. When done correctly, this shape will suit every girl and will look appropriate with any outfit.
Editor's choice: Beige manicure: interesting options
Common problems with hair extensions
- The natural nail plate is completely flat or its edge tends upward. In such cases, the stress zone is difficult to form and most often remains the weakest in the extended nail.
What to do: Before printing the material, drop a little polygel in the center of the stress zone. The ball should be no more than 1.5 mm in height and no more than 1 mm in width. Dry the ball in the lamp and start printing. This technique will help keep your shape at the desired level and prevent it from falling below the required level. - A very arched nail. When looking at the end of the free edge of a natural nail, a strongly rounded arch is visible. In this case, it will not be possible to press the workpiece tightly, since the transverse arch of the workpiece will not be so rounded.
What to do: before imprinting the form, add a little polygel to the natural nail in the cuticle area. This technique will help smooth out a steep arch. - Nails grow downwards. If the nail plate tends downwards, the edge of the workpiece at the cuticle will constantly move away.
What to do: Place a small layer of polygel near the cuticle, as well as drops in the center of the stress zone. Only after the layering has polymerized, start printing. - Large gap between cuticle and mold. There is no need to install the workpiece tightly to the cuticle, but there should not be a large gap. The maximum indentation is 1 mm. What to do: File the plastic blank on the sides so that the edges do not interfere with moving it closer to the cuticle. You only need to cut down a little bit so that there are no gaps in the side sinuses.
- There is no free edge. To work with top forms, it is best that the natural nail has at least minimal regrowth. The distal edge will help avoid material leakage and also increase the strength of the structure. What to do: Before modeling, complete the free edge with polygel. You can do this on disposable paper blanks.
Arched square nail design. Arched almond nail design
In the photo you can see how beautiful and graceful square and almond-shaped arched nails are.
Red square arched nails.
Arched square leg design.
Arched square nail design: sophisticated black and white combination.
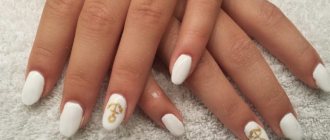
Arched quadra design with gold.
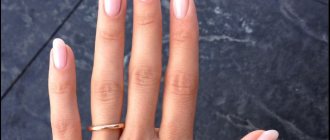
Arched oval design.
Arched almond design.
Modeling using the Ombre technique
Thanks to the unique technology and simplicity, extensions can be done immediately with the design. One of the common varieties is ombre modeling.
To work you will need:
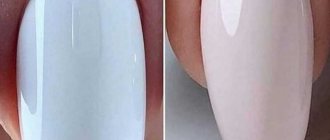
- Polygel: white and camouflage;
- Orange stick and brush;
- File and buff;
- Top.
- Prepare for extensions: do a manicure, apply primer;
- Place a small amount of camouflage in the center of the workpiece with an orange stick and spread it with a brush in a thin layer. When distributing the polygel, “smooth” it to a thin, almost imperceptible layer;
- Place the form in the lamp for 7 seconds so that the camouflage “sets” slightly;
- Using an orange stick, place white polygel in the place where the white color is planned for ombre;
- Distribute the polygel, carefully blending it onto the camouflage where the color transitions;
- Dry for 7 seconds in a lamp;
- Lay out a little more camouflage - this layer will become the main thickness of the future nail;
- Distribute the gel, forming a thickened stress zone, a free edge with its future shape, a cuticle zone and side ridges;
- Print the form with the material onto the nail, remove the excess, complete the missing pieces with camouflage;
- Place your hand in the lamp for 10 seconds;
- Using a clamp, pinch the distal edge and growing points, remove the workpiece and install a clothespin;
- Dry the material in a lamp;
- File down the free edge, remove any imperfections and polish the surface of the nail with a buff. When polishing, avoid the color transition area so as not to simply file it off;
- Wipe your nails with degreaser and apply top coat.
Gradient manicure: preparation, ideas, materials, 6 methods of execution
French lay-out
In order not to draw the smile line and not suffer with a clear joint, use the lay-out technique. In this case, everyone can get a French manicure.
- Carry out standard preparation - manicure, polishing, degreasing and primer coating;
- Place camouflage polygel into the mold and form a curved smile line. This part will be pink, so leave an imaginary margin for the white tip;
- Stamp a camouflage shape onto your nail. Look at the structure from above - if the gel shows through, pull the workpiece off and start over. The layer should not be too thick, but it should not be visible either.
- After installing the form with polygel on the nail, send it to the lamp for 10-13 seconds;
- Reach out with your hand, pinch the free edge, remove the workpiece and put on the clothespin;
- Dry the polygel in a lamp;
- Take the mold again and put white polygel there. Stretch it as much as the length of the future nail should increase. Don’t pay attention to the smile line - the joint with the camouflage will be smooth in any case;
- Secure the blank on the nail, moving it from the free edge to the junction with the camouflage;
- Check the antennae. The lines going to the lateral sinuses should be smooth and filled. If you find any gaps, fill them with white polygel;
- Place your hands in the lamp for 15-20 seconds;
- Pinch the nail, but only where the white color is completed. Attach a clothespin and send your nails to dry;
- File the form, check for empty cavities and polish the nail plate to remove excess streaks of white polygel onto the camouflage;
- Cover your nails with top coat.
Design options for a French jacket - a selection of ideas
Arched French nails: design, photo
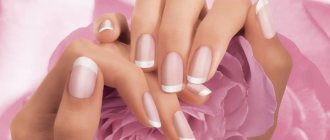
Arched silhouette m French - design - an ideal combination in manicure. The nails turn out impeccably beautiful and very delicate.
French arched nails.
Arched long French nails.
Arched French nails for a wedding.
Arched French nails with a pattern.
French arched nails with lace.
Aquarium manicure
- Carry out standard preparation of nails for extensions;
- Take the mold and cover the inside with a small layer of clear polygel. The layer should be such that design elements are “sunk” in it;
- Lay out the desired design using an orange stick. Almost anything can be used as decoration - rhinestones, bouillons, kamifubiki, sparkles;
- Dry the form with the future aquarium in a lamp for 10 seconds;
- Lay polygel on top of the decor in the color of the future coating - camouflage or a bright shade, if desired;
- Distribute the material according to standard rules - less at the cuticle and on the sides, more in the stress zone and on the free edge;
- Stamp onto the nail and remove excess material;
- Dry for 15 seconds, pinch, remove the mold and dry completely;
- Cover the design with a top.
Polygel nail modeling on top forms is becoming the most popular technique. If you haven’t tried this on yourself yet, don’t put it off. Any questions? Ask in the comments.
4.8 / 5 ( 143 voices)