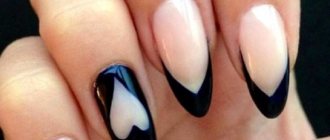
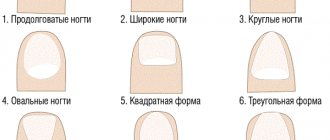
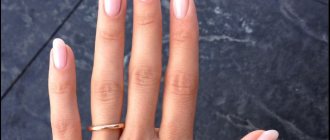
The shape of nails is individual for each woman, it depends on the shape of the fingers, their thickness, length, as well as the woman’s style, lifestyle and taste. But the almond shape of nails is an exquisite classic!
We have heard the expression many times that what is fashionable and new is the well-forgotten old. And these words have repeatedly been confirmed in styles, clothing cuts, hairstyles or color schemes, as well as in the shape of the nail plate. The almond shape was the biggest buzz in the 50s! And now her popularity has again captured fashionistas all over the world on a new scale.
Almonds are different from other shapes you know like round or square nails. But this particular form is very popular on Instagram among bloggers, craftsmen and other famous celebrities. Therefore, the topic of today’s material will be the almond or almond-shaped nail shape!
How to give almond shape to your nails: basic rules
Important: An almond shape can be given to those nails that have an average or slightly longer than average length of the free edge. This manicure will not work on short nails! You will have a rounded triangle, but no almonds.
The free edge should be at least equal to the middle of the nail bed or at least 5 mm. In this case, you will get a beautiful, elegant and sophisticated almond manicure, which will make your hands feminine and elongated.
Consider the length of the free edge
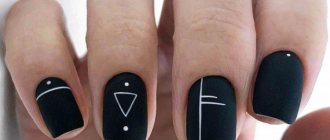
- The almond manicure itself is similar to almond kernels - rounded at the base of the nail and a narrowed but smooth edge of the nail plate.
- For work we need a file from 180 grit! If you are working with natural nails. For artificial materials, we take a higher abrasiveness - from 100 grit.
- We hold the file in the “lock” position: on one side you place all 4 fingers, and on the other - your thumb.
- First of all, find the center of the nail! Sometimes the upper phalanges or the nail itself grows slightly at an angle, to the side. You can’t leave it like that, especially when creating an almond manicure. To do this, we need to find out the center of the finger itself, from the base. We place the edge of the file in the middle of the finger and find the center on the nail plate.
Finding the center
- For convenience, we mark a small point - this is the center, our landmark. Of course, you are doing this only for illustrative purposes while you are learning. During the cutting process it will be removed. And in the future you will be able to see the middle of the axis by eye.
During training, you can put a dot with a marker
- After which we look at the client's nails. But we do this from the position as a person will see them on himself - that is, we bend the arm at the elbow, turn it over and look at the back of the hand. We find the shortest nail among other fingers!
We take into account the length of each nail or possible flaws
- If the nails are all of the same minimum length, then we make a reference point to the longest nail bed. First we cut the length on all fingers!
Important rule: The middle, index and ring fingers must be the same length! Therefore, it is worth starting to work with them. Especially with an almond-shaped manicure, the little finger, but also with others, can be literally 1 mm shorter. But on the big one, on the contrary, it’s 1 mm longer!
Remember two important rules when forming any shape:
- We make smooth and long movements with our hands! The shorter your movements, the more uneven the edge of the nail will be.
- We do not go to the nail platinum growth points! We work from them, diagonally, under the nail. We take the file into the void, and not onto the nail!
First we cut the sides, and then we cut out the shape!
Right
Wrong
When you file the corners to make almond edges:
- We make long, smooth movements, bringing the file to the center of the nail from the growth points, thereby forming a smooth almond tip. We do this with movements in two directions, without going into the area of the nail plate.
- As a little tip: Your joint needs to work wide to create long movements. Imagine that you are playing the violin. Both the elbow and even the shoulder joint should be involved in the work.
We work not only with the hand, but with the whole joint!
- It is strictly forbidden to lift the file upward, bring it directly to the base of the nail, or, even worse, reach the cuticle. We move the nail file diagonally, without touching the growing point!
- At the same time, hold the file at an angle of 45°. As a guide, the side of the file, the end, should be looking at you. We form our smooth angles.
Movements are smooth, sliding
Sharp, strong movements or movements that extend to the base of the nail are not permissible!
- When we form the lower parallel, we put a file under the nail! We work from the growth point!
- As a little advice: If you need to level the plate, move the center point by carefully cutting off the side walls. We work smoothly and slowly on the side where the nail will be displaced so as not to saw through.
We put it strictly under the nail!
First we saw the fingers on the left hand, then on the right hand!
- We also don't buff up and down or side to side. Your movements should be sliding from the base of the nail growth and smoothly move towards the free edge.
How to work with a buff!
How to create an almond shape on short nails - can you use soft almonds?
If your nails are not long enough and you don’t want to resort to extensions, but you really love almond-shaped nails, then you can use a softer version.
Important: To create almond nails on short nails, the required length of the free edge must be at least 5 mm.
We will form a soft almond We
also start by finding the center point of our nail, focusing on the finger itself!
Measuring the center
We begin to form this shape a little differently - your movements should be long, but the file should lie at an angle of 45° under the nail. There we round off the free edge. But we work without fanaticism!
Under the nail!
After this we move on to forming the side arch. As in the case of long nails, soft almonds eliminate undercuts immediately from the ingrowth point. We're backing down a bit! Forming a smooth arc from the side, we look at the end of the file.
After this we sharpen our nose. With sliding, rocking movements we soften our tip. Our hand passes through the silhouette of a boat. After all, we repeat, all the lines are soft and smooth.
Forming the nose of the free edge
Now we cut down the lower parallels. We place the file under the nail and smoothly move it towards the center.
Under the nail
Checking the evenness of the cut.
Smooth
Let's check the rest of the nails.
We check
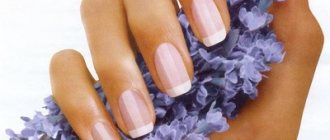
Giving your nails an oval outline
Let's look at the process of obtaining the selected form step by step:
- Getting rid of old coating. The surface of the nails must be prepared before performing the procedure. Using a disc soaked in nail polish remover (it is better to choose a variety without acetone), remove any remaining decorative product.
- Performing water procedures. You need to make a bath for your hands; in cosmetic stores you can buy special salt compositions for caring for the skin of your hands and use them. If this is not possible, then you just need to thoroughly wash your hands with soap and hot water.
- Cuticle trimming. Using an orange stick or spatula, separate it from the nail plate and then remove it with scissors or tweezers. This technique will make your nails longer and create a well-groomed look.
- Giving nails the desired length. Use nail scissors to trim your nails and then check the length of each of them, they should be approximately the same, minor deviations can be corrected in the next step.
- Creating an oval shape. The file for correcting plates must be pressed with its flat side against the nail and moved from the base of the tip to its tip. Movements should be smooth and rounded. After this treatment, the nails will acquire the desired shape.
- Sanding the nail. Its surface may be rough and have irregularities; they can be smoothed out with a special file.
- Hydration. After performing a manicure, you need to rinse your hands in water and then rub oil or cream into the plates and cuticles.
This is a standard algorithm for giving nails an oval shape; it will be slightly adjusted depending on the length of the nails and the type of nail plate (meaning natural or extended).
Owners of short nails should take into account that the oval should be done completely from edge to edge of the nail, and not partially. The oval shape on them will look especially impressive if the woman has an oval cuticle line.
Too long nails with this shape will look ridiculous; you shouldn’t let them go too far into an oval design, as they can quickly break off. Their ideal length is 5 mm. When making an oval shape on your nails, you should leave their sides straight.
Extended oval nails are made in beauty salons using gel or acrylic. These two methods of creating a long nail plate differ in the hardening of the coating. To obtain an oval shape, special thrips of the required length are used.
Who should choose almond-shaped nails and who suits almonds?
- Of course, when choosing a manicure, consider the shape of the cuticle. Each of us has our own, but the main types are distinguished: square, circle and triangle. Almonds in this matter are more classified as oval, so they occupy a universal place and fit almost any shape.
- Almonds are also , taking into account the characteristics of the fingers. It will make wide fingers thinner and short fingers longer. But still, a narrow nail plate and a short nail bed are more suitable for almond manicure.
- It is also important to feel the balance of the ratio here - if you have a small nail bed, but your fingers are plump and short, then almonds will only attract attention even more due to the asymmetrical ratio. It is worth paying attention to a soft square or oval (depending on the shape of the cuticle). Girls with long and narrow fingers are lucky in this regard - almonds, like any other shape, will look great!
Almonds work well to lengthen slightly plump fingers with a nail plate of medium length and width!
- If you want to create an almond shape, also consider the length of the free edge! Almond works best on medium to long nails to really create a lengthening effect. If you have wide fingers, then short almonds are contraindicated for you, since they will fill out the phalanges even more. It’s better to make a temporary oval - it stretches any nail shape!
- But the most important thing was the client’s choice! If you have a soul for this form, then it is difficult to fall in love with another form only on the advice of another person. Give yourself a manicure that suits your shape and your fingers. If you don’t like it, go back to your favorite form.
The almond form is considered one of the most practical forms - it is practically not afraid of chips and damage. Although it still requires careful treatment, since in terms of practicality it is still slightly inferior to the oval. But with such nails, your fingers will always be a modest object of attention! After all, almond-shaped manicure can be considered a classic, with which your nails will always look feminine and gentle. Perhaps that is why many women choose almonds for manicure.
Square and trapezoid
The square shape of nails is currently the most fashionable and popular. She is quite glamorous, easy to design, and many girls choose her. However, it is the most difficult to create from natural nails; in addition, it is fragile and can break and crack during use, even if the nails are strong enough. So, how to cut square-shaped nails correctly will be described in the instructions below.
- Trim the free edge to the desired length. In this case, make the cut in a straight line perpendicular to the longitudinal axis of the finger and its tip;
- Start cutting from one side. The file must be held parallel to the finger and perpendicular to its tip. This way the line will be straight;
- Repeat the procedure on the other side of the nail. At this stage, it is very important to ensure that the sides remain parallel to each other and do not narrow;
- Now file down the free edge. The file must be held perpendicular to the axis of the finger;
- As a result, the free edge should have acquired a square shape and acquired two right angles on both sides. Further, if you wanted to get a “clean square” shape, you don’t need to take any measures;
- If you have chosen the “soft square” shape, then after this you need to slightly round the right corners of the free edge;
- With a “rounded square” shape, you need to round the corners as much as you like.
The trapezoid shape is created in the same way, but by filing the sides it is necessary to ensure that they converge to the desired degree.
Rounding and making the trapezoid soft is not recommended. [yandex2] [google2]