Beautiful well-groomed nails are one of the elements of a feminine image. To make your manicure look perfect, it is important to choose not only the design, but also the shape of your nails. This article will focus on the amygdala. First, make sure that this particular form suits you. After that, proceed to the information about cutting nails.
Photo from the site: vashi-nogti.ru
Almond-shaped nails: what are they?
Almond-shaped legs should never be confused with oval legs. They are somewhat narrower, sharper and resemble almond grains. This was the reason for this name. These nails are convenient because they do not get caught on foreign objects. You can do simple work with them without fear of breaking them. Thus, once done, the manicure will last for a considerable time. True, during serious physical work they may break first. All because of the sharp tapered edge.
Almond-shaped nails can be considered a classic. They never go out of style, so they are a good choice at all times.
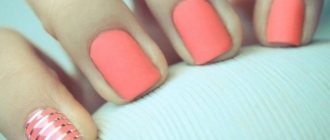
Almond-shaped nails look feminine and delicate. Perhaps that is why many women choose them for their manicure.
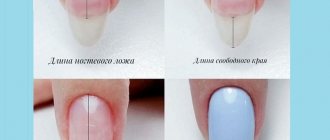
It is worth noting that such nails should not be too short. The length can be changed, but it is important that the nail plate is no smaller than the nail bed.
There are many different designs available for almond shaped nails. You really have a lot of choice in this.
Photo from the site: WomanMirror.ru
Video
A manicure is not only about choosing the right nail polish color, but also about the ideal shape of your nails. The process of hand care itself begins with its adjustment. But choosing the right shape is half the battle: you still need to somehow give it. Sometimes it seems quite difficult to do this on your own. But we will prove to you that this is not so. Today we will talk about the most feminine and sophisticated option - almond-shaped nails.
- Features of the almond shape
- Who is this manicure suitable for?
- Flaws
- Correction: necessary tools
- Preparation for the procedure
- Step-by-step instructions for creating
- For natural
- For extensions
- Tips for creating an almond-shaped manicure
Who suits almond-shaped nails?
Almond-shaped nails visually lengthen the fingers, so they are suitable for almost all girls. They are especially worth using for those who have chubby hands with short fingers. Almond-shaped nails will correct existing imperfections and give the brushes elegance and femininity.
Psychologists believe that almond-shaped nails are chosen by energetic women who have a lot of enthusiasm and coquetry. They lead an active lifestyle and are not afraid to surprise.
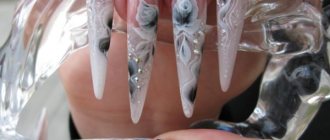
Stiletto nails are one of the varieties of almond-shaped nails. They are usually made by shocking individuals. This shape has to be extended, since natural nails of such length and so narrow cannot last long.
Photo from the site: vros-nogot.ru
Preparation for the procedure
Before filing the nail plate, it must be put in order. How to do it?
- First, remove the polish completely. It is not recommended to correct the painted plate!
- Now you need to soften the plate. To do this, make a warm bath for your hands (make sure that the water does not burn, but is at a comfortable temperature). Keep your fingers in it for at least a quarter of an hour.
You can use plain water, but if you add sea salt to it, it will be healthier. You can also prepare an oil-based bath or a herbal decoction.
You can also apply a light moisturizer after the bath (this is useful to do after any contact with water). However, in this case, try to make sure that the product does not get on the nail plate.
How to cut almond nail shape
How to give your nails an almond shape? First of all, prepare those tools and materials that will be useful to you in the process of forming the nail plate. Usually this:
- file;
- wire cutters;
- grinder.
It is worth noting that the tools must fit the nails. In particular, if the plates are soft and fragile, then the file should not be very hard. The same can be said about the grinder. Experts advise using fine-grained files made on a rubber or cardboard base for natural nails. For artificial ones, metal ones with large grains are suitable. You can prepare several files of different sizes at once. They will come in handy at different stages of work. This is important so that the nails can be properly filed without delamination.
Photo from website: Bliss Nail
Preparing for the nail shaping procedure
Before we tell you how to make almond-shaped nails, it is important to mention the preparation for the cutting procedure itself. First, give your hands a warm, moisturizing bath. This will soften the nails and make them pliable. It will also be easier to tidy up your cuticles after the bath. You can move it to the edge without torn fragments or accidental damage. Hangnails should also be cut off. All these measures will allow you to prepare your nail for the manicure procedure.
For the bath you can use olive oil, salt, relaxing and disinfecting herbs. You can also add mineral and aromatic oils to the water.
After the bath and other preparatory operations, dry your hands, lubricate them with a non-greasy cream and wait a few minutes. After this, you can begin the cutting procedure. Remember that dry nails are easier to file.
It is assumed that before the procedure begins, the old polish will be removed from the nail plates. It should not interfere with seeing the resulting form.
Photo from website: Just My Beauty
Almond shape: how to cut nails
So, let's start describing the most important things. How to file almond-shaped nails? Many experts agree that you first need to make the free edge square. This shape will be the basis on which it will be easy to create an almond-shaped nail. To do this, simply cut the plate at a right angle. This is why you will need wire cutters. They must be sharp to ensure an even cut.
How to make an almond shape from square nails? Next, you should file down the nail plate so that you get a trapezoid out of the square. It will be a little elongated. To give this shape, you can use a coarser file. It will make the process go faster, which is what you need. You will use more delicate files at the end, when it is important for you to smooth out the ends as beautifully and gracefully as possible.
Don't press the nail file too hard. You don't need to crumble your nails. It is important that the result is beautiful.
How to make almond-shaped nails from a trapezoid? To do this, narrow the free edges further so that you get what you want. Do not stretch the nail too much, because this will make it look like a stiletto. Insufficient narrowing will make the shape simply oval, and this is a completely different matter.
After this, polish the nail with special tools so that its edges are smooth. Thoroughly shake off any dust resulting from sawing. After this, you can start applying the design.
This method of forming an almond-shaped nail is suitable for any type and length of the nail plate.
Photo from the site: french-foto.ru
Nail care at home and in the salon
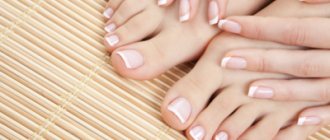
Daily and weekly nail care should include massage, baths, compresses, and rubbing in strengthening creams. It is necessary to prevent hypothermia of hands and nails (warm gloves will help here) and contact with aggressive environments (using rubber gloves).
Nails require daily and weekly care
In the salon or at home, before changing the shape of the nail plates, they must be prepared. First of all, it's a warm, moisturizing bath that will help soften your nails and cuticles. It is best to use olive oil, sea salt, and decoctions of medicinal plants. The burrs are cut off. Before starting the nail shaping procedure, hands are lubricated with moisturizing cream.
Important! Before carrying out manipulations, the nail polish must be completely removed, otherwise the ideal shape will not be obtained.
Well-groomed hands are determined, among other things, by the appropriate design of the nails. The optimal shape must be selected experimentally. In this case, it is advisable to take into account such parameters as:
- length and shape of fingers;
- defects on the fingers (calluses, scars);
- basic work performed by hand;
- condition and shape of the nail bed;
- natural geometry of the nail plate.
Fashion trends in manicure, of course, must be taken into account, but you should not follow them blindly; the selection of the shape must be done individually, after going through the possible options. It is advisable to seek help from nail industry specialists to choose the best design, color or pattern.
How to make almond nail shape from an oval
If you don’t want to lose the length of your nails by initially cutting them at a right angle, you can try to immediately cut the nail the way you need. If the plate is oval-shaped, then you should make its end narrower. This way the nail will look like an almond. This method of cutting nails is faster, but at the same time more complex. You want the shape of the nail plates on all fingers to be the same. This is easier to do if you originally wore a square. From an oval you will have to create an almond shape “by eye”.
About nail design
How to shape your nails at home
Stylish and beautiful nails are always in trend. You can strengthen them with nutrition, use protective coatings, or give preference to extended manicure. In any case, the signs of perfectly designed nails are:
- the plates have the shape of an oval or square, their contour is soft;
- decorative elements used - beads, metallized threads, different-sized rhinestones or crystals, are combined with each other;
- the use of gel polish, which allows you to create a bright and non-trivial nail design, and also protects them from dampness and moisture;
- using the “ombre” technique – smooth transitions of colors from one to another;
- manicure in a universal French style, which is suitable for both everyday manicure and special occasions.
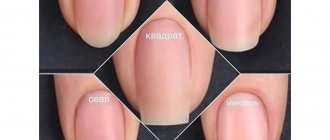
Cosmetologists distinguish several forms according to which nails are designed:
- for an almond-shaped manicure, it is better to have long nails;
- sharp almond manicure – the shape of the nails resembles stilettos;
- round – universal type, suitable for weak nails, you can use both red and beige polish;
- square - the best choice for medium-length nails, but requires constant care;
- oval – classic, repeating the natural shape of the nail plate;
- soft square - a combination of square and roundness, helps to avoid injury to the nail corners.
Nail design options
Additional Information. A new trend in manicure is individual design, when the design takes into account the woman’s style, her clothes and personal wishes. Artistic painting, a combination of varnishes, and additional decorative elements can be used.
In nail design, fashionable trends are acrylic extensions, floral French, fan French, matte French, the use of sparkles (glitter), acrylic designs (flat design) and stucco from it, photo design and abstract.
How to make an almond shape on extended nails
When working with acrylic, choose rough files that are comfortable to work with. The cutting pattern is the same as for natural nails. But it should be remembered that nippers are not suitable for artificial plates. Under their influence, the acrylic nail can crumble, which will ruin the manicure and will not give anything else. It is better to replace the nippers with a file. Of course, you will spend more time with it, but there is simply no other choice.
It is worth noting that it is better to initially make extended nails in the shape that you like. After all, remodeling will require time, resources, and will not look as high quality as on natural nails. If you really want to change the shape of the extended plates, then it’s better to do it with a specialist. This, of course, will cost money, but it will also guarantee a good result.
If it is not entirely clear how exactly to make the shape, watch the video at the end of the article on how to make almond-shaped nails. It will be informative for you, since you can not only find out how the whole process goes, but also see it. In an area like manicure, this is important. While watching how to make an almond nail shape video, you can simultaneously follow the master and thus learn.
Photo from the site: french-foto.ru
Tools for work
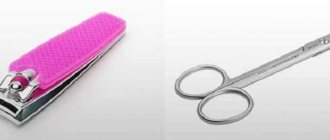
It is impossible to make the almond shape of nails correctly if you refuse to process the plates. For this reason, you will have to prepare the necessary tools:
- manicure scissors or tweezers - to shorten the length and remove the cuticle, you can change them based on convenience,
- sawdust file (180-100 grit),
- grinding and polishing blocks,
- pusher/orange sticks to push back cuticles.
First, the plates are cut to the same length, then they proceed to sawing. For natural nails, do not use hard files; fine-grained tools are needed. After giving the desired appearance, the plate should be sanded and polished, paying attention to the free edge.
Which design suits almond-shaped nails?
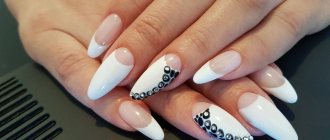
It is important not to make nails of this shape vulgar. Therefore, too many bright colors on them will not be appropriate. It's better to get a French manicure or French manicure. At the same time, make sure that the latter is deep enough.
Another good solution is Chinese painting on almond-shaped nails. This design will look bright and at the same time not vulgar or provocative. To create it you will need acrylic paints and, of course, the hand of an artist.
Almond-shaped nails look good with all kinds of decorations. You can purchase them at any store and simply stick them on. Once attached, the decoration is secured with clear varnish.
It is worth noting that there are no special restrictions in the design of almond-shaped nails. You can realize your own fantasies or the ideas of the master. The main thing is that you like it.
Manicure ideas with photos
A classic, strict solution is a French on almond-shaped nails. Don't be afraid to seem boring. Currently, masters have learned to turn French manicure into a work of art. Design elements with abstraction, geometric lines, and marble patterns are added to the usual smile. Floral designs, for example, as in the photo, look very stylish in combination with a jacket.
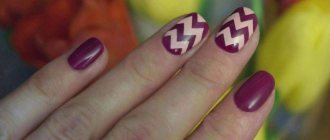
Since the almond shape is most often given to long or medium-length nails, almost any manicure design can be created, without restrictions and strict rules. Rhinestones, sparkles, 3D stickers, rub-ins, painting with gel paints - everything is allowed.
Since the smooth outlines of almonds are beautiful in themselves, the design of an almond-shaped manicure can be made in a minimalist style.
Almond-shaped New Year's nails can be decorated with snowflakes, balls, stars, snowmen and even reindeer sleighs.
Regardless of the time of year, gradients with different combinations of colors and shades look great on fingers.
What other form of manicure will be fashionable in 2020-2021, you can find out
Here
Fashionable ideas for nail extensions using tips
Liquid tips
Liquid tips are reusable plastic forms that are used to create the base of an artificial nail. Liquid tips are used for nail extension in both acrylic and gel technologies . Their shelf life is up to two years. Liquid tips are often used to create an arched jacket for the smiley line, and you can also lay out an aquarium design. Liquid tips can also be used on problem nails.
Sharp tips
This shape of the tips visually lengthens your fingers and makes them especially sophisticated . Pointed nails are associated with passion, maybe even a little aggressiveness and courage of the person wearing such nails. However, nail extensions with sharp tips are absolutely not suitable for owners of thin and long fingers - the result will look stupid and ridiculous.
There is one more nuance, the low strength of the pointed edges of the nails, so that with an awkward and careless movement, a crack instantly appears , which is practically impossible to correct.
Square tips
Extension of square tips looks very natural and harmonious , making the shape of the nails more sophisticated. The special popularity of square-shaped nails became established after masters released the “French manicure” style into the world. However, it is worth remembering that owners of short and chubby fingers are not recommended to use such extensions - the appearance will be inappropriate and prim. The square shape of the tips is practical and versatile, and also does not require any restrictions during use.
Oval tips
The oval nail shape is the most popular and is considered a traditional and classic shape. If you follow all the rules when applying extensions, the free edge of the nails mirrors the contour of the cuticle, which allows you to create an ideal balance between them, which suits almost all ladies.
This type of extension is especially recommended for owners of short and chubby fingers. It is worth drawing your attention to the fact that people with long and thin fingers should not use square tips - they will visually lengthen the nail and finger, which will seem very ugly to observers.
Almond tips
The almond shape will give your fingers extra elegance and grace. This form always looks very natural and natural , because it most accurately follows the natural contours of the shape of a natural nail. Acrylic extensions on almond tips look natural and are considered more durable, and the nails will retain their freshness and last up to four weeks.
Nail extension on tips with acrylic
We will need:
- tips;
- nail file;
- glue for gluing tips;
- tip cutter for correcting the shape of the tip;
- brush for applying acrylic;
- primer - a means for preparing the nail before directly applying acrylic;
- acrylic and acrylic powder;
- fixative
Nail extension process:
- We treat the surface of the natural nail with a nail file, polish it and degrease it. This procedure promotes better bonding of tips with natural nails.
- We select corresponding to the width of a natural nail tips and glue them to the nail surface using glue: apply glue to the part of the tip where it will stick to the nail, then press it to the nail surface and hold it in this position for 8-10 seconds. Remove excess glue with a napkin. If the length of the nail does not satisfy you, you can adjust its length with a tip cutter.
- Using a brush, cover each nail with a thin layer of primer.
- Gently apply acrylic to the prepared nail: in the center of the nail apply more acrylic, then, moving to the edge of the nail, reduce the layer of applied material.
- After the acrylic has completely dried, we remove all errors and inaccuracies using a nail file.
- Finally seal the result finishing coat - fixer.
Nail extension with gel tips
We will need:
- modeling gel;
- tips;
- brush for applying gel;
- type cutter;
- glue for gluing tips;
- nail file;
- UV lamp for extensions;
- degreaser.
Nail extension process:
- Thoroughly polish the surface of the natural nail and degrease it.
- For each nail we select tips of the appropriate size .
- Apply a drop of glue to the part of the tips that will lie on the nail surface.
- Apply the tips to the nails and press firmly for a few seconds.
- Extra remove glue with a napkin or cotton pads, using a tip cutter we adjust the shape and length of the tips.
- Using a brush, place the gel in the middle of the nail and carefully distribute it evenly over the entire surface, being careful not to catch the skin and cuticles.
- To harden the gel, place the nails under an ultraviolet lamp for 3-5 minutes.
- After this, apply a second layer of modeling gel and also dry it under the lamp.
- Using a napkin or degreaser, remove the sticky fatty layer that remains after drying under the lamp.
- Using a nail file, we level and polish the surface of the nail , and remove the remaining dust after sanding with a damp cloth.
- Finally, we cover the nails with colorless gel polish or any other topcoat.