What is biogel
Covering nails with biogel at home, such as in the video below, can be done after completing several training sessions. But why is such a procedure necessary and why is it so expensive in salons? What are the advantages of biogel?
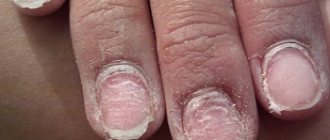
The use of this product is an excellent solution for girls with weak and brittle nails. A dense layer is created on the surface of the plate, which prevents delamination. It will also become much more difficult to break the free edge. At the same time, the nails will remain flexible and elastic. But the problem of cracks and chips along the edges will be solved.
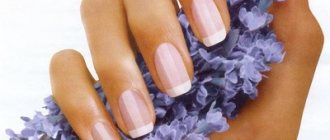
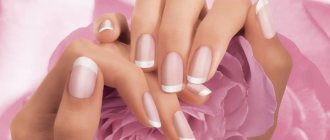
This product is based on a natural component – yew resin. Thus, biogel manicure, as seen in the photo, not only looks completely natural, but also causes only minimal damage to the nails. Unlike acrylic, biogel does not contain acids, ethyl and methyl derivatives.
This substance strengthens and heals nails. With regular use of the coating, the plates become smooth and strong. They may stop peeling, breaking, etc. The plate breathes under the biogel, which means it does not deform or change color.
Correction of the gel coating does not require touching or damaging the nail plate. Only the gel is removed, and then a new one is applied. The material has absolutely no contraindications. It can be used by both allergy sufferers and pregnant women.
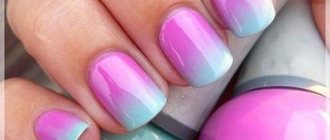
Biogel also has several unpleasant features. The coating does not withstand contact with cleaning agents at all. Cleaning will only have to be done using gloves. The coating is also destroyed by acetone, ammonia and even ordinary alcohol. In addition, the material is much more expensive than simple manicure polish. Thus, biogel nails, especially if they have a multi-color design, as in the photo, are not a cheap pleasure. However, applying such a coating yourself is much cheaper than carrying out such a procedure in a salon.
Why do you need biogel?
Biogels are designed to strengthen nails, including providing nutrition for those nails that are peeling or breaking. Unlike gel polishes and acrylic extensions, biogels do not have a negative effect on nails; on the contrary, they nourish the nail plate and allow it to breathe. Therefore, such unpleasant consequences as discoloration or the development of a fungal infection are completely excluded.
Biogel gives nails a healthy appearance and prevents cracks, and the tips of the nails do not break. In addition, the application of biogel creates a coating that is resistant to impact. This type of manicure, in which biogel is applied, is recommended for girls who have problems with their natural nail plate or after removing extended nails. Often after any type of extension, natural nails require restoration, and this process takes a lot of time. But if you get a manicure using biogel, your nails will quickly recover and return to their previous appearance.
Types of gel
Before working with biogel, you need to find out what type of material you need. Each type has its own unique characteristics and is therefore suitable for specific procedures. So, there are three main types:
- Transparent gel is the most popular. It is used for strengthening nails, extensions, fixing and many other procedures. It will not be possible to grow nails with this material, as it is too soft and liquid for this. The color coating also has the same characteristics, except that it is equipped with coloring pigments;
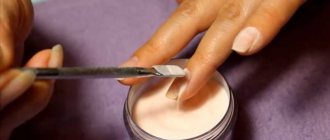
- It is difficult to use a building material to cover nails with biogel, as in the photo. This is due to the fact that it is quite thick and it is very difficult to cover the nails evenly. However, you can create a long nail tip. You can create any shape and length - from the minimum “one” to a very long nail. At the same time, when making adjustments, you do not have to completely remove the entire coating;
- UV-protected gel is used during the holiday season, when many people go to the beach to relax. This varnish does not change color when exposed to the sun and does not reduce durability.
Before you start strengthening natural nails with biogel at home, as in the video, you need to choose the right type of gel. After all, only such material can fully meet your expectations. Otherwise, you will not be able to achieve the expected result. Or you will have to work hard to achieve it.
How does a gel manicure work?
We have all heard at least once about gel nail extensions, supposedly this is the safest procedure for improving the nail plate. That under the gel the nails breathe normally and do not overheat. And scientists thought: “What if we made nail polish based on gel?”, and so one of the most popular nail care products appeared - Shillac polish.
This is a universal coating that can be changed depending on your mood, because it is very easy to remove at home, but if you do not touch it, then Shillak will last two weeks on your nails during normal activities.
Such a simple manicure at home is very easy to do, it all depends only on the girl’s skills and the chosen design. When Shillak first appeared on the market, its color range was very limited, but now covering nails with colored biogel of any shade of the rainbow has become the norm. You can find beautiful variations with sparkles and sequins; in some cities you can even buy gel polishes with gradients. Video: covering nails with biogel https://www.youtube.com/watch?v=XixtRtzARLI
Materials
In order to use biogel and strengthen your nails with it, you need to have all the necessary materials, tools and equipment on hand. At the same time, the set is standard for applying any type of gel or shellac. Thus, you can use it not only at one time. So, you will need:
- Standard manicure accessories - orange sticks, a tool for applying or pushing back cuticles, a polishing buffer, nail files;
- Gel base;
- Directly gel;
- Top coating;
- Primer for plate dehydration;
- Degreaser;
- UV lamp from 36 Watt.
The above is the minimum set if you are going to strengthen your nails with bio gel. The process itself takes place in several stages, which will be described below. By following them, you can easily perform a salon-quality manicure at home. At the same time, you do not have to spend a lot of time and effort on this.
[yandex2] [google2]
Application technology
The actual application of this coating is no different from painting a nail with any other varnish. However, the plate preparation procedures are quite specific. The entire process of such a procedure as strengthening nails with biogel with the result as in the photo is presented in the video. So, by following our simple tips, you can get a manicure that, in terms of aesthetic value and durability, will not be inferior to a salon one.
- Prepare your nails for coating as usual. That is, push back or cut the cuticle. Also, trim the free edge of the plate;
- Polish your nails thoroughly with a buff. At the same time, it is important not to thin them, but to even them out as much as possible. The gel will adhere as tightly as possible to the smooth plate;
- Before applying the biogel, for the result as in the photo, degrease the plate using nail polish remover containing acetone or alcohol wipes. Another option is a special degreaser for manicure. Simply wipe your nails with a cotton pad or napkin soaked in the product, or apply it with a brush;
- Once the product has been absorbed, coat your nails with a primer, which will remove excess liquid from the plate. Leave it for 3 – 5 seconds;
- Apply the base in a thin layer. It is important to use a special base for the gel. Others may begin to peel off after 4–5 days, thereby reducing the durability of the manicure. The special one, in fact, is a very liquid gel;
- Dry the coating under the lamp. This usually takes 60 to 120 seconds. In any case, follow the instructions that come with your coating;
- If necessary, you can create a manicure, as in the photo, by decorating the biogel for nails with rhinestones, sparkles or other means. This should only be done when the coating has completely polymerized under the lamp;
- Apply top coat. It should also be specialized, intended for use with gel polish. Otherwise, it will quickly chip, crack and lose its aesthetic appearance;
- Dry it under the lamp according to the instructions. Usually from 1 to 2 minutes.
Now your manicure is ready. The coating will last on the nails for 2 to 3 weeks. In many ways, the durability of a manicure may differ depending on the initial state of the plates. So on weakened and peeling nails, even the best gel will last less.
How to strengthen nails with biogel?
How to cover your nails with biogel? You can make an appointment with a manicurist. And if you have certain skills, you can purchase the necessary equipment and materials and do a useful manicure at home. This will cost quite a round sum, but spending on tools and various liquids will pay off over time, and the manicure procedure will take no more than 2 hours.
First you need to purchase from a specialized store:
- biogel, transparent or colored;
- top coating (finish);
- hand sanitizer;
- natural nail file and buff;
- cuticle remover liquid (“liquid blade”);
- ultraviolet or LED lamp;
- orange sticks.
When all the necessary tools have been purchased, you can begin the manicure. To do this you need to know the application technology. Step-by-step instructions on how to properly strengthen your nails with biogel:
- First you need to prepare the nail: remove the varnish, if any, and adjust the length and shape of the free edge with a file. Push back the cuticle with a wooden stick, soak it with a special product according to the instructions and remove. Using a buff, lightly, without overdoing it, remove the natural shine from the nail plate.
- Preparation is followed by cleansing. The nail must be degreased, otherwise the biogel will not adhere well to the nail plate and will not last long. You need to degrease with a special product, preferably acid-free, or nail polish remover without acetone.
- Cover your nails with base polish. When applying, do not touch the side ridges and retreat 1 mm from the cuticle. The layer should be as thin as possible. Dry in a lamp.
- Apply biogel, also in a neat thin layer. Place your fingers in a lamp and dry them. Apply another 1-2 layers, if necessary, dry.
- Draw a design on the nail, or decorate it with rhinestones, sand, stickers. You can skip this point and leave a single-color coating.
- In the last step, apply the finishing polish, remembering to seal the tips of the nails. Dry in a lamp and remove the sticky layer with a degreaser. Nail strengthening with biogel has been completed.
The video tutorials below will help you learn how to properly apply biogel at home.
https://www.youtube.com/watch?v=w935NIRvSG0&t
IMPORTANT TO KNOW: How to carefully paint your nails with gel polish: useful tips
Removal
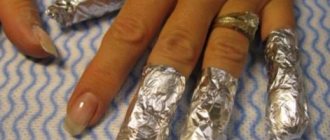
The technique of applying biogel to nails is quite simple. The process of removing it is no more difficult, but it can significantly damage the nails. It includes two stages - mechanical and chemical destruction of the coating. You applied the gel, and now, after almost a month, the border of nail growth and the gap between the cuticle and the gel have become noticeable. Then it's time to remove the covering. To do this, you will need acetone-containing nail polish remover, cotton pads, foil and about an hour of free time.
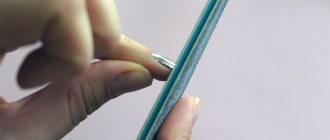
The application of biogel at home is shown in the video. But its removal happens like this. First you need to cut off the coating with a coarse polisher. Be very careful and try not to damage your plate. Leave the thinnest layer of gel on the nail.
Soak cotton pads in acetone and place them on your fingers. In this case, it is important to “swaddle” the nails into the disc, pressing tightly. Leave this compress for 15 – 20 minutes. Depending on the thickness of the coating, type of material and nail polish remover, the holding time can vary from 10 minutes to half an hour.
When you notice that the biogel manicure you performed at home, or rather its remnants, has begun to quickly deteriorate, then it’s time to remove it. Destruction will manifest itself in the fact that the coating will peel off in flakes. Once this process begins, the remaining gel can be easily scraped off with orange sticks or a polisher.