Rating: No rating
French manicure is already perceived as an unshakable, constant value in the world of nail art. The same constant as the little black dress in the fashion world . French is not just a nail design, it has become an independent phenomenon with its own history, name and long line of followers. And the first thing that beginners in the field of nail design master is, of course, French manicure.
Specifics of French nail extensions
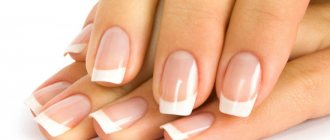
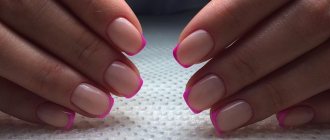
The result that everyone expects to see is a perfect nail with an equally perfect smile line. Glossy surface of the nail with a clear transition between the pink background on the nail bed and the white line along the edge. And it's all. Design, decorations, these are all secondary and not so important. Because initially there was none of this, and the French jacket itself, as conceived by its discoverer, was called Natural Look.
First, let’s figure out what kind of miracle a French manicure is and what components make up the French manicure effect :
- smile – a rounded transition line between white and pink, smoothly disappearing towards the edges;
- mustache – lateral fragments of a smile, in which the lines become thinner and disappear.
But the most important thing that you need to study (and perhaps even pass the exam) are the rules and laws of constructing a smile line :
- The white line on the free edge of the nail cannot be wider than the pink layer .
- The longer the nails, the wider the white line can be. But don't forget rule number 1.
- The smile line should be symmetrical relative to the axis of the nail . Antennae – end at the same level. You can, of course, do without them, but then the manicure will no longer be so elegant.
- The width of the white line should be the same on all nails .
A smile and transition can be achieved in several ways, no matter what. The main thing for the client is to get the expected design. A rather complex nail extension is a French extension, consisting of two parts. First, a nail bed is formed using gel or acrylic, and a smile is laid out close to it using the same material, but white . With this double design it is difficult to get a thin white line. But, if you want to quickly master French nail extensions, take the work home, so to speak, and practice.
You can draw a smile line . This option is easier even if you lack artistic talent. The line can always be corrected and completed with a thin brush.
An unsuccessful transition (anything can happen) can be disguised with rhinestones and sparkles. Well, this is an extreme case for the very, very newbies.
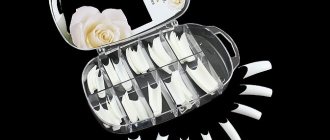
French tips extensions
This is what French tips look like
This method also has a name: extensions using express tips. If you don’t have enough time for your usual manicure, and the situation urgently requires you to get yourself in order, then this method is perfect. French tips prepared in advance are attached to the nail. The entire space of the nail plate is filled with gel or acrylic; the thickness should be equal to the extended jacket. After this, the entire plate is covered with the selected substance to secure the extended part and the natural one. The color scheme in this type of manicure is quite simple: you paint your nail in a transparent or pinkish color, and the French manicure is done in a contrasting color.
As you can see above, this French nail extension is a labor-intensive and convenient manicure, but, unfortunately, you will have to do it anew every time, because the correction is extremely difficult, almost impossible. But there are also advantages: the extension is not done from the cuticle, so as your own nail grows, the French retains its attractiveness for a long time. The nail plate is not damaged.
What is needed for the French nail extension procedure?
In addition to all the materials and tools for standard extensions, you need to have a thick modeling gel of two colors. Accordingly, for acrylic - acrylic powder in two shades - pink or white.
Some craftsmen use camouflage acrylic instead of pink acrylic . This combination gives the impression that the French manicure is simply painted on your own nails. This is such an optical illusion.
And yet, it is difficult to depict a smile line only thanks to your artistic abilities and eye, especially at the beginning of your career. Therefore, manufacturers of manicure accessories have come up with all sorts of shapes, sticky stickers and the thinnest brushes that make this difficult work easier.
Step-by-step instructions for French nail extensions with photos
In principle, there are practically no differences between the gel and acrylic processes. The only difference is in the modeling material and in the names of all components for extension.
Therefore, let's go through the standards for French extensions :
- Determine the future length of the nail. If you are long, you can create a French design right away, without additional lengthening. If lengthening is necessary, choose the method of extension with tips or on forms and complete the entire procedure in advance.
- Shaping the nail. Choose a shape - almond, square, ballerina or any other. The shape determines which smile line is best to form on the nail.
- Thinking over the smile line. For French lay-out manicure, there is one connection option - classic smooth. Complex curves can be formed, but the result is not worth the effort, except as an experiment. It is easier to draw a complex or double smile line with a brush.
So, the nail is perfectly formed. The most important thing begins .
- On the nail bed apply modeling gel (acrylic) pink and form a perfect round shape - the nail itself from the hole to the future joining line of pink and white.
- After the material has hardened, the resulting pink workpiece polish thoroughly, once again walk along the line of the future junction of colors.
- Modeling gel (acrylic) form a white line (free edge). Pay special attention to the mustache. They should be the same, the rounded transition line should be symmetrical and equally curved on all nails. Further process the frozen material along the edge with a nail file.
- Lightly polish the transition between two colors gel (acrylic), the surface should be just perfectly flat.
- Apply protective layer of finishing gel or a special coating for acrylic.
- Congratulate yourself and look at the results.
Step-by-step instructions for gel French extensions
In the presented master class, you will be offered the technology of a detailed French manicure, where work on the French smile line is done after directly modeling the nails. This method is simpler and more understandable, making it easier for beginners to master. The final result will undoubtedly please you: the Frenchman’s smile line will look very natural and beautiful.
French gel extensions - video
1. First of all, it is necessary to carry out standard hand disinfection - first of the master, then of the client.
2. Next comes the basic nail treatment. Push back the cuticle with a pusher, then use a file with 180 abrasiveness to trim the free edge and sand the nail plate.
3. Prepare your nails for extensions. Degrease the nail plate with a lint-free cloth, then apply a dehydrator to remove excess moisture. Then carefully coat the nail with primer: apply the product in thin strips, joint to joint, from the cuticle to the free edge. Don't forget about the end of the nail.
4. It's time to move on directly to French nail extensions. Attach a special template shape to your finger, as shown in the photo. First, carefully coat the natural nail with the base gel, and then form the free edge to the required shape and length. The movements of the brush should be measured and continuous so that the basis of the future manicure turns out without flaws. When the base coat is ready, place your finger in a UV lamp for 2 minutes to cure.
5. Next you will need a soft pink camouflage gel. Apply the gel to the base of the nail and, using gentle movements of the brush from left to right, distribute it to the free edge. For more comfortable placement, hold the client’s finger at an angle of 45 degrees. The gel is very easy and pleasant to work with; you can easily eliminate all the imperfections until you put your finger in the UV lamp. When everything is ready, dry the camouflage layer for 2 minutes.
6. After polymerization, carefully evaluate the result. If there are any unevenness or imperfections, you need to add material and apply a second layer of gel, which will hide all the errors. If you are doing short French nail extensions, then most likely one camouflage layer will be enough for you.
7. When you take your hand out of the UV lamp, make sure that you are happy with everything. Remove the sticky dispersion layer using a lint-free cloth. The template form can also be removed from your finger - it will no longer be needed.
8. Next, you need to file the nail according to the standard pattern: shape, surface, bottom and side parts. Using a buff with an abrasiveness of 180-240, carefully sand the smile area so that it becomes clearer and the paint does not spread during the painting process.
9. In the drawing method of extending a French manicure, you can create a smile using different materials: gel polishes, special paints, etc. In these instructions, the master uses permanent gel. First of all, using a thin brush, draw the outline of the smile, defining its shape. Make sure that the antennae of the arch fit into the nail growths, then the smile will look very elegant and beautiful. Next, use neat strokes to paint over the free edge area. You can draw a smile the way you want. The main thing is that the extended French manicure ends up looking flawless. Be sure to paint the end of the nail with white gel, then use a UV lamp for 2 minutes.
10. If desired, you can apply a layer of pearlescent gel, which will give your nails a glossy shimmer.
11. Finally, the French extensions are covered with finishing gel. Gently apply it to the entire surface of the nails: from the tip to the cuticle. It is very important that you do not go overboard - the material should not come into contact with your skin. As in the previous steps, do not forget about sealing the end. The finishing gel must also be dried in a UV lamp for 2 minutes.
12. The final touch remains - use a degreaser and a lint-free cloth to remove the sticky layer, then apply strengthening cuticle oil to your nails.
Of course, nail extensions are quite a complex process, and it’s hard to grasp after just one reading. Therefore, we bring to your attention a useful video lesson from the wonderful master Victoria Servetnik, who will help you understand all the intricacies of creating an extended French manicure.
Fashionable ideas for French nail extensions
Of course, you can increase a very small length, but then why all this effort? And most importantly, who will understand that nails are not simple, but obtained through effort and creative torment. Length is what becomes the deciding factor. And the smile line can be anything - even white, even colored, even with a pattern, even with a bow.
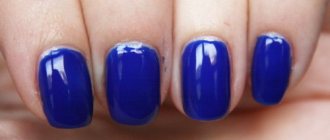
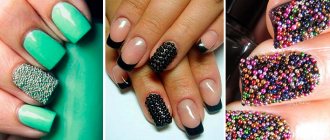
Nail extensions and black French design (with photo)
Probably, in contrast to the followers of the white French manicure, a black French manicure was invented. Well, all the great masters created without regard to traditions or other people’s opinions. And this design looks no worse than the classic one.
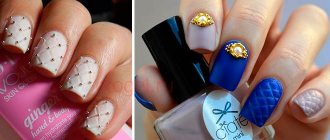
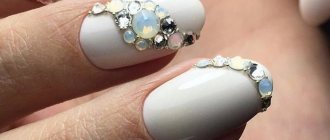
Nail extension and French design with rhinestones (with photo)
Rhinestones can do anything - emphasize (the beauty of a design), shape (a smile line on a jacket), disguise (minor flaws, well, who doesn’t), add additional shine and much more.
Nail extensions and French design with glitter (with photo)
A shiny jacket also provides several options. You can make a shiny hole or highlight, shade and duplicate the smile line . And this is without even mentioning all kinds of designs and ornaments that are made using sparkles.
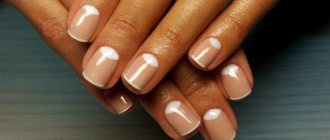
Nail extensions and classic pink jacket (with photo)
Fifty shades of pink – and that’s all for a French manicure. French in pink is an absolute classic of the genre , just like that, no less, no more. It is shaded with delicate lace and thin monogram patterns. Such a feminine manicure, touching and fragile, but noticeable.
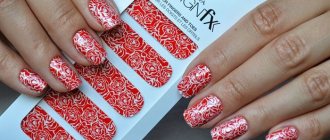
Nail extensions and French designs in different colors (new items with photos)
But where the creative soul can develop to its full potential is in a jacket of different colors. The main thing is not to miss the combination of hole and line in color . For adherents of the classic French jacket, there is a rather bold combination - a pink base and a thin line of any color. Or a colored hole with the same classic pink nail. For creative and daring people, there is no limit to perfection in color combinations.
Photo gallery of acrylic jacket
Of course, an important factor is the appearance of acrylic nails. So that you can evaluate the final result of acrylic French manicure extensions, we have prepared for you a collection of photos with bright and interesting French manicure designs. They will help you gain a better understanding of this technology.
If you liked the extended nails that you saw in the photo, and you are not embarrassed by the indicated disadvantages of working with acrylic, you can safely try this French manicure . If you think that this is not for you, pay attention to French manicure extensions with gel - this is a more modern and progressive technology in all respects. In conclusion, we bring to your attention a useful video where you will find an excellent master class.
Modern trends dictate their own rules: today, short natural nails that look as natural as possible are in fashion. Extensions are gradually fading into oblivion, but this does not mean that you need to completely abandon this type of nail decoration. Whatever you choose, always be beautiful and cheerful!
Video tutorial on how to do nail extensions and the perfect French design at home
The master tells how to make French nail extensions using acrylic and special forms for a perfect smile. Yes, they exist, reusable metal molds that fit every nail size perfectly. A few practiced movements, and from under the hand of the master comes the perfect blank for a French jacket . Such informative lessons with videos for beginners are an ideal guide for those who want to master French nail extensions in the shortest possible time.
Which type of French manicure do you like most? Perhaps you have your own favorites? Write comments, we will be grateful to you.