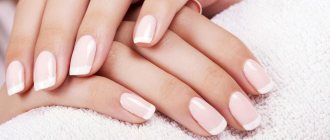
What is French manicure?
French is a real gift from the manufacturer of manicure products “ORLY”. But with French I was cruelly deceived. It is not known where this name came from, because it was created by an American after one director complained that actresses spend a lot of time taking care of their nails. But this doesn’t matter, the main thing is that now we have a universal manicure option that fits perfectly with any look.
The classic version of the French manicure is short nails that look natural and well-groomed, with a white rim and a base of a natural color - beige or pink.
Required Tools
If you decide to do a French manicure with gel polish at home, you need to prepare everything you will need during the process. Searching for a tool you suddenly need distracts you from your work and affects the quality of your manicure.
Trend of the season
You will need:
- Basic manicure accessories - scissors, nail file, nippers, buff.
- Primer.
- Base coat for gel polish.
- Cuticle oil.
- Pink and white gel polish for a classic version, colored varnishes for a bright jacket.
- Top coating.
- Stencils for French manicure.
- Orange stick.
- Cotton buds.
- Nail polish remover.
- Additional decorative elements upon request.
- Lamp for coating polymerization.
High-quality French
Preparation
French manicure with gel polish looks perfect on well-groomed hands. Carelessness will ruin even the work of a first-class master from the salon. To make your nails look beautiful, you need to carry out preparatory procedures. It won't take much time, and the result will pleasantly surprise you.
- First of all, you need to remove the old coating, or its remnants.
- Get a European or cut manicure - determine the length of the nails, shape them with a file, remove the cuticle.
- It's time to take a bath with sea salt.
- Treat nails with a degreasing agent.
- Use a buff to buff the surface of the nail plate. Important! Grind strictly in the direction of nail growth, otherwise there is a risk of damaging the nail plate.
After the above procedures, do not wet your hands, do not use cream, balm, or oil. Try not to come into contact with foreign objects.
Manicure products
Classic French
- Apply primer to polished and grease-free nails and wait until it evaporates from the surface.
- Carefully apply the base coat and dry in a lamp. Drying time depends on the varnish and lamp power.
- Apply pink or beige gel polish and dry your nails. If necessary, apply a second coat and dry.
- Use white polish to draw a smile line on the regrown part of the nail plate. If you are not sure, you can use special stencils. If the varnish accidentally smears, it's okay. The defect can be corrected using a cotton swab.
- Send your fingers under the lamp to dry again.
- Apply top coat and dry.
- Remove sticky layer.
- Rub the oil into the cuticle, this will give your hands a well-groomed look and protect the skin from drying out.
Classic jacket with heart
Some craftsmen practice combining the main and white colors. Due to inexperience, the line where two varnishes meet will be very noticeable. You can disguise it with decorative elements. But first it’s better to get your hands on it using the method described above.
French manicure options and their differences
But modern manicurists have gone further, deciding not to limit themselves to just one thing and have created many variations of it.
- At first, French began to appear on long nails.
- Today you can see not only clear rims on the tips of the nails, but also varnish applied using the popular ombre technique.
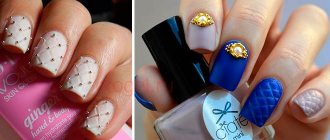
- A revolutionary decision was a radical change of color - the white rims were replaced by black ones, and then completely became multi-colored. For this type of French coat, matte and glossy varnishes of the same color were used. Recently, “metallic” jackets have come into fashion, using foil, glitter and rhinestones on the tips of the nails.
- Then the crescents gave way to diamonds. Then the idea came to paint diamonds in two layers alternating white and black. This is how the zebra style jacket appeared.
- Later, a variety of “lunar” or “reverse” French appeared: the crescent moved from the top to the base.
- Among the recent new products: “lace” French manicure, with designs reminiscent of mehendi patterns.
- Now we can preserve this manicure for a long time thanks to shellac.
Smooth jacket using gel polishes
Recently, gel polishes have become increasingly popular among women. This material is gradually replacing conventional gels, which laid the foundation for nail extensions and opened up new opportunities for creating first-class designs. Professionals claim that they are much easier to work with: they are easier to apply, dry faster in a lamp, and can be used on natural nails.
In fact, French polish using gel polishes is done in the same way as with regular polishes. The only difference is the need to polymerize the material in a UV lamp for a certain time. But at the same time, the result lasts much longer than usual if everything is done correctly.
- We give the nail a shape and degrease the surface.
- We apply camouflage (gel polish of a pastel or any other shade that will serve as the base) in two layers. The polymerization time of each layer is 20 seconds.
- Then, using a brush, carefully draw a smile line, again in two layers. Dry each layer in a UV lamp for 20 seconds.
- Apply a finishing coat to secure the result.
It is important that when performing a design, make sure that during the work you touch the nail plate after degreasing. Also, remember to seal the tip of the nail at each subsequent step.
What are stencils for?
To draw a beautiful, neat line with a brush and white varnish at home without stencils, you will have to practice quite a lot. Therefore, to make the task easier, stencils were invented. And they come in two types: for applying patterns and “smile” shapes to nails and for obtaining beautiful designs on them. In addition, using ready-made strips at home significantly reduces the time and money spent on trips to the salon.
How can you replace stencils?
You can try to do without special stencils: cut a strip of adhesive tape or electrical tape into strips 2-3 cm long to wrap around your finger. Stick to the nail plate at the desired level and apply the polish with bold strokes! To avoid troubles such as peeled off varnish, the tape must be glued to some flat surface a couple of times so that a minimum of glue remains on it. You can also cut out homemade templates from paper and attach them to your nails using water.
French on natural nails without gel
For girls who are not familiar with gel or acrylic extensions, a neat classic design on natural nails will be most suitable. You just need to know how to make an even jacket using additional accessories.
Conventionally, the technique of performing French design can be divided into two categories: with and without stripes. If this is your first experience in drawing a smile line, then, of course, you won’t be able to do without stencils.
Technique for performing a jacket using stripes:
- We prepare the nail plate according to the standard scheme.
- Apply the base coat and wait until it dries completely.
- We glue pre-prepared stencils onto the nail. You should try to ensure that the stencil line coincides with the natural smile line. In this case, it is necessary to ensure that there are no voids or gaps between the nail and the strip through which white varnish can flow.
- Cover the tip of the nail with white polish and wait for the material to dry. Don't rush, removing the stencils ahead of time. Wait until the white coating dries completely, otherwise the design will be greatly damaged.
- Finally, apply a layer of pastel-colored varnish or clear coat.
If this is not the first time you have worked with a similar design, then perhaps the use of stripes is no longer relevant for you. After all, over time, you need to begin to improve your skills, and the necessary accessories are not always at hand. So it's time to learn how to make a French look without stripes, using a brush.
- We start with the standard procedure.
- After applying the base, we begin drawing the stripes. To do this, carefully draw a line along the tip of the nail with a brush with white varnish. You can act at your own discretion, choosing the most practical option for you: from the tips of the nail to the middle or from one tip of the nail plate to the other. And, perhaps, it will be more convenient for someone to move the finger itself rather than the hand.
- After the white varnish has dried, we finish making an even jacket with a transparent or translucent coating.
It is difficult to say which of these options is correct to use from the point of view of nail aesthetics. Each of the girls acts at her own discretion, choosing the most convenient way to create a beautiful design.
With the use of more professional materials, you need to take design creation more seriously. After all, the durability of your manicure depends on how correctly your French manicure is done.
Types of stencils
Disposable
Disposable blanks consist of an adhesive paper or vinyl backing and backing. How to use them? The adhesive strip is applied to the nail, the desired color is applied on top, then the stencil is removed.
The base is low cost and easy to use. Keep in mind that vinyl adheres more tightly to the nail, resulting in a clear design.
Reusable
Typically, reusable stencils are made of metal and are sold in a set of 8 sizes. Silicone and plastic are also available.
Round
Have you seen paper stickers in the form of circles? These are used for lunar, that is, reverse manicure. They are attached to the bottom of the nail.
Triangular
Triangles glued to nails allow you to create an original pattern that will look beautiful on long nails. As an original addition, you can leave the hole colorless or paint it a lighter shade.
In the form of an arc or a tick
Arcs and swooshes are easy to use and create something more classic. The only thing you need to pay special attention to is precise centering in order to get the same result on all nails.
Which brush to choose for a French manicure
So, we have already found out that working with this design will not be difficult at all. However, this requires accuracy and perseverance. Of course, you can use a stencil, but experts highlight their lack of practicality and the fact that it is not always possible to get the desired shape of a smile. This is where a design brush comes to your aid.
French
The right brush should be as thin and long as possible, with its help you draw a fine line between the main color and the pattern. In order to paint the tip of the nail a uniform color, it is not suitable and you will need to buy the most ordinary gel brush, you can also use a brush from a bottle of varnish. Before you get the perfect line, you will have to practice to get better at it, so to speak. This can be done on special tips or simply on a piece of paper; this is necessary so that you can calculate the pressure and get used to working with a thin brush.
This tool will also be useful to you for subsequent work with gel polishes; it is with its help that masters in salons make drawings of any complexity.
When choosing a brush, pay attention to the fact that it should be soft and perfectly smooth. If uneven fibers stick out on it, they will interfere with drawing and making blots.
How to make stencils for manicure with your own hands
Do you urgently need a spectacular manicure, but don’t have any stencils on hand? Let's not waste time, let's get to work! How to make templates:
- We arm ourselves with applique or manicure scissors.
- We scroll through slides in our heads with designs for headbands or patterns for stamping and settle on the one we need.
- We find a photo on the Internet and print it out or draw the selected stencil and cut it out. It is better to print on paper with an adhesive backing, but if this is not available, then use regular paper.
- We cut 10 copies, although it is better to add a few more at once, in case the sticker gets damaged.
- If you need to make a stencil several times, we strengthen it with tape to create density and so that the paper does not get wet.
- Let's get straight to the manicure!
Which gel polish to choose for a French manicure.
The main rule when choosing a material for work is, of course, its quality. As for your choice when choosing colored gel polish for a French manicure, in fact, as for any other design, pay attention to the following:
- Dense and rich color that applies well in a maximum of two coats. Otherwise, when performing work, you may develop bald spots and an uneven shade;
- Gel polish should not be very liquid, but thick will not work either. As a rule, they lie in several layers and cause pigmentation. And also, the nails under such a gel will form a tubercle and will soon cause a detachment.
The best option for the nail base is to choose a gel polish of a delicate shade that best matches your natural color of the nail plate.
Many artists use gel paint or regular acrylic paint to paint a smile. Because its shade is much brighter than a regular gel and is easier to work with, laying down in a thin and even layer.
Step-by-step technique for performing manicure with a stencil
Whatever one may say, French is not just about applying varnish. The process is long and quite labor-intensive, but you don’t mind the energy and time for such beauty, right? I'll tell you step by step.
Preparing your nails
We erase the old varnish. We bring the shape of the nails to the same desired shape and size using a nail file. By the way, based on personal experience, I advise you to use glass - my nails stopped breaking from the summer breeze only after I started using this tool.
Now fill the bowl with hot water, add just a little liquid soap, a couple of drops of your favorite aroma oil and a teaspoon of sea salt. Dissolve it all, if necessary, dilute it a little with cold water, lower your hands and keep it in the bath for 5-7 minutes.
Having taken out your hands, wash them thoroughly with soap; if necessary, use a brush to remove dirt. Using a pusher or an orange stick, push back the cuticle. We get rid of it by applying a special remover liquid, using nail scissors or triangular cutters. We do the same with the skin around the nail. We make sure that the cuticle has completely capitulated and move on to the main part!
Process description
Use a sanding file to lightly polish the surface of the nail.
- If you want a contrasting result and a clear border, then apply a colored base (pink, milky, beige). Dry well. If you want to make your manicure more noticeable, apply a second layer. After drying, stick the stencils tightly and make white “smiles” at the ends. Carefully remove the stencils, dry them, and apply the finishing coat (transparent varnish).
- If you are more attracted to a slightly blurry manicure, then apply a transparent base first, then paint the tips, without stripes, and then cover with a translucent colored varnish.
French manicure at home: step by step
In order for a French manicure to be as natural and feminine as possible, but at the same time attract the gaze of others with its elegance, it is recommended to follow some rules:
- First of all, the French line is drawn by defining the central axis of the finger;
- Then, from this point, curved smiles are drawn symmetrically on the sides;
- Also mark the end points of smiles in advance;
- In the classic version of French manicure, the length of the white part should be at least 2 times less than the base.
Watch the video: how to correctly draw French nails step by step and repeat all the steps.
The main component of a neat and beautiful French manicure with gel polish is high-quality treatment of the nail plates. The durability of the manicure will depend on this. Read on to learn how to properly prepare your nails for coating.
Nail preparation
First, treat your nails with a disinfectant. At the same time, make sure that the antiseptic does not flood the nail plates, as the product has a strong moisturizing effect. If they are heavily moisturized, this will weaken the interaction of the nail plate with all applied layers of varnish.
At the next stage of nail preparation, the old coating is removed if necessary. Soak a sanitary napkin in gel polish remover and moisten each nail with it.
After this, pry off the old layer with a special manicure stick and remove the varnish. If the previous manicure was done using a machine, the old layer is removed using a cutter.
Before processing the cuticle, it is necessary to align the edge of the nails. Try to keep the shape and length the same on all ten fingers. Experienced specialists recommend moving the nail file in one direction, this will help avoid the formation of gel polish peeling.
Cuticle treatment
A clear cuticle remover is applied around the nail. After all fingers have been treated with the product, they should be placed in a bath of warm water to soften them. This liquid contains substances that promote painless cleansing of the pterygium and cuticle. For the product to work, keep your hands in warm water (30-40 degrees) for 5 minutes. After the time has passed, wipe your fingers dry.
First you need to lift the cuticles, for this you will need a pusher, with the help of which the cuticles are gently pushed back and lifted. The cuticles are trimmed either with nail scissors or with a cuticle cutter.
When processing the cuticle, the tool must be held at one angle, in this case the cutting line will be smooth and not broken. This is very important, since it is the uneven line that is the main reason for the gel polish to flow behind the cuticle, resulting in the formation of burrs. After all the fingers have been treated, use an orange stick to check whether all the pterygium is cleaned. Apply oil around the nail area and massage so that the product is better absorbed.
Don't forget that your nails have a natural gloss. However, when applying gel polish, it must be removed. In order not to injure the nail plate, it is best to use a buff.
Lightly move the tool over the entire nail several times, removing the protective film. Sanding also needs to be done with sufficient quality, reaching all edges of the nail, since skipping even a small area can cause the gel polish to peel off.
Apply primer and base
After the gloss is removed, excess residue is removed with a brush, then a dehydrator is applied to the surface of the nail. This product degreases the surface, thereby enhancing the interaction of the nail with the gel polish.
Before applying the main composition, it is recommended to further strengthen the nail plate.
A transparent strengthening agent (primer) is applied to the nails, with the help of which the plate will not be too thin after polishing. The primer is also dried in a UV or LED lamp. The time depends on the type of product used and the type of lamp, but as a rule, it is 30-60 seconds.
Apply the base in a thin layer. You should be extremely careful and attentive so that it does not flow beyond the nail. The base material can be transparent, white or beige. You can also use it to create highlights that fit perfectly with a French manicure.
Immediately after the base is applied to the nail, it needs to be dried in a lamp. It is important to ensure that the base does not roll off. To do this, try to keep your finger level. The base is dried in the lamp for approximately 1-2 minutes.
Drawing a French coat
There are many ways to simplify your work when drawing a French jacket. Only professionals can paint the perfect smile for a French manicure with a brush, without the use of special tools.
You can draw a French line:
- A special manicure brush with a flat end;
- Stripes (stencils). At home, you can make homemade strips from narrow tape, electrical tape, masking tape and adhesive tape;
- Tips.
We choose the appropriate method and draw white stripes.
Apply top coat and remove sticky layer
After the gel polish has dried and the French manicure design is completed, the coating must be fixed with a layer of top coat. The product also needs to be dried in a lamp.
The sticky layer is removed only at the final stage of the French manicure after the top layer has polymerized.
At the final stage, you need to remove the sticky layer from the French manicure. Many girls mistakenly assume that they need to remove the layer after applying the base. However, it is thanks to the sticky layer that all stages of manicure - base, color layers and top - are well bonded to each other. If you remove the dispersion ahead of time, the manicure will lose its strength and the gel polish will begin to peel off from the nail.
The best French manicure ideas
With rhinestones and sparkles
Rhinestones and sparkles are a universal addition to a French jacket. Several use cases:
- Attach the crystals under the white rims.
- Decorate the tips of your nails with glitter instead of white polish.
- Emphasize the hole with crystals.
although in fact, accessories on one finger will be enough so that the manicure does not lose its zest. The ring finger is usually chosen for this.
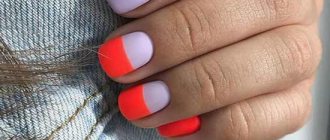
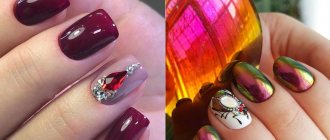
Color
According to manicure fashion 2018-2019, white headbands for this season can be replaced with blue, lilac, pink and orange stripes. And in the cold season, nail stylists recommend purple, red and even black for nails.
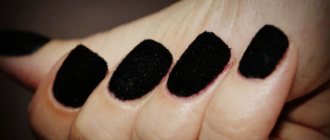
Black
Black is generally a universal color - a bold decision and easily combined with any shade. One of the most advantageous types of French is a nail plate painted matte black and rims of the same color, only glossy.
I suggest watching a video of how a nail art master does a manicure with gel polish in the camouflage style and explains all the steps step by step.
What types of French do you like? Leave comments, share with friends on social networks and subscribe to updates. See you!
Video tutorials on how to apply French gel polish
French manicure itself is self-sufficient and does not particularly require any additional decorations. However, if you want to make an unusual and original design, as well as a manicure for a holiday or wedding, do not hesitate to add decor. Rhinestones, velvet powder, glitter, and voluminous decorative elements look most impressive with French. Thanks to the competent and harmonious selection of contrasting colors, you are free to create masterpieces to suit every taste.
For those who like to perceive information visually, I would like to offer several videos that helped me understand the possibilities offered by a French coat made with gel polish.
Video for beginners on creating a French manicure with gel polish
Video tutorial No. 1: Three ways to make French gel polish
Video tutorial No. 2: An easy way to do a reverse French stitch
Video tutorial No. 3: Eight ways to draw a smile for a French manicure
Video master class for the more experienced and determined
Master class No. 1: Secrets of nail service - French gel polish
Master class No. 2: Reverse French
Master class No. 3: How to correctly draw a smile for a French jacket