When learning the basics of manicure, you need to know how to properly seal the end of the nail with gel polish.
The question can be fully revealed only in the sequence of the entire manicure process. The final result depends on the precise execution of each stage. Professional fixation of the material allows you to maintain well-groomed nails for as long as 3 weeks. It’s easy to learn on your own at home. You just have to collect a basic set of tools and carefully study the secrets of the technology. And the time saved on going to the salon can be spent on your loved ones or your loved one. How to properly seal the end of a nail with gel polish? The advantages of this material are undeniable. Retains a glossy shine for a long time, with almost no chips or cracks. And the environmental properties do not have a destructive effect on the nail structure. A wide range of shades allows you to choose the appropriate tone for any outfit. And the price is affordable, everyone can collect a small collection. But all the advantages can easily be ruined by the wrong technique, so you shouldn’t rush and skip processes. Everything is in order, otherwise, having learned to seal perfectly and making a mistake during processing, all the work is reduced to zero.
When is a sealing procedure still needed?
The end is closed not only when applying gel polish, but also in a number of cases when it is necessary to preserve the coating (nail).
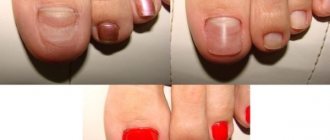
If the stratum corneum begins to peel off, and the manicure is still very fresh, then the master can reseal the edge, maintaining a neat appearance.
Sick, peeling nails that lack vitamins can be grown back and preserved by sealing.
When the tip of the nail or its edge breaks off and there is no time for proper care, the crack is sealed with gel polish.
Why doesn't sealed gel polish last?
It would seem that sealing the end of the nail with gel polish was done according to all the rules. But the chips still appeared. Why did this happen? Because the rules for wearing artificial turf were not followed. No matter how well the end is sealed, any coating is powerless against abrasives.
Constant exposure to the ends of your nails when typing on a keyboard, playing musical instruments, or washing dishes without gloves leads to thinning of the gel polish on them. Eventually, the coating wears away completely in some places, which leads to chips. It is recommended to wear gloves when washing dishes. And for those who have a profession that is traumatic for gel polish, it is better to do strengthening before applying gel polish.
Tools and materials
Gel sealing requires the same tools as coating. First, the nail should be prepared, degreased, then get to work.
Tools:
- manicure scissors help adjust the length and shape of the nail plate, and remove the cuticle;
- buffs (polishing blocks) of varying degrees of abrasiveness prepare the stratum corneum for applying varnish;
- files with different grain sizes level and shape the free edge of the nail;
- brushes for applying varnish;
- UV lamp for drying each layer.
You may need wire cutters or orange sticks. They are used if you need to remove excess skin around the nail bed.
To apply the coating and seal the chip, it is necessary to use high-quality materials:
- means for removing liquid and fat from the nail plate (bonds, dehydrators);
- disinfectant;
- primer;
- the basis;
- top
The primer and top are colorless, the base is colored.
Execution technique
There is a certain technique for sealing the end of the nail. It was not discovered with the advent of gel polish; it is a well-known method of covering nails with regular polish. It is studied in manicure schools.
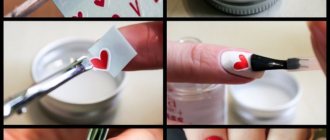
How to seal the end of a nail with gel polish:
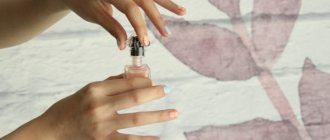
- The brush is lowered into the bottle and squeezed well against the neck. It should be semi-dry.
- The brush is held at an angle of 45% to the end of the nail and brushed along it with the very tip, one or two hairs.
- If gel polish gets on the skin, remove it immediately with an orange stick.
Sterility must be maintained when applying the coating. This means that no organic matter should get on the nails. This affects adhesion. Therefore, the craftsmen work in masks and gloves. And, of course, you shouldn’t remove excess material with your fingernail. There is an orange stick for this. In particularly difficult places, you can use it by first dipping it in an alcohol-containing liquid - a disinfectant.
End sealing technique
The work can be divided into 3 stages: preparatory, main, final. If you strictly follow each of the suggested steps, the coating will turn out to be of truly high quality.
Step 1 (preparatory)
First, the cuticle and excess skin are removed, and the nails are given the desired shape.
It is important to thoroughly degrease the surface of the horny plate and remove excess moisture with dehydrators . The same manipulation is carried out at the end.
After treating with any liquid, hands are dried without using a lamp.
Then the surface of the nail is polished with a buff, partially removing the keratin layer for better adhesion to the primer.
Use a special lint-free cloth to remove any remaining nail dust.
It is important that the plate is well cleaned of any particles, otherwise the coating begins to swell and peel off from the horny plate.
Step 2 (basic)
A primer (base) is applied to the keratin layer and end. Using a brush, apply the product to the back side of the free edge, pass well along the end, trying not to leave bald spots.
Dry the first layer for 5 minutes with or without a lamp (this depends on the instructions for use of the product).
As soon as the base dries, apply a colored layer. It is applied from the base of the nail, pulled out to the free edge, moving slightly past the end.
At the sides, all layers of varnish are carefully applied, pushing back the skin. The base is dried under a UV lamp for 3-4 minutes.
Step 3 (final)
After the base has dried, begin applying the top. Using a dry thin brush, carefully process the edges of the nail along the entire perimeter, then apply a fixing coating to the entire horny plate, going beyond the edge.
The finishing layer is dried under a lamp in accordance with the instructions.
Expert advice
Incorrect hand position in the lamp while drying gel polish leads to it unevenly polymerizing, becoming fragile in certain areas. Therefore, you should check how your hand lies in the lamp. If your fingers are not strictly horizontal in it, but look down at least a little, the ends will not dry out properly.
A photo of how to seal the end of a nail with gel polish and dry it correctly in a lamp shows the correct position of the fingers.
It is very difficult for non-professionals to apply gel polish to the end of the nail in a thin layer. To prevent thickening of the material at the tips, the brush is wrung out well and barely touches the nail when sealing.
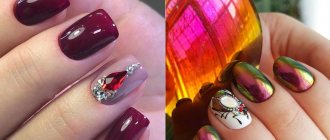
There are complex tones that require a special application technique. These are pastel colors that often appear in stripes. Trying to correct such a flaw, amateurs apply layer after layer to cover the defect. This results in too much volume at the tips of the nails. You should learn the technique of applying pastel and nude coatings, then you won’t have to make mistakes.
Sealing the end on short nails
The preparation of a short nail plate for the application of gel polish is carried out more carefully to increase the adhesion of the varnish and the keratin layer. You need to properly seal the end and edge so that the gel does not peel off.
Application technique:
- Carefully remove the cuticle and excess skin around the nail plate, especially if the manicure is performed at home. The salon performs hardware (unedged) manicures.
- It is good to degrease the keratin layer, remove moisture, especially along the free edge. You can use pharmaceutical alcohol (70%).
- Treat the surface of the nail plate with a soft buff until matte. With this device you need to go well along the edge so that all layers of the gel lie evenly and “stick” well.
- Remove dust and crumbs with a napkin.
- Apply the primer in a thin layer (you need to do this especially carefully along the edges), dry according to the instructions. A thick coating on short nails will not last.
- Gel polish should be dense in texture, but applied in a thin layer. Carefully process the edge of the nail and dry it under a lamp for 3-4 minutes. It is not recommended to apply more than 2 layers of base.
- The top is applied especially carefully; it is important to thoroughly process the ends of the horny plate and the free edge. The finishing layer is applied in a thin layer, otherwise it will move to the edge and wrinkle. It is dried under a lamp for 3-4 minutes. It is important not to touch the edge of your nail to the lamp panel and not damage the polish.
- After drying all layers of gel polish, a sticky residue may remain on the surface. It can be removed with clinser or alcohol.
At the final stage, nourishing oil is applied to the cuticle and cream is applied to the hands.
Types of sealing
Modern nail technicians have borrowed the technique of sealing nails from ancient Japanese manicure, which is more than four hundred years old.
Even then, ladies of high society from the Land of the Rising Sun used his secrets, with the help of which they gave their nails the perfect shine, restored their health and the rare color of pink pearls.
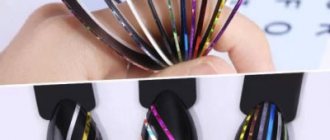
Today, you can seal your nails at home using:
- Beeswax;
- Permanent gel wrap;
- Hot oil manicure;
- Acrylic, keratin or biogel.
However, we will focus on the simplest and most affordable options.
Wax
This is the most popular sealing procedure, recommended both as a preventive measure and after extensions, especially for weakened thin nails. After all, wax is a natural product rich in:
- Carotenoids;
- Minerals;
- Resins;
- Propolis;
- Beta carotene;
- Vitamins from group A, B, D, E;
- Starch;
- Pectins;
- Glycosides;
- Polysaccharides;
- Essential oils.
Thanks to the unique combination of these nutrients, nails during the procedure receive excellent bactericidal, softening, regenerating and anti-inflammatory nutrition.
At home, the sealing technique can follow this scheme.
- Initially, you will need to remove the old coating from your nails.
- Use a disposable nail file to form the required length and shape of the nail.
- Then you should take a warm healing bath, adding a little sea salt.
- Afterwards, remove dead cells from the nail plates, the area around the cuticle and the side ridges.
- Then, using a file or suede buff, we polish the nails, and then rub them with natural wax cream.
By the way, you can prepare such a sealing composition yourself. To do this, you will need to take 80 grams of some basic Pancake week product: olives, shea, almonds. Heat it in a water bath, adding 20 grams of natural beeswax, glycerin and a little distilled water.
This whole mixture is mixed until smooth, and then used warm. Thanks to the thermal component, the medicinal wax composition is quickly absorbed into the nail plates.
To make it grab faster, you should hold your hands under running cold water for a few seconds. As a result of this procedure, a shiny thin film is formed on the nails, protecting them from external negative factors for a month.
You can watch this procedure in the following video.
Consequences of an unsealed nail
If each layer of gel is not sealed, the manicure will not last long. Water gets between the varnishes, the layers begin to delaminate . After a few days, the coating peels away from the base and chips may appear.
If the free edge is not immediately covered with gel, then the manicure will look sloppy and untidy. The nail plate is visible from under all the layers, especially if it is thick. Over time, dirt begins to accumulate.
This means that the master performed the work poorly and unprofessionally.
Sealing errors
The durability of the gel coating is influenced by the technology of its application.
Errors that lead to chipping and delamination:
- applying gel to the unprepared edge;
- processing the edge with a file, not a buff;
- applying cream, oil before applying gel to the end;
- applying thick layers of gel polish;
- shaking the bottle of varnish before applying it;
- drying not in a horizontal, but in a vertical position;
- sealing when applying one layer of gel, and not all;
- removing the sticky layer released during drying from the primer or base (it can only be removed from the topcoat).
If you avoid these mistakes when sealing your nail, a manicure with gel polish will last about a month.
How to seal gel polish on problem nails
On thin, soft nails the coating does not adhere well to mechanical stress. You should first strengthen them, and then cover the ends of the nails with gel polish. For strengthening, a rubber base is used, which is applied according to the principle of a modeling gel: a longitudinal arch is formed by turning the hand over.
Another way to strengthen it is to add acrylic powder to the base. Such nails will be hard and strong. After strengthening, perform the entire sequence of applying gel polish as usual.