For a very long time, French manicure has not faded away and is in demand among girls and women of all ages and classes. In addition to the classic jacket, other types are known and popular, such as white or rainbow jacket, fan jacket and others. Even those who for some reason cannot grow their nails, thanks to extensions, can run around and show off a fashionable, stylish, beautiful and popular French manicure.
Beginning masters or just girls who want to learn this art on their own very often ask questions, since this procedure is considered to be quite difficult. The main number of questions is how to extend nails with gel, since there are two methods: painted and laid out.
The women's portal TheWomens.Ru also recommends that you familiarize yourself with later materials that will tell you how to apply shellac, how to make square nails or how to apply gel polish on nails correctly, from the category of female beauty! There is a fundamental difference between these methods, which must be learned immediately. A laid out French is when the free edge is made exclusively with materials, as opposed to a painted one, where everything is done in white or any other color. Often, with the second method, the free edge is drawn with gel paint, gel polish or a thin layer of material.
See also: Trim manicure - video lessons for beginners
It is worth noting in advance that the painting can be applied to an already modeled nail, but the elements of aquarium design, on the contrary, are created in the process of extension, step by step.
Okay, theory is theory, but practice and a clear example are always better. We watch a video where professional experts in their field extend nails with gel and comment on the process.
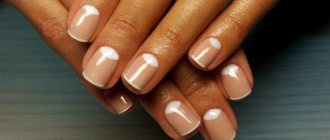
French tips extensions
This is what French tips look like
This method also has a name: extensions using express tips. If you don’t have enough time for your usual manicure, and the situation urgently requires you to get yourself in order, then this method is perfect. French tips prepared in advance are attached to the nail. The entire space of the nail plate is filled with gel or acrylic; the thickness should be equal to the extended jacket. After this, the entire plate is covered with the selected substance to secure the extended part and the natural one. The color scheme in this type of manicure is quite simple: you paint your nail in a transparent or pinkish color, and the French manicure is done in a contrasting color.
As you can see above, this French nail extension is a labor-intensive and convenient manicure, but, unfortunately, you will have to do it anew every time, because the correction is extremely difficult, almost impossible. But there are also advantages: the extension is not done from the cuticle, so as your own nail grows, the French retains its attractiveness for a long time. The nail plate is not damaged.
Video tutorial on gel extensions:
Of course, you may not succeed the first time, but gradually, by getting better at it, you can become an excellent nail extension artist and make your wildest nail design decisions come true, while making money!
Creating a nail shape using gel forms does not always work out the way you want. Especially for beginners. Don't worry, everything can be fixed with a file!
A file can be used to trim and remove unevenness, giving the nail the desired look.
It is best to start with short square nails, since this shape is easier to do than the rest. As a beginner, you first need to get your hand used to applying the gel and filing it.
To ensure that the gel sticks well to the nail, file off the top layer of the nail plate well and degrease thoroughly!
Editor's choice: Turquoise manicure: design ideas and color combinations
Also carefully remove the sticky layer from the gel before applying the next layer.
For a French manicure, it is better to use a stencil, since not everyone can do a French manicure evenly right away.
After you get the hang of creating the shape, you can start designing your nails. For a beginner, it is better to apply all kinds of patterns with a special tool, rather than with a thin brush.
You can first practice on an ordinary tip so that you can apply a neat design to your nail.
In order to build up well, it will take a little time and skill. Practice your skills, watch the video, learn and don’t be afraid!
Shapes of extended nails in the photo:
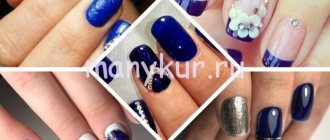
Variations of French on nails
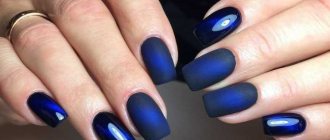
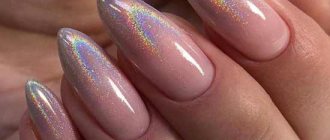
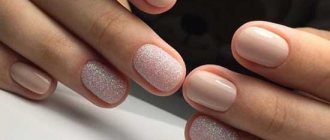
Today it has become fashionable to cover your nails with something sparkling and bright. Therefore, it is worth talking about the so-called French millennium. The technology is as follows. The base is the natural color of the nail plate and highlighting the tip. The highlight is the sparkling decor, which gives the nails an unforgettable effect. Variations may be different:
- the entire tip is covered with glitter, microdust or sequins;
- you can decorate the smile line with glitter;
— glitter is applied to the cuticle area, and an inverted jacket is obtained.
Note The base for mixing with glitter must be transparent, otherwise the millennium French look will not work. Also, all sparkling materials should be small and fit tightly to the nail so that there are no gaps.
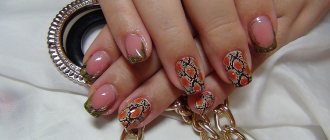
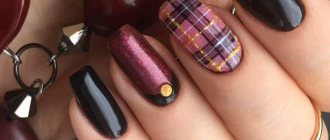
Extended French nails are performed in the fan-French style. It is somewhat similar to the previous one, but differs in the variety of colors. When talking about this manicure option, we mean decorating the tip with different materials: foil, mica, rhinestones, pieces of fabric, flowers, and so on. In this case, the nail plate can be absolutely any color, but the edge of the smile does not have to be drawn even. Roughly speaking, this is an applique on the nail.
French nail extensions: features and design types
In order for the French nail extension process to be successful and the result to be impeccable, you should remember the modeling features and the quality of the material.
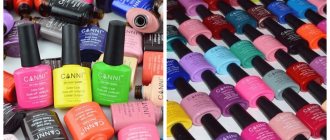
French nail extensions photo So, materials for nail extensions should be used only from well-known manufacturers. In addition, it is very important to test the material for allergies.
Moreover, such a test is necessary for both the master and the client who wants to do extensions for the first time.
Acrylic or gel?
Each of these materials can be used for nail extension using the French technique. What is important is the skill of a specialist who is able to do nail extensions using this technique so that no one will know what material was used to make the extensions.
Most often, nail extensions using the French technique are done using gel.
In addition to materials, tools are of great importance. Thus, French nail extensions are performed using a brush with hard but elastic bristles.
The brush must be of impeccable quality. The best is considered to be a sable brush, which, when wet, forms a “point.” All other brushes are simply not suitable for modeling nails.
And finally, the peculiarity of French nail extensions is the extension on forms. To get a good result, a correctly selected form is used, which is an ideal continuation of the natural nail. The result is a perfectly long and beautiful nail with a French manicure.
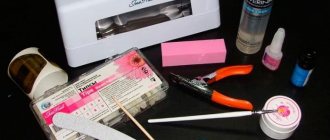
Thus, in order to perform nail extensions using French technology, you need:
- Good quality gel or acrylic;
- Brushes with hard and elastic sable bristles;
- Forms;
- Two cups of monomer, colored powder (for acrylic extensions);
- Glitter dust, sparkles, etc., if you need to build up a colored jacket;
- Finish coating.
As a rule, the procedure lasts about three hours, after which you can safely “use” your nails.
Types of French nail extensions
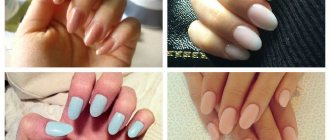
French nail extensions photoFrench nail extensions can be made both in the classical technique - white edge and pastel base, and in modern design. The latter method involves various techniques using colored coatings and different types of glitter.
We have previously written about the main varieties of French modern: color, millennium and twist. All of them are relevant both on natural and artificial nails.
In addition to these varieties, there is also Fan-French, which is made using bright materials. For example, the edge is decorated with foil, mica, neon colors of varnishes and paints. This variety is almost similar to Twist French.
Top
Gel or acrylic
Substances such as gel and acrylic are classified as acrylates. The gel resembles fiberglass and has an ideal surface. Moreover, it itself spreads evenly under the influence of UV rays and shines beautifully. It is elastic, so the nail moves easily with it. Acrylic has a matte sheen and may yellow over time, but it has a huge range of colors. Acrylic nails are quite durable and are not afraid of temperature changes. Acrylic has a specific smell when applied.
There is an opinion that acrylic on forms for a French manicure looks better than gel, since the smile line is clearer. But this is not the rule. A professional master will be able to paint a beautiful smile on gel nails.
Video tutorials on how to apply French gel polish
French manicure itself is self-sufficient and does not particularly require any additional decorations. However, if you want to make an unusual and original design, as well as a manicure for a holiday or wedding, do not hesitate to add decor. Rhinestones, velvet powder, glitter, and voluminous decorative elements look most impressive with French. Thanks to the competent and harmonious selection of contrasting colors, you are free to create masterpieces to suit every taste.
For those who like to perceive information visually, I would like to offer several videos that helped me understand the possibilities offered by a French coat made with gel polish.
Video for beginners on creating a French manicure with gel polish
Video tutorial No. 1: Three ways to make French gel polish
Video tutorial No. 2: An easy way to do a reverse French stitch
Video tutorial No. 3: Eight ways to draw a smile for a French manicure
Video master class for the more experienced and determined
Master class No. 1: Secrets of nail service - French gel polish
Master class No. 2: Reverse French
Master class No. 3: How to correctly draw a smile for a French jacket
Instructions for French extensions
- It is necessary to disinfect the hands of the master and the client.
- Push back the cuticle and use a 180 grit file to trim the free edge. Then sand the plate.
- Using a lint-free cloth, degrease the nail and apply a dehydrator. Then carefully coat the nail with primer.
- Attach the template to your finger and form the nail into the desired shape. Then place it in a UV lamp for polymerization for 2 minutes.
- Next, pink camouflage gel is applied, while holding your finger at an angle of 45%. This layer also dries for 2 minutes.
- Use a lint-free cloth to remove the sticky layer and remove the template. Then the nail is filed on all sides with a file with an abrasiveness of 180-240 grit. The procedure must be performed carefully, especially the smile area, otherwise the paint will spread.
- Then, using a brush, first draw the outline, and then the entire tip of the nail. When the smile is ready, dry the nail for 2 minutes in a UV lamp.
- Finally, the French coat must be coated with finishing gel, not forgetting the end of the nail. The gel should not go beyond the edges and get on the skin. It also takes 2 minutes to dry.
- Last procedure: remove the sticky layer with a degreaser and apply cuticle oil.
Nail extension is a labor-intensive and scrupulous procedure, so it is better to entrust it to a good specialist.
Gel extensions
It’s very easy to do this at home; you just need to download a free online video lesson in Russian.
- We prepare the nail - remove the cuticle and file off the top layer with a large file, degrease it, apply primer
- Applying the form
- We apply the first layer of gel and give it a shape, send it to a UV lamp for drying. Taking off the uniform
- We degrease this layer of gel and apply the next one and send it to the lamp
- We file down the bumps and irregularities, adjust the shape and length with a file, degrease and apply the next layer of gel and send it to the lamp
Editor's choice: How to do a manicure on wide nails?
Before applying the last layer of gel, you need to apply a pattern or varnish, if the varnish is under the gel, in order to fix it with the top layer.
The procedure is not complicated.
The correction is carried out in the following order:
- We file off the old gel with a file, apply a form and apply new layers of gel according to the same principle as for extensions.
Gel nail extensions: step-by-step instructions for beginners
Video lessons on gel extensions with tips
This video lesson gives a visual representation of the sequence of actions for high-quality nail extensions. Pay attention to the little things that matter.
Algorithm of actions when working with tips
When working with tips, a single-phase system is used for all cycles. The composition levels the surface, promotes adhesion, and reduces process time. To work with templates, 2 or 3-phase compositions are used. The liquid consistency of a single-phase gel will not allow you to beautifully shape the tip. Both methods require a sequence of steps.
If the order is not followed, the plastic will peel off or an air “pocket” will form, which will ruin the aesthetic effect and cause a fungal infection.
Gel nail extensions require careful selection of tips. They are selected according to the parameters and shape of the natural plate. Convex imitations cannot be glued to a flat surface, otherwise bubbles will form inside. For short nails, narrow models are preferred.
We recommend that you read: Causes and treatment of peeling and brittle nails - the answer to the question why do fingernails peel?
The procedure is as follows:
- The process begins with a dry manicure. It is important to get rid of cuticles and pterygia using a pusher or spatula.
- Hands are treated with an antiseptic.
- Excess length is removed. To avoid touching the skin, the 180 grit abrasive file is held at a right angle. The free edge is left under the tip hole.
- The stratum corneum is cut down to roughness. The tool is held parallel to the plate.
- Tips are glued. Fixation occurs with a drop of glue applied in the center. The hole is attached no lower than 1/3 of the length, no higher than half of the nail.
- The claws are adjusted with a 180 grit file to the desired length. To soften the seam, a special liquid is applied.
- The connecting line is cleaned until it disappears completely. During operation, the file is held at an angle of 45 degrees.
- The remains are cleared with a buff. The shine is removed from the surface and a primer is applied around the perimeter.
- The gel is distributed in a transparent layer.
- Keep your hands under the lamp for up to 1 minute. The remains are lightly blotted. The surface must remain damp.
- A denser layer is applied to the sticky coating and kept for a minute under the lamp.
- The plates are treated with a special napkin. Peach oil is rubbed into the cuticle.
- If the surface turns out to be embossed, the top layer is removed with an abrasive file and the gel is reapplied.
Video instructions for gel extensions with forms
Video tutorials on gel nail extensions will help you master the technique of performing this labor-intensive procedure. You will become a real manicurist.
Algorithm of actions when working with forms
The preparatory stage is similar: hand disinfection, cuticle removal. The free edge is filed down to 0.5 cm. In the direction from the “smile”, with the help of a buff, the scales are raised to the upper border. The shine is removed from the surface and a primer is applied.
The stencil is being tried on. When working with one-time templates, the process is simplified. The soft base allows you to manipulate the shape. The layout is peeled off from the piece of paper, and the middle is removed from it. The edges are adjusted with scissors.
The sample is placed under the nail and fixed to the finger. It should take a natural shape and match the parameters. French manicure is performed along the contour of a “smile”, additionally drawn with a brush. This technique allows you to beautifully design the plate. After fastening, the sides are checked. The template should be positioned evenly. A raised, lowered top will give the artificial nail a beak shape or resemble a springboard.
We recommend that you read: Pedicure – fashion trends 2021 + 45 PHOTO ideas
The base layer is distributed with careful movements. Each subsequent layer is dried under a lamp for 1 minute. Modeling gel is added and a free edge is formed. Another portion of the viscous composition is applied to the sticky surface along the edge.
The sticky layer is removed with napkins, the stencil is removed, and the surface is sanded with a file. The shape is modeled. Gel is applied to the connection line with the mock-up. The composition stretches towards the outer boundary. The joint is carefully sanded. If you are not satisfied with the result, the top layer is removed, the surface is cleaned, and the gel and topcoat are reapplied. All that remains is to apply the decor.
Features of the top extension:
- Gel is applied to the inside of the model;
- after drying, a layer for adhesion is distributed under the lamp;
- the layout is applied at an angle to the surface of the free edge;
- fixed with a finger for 15 seconds, kept under the lamp for 3 minutes;
- The template is removed and the tip is smoothed with a file.
Video lesson on French gel nail extensions
//www.youtube.com/watch?v=VTU6A3VPe9s
The French gel nail extension video will help you create a unique manicure and give unique elegance to your nails.
The method of extension on yews is more than 10 years old. Templates have not been used for very long. Many argue about the ineffectiveness of the principle using plastic imitations. Despite all the pros and cons of each, the choice of technology depends on the shape of the nails, the effect depends on the experience of the master. The best way to confirm or refute an opinion is to try it for yourself.
Methods for gel nail extensions
Let's look at the two most popular methods of nail extension - with tips and with forms. They are slightly different from each other, however, both give good and long-lasting results.
We recommend that you read: New nail designs for winter 2021 + 30 PHOTOS
Modeling on tips
The principle involves fixing plastic imitations to a natural plate. The variety of shapes, sizes, shades allows you to choose the best option. The shape and length are adjusted with a grain file.
Advantages of the method : suitable for brittle nails, fingers with large “cushions”.
Flaws:
- nails take a flat shape;
- they are limited in the choice of manicure - “stiletto”, “edge”, “Monroe”, “bridgette” will not be possible;
- aesthetics depends on craftsmanship;
- complex correction.
Extension on forms
The method is based on the use of templates made of different materials. Depending on the technology, the layouts are located on top or bottom of the sawn plate. In the first case, the gel is distributed over a stencil and then applied to the nail. In an alternative embodiment, the composition is applied to a model fixed to the finger. After the gel has polymerized, the molds are removed.
Advantages of the method: strengthening of the natural plate, relevant in the presence of cracks and deep fractures.
Flaws:
- labor intensity of the process;
- The principle is suitable for nails of a certain shape.