Today, making a beautiful manicure at home is not difficult even for a beginner. There are a lot of auxiliary tools for this, for example, such as stickers, stencils, etc. However, until recently, home manicure had one significant drawback - it was very short-lived. Everything changed with the advent of shellac (also known as gel polish). This is something between regular polish and gel. The main advantage of shellac is that it lasts for more than 2 weeks. Moreover, it can be used even at home. In addition, gel polish manicure has a very beautiful rich glossy shade.
Manicure with gel polish
So, the advantages of gel polish are obvious. All that remains is to find out how to apply it at home, what is needed for this, and also how to subsequently remove it.
What is gel polish?
A bottle of gel polish looks practically no different from regular enamel. However, its contents contain a little magic, which became possible thanks to the combination of varnish and biogel. It was this miracle formula that made this coating incredibly durable and ensured that it stayed on the nails for at least two weeks.
Gel polish at one time became a real reformer in nail aesthetics, making a name for itself on the durability of the coating, which no one had previously succeeded in achieving.
What materials are needed
To carry out such a special type of manicure as gel polish, you will need a remarkable set of materials. True, most of them are practically no different from those used for regular manicure and are always on hand for the fair sex at home.
Once armed with special tools and materials for gel polish manicure, you can use them more than once, both for yourself and for your mother or girlfriend.
So, the complete list is:
- a set of manicure tools (cuticle pusher, files, manicure brush, scissors, nippers, polishing buff);
- special lint-free manicure wipes;
- degreaser;
- acid-free primer;
- base and finish for nails;
- gel polish with color;
- UV or LED lamp for drying;
- cuticle oil.
Let's compare the pros and cons of this manicure
After weighing the pros and cons of a gel polish manicure, you can confidently agree or refuse it.
Despite the huge number of advantages of gel polish manicure, shortcomings were also discovered upon closer examination.
Pros:
- applying varnish does not require special knowledge;
- the shine on the nails lasts until the gel polish is removed;
- the color does not fade or lose its brightness;
- additional protection for nails;
- drying speed.
Minuses:
- allergic reaction to gel polish components;
- Removing a manicure will require some special tools;
- change in the quality of the nail plate after long-term use of gel polish, namely delamination, thinning and fragility;
- the harmful effects of UV rays emitted by lamps on girls and women who are predisposed to cancer.
#6 Manicure with quail egg effect and design
The quail egg design belongs to the minimalist technique, so the patterns on the nails should be appropriate. The trend is nail art with a small amount of specks on the nails and designs with ribbons, stripes, and stamping patterns. Nail art with florists looks beautiful. Use twigs, buds, flowers in black, made using stamping.
A watermelon design looks great in summer looks. A bright accent in the form of this berry fits perfectly into the design with black specks. The design with a quail effect harmonizes perfectly with inscriptions and slogans. The words are placed on the ring finger, most often on a plain background, so that they are easy to read.
Quail manicure is practically not complemented by rhinestones and other voluminous decor. Such elements create visual dissonance and are completely out of harmony in the context of nail art alone. Instead of rhinestones, you can use foil stripes, silver or gold glitter.
A manicure with a quail effect is a new nail design that immediately attracted the attention of fashionistas. The design looks unusual and stylish, fits perfectly into everyday and business looks. The brightness of the design is offset by delicate pastel shades, so this manicure will successfully fit into even the strictest dress code.
Preparing nails for applying gel polish (step by step)
The quality and time spent on the nails will depend on how carefully all stages of the gel polish manicure are carried out. Therefore, we advise you to be patient and follow all the recommendations of specialists in full.
Strict and careful implementation of the procedure for applying gel polish is the key to long-term contemplation on your nails.
The first thing you need to do is prepare your nails for gel polish, which will become the basis of the entire manicure:
- Formation of the nail plate. Using nail files, the tip and sides of the nails are shaped into the shape chosen for the manicure. Remnants of old varnish, if any, are also removed.
- Cuticle removal. Using a special product or tweezers, you need to get rid of all excess skin around the nail.
- Surface polishing. Using polishing files, all roughness on the surface of the nail is removed to ensure the best adhesion to the gel polish.
- Degreasing the nail plate. To remove any foreign elements, be it dust or lint, as well as residual liquid, it is necessary to degrease the surface of the nail. You can use a special product or regular nail polish remover for this.
- Base coat. The base should completely cover the nail plate, so at this moment try to be as careful as possible. Dry the base under the lamp.
- Directly gel polish. The application of the coating in one or several layers is secured by drying under a lamp.
- Finish coating. The fixative gives incredible shine and this layer of manicure is also dried.
Multicolored nails
After cleaning the nail plates from overgrown cuticles, hangnails and giving the nail a beautiful shape with a file, wipe them with a purchased sponge. This will remove shine from the nail and help better fixation, remove all excess from the surface of the plate and make the nail even and smooth. Next, wipe the surface of all nails with degreaser and then with primer. Of all the liquids, only it has a pungent odor, which quickly evaporates and does not create discomfort in the room.
Apply base and dry your nails under a UV lamp. Set it to 2 minutes, indicated by two stripes. This is enough for drying, and the device will turn off at the right time. Next comes creative work with the colors of the varnish itself chosen in the store. The simplest idea for a gel polish manicure that will look impressive is to paint each nail a different shade of one selected color.
In the photo above you can see how the intensity of the pink color decreases from nail to nail, which, by the way, is unusually fashionable this season. Before spreading, carefully wipe each brush on the edge of the jar so that no excess liquid remains, otherwise there will be unsightly smudges.
When all your nails are painted, place your fingers under the lamp and dry for 2 minutes. You can make a similar coating a second time so that the colors and shades are deeper. Then apply the fixative and after being under ultraviolet rays, wash off the sticky layer. A simple manicure with gel polish is ready.
How to remove gel polish
Manicure with gel polish is a special procedure in every way. In addition to a special drying technique using lamps, it requires a special approach to removing manicure. The ritual consists of cutting off the top layer with a buff and soaking the gel polish with a special product. To do this, take a piece of cotton wool soaked in solvent, apply it to the nail and wrap it tightly in foil.
After 15-30 minutes, the film-like plate with gel polish should peel off from the nail plate. The time for removal is selected depending on the period of wear of the manicure.
Even before applying gel polish, you need to know how to remove it.
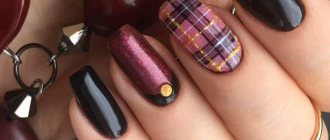
Nail design with gel polish fashion trends 2018
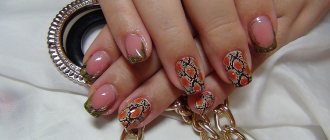
All modern nail design trends that are relevant for manicures with a regular coating will also be acceptable for gel polish. The designs created by the designers are very diverse and are suitable for various fashionable looks. The trend is in artistic paintings inspired by floral motifs, national ornaments, graphic figures, abstraction, patterned squiggles and lace veils.
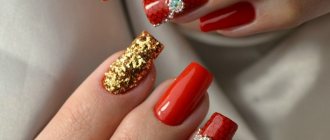
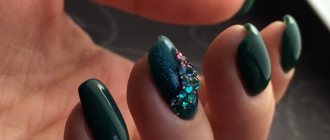
Despite the incredible shine of nails with gel polish, manicurists were not afraid to use additional shine in the form of decorative elements. Rhinestones, metal beads, micro beads and colored stones appeared on the nails in arcs, crescents and chaotic scatterings.
Any innovations in the world of nail design are not alien to gel polish.
Variations in the design of some types of manicure using finishing elements had the effect of ceramic stucco due to the fact that colored convex stones were used.
Matte and textured gel polish will be presented as decorative elements or as a coating on two or three nails. A luxurious effect with elements of glamor can be achieved by using “sparkling” finishing elements. They can be glitter, rhinestones or special metallized adhesive tape. Also in trend are “bare” zones - areas on the nail plate that are not touched by colored varnish.
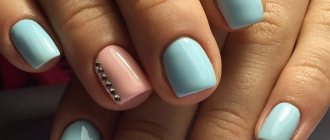
Color combination in gel polish manicure
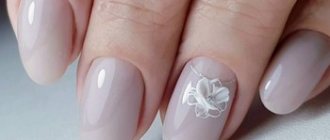
Pastel colors are on trend. Manufacturers are releasing new collections that are full of metallics and glitter. For example, the TNL collection offers an excellent palette of shades. For an everyday look, these gentle tones are suitable:
- lactic;
- light pink;
- lavender;
- cream;
- white;
- beige.
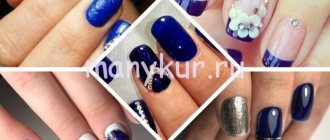
For autumn and winter design, it is better to choose one of the fashionable dark ones:
- violet;
- plum;
- blue;
- purple;
- brown;
- dark green.
Black is suitable for special occasions and everyday life. On square nails you can make a two-color version, adding variety to the swamp tone. It’s good to add bright accents in fuchsia or orange, place broths and rhinestones.
At home, you can make a simple geometric design by decorating your ring nails with diamonds using gel polish.
Principles of color combinations in manicure
You need to be able to combine shades not only when creating nail art. This skill is useful when choosing a wardrobe and thinking through makeup. A manicure in different colors, like a pedicure, should be combined with clothes and accessories. It is better to choose shades not intuitively, but after familiarizing yourself with the classification of combinations and photos of fashionable looks.
Monochromatic combination
We are talking about several shades of the same basic tone. For example, a two-tone design could consist of a trendy lemon tone accented with a brighter yellow polish on the ring nail. Manufacturers of gel polishes produce sets of 2-3 tones of one main one, which have a good combination.
Achromatic combination
These are black and white, and gray tones in between. Such fashionable shades combine wonderfully and are used in two- and three-color designs. It is permissible to diversify the tones with gel polishes of burgundy, coral, green, blue or yellow.
At the same time, it is taken into account that chromatic colors next to achromatic ones become brighter than with a single-color coating.
Combination of opposite colors
This design involves a combination of shades that are far apart from each other on the color wheel. For example, a good combination of red and blue, yellow and eggplant. Such tones do not lose their individuality even when mixed. It is better to combine similar shades. You need to choose:
- bright;
- pastel;
- warm;
- cold.