Today, manicures made using a relatively new American product called Shellac are extremely popular among fashionistas all over the world.
It all started in 2010, when the American company CND introduced the world to an innovative series of gel polishes. Since then, many similar products have been released, others have become a household name.
When we talk about shellac manicure, we mean coating the nail with a special gel polish . You shouldn't compare shellac with nail extensions. Coating a nail with gel polish is a simple procedure that resembles a regular manicure with colored varnish applied to the nail.
The difference lies not only in the composition of shellac, but also in the fact that after applying each layer, the nail must be dried in an ultraviolet lamp.
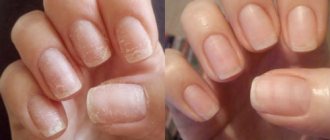
This manicure can last three weeks, remaining just as bright and intact. After three weeks, the shellac should be removed, as the overgrown nail becomes too noticeable.
A manicure using shellac can be done not only in a salon, but also independently at home . Remember that the beauty of a manicure and its longevity depend on the correct execution of each stage of the work.
Preparing nails for manicure
In order to do a shellac manicure yourself at home, you will need to complete the following preparatory steps:
- Any manicure should begin with tidying up the nails, giving the same shape and length to all nails, and removing dirt and varnish residues. To do this, we will need a nail file, manicure scissors and other manicure set accessories.
- Treat cuticles with cuticle remover or soften with cuticle oil and then remove. Try to remove as much cuticle as possible. Since you plan to have a manicure for at least two weeks, it is advisable that the cuticles are not visible for a long time.
- In order for the base to fit well on the nail, you should first sand it. A medium abrasive buffer is best suited for this job.
- Now the nail needs to be degreased. Before you begin degreasing your nail, clean it thoroughly. It is best to wash your hands and dry them with a towel. There is a special product for degreasing, which is not cheap. You can replace it with regular alcohol wipes or acetone.
How to complete a shellac kit at home
Some girls prefer not to buy a set for shellac with a lamp, but to compose it themselves by purchasing everything separately. First of all, you need to decide on drying for the coating. Some people don’t know how to choose a lamp for shellac, what types of this equipment exist and what their differences are. The LED lamp is an innovative device that dries the gel in 30 seconds, does not consume a lot of electricity, and does not require replacing bulbs. However, this option is better suited for professionals, because its cost is much higher than ultraviolet drying (from 1,500 to 7,000 rubles).
UV lamps are a cheap equipment option that will dry the coating in no earlier than two minutes. For girls who experiment with long-term nail designs at home, this device is suitable. It will require minimal costs, because the prices for ultraviolet drying are quite affordable for every girl (from 800 rubles). In this case, the final price depends on the power of the device.
Very useful purchases would be: primer, foundation, topcoat. Prices for additional products vary from 250 to 1000 rubles, this is influenced by the manufacturer’s brand and other factors. You may also need a product that slows down cuticle growth, which costs an average of 350-600 rubles. Caring oil will also be useful and will cost 200-300 rubles. Gel polish can be ordered in online stores or purchased in cosmetic supermarkets at prices ranging from 300 to 1,500 rubles.
If you decide to assemble your own set for long-term nail art, then do not forget about the consumables:
- napkins;
- files;
- foil;
- replaceable light bulbs (for drying).
- Shopska salad - step-by-step recipes for cooking with feta cheese, Feta cheese or cottage cheese
- How to live without drugs
- How the life of Russians will change from April 1, 2021
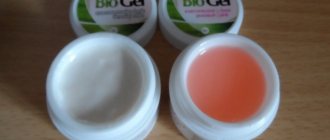
Primer
Immediately after degreasing the nail plate, apply a primer.
The primer is a kind of primer before applying shellac..
It is thanks to this cosmetic product that any varnishes and gels will stay on the nail for a long time.
The primer functions not only as an adhesive, but also as a disinfectant. Despite the fact that the primer dries out the top layer of the nail plate, it does not have a harmful or destructive effect.
The primer is applied along the edge of the nail. You should not dry a nail coated with primer in a lamp; it is better to wait for it to dry naturally, especially since this stage will not take much time. As a rule, one minute is enough.
Base and top
The desire to do a manicure using shellac at home is most often explained by the desire to save money. If you're getting a manicure for the first time, the total amount of all the necessary purchases can be scary.
Only after a few months will your investment begin to pay off. Despite the large expenses, don’t even think about giving up buying a shellac base. Applying varnish directly to the finish is a big mistake and will lead to disappointment and cracked colored varnish.
If the primer protects the nail from the effects of the coating, then the base is responsible for preserving the color and integrity of the varnish for several weeks. A manicure done without a base may peel off within a week.
The top protects the colored layer of manicure on top. This product is also very important for manicure using any type of varnish. Every day our nails are subjected to various tests. In order for the color coating to last as long as possible, it also needs protection. This is exactly the type of protection that the top is.
Creating a manicure using shellac has many nuances, due to which this manicure looks luxurious for a long time. To obtain the desired result, you need to observe all the subtleties of craftsmanship.
What should be included in a shellac kit?
To make a manicure with gel polish you will need a basic minimum of products and tools. Standard kit contents: 1. UV lamp. This is a must-have equipment for drying nails, thanks to which the coating hardens quickly and without streaks. The following types of lamps are suitable for polymerizing gel polishes:
- UV power 36-54 W
- LED 9-12 W
- combined UV+LED.
Each of them is equipped with a timer for 30, 60, 90 seconds for comfortable work. 2. Degreaser or disinfectant. Designed to clean the nail plate before applying base.
3. Base coat. Levels the plate, ensures strong adhesion of the varnish to the surface, and prevents contact of the natural nail with coloring pigments.
4. Color coating (gel polish, shellac). Apply in one or several layers.
5. Fixing (finishing) coating, top. Protects manicure from damage, gives additional strength and glossy shine.
6. Liquid for removing the sticky layer. After applying and polymerizing the top, the dispersion layer is removed using this product.
7. Orange sticks. Not included in every starter kit. They are used to remove excess polish and push back cuticles during a manicure.
More advanced sets contain additional materials: primer, topcoats with corduroy, matte and other effects, files with different abrasiveness, correctors, brushes and trays, remover and clamps. Such kits are a real find for professional craftsmen looking for an effective ready-made solution.
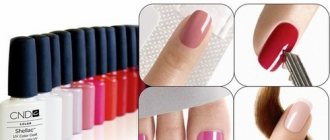
Color layer
The color palette from CND is updated annually, so you have a large selection of different shades, the choice can only be limited by your preference. Apply the color coat carefully and dry your nails in an ultraviolet lamp for about 2 minutes at 36 W.
Try to apply the layer as thin as possible. If you apply a thick layer of varnish, it will swell during the drying process, and you will have to go back to the very beginning and do the whole job again, starting with degreasing your nails.
One coat will look pale and will be almost transparent. Therefore, a second layer is necessary . It, just like the first one, should be thoroughly dried with a lamp.
Without little things, nowhere!
The list of tools that are necessary for this manipulation is not limited to shellac. To obtain a lasting result that does not lose its attractiveness for about 2-3 weeks, you will also need to purchase a lamp (UV or LED) to dry the gel polish. What else do you need for shellac at home? You can't do nail art without:
- files and scissors;
- special brushes;
- various pictures and other decor;
- basic composition;
- finishing agent;
- liquid to remove the sticky layer.
Shellac lamp
A lamp plays a big role in manicure using shellac . The process of drying a nail is called polymerization. For this process, one of three types of lamps will suit us:
- Ultraviolet;
- LED;
- Gas-light, cold cathode.
The most popular are ultraviolet lamps, largely due to the fact that they were the first. LED lamps carry out the polymerization process much faster.
Where an ultraviolet lamp requires 2 minutes, an LED lamp requires 2 seconds. But it should be borne in mind that LED lamps do not dry all types of gels and varnishes.
Cold cathode lamps are considered the most functional today.
This lamp dries all existing varnishes, does not have a negative effect on the skin of the hands, and polymerizes quickly enough.
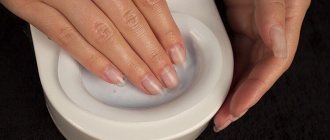
Remover
Shellac can not only be applied independently, but also removed independently. The CND company has provided the market not only with products for creating long-lasting and colorful manicures, but also with products for removing shellac.
It is the CND product that large beauty salons prefer to use; they are also used at home.
This product is intended not only for easy removal of manicure, it also contains caring components that allow not only not to cause harm to the nail, but also to provide nutrition and care during the procedure.
Shellac removers are not only produced by CND.
Many companies offer their own analogue products. Domestic manufacturers are trying not to give in and are already ready to offer their product called Severina.
This product is not much inferior to its foreign competitors, but it is more affordable. Therefore, among professionals and amateurs, it is the Russian shellac remover that ranks second in popularity.
We can highlight such companies as Lady Victory, Jerden and Bluesky. Their products are also worthy of attention.
In order for a manicure at home to be as good as a salon one, you need to treat each stage of the work carefully and do everything strictly according to the instructions.
What is a shellac kit
This type of nail design combines the properties of corrective gel and traditional varnish. For the first time, a kit with which you can make home shellac was released by CND. At the moment, many manufacturers are selling kits for long-term nail art, because women all over the world increasingly prefer this type of manicure. Ready-made kits should include what you need for shellac to make it yourself at home. The equipment depends on the needs and level of training of customers.
Starting
This kit for shellac at home contains only the most necessary tools and materials. It is suitable for beginner girls who for the first time decided to do such a manicure at home. As a rule, the kit contains a protective agent, a fixative. This is an inexpensive option, suitable for beginners, which will help save your budget (this is especially important if you don’t like gel polish).
Sample list of starter kit components:
- UV lamp for shellac (power from 18 watts);
- colored varnish (shade can be selected before purchase);
- sometimes stencils (for French);
- varnish base;
- fixative (may not be included in the initial set);
- orange stick;
- special napkin.
Base
The advanced home kit is equipped with a large number of tools and materials. They often have several shades of color coating. The advantage of the kit is that it includes everything most important for the procedure; materials from one manufacturer are in good harmony with each other. This fact greatly simplifies the procedure for applying shellac and makes the design more durable.
What is included:
- ultraviolet drying;
- lint-free wipes;
- color coating 1-3 types;
- orange sticks;
- base coat;
- fixative
- Okroshka with mineral water and kefir - how to cook according to step-by-step recipes with photos
- 10 dangerous reasons that can cause chest pain
- Checking a phone number for region and telecom operator via the Internet or database
Professional
The option for a complete set for shellac at home includes everything you need for a high-quality manicure while observing strict technologies. Thanks to this, the coating will be as durable as possible, and you will not harm the nail plates. This equipment is usually purchased by employees of beauty salons for work or girls who constantly do gel polish and decided to expand their capabilities in this way.
The professional kit contains:
- LED or UV lamp of the required power;
- color coating (up to 10 different shades to choose from);
- stencils (for making French);
- special napkins;
- orange stick;
- foil;
- degreaser;
- removal liquid;
- primer;
- the basis;
- finishing fixer.