Why does gel polish chip?
A professional approach is the key to the success of any business. Before you start creating a beautiful manicure with gel polish, you should thoroughly study the rules for step-by-step preparation of nail plates and applying all the necessary layers. One of the most common reasons why gel polish chips is precisely the wrong approach to the process. If you are new to the nail industry, be sure to read the step-by-step instructions and nuances of working with gel polishes.
Manicure with gel polish
There are quite a few reasons why a piece of varnish may break off:
- the presence of defects and damage to the nail plates that were not previously cut down or polished;
- use of low-quality materials;
- mechanical damage to nails;
- violation of the step-by-step process;
- debris getting under the top layer;
- insufficient drying time;
- the use of decorative elements that are incorrectly secured;
- raw nail tips;
- exposure to chemical composition on manicure;
- personal intolerance and reaction to gel polishes;
- lack of vitamins in the body, as a result of which pieces of any coating break off.
Note! The free edges of the nail plates must be treated with each layer of primer, top, varnish and finish. If this is not done, the gel polish on the tips of the nails will chip off.
Causes of gel polish peeling and chipping.
Causes of gel polish peeling and chipping.
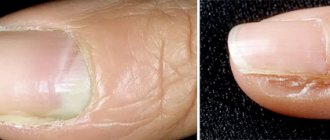
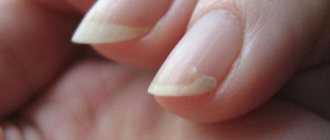
Manicure with gel polish is durable, but there are also cases of chipping from the tips of the nails or peeling (both from the tips and from the sides, and at the base of the nail). The reasons are not always poor manicure or low-quality products.
Problems often arise with thin nails. Gel polish is a hard material, and when applied to thin, flexible nails, it will easily chip or peel off. Special bases for thin nails come to the rescue. An experienced master will determine the initial condition of the nails and select the appropriate material.
There are excessively wet nail plates. The material on these will peel off if you don’t prepare the nail surface enough before applying the base. It is imperative to use a degreaser, dehydrator, primer, bonder.
Rare cases - chipping of only the top coat or the top coat together with the color coating| In this case, the base remains on the nail. This may be caused by incompatibility of material components when you use different manufacturers of the base, color layer and top. Or, for example, the sticky layer was removed from the gel polish before applying the top coat, which reduced the adhesion (adhesion) of the materials, which led to chipping.
If you are a lover of a bath (sauna) or solarium, then you may also encounter detachments. Gel polish does not like sudden temperature changes. For the same reason, you should wear gloves or mittens in cold weather.
It is advisable to protect your hands with gloves when using household chemicals. Its composition is often not friendly to polymer decorative coatings and the skin of the hands.
Changes in hormonal levels (due to illness, pregnancy or menstruation) and taking medications can cause gel polish peeling. And sometimes there is simply an individual reaction, when the gel polish breaks off due to intolerance to certain components.
And also, you should not overuse the coating, because the regrowth of the nail plate leads to disruption of the nail architecture and load distribution. Or, if you press hard on the tip of the nail, the gel polish may break off. For example, in the case of opening hard packaging with a fingernail.
Violation of gel polish manicure technology is the most common cause of detachments and chips. Let's list some errors:
— insufficient preparation of the nail plate before applying the base;
- applying the base to an undried nail;
- use of oils or fatty hand creams before the procedure;
- poorly processed cuticle and not cleaned pterygium;
— no “sealing” of the free edge (a mandatory step not for all types of gel polish);
— insufficient polymerization time (the varnish has not dried);
— excessively thin layers of coating;
How to fix
If the polish has chipped on the eve of your next visit to the manicurist, then you should just make an earlier appointment. But what to do if the design is still completely “fresh”, and the master is far away? Sometimes a girl has to correct an annoying misunderstanding on her own and quickly remove the flaw.
First, we recommend that you figure out the reason. If it was not immediately possible to find out why this happened, then other tips of the nails can expect a similar result. You need to understand that depending on the root cause, you will have to choose a method to solve the problem.
- If the chip has formed at the very tip of the nail, you can carefully file the plate to the desired level. Thus, the defective area is completely eliminated.
- If the gel polish has chipped off in several places along the edges of the nails, you can decorate it with a French polish. Take a lighter color of varnish than the main background. Draw smile lines along the edges of the plates with it to hide the chipped areas. Cover the top of the nails completely with a colorless fixative.
- When a large area of gel polish has chipped and needs to be fixed quickly, without visiting a specialist, then you need to choose a similar color. If the desired tone is not available, you can apply any decor: rhinestones, stones, beads, stickers, etc. Using decorative elements, you can visually remove the coating defect. The entire design should be covered with a fixative on top.
- If you have all the necessary tools and materials, chips and other design violations must be removed step by step. All layers are applied using a specific technique. Large areas of deformation should be completely covered in a new way.
Note! When you know exactly why your gel polish is chipping at the ends, you can take the right measures. For example, if a woman has serious hormonal imbalances, or a severe lack of vitamins, then no design will last long.
Nail preparation
The qualifications of the manicurist and the quality of the products used are also quite important. Violation of the process technology leads to the inevitable formation of defects and deformations of the manicure.
If the gel polish on your nails chips within 2-3 days after application, do not hesitate to contact the person who did your manicure. The technician must correct such errors without any questions asked. The only exceptions may be mechanical or chemical damage to the coating and nail plate.
First, let's immediately figure out what we're going to talk about: gel polish, shellac, both of them, or are they even the same thing?
Shellac and gel polish: are they different?
Shellac: what is it?
So, shellac. Let's call it shellac No. 1. You will be surprised, but this is an organic resin. And it is distinguished by the females of rare insects - scale insects; there are such living creatures on our planet.
Now shellac number 2. An artificial polymer for coating and strengthening nails with the brand name Shellac, patented by CND back in the 70s of the last century. Shellac manufacturers themselves insist that their product is completely unique, but they do not indicate anywhere that natural shellac, that is, resin, is used in its production.
Gel polish: what's the difference?
In fact, shellac is the brand name of the first gel polish, which is slightly different in composition from others, just as all gel polishes from different manufacturers may differ from each other in details.
Like Coca-Cola and Pepsi-Cola, for example: the drinks are similar, but each manufacturing company has its own special secret. And gel polish as such is a polymer varnish used in manicure and pedicure, a liquid film coating that hardens under the influence of UV radiation.
Well, since we have understood the types of gel polishes, it’s time to find out why gel polish on nails cracks.
Exploitation
Crack repair
Often, rapid deterioration of the quality of a manicure is the fault of its owner. Do not assume that extended or strengthened nails become indestructible. You need to take care of them no less than natural plates, if not more, since due to their large length they are subject to greater loads. The following operating errors can cause gel nail polish to crack:
- Exposing the plates to high temperature and high humidity. In this sense, the sauna is completely destructive for extended or strengthened nails. A heated solarium also causes significant harm, but not so much due to the fact that there is no humidity;
- Water generally has a rather negative effect on the quality of manicure. If you work as a doctor, florist, or in other areas where you have to wash your hands frequently, then you can’t hope that your manicure will last as long as those of those who don’t subject it to such stress;
- One of the most important reasons why gel polish on natural plates cracks is mechanical stress. Its plate is flexible and quite soft, and therefore it can bend even with minimal load. Sometimes it is difficult for the gel layer to withstand such a load and it chips;
- Low temperatures also have a negative effect on the gel. Thus, if you have extended your nails in winter, it is recommended to wear gloves or mittens at all times. Sub-zero temperatures can cause not only cracking, but also tarnishing, chipping and detachment of the gel, both from extended and natural nails.
- Any cleaning products, even not too aggressive ones, destroy the gel on the nails. Cleaning, washing and washing dishes should only be done with gloves.
Following these simple rules can extend the life of your manicure for a long time. If the question of why gel polish peels off nevertheless arises, then you can be sure that the answer to it must be sought in another area.
Causes of cracks in gel polish and shellac
In general, the good thing about gel polishes is that they should stay on your nails for at least two weeks. This is very convenient and allows you to maintain a beautiful manicure much longer than with regular nail polish. However, many girls complain that their gel polish cracks on the second day. Why is this happening?
Violation of application technology
The main reason for the rapid cracking of gel polish lies in the violation of application technology. Most often this happens when girls do a manicure with gel polish or shellac at home and do not go through each stage carefully enough:
- Poorly clean the surface of the nail plate before applying shellac. An unremoved speck of dust, hair or eyelash will make the surface uneven, and this can lead to peeling or cracking.
- They don't polish their nails well. For better adhesion of the varnish, the surface of the nail plate should be slightly rough.
- Poorly degrease the nail surface. To degrease, use alcohol or acetone-free nail polish remover.
- Do not use “drying” - a primer that removes moisture from the surface of the nail. This must be done before applying the base coat. Otherwise, the effect of “wet nails” will remain, which will subsequently lead to peeling and cracking of the shellac.
- Any of the layers - the base layer, the gel polish itself or the top coat - is applied too thickly, and this interferes with normal polymerization.
- Each layer is poorly dried under a lamp: an ultraviolet tanning bed for nails is a necessary element of shellac application technology. If at least one of the layers is not sufficiently dried, the result can lead to cracking of the entire coating.
- The layers of gel polish “seal” poorly: each layer should be not only on the very surface of the nail plate, but also on the tips of the nails. Covering them thoroughly means “sealing.”
Careless handling of the coating and characteristics of the body
There are a number of other reasons for cracking of gel polish in addition to violations in technology:
- The nails themselves are thin and fragile. This may be congenital, but it can also occur as a result of frequent removal of gel polish by filing it off or excessive use of shellac remover.
- Coating using low-quality materials.
- Taking antibiotics. Oddly enough, it can also affect your nails. If you apply gel polish during a course of antibiotics, it may not last long.
- Immediately after manicure and/or frequent immersion of hands in water. For example, swimming in a pool or washing dishes without gloves often causes shellac or gel polish coating to crack.
Bubbles and gel polish.
Sometimes after a manicure procedure we see bubbles under the gel polish. The varnish bubbles either from air inside or from moisture escaping . ♦ Because of the air - you manage to get it into the brush while you are taking it out of the bottle: you rub the brush too actively on the neck of the bottle, trying to leave excess paint. If you do this too quickly, air will get into the varnish on your brush. The same is true when applying paint to a nail; if you rush to apply and distribute the paint over the nail and move the brush quickly, air gets under it. This is especially true for liquid gel polishes. It's a matter of technology. ♦ The second reason is naturally wet nails. The solution is a dehydrator, coat the nail 2-3 times, on the underside of the free edge too, let it dry, evaporate and only then apply the coating. If the humidity of your nails is high, do not use steaming in water before manicure, use a cuticle remover.
Single bubbles can be fixed
Also, if your nails are wet, you will need a primer in addition to the dehydrator. It happens that gel polish comes off the nail, even expensive shellac peels off, completely like a sticker. Peeling off the coating is very harmful to your nails, never do it! To prevent the gel polish from coming off, gently buff the nail plate, remove moisture, and apply an acid-free primer under the base. If there are few bubbles in the varnish, just a few (indicated by arrows in the photo), the problem can be corrected using a sander. Carefully walk where the gel polish has swollen, leveling it with the surface of the entire coating, wipe off the dust with a napkin soaked in de-sticking liquid, and cover it again with top gel polish, trying to avoid bubbles.
The top does not shine, turns yellow, darkens
Everyone knows that at the end of a gel manicure, a topcoat must be applied. With light colors, over time you may notice that the top turns yellow . The most likely reason is that the layer is too thick. Some people make 2 layers for “safety net” - this is unnecessary, there should be one top layer, but it should be of high quality, neither thin nor thick, sufficient. It comes with practice.
Many people wonder why the top doesn’t shine on a new manicure. The issue may be due to improper removal of the sticky layer. The dispersion must be removed from the cooled nail. Polymerization continues for some time after you remove your hand from the lamp, so we wait until it cools down. It is also important that the top gel polish shines - each nail should be wiped with a separate napkin. By removing the sticky layer, we remove a certain number of molecules that have not undergone polymerization; they remain on the fabric, and if we wipe the next nail in the same place, they get on it and the removing liquid loses its effectiveness. Some topcoats do not form a sticky layer at all, and if you try to remove it, the shine will simply deteriorate, check your product. Here are briefly all the important rules, subtleties and secrets of mastering gel polish manicure for beginners.
How to extend the durability of the coating on your nails?
What to do to prevent cracks from appearing in gel polish? It's simple! It is necessary to exclude the reasons for the insufficient durability of the coating discussed above:
- It is necessary to carefully follow the gel manicure technology. Do not allow any violations - the varnish will not crack after 3 days.
- It is important to take good care of your gel polish nails. Do not try to pick something out of something with them, protect them from blows and clicks. Avoid excess exposure to detergents - use gloves.
- Remove shellac in the correct way: under no circumstances try to tear it off the surface of the nail, do not pick it out with metal tools, or file it with a file. It is enough to lightly file down its surface, then apply a cotton wool moistened with remover liquid and wrap it in foil. After 10-15 minutes, all you have to do is clean off the soaked varnish with a wooden stick.
If you carefully carry out the listed procedures, your nail plate will thank you with a healthy appearance and long lasting gel manicure.
Video: how to properly apply gel polish and shellac to avoid cracks
07.07.2017
Many people are faced with the problem that the gel polish peels off or comes off as a film within a few days after application, and chips and cracks appear on it. Why doesn't gel polish stick to my nails?
Based on the experience of manicurists, we have identified several reasons and errors due to which gel polish does not stick to the nails.
Typical mistakes when applying gel polish
Of course, the first and main reason for peeling and chipping is errors in coating application. It is quite possible that at one of the stages you missed or did not take into account some nuances.
1. The cuticle and pterygium are not completely removed. Before applying the base, you need to carefully push back the cuticle with an orange stick or pusher and completely remove the pterygium. Otherwise, the gel polish will begin to peel off where the nail grows.
2. The nail is not polished enough. Be sure to use it - this will improve the adhesion of the nail surface to the base.
3. The nail is not degreased. Always wipe your nail plates with a degreaser. If you have “wet” and brittle nails, we recommend using a primer or ultrabond.
4. Coating layer is too thick. Base, gel polish and top coat should always be applied in a thin layer.
5. Coatings are poorly dried. After each layer, you need to dry your nails until they are completely dry. The time depends on the power of the lamp. After several years of use, the lamp's power decreases and it takes longer to dry.
6. Layers are not sealed. Such an error is guaranteed to lead to peeling of the gel polish. It is necessary to seal each layer: , and . This will significantly extend the durability of the manicure.
Other reasons for gel polish peeling
In addition to the listed application errors, there are other reasons why gel polish does not adhere well to nails.
- Sometimes it peels off due to low-quality products (for example, fakes) or because they have expired. Always choose proven bases, tops and gel polishes. And remember that not only coatings have a service life, but also UV/LED lamps - they need to be replaced on time.
Another reason is much less common than the previous ones. But still, some nails cannot tolerate gel polish coating due to the individual characteristics of the body. Often the manicure does not last due to hormonal changes, pregnancy, breastfeeding, or thyroid dysfunction. In this case, this is a reason to visit a doctor.
The durability of gel polishes is designed for 2-4 weeks and depends on the individual characteristics of the owner of the nails: the state of the body, profession and lifestyle. How often do your hands come into contact with water? With constant contact with moisture, gel polish is unlikely to last longer than 2 weeks, and this is normal. Provided high-quality coating with professional products and careful handling, the durability of the manicure can be extended up to 4 weeks. The nails gradually grow, a free zone appears at the cuticle, but the coating itself looks like new.
In most cases, gel polish is susceptible to chipping due to improper application technology. Purchasing proven, reliable products and following all stages of nail coating usually solve the problem once and for all.
We hope you found our article useful. Good luck!
Best regards, your online store imkosmetik.
The main reason for the appearance of cracks and chips when using gel polish is incorrect application - no matter what anyone says, but this is the most common mistake.
At home or even in a salon, if the master is inexperienced, the technology for coating nails with gel polish is often violated. However, there are other reasons for cracking in gel polish.
Gel polish chips and peels off sooner than after 2 weeks of wear.
The most likely reason that the gel polish does not hold well, swells, chips and detachments appear is a defect in the manicure: improper preparation of the nail, violation of the sequence of steps, neglect of any of them, or insufficiently thorough execution.
The quality of gel polish is at the very last place. Chips and detachments of gel polish most often occur due to:
- There is a pterygium left somewhere in the cuticle area.
- A dehydrator was not used, so natural oil components remained on the surface of the nail plate. The dehydrator should also be passed along the ends and on the inside of the free edge of the nail.
- When applying the base, you need to leave a small indentation from the cuticle, otherwise it will not be correct.
- The base is applied too thick.
- Abundant sealing of the nail end with all layers of coating. As a result, a critical mass accumulates and adhesion to the end is disrupted, microcracks appear. You need to be extremely subtle, just the base, finish and once with color.
- If the length is long, the overgrown free edge often bends, even imperceptibly - the integrity of the varnish is compromised in stress areas on the sides; gel polish does not last long on long nails.
Also, chips and detachments of gel polish quickly appear if there is a lot of prolonged contact with water - washing, washing dishes without rubber gloves. Sooner or later the gel polish will swell, because... The nail heats up in water, absorbs moisture, becomes softer and more elastic, and is easier to bend. This results in overtension in the layers, as a result - microcracks that violate the tightness of the coating, and then chipping or peeling is a matter of time.
Good news. Chips of gel polish along the edges and corners of the nail can be eliminated using restoration, similar to the correction of overgrown gel polish .
They often ask whether it is necessary to remove the stickiness from the base sublayer; supposedly, this technique is taught in some courses and is found in video materials. Overall, this is wrong. The dispersion layer is the residual stickiness of the gel component, formed after polymerization of the substance under the influence of ultraviolet radiation. Polymerization is the attachment of small molecules of gel polish to each other, as a result of which large, rigid molecular structures are formed (the varnish hardens), and those that are not attached are pushed to the surface (they will react with the next layer). This creates a sticky layer; if it is removed at the stage of the base or intermediate color stains, the adhesion will deteriorate and the wearability of the coating will decrease. Another thing is that gel polish is such a universal substance that it will still last quite a long time. Therefore, we must proceed from expediency - it is permissible to remove the stickiness for the sake of completing the design, or if you are just learning how to apply gel polish and do not have time to paint the nail, the varnish spreads.
Top coat on gel polish is cracking - looking for cause-and-effect relationships
Gel polish itself is quite durable, however, to further secure it, use a topcoat (finish coating).
Surprisingly, sometimes it is because of it that a manicure loses its attractiveness and durability.
Reason 1
Base coat, top coat and gel polish are available in “hard” and “soft”. What does this mean in practice? A hard coating when applied to a flexible base will cause the top to crack.
Such troubles become noticeable on the 3-5th day of wearing a manicure, and are especially visible on light colors. A kind of craquelure with dirt in the cracks will not please anyone.
- Solution
Take all your bottles used for gel polish and apply them to transparent film (plastic bag) - secure under the lamp. We carry out a flexibility test - to do this, it is enough to bend each layer. To avoid problems in the future, combine “soft” gel polishes with the same base and top coat.
“Hard” coatings are best left for thick extended nails.
Reason 2
This reason is the most common today. It consists in using a top coat that is incompatible with the main coating, and most often it happens that having chosen a rather expensive and high-quality gel, they recklessly save on the top coat.
This reason is easiest to determine. In this case, the gel polish cracks at the ends.
, and not on the main part of the nail plate.
- Solution
Use products of one brand, or use a universal, but not cheap option.
Reason 3
The finishing coat needs to be cured under a UV lamp. If you overexpose your nails, position your hands incorrectly, or if the device does not receive proper care, bubbles will appear on the surface, which will soon begin to burst and the manicure will be ruined.
Solution
- clearly maintain the drying time depending on the type of lamp (UV - 2-3 minutes, LED - 30-60 seconds or combi - 1 minute);
- adhere to the drying time of gel polish depending on the presence or absence of designs and decor;
- follow the instructions for using the top;
- change lamps regularly (especially for UV and combi lamps);
- Wipe the mirror surfaces of the lamp.
Reason 4
Appears during the first week of wearing gel polish. A web of cracks appears, or the coating on the tips of the nails cracks, there may even be chips - the reason is horribly banal.
Frequently washing dishes with bare hands, cleaning surfaces in the bathroom and kitchen with aggressive chemicals and again with bare hands.
- Solution
Super durable gel polish will not cope with its tasks if it is constantly in contact with hazardous environments. Buy nice gloves for washing dishes and cleaning the apartment, and your troubles with cracks in the gel will end.
Reason 5
When using a finish with a sticky layer, if you do not remove it after polymerization, it will very soon be removed along with the main varnish.
- Solution
After polymerization, remove the sticky layer (do not forget to wait the required minute for this procedure).
VIDEO INSTRUCTION
Coverage rules - important to know
Fans of gel polish should remember at least the basic rules:
- It is prohibited to use cream or other cosmetics before applying gel polish and several hours before coating;
- hands must be dry;
- We must not forget about preliminary degreasing;
The use of a degreaser deserves special attention, so we will dwell on it in more detail.
- If a nail technician sprays the product on the nail, this indicates his inexperience. That's right - apply the clinser to a cosmetic napkin and thoroughly wipe each nail, paying special attention to the area near the cuticle.
- Often, instead of a degreaser, improvised means are used - alcohol or nail polish remover. These are acceptable measures at home, but under no circumstances should you use acetone or vodka for this purpose.
Other important rules:
- gel polish should be applied only to a nail previously treated with a buff (first go along the main part of the plate, and then along the edge);
- each layer must be fixed in the lamp;
- Too thick layers should be avoided;
- if your nail plate is soft and peeling, it is better to strengthen it - increased flexibility leads to cracks in the coating and detachments;
- During application, it is necessary to protect the nail from microscopic dust particles.
Also, the durability of varnish can be affected by the use of medications (especially antibiotics), the appearance or exacerbation of chronic diseases, as well as “special” days for women.
Note!
It has been proven that some representatives of the fair sex have an individual intolerance to gel polish, so after testing several companies and getting the same result, you will most likely have to stop using such products.
VIDEO TIPS
Many girls call gel polish their salvation. And how could it be otherwise, if it lasts a long time, looks attractive and makes you feel confident?
To avoid becoming one of those disappointed in this miracle remedy, listen to the opinions of professionals:
- Don’t skimp on your purchase, remember that high-quality coatings last much longer, look perfect throughout the entire period of wearing a manicure and do not crack;
- Get the coating done at least once in a salon by a professional technician to visually study all the subtleties of application;
- Coating nails with gel polish at home should have minimal differences from the salon option;
- Use base and top in accordance with the chosen varnish, do not skimp on them;
- Before use, read the information on the gel polish label.
A beautiful manicure can not only create the right impression about a woman, but also significantly increase her self-confidence. Consider our recommendations when using gel polish and manicure problems will no longer bother you.
« || »
Your nail polish has chipped, but you don’t have time to completely renew your manicure? Such troubles always happen at the most inopportune moment. To ensure that they happen as rarely as possible, we recommend giving preference to a high-quality professional salon manicure, the benefits of which you can find out on the page, as well as using tips on how to extend the life of a manicure, which we published in previous articles. But, in any case, sometimes your manicure can go bad at the most inopportune moment - one small chip of the varnish, and your nails no longer look the same. What can you do if you have little time?
We suggest not covering your nails with another polish - do not waste extra time erasing the old one and applying a new coating. Instead, you can make a kind of graphic jacket, which looks no less stylish and can be a real salvation for you at the last moment.
What will you need for this?
Nail polish in a contrasting color (preferably dark);
Finish coating (fixer);
Scotch tape (preferably thin, it will be more convenient);
Scissors;
Soft nail file.
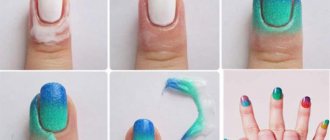
Step 1: File and polish the damaged nail
Using a soft file, file and polish the nail around the chipped polish. The surface should be smooth - this way you can remove all chipped remnants of the old varnish and prepare the surface for applying the new one.
Step 2: Cut strips of tape
Using scissors, cut 10 small strips of tape, slightly wider than your nail plate.
Step 3: Apply tape to your nails
Attach the tape so that it covers the areas that you will not cover with new varnish. That is, the chipped areas that you prepared for applying new varnish should remain open. The most universal way is to stick strips of tape slightly diagonally - you will get a very stylish manicure, a kind of graphic French manicure. And so that when you remove the tape from your nails, the old polish does not break off in a new place, before gluing it, touch it with your fingers on the sticky side (so it will not stick so much).
Step 4: Paint the tips of your nails
Paint the tips of your nails that are not covered with tape with a contrasting polish, remove the tape before the nail polish is dry. This is the only way you will get a clear, unsmudged line. If you wait until the lath dries, it may come off along with the tape as a solid coating.
Step 5: Apply Topcoat (Sealer)
After removing the tape, let your nails dry for a couple of minutes, then apply a clear sealer and your new manicure is ready!