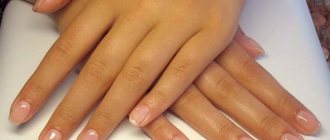
When is it necessary to correct gel nails?
No matter how professional the master who applied gel polish on nails is, the client very soon has to visit him again. There may be several reasons for this, we will highlight the most important ones:
- The nail has grown. Ideally, correction of gel nails is done once every 3-4 weeks. Of course, the procedure can be postponed for a long time, because the drawing is beautiful or there is no time. But to be honest, these pens are becoming less and less beautiful every day. You can see the untreated nail plate, which at first girls can try to cover with regular polish. In addition, the longer the nail, the more likely it is to become a victim of chips or cracks.
- Physical pressure or blows. Gradually, girls get used to the new state of their nails and stop being careful with them. Sometimes it happens that the hand touches a hard object, or even worse, the client can get her finger pinched by the door. In any of these cases, the appearance of the nails deteriorates and correction of gel nails is necessary.
- Cracks. Inadequate quality of the applied gel polish or its incorrect application sometimes lead to the appearance of small or large cracks. The situation can also be corrected by correction, which becomes more complicated only if your own nail is also cracked.
- The coating is peeling off. The reasons may be the same as when cracks appear, but if this is not the first time, it is worth understanding the problem. Peeling manifests itself in the form of lifting of the coating on the sides and can reach one or one and a half millimeters.
Sometimes the problem of peeling occurs after treating nails with a worn-out file, which does not fully perform its function.
Types of correction
Based on the considered reasons that force the fair sex to visit a manicurist again and again, there are 3 main types of gel nail correction:
- mini-correction - most often it has to be done in the first week after applying the gel coating. The reason for this may be small cracks, chips or scratches that need to be removed and gel polish reapplied in their place;
- simple or medium - this can be a regular planned correction of gel nails, consisting of filing and varnishing the regrown part of the nail plate;
- complex or large - such a correction can be performed at any time, the cause may be serious damage to the coating (chips, large cracks, peeling, as well as nail breakage).
The latter type also includes correction of French gel nails, a more detailed description of the technique for performing which is given below.
Procedure
Let's move on to step-by-step instructions on how to do gel nail corrections at home.
Preparing the necessary materials
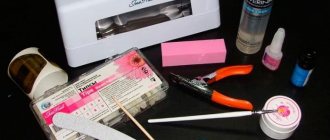
Any master who is going to make a correction must have special tools available:
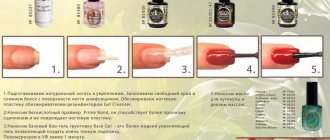
- an antiseptic necessary to disinfect the skin around the nails and eliminate possible problems with fungus;
- the gel polish itself;
- primer, which is designed for a better gluing effect of the nail plate and gel;
- finishing coat, applied at the end of the procedure and makes the nails shiny;
- a product that removes the sticky layer after drying the nail in a UV lamp.
In addition to those already listed, it is also worth noting decorative elements - rhinestones, glitter, ribbons, etc. They are not mandatory during the correction process, but may be needed if you want to change the design on your nails.
Equipment preparation
The most important equipment during gel nail correction is an ultraviolet lamp. It is used for polymerization of gel polish, i.e. accelerating its hardening. In addition to the lamp, the manicurist will definitely need nail files, which he will use to polish the nail plate and give it shape.
If hardware correction of gel nails is carried out, you will need a special milling cutter. Depending on the expected result, various attachments are used, more details about which can be found in the table.
| Type of nozzles | Main purpose |
| Cylindrical with rounding | Works on the principle of a nail file for cutting off the upper part of the plate and polishing it (the rounded part is necessary for delicate processing of the area in the cuticle area) |
| Cylindrical without rounding | Used when processing the plate from the upper and lower sides, as well as to reduce the length of the nail |
| Cone-shaped | Perfectly suited at the junction of gel polish and regrown nails, as well as during the treatment of detached areas. More suitable for treating the inside of the nail |
Nail preparation
Correction of gel nails begins with preparing the surface to be corrected:
- to begin with, the hands are treated with an antiseptic;
- then the cuticle is pushed back to file the overgrown part with a natural nail file;
- Next, you need a file for extended nails, which is used to process the gel coating. In this case, the border between the real and artificial parts of the nail is made as less noticeable as possible, and existing detachments are removed;
- The last step in this stage is to form the free edge of the nail.
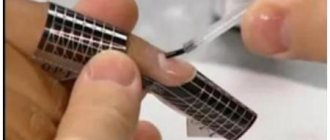
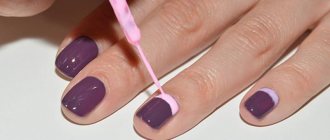
Gel polish coating
After the fingers have been properly prepared, the master removes all dust from them after filing. A stiff brush is used in this process. Now, to begin applying the gel coating, the specialist degreases the surface and applies primer to the regrown part. As soon as it dries, the gel is applied, and the hand is sent under the light of a UV lamp for half a minute. At the end of the time, there is no need to remove the sticky layer, and the nails are covered with modeling gel. Before this, if necessary, a design is made. Next, the pens are placed in the lamp again, for 3 minutes.
The modeling gel can be applied one more time, the free edge of the nail is sealed and returned to the lamp. This time the time is also 3 minutes.
Nail treatment
After re-polymerization, it is necessary to remove the sticky layer, for which lint-free wipes are excellent. The next step is to give the nail its final shape, and all dust is again removed with a brush. At this stage, you also need to disinfect, after which you can use a finishing gel to fix the result. After this, polymerization is also required - 1 minute.
If gel polish does get on the skin of your finger, an orange stick will come to the rescue and help you get rid of it carefully. At the end of the gel nail correction procedure, the master again removes the sticky layer and always applies moisturizing oil to the cuticle, which is gently rubbed into the skin.
Correction of extended nails
The extension procedure allows you to give your nails the desired shape and length in just 1.5-2 hours, strengthen them and create a unique design. Over time, the appearance of a perfect manicure deteriorates, as your own nail plates grow back quite quickly. Therefore, regular correction of extended nails is necessary, which is needed not only to improve the appearance of the manicure, but also to prevent peeling of the artificial coating due to the penetration of air under it and the development of infections in the cuticle area.
How is correction of extended nails done?
To describe the procedure briefly, it includes replenishing modeling materials, updating the coating, restoring the sealing and aesthetics of the nail plates.
Correction of nail extensions on tips (acrylic technology):
- File the overgrown tips with a reversible “drum” attachment and process to a thin substrate.
- Use a 180 grit file to file the surface of the nail to completely smooth out the transition from your own plate to the tip.
- Push back the cuticle with a spatula.
- Perform a hardware manicure with a diamond nozzle.
- Degrease and disinfect nails, wipe with a dry cloth.
- Apply a small amount of acid-free primer at the base of the tip.
- Use camouflage acrylic to lengthen the nail bed, shaping it with a brush.
- Model the apex and growth zone of the cuticle with matte pink manicure powder.
- Compress the stress area.
- Secure the clamp with a clothespin.
- Model the free edge of the nail with white acrylic. It can be laid out on 2 tips at once.
- Use the base of a thick brush to form free edges.
- Use the reversible drum attachment to file the tip of the nail.
- Process the longitudinal and internal arch in the same way.
- File the apex and cuticle area using the corn attachment.
- Using the “Step by Step” technique, file the nail plates with a 100 grit file.
- Using the reverse corn attachment, sand the inner arch of the nail.
- Treat the hyponychium area, where the skin comes into contact with the inside of the nail plate, with a carbide tip.
- File the sides and top of the nails with a 100 grit file, remove dust in the area of the skin ridges with a diamond nozzle.
- Cover the inside of the free edges of the tips with finishing gel without a sticky layer.
- Also coat the outer part of the nails with gel.
- Hold your hands under the ultraviolet lamp for 2 minutes to complete the procedure.
The described technique is also suitable for gel extensions. The amount of material used may vary depending on the design.
Is it possible to correct extended nails at home?
Of course, it is better to entrust the manicure to a professional. The master will not only perform the procedure more efficiently and quickly, but will also assess the general condition of the plates and the skin around them, check the cuticle and periungual ridges for inflammation and damage, detect visually invisible microcracks in the nails and immediately fill them.
Self-correction is allowed only in cases where you have the necessary equipment and materials at home to restore the nail plates, as well as the necessary skills and experience.
How often do extended nails get corrected?
The average growth rate of your own nails is 2 mm per 7 days. Accordingly, it is recommended to restore the shape and appearance of the manicure at least once every 3 weeks.
It is important to remember that the indicated value is individual for each woman, so only the owner of the manicure and her master can determine how often the extended nails need to be corrected.
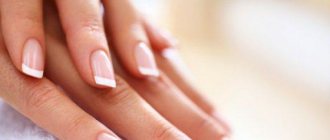
French gel nail correction
How to correct gel nails if they have a French design applied on them? This can be done either manually or using hardware. In any case, this procedure is the most labor-intensive and, as a result, the most expensive. This is due to the need to maintain a smile, especially if the natural nail is visible under the gel.
Correction of French gel nails is done in this order:
- Disinfectant is used.
- All defective areas of the gel coating are removed, after which the dust is removed with a brush.
- Nails are degreased and covered with primer.
- Using a transparent modeling gel, the edge of the nail is raised, which must then be dried in a UV lamp and the sticky layer removed.
- The camouflage gel is used to form the area of the nails, which are polymerized again (2 minutes).
- Stress zones are crimped, secured with a clothespin, and the hands are again sent to dry (1 minute).
- After the sticky layer is removed, the edges and surface of the nails are processed with a nail file. Again, the dust is removed with a brush.
- This step is the most important - a smile is formed with white gel, after which polymerization is required for 4 minutes.
- Now the nails are given their final shape, after which unnecessary dust is removed, and the surface is degreased and coated with primer again.
- A fixing agent is applied (from the outside and inside) and polymerization is carried out for two minutes.
Adjustment procedure step by step
The salon does everything right, as it has professional care products, special equipment and experienced technicians. At home, everything needs to be done correctly; for this, step-by-step instructions will be given below.
To work from home you need to use the following equipment:
- UV lamp for drying nails.
- Gel for extensions (base and finishing).
- A means to remove the sticky layer of gel (acetone or ethyl alcohol).
- File with abrasiveness 180 Gritt and buff.
- Brush for applying gel.
- Primer (disinfectant).
- Cotton sponges.
- Orange stick.
- Dust removal brush.
- A soft, lint-free towel.
- Nourishing oil (grape or aloe seed).
Instructions on how to make the correction step by step:
- first you need to remove all nail polishes, acrylic paints, etc. It is better to use products that do not contain acetone;
- Next, you need to lift the cuticle with an orange stick;
- the plates are degreased using alcohol or another product;
- Using a file, you need to correct the shape of the extended nails; first, all parts of the gel that have begun to lag are filed off. In the area where the old coating began at the cuticle, almost all the gel must be removed, the transition to a natural plate should become unnoticeable. This is an important stage in strengthening the artificial surface, since if there is a crack left somewhere or there are airy areas, then such a coating will not last long;
- before applying a new layer of gel, the plates are treated with a primer, so the strengthening will be more reliable and infection will not get under the nail; excess is removed with a towel;
- Using a buff, the smooth coating of the regrown plate is cut off. Next, this hole is filled with gel and dried in a UV lamp;
- After drying, you need to remove the sticky layer and begin to form the correct shape. If there are any irregularities, they are immediately corrected with a file. A layer of base gel is applied evenly over all parts. A little more gel should be applied to the stress area, it is located slightly above the middle of the nail, but it is important not to overdo it so that the excess does not spread onto the cuticle and side ridges. Afterwards, the nails are also dried in a lamp;
- Next comes the correction of the shape, all defects and unevenness are leveled to the desired result, a nail file is used for this. It is important not to cut off the reinforcement itself, namely the applied base gel to the old coating;
- all dust is removed regularly with a brush;
- a design (french, pattern, etc.) is applied under the finishing coat;
- The last layer is applied with a single layer of finishing gel and dried in a lamp. Afterwards, to give smoothness, you can treat the coating with a buff;
- The last step is to treat the side rollers and cuticles with nourishing oil, it is simply rubbed in like a cream, after a few minutes the residue can be removed with a towel.