What is volumetric modeling and who is it suitable for?
So, nail sculpting is the creation of three-dimensional patterns using modeling acrylic powder or a special gel composition. With the help of these materials, the volumetric ornament you choose is literally molded as if from plasticine and gives the manicure a unique 3D and even 4D effect. Many girls choose flowers, fruits and even insects (butterflies, bugs, etc.) as patterns. This manicure is suitable for almost everyone, regardless of the shape and length of the nails, and can also be used on both your own and extended nails. Volumetric sculpting on nails is especially popular among brides, as well as among young girls as a summer manicure.
Materials necessary for volumetric modeling, their types, differences, advantages and disadvantages
Today, professionals use only two existing types of volumetric sculpting in manicure:
- modeling with modeling acrylic powder;
- modeling using a special gel composition.
Modeling with acrylic powder
Acrylic modeling is very popular. Powder can be transparent or translucent, in various colors and shades; some manufacturers add glitter to it. Such a wide palette allows you to create beautiful three-dimensional patterns on your nails.
Acrylic extension and sculpting is done by combining two materials: acrylic powder and liquid (monomer - a transparent liquid necessary for hardening of acrylic powder). The connection of these materials is carried out directly at the moment of building up or creating a three-dimensional pattern.
Acrylic modeling comes in 2 types:
Aquarium sculpting - when creating such a design, a finished three-dimensional acrylic element is placed on the nail, then the entire nail along with the design is filled with transparent gel. As a result, the pattern ends up inside the artificial nail. The advantage of aquarium sculpting is that the volumetric elements do not cling to clothing, which significantly increases the wear time of such a manicure. However, the thickness of the nail is very large, which for some may be a disadvantage.
Volumetric modeling - with this type of modeling, acrylic elements are not filled with gel, and therefore the clearest volume of the pattern is visible. A significant disadvantage is the inconvenience of manicure in everyday life, since protruding patterns very often cling to clothes and other household items. Nevertheless, this type of modeling is very popular.
Advantages of sculpting with acrylic powder
- Modern acrylic contains the substance ethyl methacrylate. This substance does not harm the nail plate, but on the contrary, gives the nails a healthy appearance, making them stronger and more elastic.
- Acrylic is practically unaffected by temperatures. Acrylic also does not disrupt the shape and natural appearance of the nail. The nail plate does not bend under acrylic.
- Acrylic is easy to remove from the nail. You just need to dip your nail in a special liquid and it will easily dissolve. In this case, your own nail will not be damaged in any way.
- Using acrylic you can create beautiful manicure designs.
Disadvantages of acrylic sculpting
- Acrylic should absolutely not be used by people with various types of fungal diseases, since it creates a greenhouse effect on the nails and the disease will develop even faster from this;
- It is not recommended to use acrylic for people with gastrointestinal diseases, as well as those suffering from diabetes and problems with the hormonal system;
- People using medications and girls during menstruation should not use acrylic either.
Modeling using gel
Gel sculpting is a newer phenomenon than acrylic sculpting. Previously, gels were liquid, and with their help it was impossible to create three-dimensional patterns, because they spread. Now they have begun to produce thick gels that are specially designed for creating voluminous decorative designs.
Working with gel is much more difficult than working with acrylic. Each new layer of colored gel requires separate drying under a UV lamp, which makes the process longer and more expensive. This is the main feature and distinctive feature of sculpting using gel compositions.
There are 2 types of gel:
- 3D gel – has a dense and plastic consistency. With its help it is easy to create three-dimensional drawings. Often used in baguette modeling, as a frame for a pattern or picture.
- 4D gel - this gel has a very dense consistency, which is similar to hard sculptural plasticine or clay. Before starting work, such “plasticine” for nails is divided into small parts in the form of balls, and then the required pattern is cut out of it with a special metal tool. This gel sticks very strongly to your hands and tools, so when working with it you need to use a cleanser - a means to remove the sticky layer.
Advantages of gel sculpting
- The gel does not contain harmful substances, therefore it is not contraindicated for use even by women during pregnancy;
- The material is very elastic, which allows you to “sculpt” all kinds of decorative elements from it without much difficulty;
- The gel has no unpleasant odor;
- Does not harm nails at all and does not worsen their condition.
Disadvantages of gel sculpting
- The gel is very difficult to remove. Doing this on your own at home is incredibly difficult. There are no special products or liquids to remove the gel;
- The gel needs to be filed off. When cutting it down, a large amount of dust is formed, which can cause the development of allergies. It is necessary to remove the gel using special medical masks and in a well-ventilated area;
- Decorative products made from gel do not have great strength, therefore they are very sensitive to impacts, as a result of which decorative patterns can be destroyed.
Using nail gel is quite difficult, so for the first time it is better to entrust the procedure to a professional, and after gaining a little visual experience, you can try to make simple compositions yourself, at home.
beauty.ua
About the author: Tatyana Marchenko . Author of the blog tatianamarchenko.com , makeup artist, founder of the “Restart your beauty” .
A new nail fashion is coming towards us like a tsunami - plasticine for nails . And today we will learn how to make a beautiful and simply charming design using the example of gel polishes and 3D plasticine from the Canni brand.
Now, easily and simply, even as a beginner, you can create a 3D design of any complexity. But first things first!
What I liked about this brand: firstly, the combination of price and quality. Secondly, the brand focuses on the quality of its products and, as my experience shows, they are almost timeless! I have had some shades of Canni gel polish gel polish that lasts from start to finish!
Thirdly, I love the Canni - it has beautiful colors. For my sculpting, I chose spring shades of pink (#115) and blue (#038). And, of course, the gel plasticine itself is in a soft yellow shade (#01).
Canni 3D plasticine received its name precisely because of its consistency, and the nail design is similar to modeling.
Actually, for this nail decoration you will need gel plasticine , the thinnest dots and a flat brush. You can do anything, but I will show you the simplest and most trendy - lace.
An important nuance: 3D sculpting is done after the manicure is done and the top coat is applied!
Application order:
1) Using a dots or an orange stick, transfer the 3D gel to the design execution area
2) Using a brush dipped in liquid to remove the sticky layer, smooth and distribute the gel as you like.
3) Place a dot with dots and make petals around it. If there is excess space left, add dots and give the lace a lighter and airier look.
4) Dry in a UV or LED lamp. As practice has shown, the gel dries even under sunlight, and with lightning speed. So be careful with the sun! (Or, in case you don’t have a lamp, this is your option :)) The gel does not spread, holds its shape perfectly, polymerizes in any UV or LED lamp in 2 minutes, leaving no sticky layer.
That's all, actually! Your manicure with 3D plasticine is ready! It turns out very simple and beautiful :)
By performing three-dimensional sculpting with 3D plasticine from Canni , you can create really delicate openwork with lace on your nails, because this design is ideal for celebrations, proms, weddings, and can also finally make your man pay attention to your stunning manicure.
The most important feature is that this material is durable, it does not fade over time, does not chip and is not susceptible to the negative effects of external factors, therefore it allows you to create a durable and beautiful nail design that lasts for a long time.
Appearance passwords: gel polishes - 90 UAH 3D gel - 115 UAH Where to buy: Canni website
READ ALSO: Easter is approaching: 37 of the most inspiring Easter manicure ideas from Pinterest
Step-by-step technique for performing a manicure using the power of volumetric acrylic sculpting
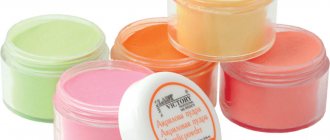
In order to create a three-dimensional pattern on your nails using acrylic sculpting, you will need the following tools:
- Acrylic powder in the desired colors;
- Liquid (monomer);
- Thin brush and flat brushes for pattern modeling;
- Napkins;
- Decorative elements (rhinestones, sparkles);
- Glue
Acrylic modeling is used on extended nails or on gel polish coating
- First you need to prepare the nail, process it properly, and give it the desired shape.
- Next, extend the nail or cover it with gel polish;
- Soak a thin brush in liquid, then dip it in acrylic powder, roll the brush until a small lump forms at the tip;
- Then place the resulting lump on the nail plate in place of the planned design, and use a brush to straighten the lump to create the required three-dimensional pattern. If the lump dries out, moisten the brush in the liquid and continue working.
- Repeat the procedure to create other pattern elements;
- If necessary, add additional decorative elements (rhinestones, sparkles, etc.);
- If desired, you can carefully coat the result with a topcoat to give it a glossy shine. However, this is not necessary if you do not use aquarium equipment.
Acrylic sculpting on nails: features of manicure
Acrylic modeling has been pleasing women with its unusual design for decades. The acrylic extension system consists of powder and liquid (monomer).
The combination of these two materials occurs directly at the moment of building up or creating a three-dimensional design.
Acrylic powder can be colored, transparent, translucent, or contain glitter. A wide range of powder colors allows you to create bright designs to suit every taste.
Types of acrylic modeling:
- Aquarium sculpting involves the presence of a three-dimensional design inside an artificial nail. First, decorative acrylic elements are placed on the nail, and then the design is filled with a transparent acrylic layer. The advantage of this type of sculpting is that the nails do not cling to clothing; the disadvantage is that the nail plate is too thick.
- Volumetric acrylic sculpting on nails is a more popular option. Nails look as natural as possible, and the volume of the design is perceived very clearly. The disadvantage can be considered inconvenience in everyday life due to protruding elements that cling to fabrics.
What you will need for acrylic sculpting:
- flat brushes for modeling;
- liquid;
- acrylic powder of different colors;
- napkins;
- decorative elements, glue.
How to prepare your nail?
Similar to gel, acrylic modeling is performed on extended nails (gel, acrylic) or coated with gel polish.
Step by step technique:
| Step 1 Prepare your nails for creating a composition with acrylic (extension or cover with a layer of gel polish). |
| Step 2 Dip a thin brush in liquid and dip it into a container of acrylic powder. Twist the brush so that a small lump forms on it. |
| Step 3 Place the lump on the nail plate in the place where the design element will be formed. Use a brush to straighten the lump, creating a three-dimensional fragment of the composition. If it dries out, soak the brush in liquid and continue working. |
| Step 4 Repeat for the rest of the drawing. |
| Step 5 If desired, glue decorative elements: beads, rhinestones. |
| Step 6 Acrylic sculpting is usually not given a topcoat unless it is an aquarium design. But some masters cover the nail plate with a top gel layer and dry it in a UV lamp. Thus, the volumetric pattern acquires a glossy shine. |
Step-by-step technique for performing volumetric manicure with the power of gel
To create volumetric sculpting using modeling gel, you will need the following tools:
- Brushes;
- Pusher;
- Dots;
- Gel (3D/4D);
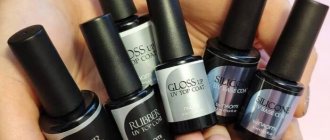
- Means for removing the sticky layer (cleaner);
- UV or LED lamp
Gel sculpting is usually used on extended nails, but it can also be used on nails coated with gel polish/shellac or acrylic.
Important! It is not recommended to use this technique on regular nail polish. Since coating with ordinary varnish is very short-lived, performing volumetric modeling on it is not advisable.
At the end of the extension or after applying gel/varnish, the sticky layer must be removed from the surface of the coating.
- Perform nail extensions or cover them with gel polish. Dry under a UV lamp and remove the sticky layer from the surface;
- Using a pusher, take a little gel and use your fingers to form a base for the design;
- Place the gel on the surface of the base and use a dot or brush to form the desired pattern; you can smooth out sharp corners with a brush dipped in a cleanser;
- Dry the result under a UV lamp;
- Repeat the same procedure to create the remaining elements of the three-dimensional pattern;
- If desired, add other decorative elements (rhinestones, beads);
- At the end of the work, apply a top coat to the design without touching the rhinestones or beads. Dry in a UV lamp.
Technique for performing manicure with plasticine-gel nails
Stage 1. Prepare the nail for work. To do this, remove the cuticle, give your nails the desired shape using a nail file, and also adjust the length if necessary. You can remove the cuticle in the classic manner and trim it with scissors, or you can resort to the untrimmed manicure technique and remove it using a special product. In this case, do not forget to use a pusher to remove the softened cuticle from under the side rollers.
Stage 2. Start covering your nails with base coat. The tight fit of the color and decorative elements to the nail plate depends on how well you complete this stage. Polish your nails in the lamp for 2 minutes or 30 seconds depending on its type.
Stage 3. Cover your nails with colored gel polishes or shellac. It is better to paint in 2 layers to obtain a more saturated color. Modeling is usually done on a light background, but a dark or even black background will look no less impressive. For example, white, gold or soft pink look elegant on a black surface. After this, polish your nails.
Stage 4. Now start creating the decor. You can use thin brushes to make additional patterns to frame the main design. Most often these are abstract lines or, if you are sculpting a rose, flower petals.
To begin, scoop up some gel plasticine using a pusher and apply it to the nail plate. Take a special brush, soak it in degreaser (clinsere) and begin to form your design. If it's more convenient for you, you can do this using Dots. When drawing the lines of the pattern, act methodically and carefully. Upon completion of sculpting, you can decorate the resulting work with additional decor. For example, in any drawing, rhinestones will look impressive, always attracting attention.
Stage 5. After this, seal the work with a top coat to keep the decor in its original form for as long as possible. Otherwise, the rhinestones may fall off, and the three-dimensional pattern will be damaged when worn. Polish your nails in a lamp.
With the help of this instruction, you can create amazing compositions yourself, experimenting with different designs each time. Surprise your friends with an unusual way of decorating, combining already familiar designs with gel plasticine.
Interesting design ideas with modeling
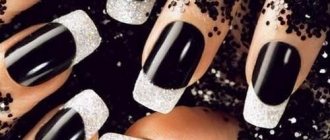
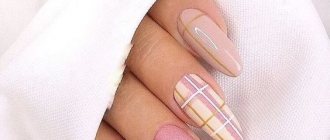
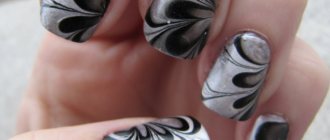
3D and 4D nail sculpting, although a new phenomenon, is already actively used by a large number of girls and women. This is not surprising, because three-dimensional drawings, when done correctly, look very beautiful and unusual! Let's look at the most popular and spectacular types of volumetric nail designs:
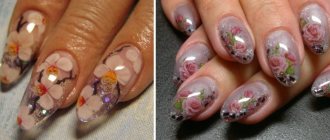
- Sculpting your nails with 3D gel in the form of lace looks very impressive. Very gentle and “airy” design for romantic natures!
- Using sculpting using 4D gel, you can create mini flower beds on your nails. Plasticine flowers on nails look very chic. For example, a design with roses sculpted on nails will help emphasize femininity and add zest to any look.
- As you already know, voluminous manicures are most popular among brides. And here are some wedding manicure ideas!
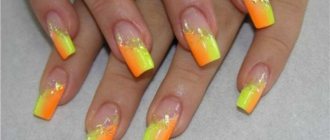
- Young and active girls can experiment with bright and rich designs of volumetric modeling. Make fruits, berries, cakes, butterflies, whatever you like!
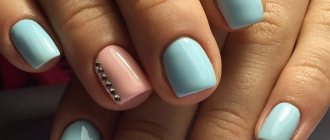
- A manicure using volumetric sculpting can be worn even in everyday life, to work or school. Just for this purpose, choose more restrained varnish colors, and use voluminous elements as a small accent.
Dear girls, beautiful and well-groomed hands are your calling card! If you are going to a celebration or just want to look stunning, then the 3D effect on your nails is what you need. And if you put in a little effort and be patient, over time you will be able to create similar beauty on your nails yourself. We hope that our article will help you with this! Go for it!
We recommend visiting our Manicurist Forum , where you can ask questions or chat about interesting topics!