Shining Abyss
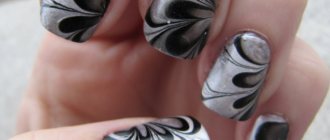
This voluminous chameleon manicure gel polish looks like space or an icy river with sparkling pebbles at the bottom. Waves of highlights in different tones shimmer on the nail at different angles. This design looks absolutely magical. You want to touch it and look at every detail. You can cover all your fingers at once or select only 1-2 on each hand. For overall balance, it is better to choose a soft pastel color for nails without a design, so that it does not look too dark and heavy.
The relief here works like a lens. In the area where there is volume, the light comes from a different angle, and we see several colors of the chameleon at once, and the pattern duplicates the drawings. The colors change constantly in dynamics, and it looks very impressive.
What you will need
- nail files and buff;
- base;
- colored gel polish with shimmer;
- gel polish pastel shade;
- thin brush;
- glitter;
- top
How to do a voluminous manicure
How to properly make a voluminous manicure with gel polish:
- First you need to degrease the plate and apply the base.
- Apply a black gel polish base to the nails that will have a 3D design.
- Apply chameleon varnish with small glitter over the dark tone.
- Dry the layer well in a lamp.
- Apply any pastel shade to the other fingers.
- Send your nails to polymerize in a lamp.
- Cover the design with topcoat and place it in the lamp to dry again.
- Using a thick rubber topcoat without a sticky layer, use a thin brush to draw uneven lines along the nail in a random direction. The volume should be maximum, but natural.
- Place your nails in the lamp for a few seconds.
- Subsequent stripes need to be drawn a little closer to those already there. But under no circumstances should they merge with each other.
- Walk along the drawn lines again with a second layer to raise the volume and make it more prominent. In addition, along with the difference in volume, the difference in the play of shades will increase. The lines of the second layer should be slightly narrower.
- It is better to keep the last couple of lines in the lamp for the full time so that they dry completely.
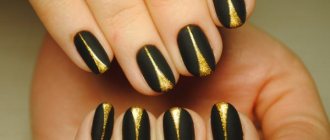
A quick and very stylish voluminous manicure is ready; in the photo below you can see how beautifully it shimmers. A great option to add something unusual to your everyday coverage or to complement a festive look.
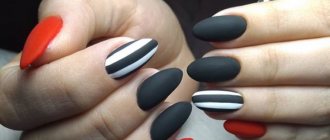
Volumetric shell design
A simple and unique volumetric manicure with shell gel polish is a favorite of many girls. He, like no one else, is able to reflect the entire feminine nature with his elegant design. It is enough to decorate just one finger, and you will automatically become an ancient Greek Goddess or queen of the ocean. Voluminous manicure harmonizes well with light and flowing dresses, as well as pleated skirts. It is done quite simply at home.
Required materials and tools
- base;
- nail files and buff;
- colored gel polish;
- thin brush;
- rubber top;
- rhinestones or broths.
Execution technique
- Prepare your nails for work. It is necessary to sand the surface with a buff and cover the design with a base layer.
- Apply the main color (white or pink).
- Use a soft buff to buff out the base color.
- Using a medium-length brush, apply a strip of gel polish, creating the outline of the shell shells. You need to start from the free edge and reach the cuticle. The strip should taper towards the cuticle. Gradually release the pressure so that the line becomes thinner.
- Dry the layer well in a lamp.
- Add some volume with gel polish. But this time you need to make the lines a little thinner.
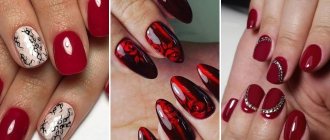
The volumetric shell design is ready. Gold, pearl, transparent rhinestones or gold gel polish with an olive tint are ideal for it.
Video instruction
A step-by-step technique for performing shell manicure can be seen in the video.
Drawing technique
How to make shellac with a three-dimensional design? There are 2 methods:
- Using dots and acrylic powder, a convex three-dimensional design is created on the nail.
- Create a 3D illusion on your nail using a simple technique.
Drawing with dots
The technique for creating three-dimensional pictures is the same for any drawing. How to make voluminous nails with shellac can be seen in the example of a fashionable knitted sweater manicure. To make such a design with shellac, you need to follow the sequence of actions:
- Prepare the nail by sanding it smooth and removing the cuticle.
- Apply a degreaser that will remove fat particles from the nail (after degreasing, do not touch the nail with your fingers).
- Spread the base layer of shellac in an even layer and dry under the lamp (drying time depends on the quality of the gel polish and the power of the lamp).
- Next, apply the base - it will serve as the background for the three-dimensional picture (in this case, a drawing of a sweater) and also dry it.
- After preparation, you can start drawing. The simplest version of a knitted manicure would be to apply a thin stripe in the middle of the nail, with checkmarks drawn on both sides of it. After painting is completed, the nail is sprinkled with acrylic powder matching the color of the shellac and dried under a lamp.
- After drying, brush off any remaining powder with a special brush, and your unusual manicure is ready.
In this way you can make not only a sweater, but also any variant of patterns. Often, three-dimensional pictures are additionally decorated with rhinestones or bouillons.
3D illusion
This method has appeared recently; it allows you to create the illusion of volume on a smooth nail using tinted transparent gel polishes. Making voluminous shellac in this way is not very difficult; you only need to be careful and follow the sequence of operations; as an example, it is shown how to do a newspaper manicure at home. For this nail decoration, in addition to the basic shellac kit, you will need:
- alcohol,
- old newspaper.
After the nail is processed, degreased, a base layer is applied and dried, you can begin to apply an unusual picture. To do this you need:
- Cut pieces of newspaper to fit the shape of your nails.
- Dip the prepared pieces into alcohol, place on the nails and wait 30-40 seconds.
- Remove the pieces of paper and wait for the alcohol to dry.
- Now you need to be careful not to erase the newspaper font when applying transparent shellac. After applying the layer, the nails are dried.
- Volume is achieved by applying several transparent and translucent layers. In the photo you can see the finished newspaper manicure.
Having mastered the basics of conventional shellac nail design, any craftswoman will be able to create an original voluminous manicure that will highlight the beauty of her hands and give her a good mood.
Quilted volumetric manicure
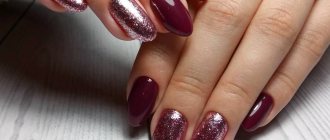
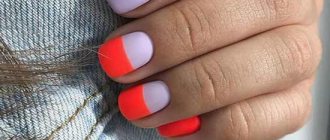
A fashionable and laconic check, decorated with rhinestones, which exudes the charm of the famous Coco Chanel. A laconic but voluminous manicure is performed with regular gel polish. The colors most often used are camouflage, ranging from light beige to dark pink. Any translucent varnish will do; it needs to be able to give a tint to the nail plate. You should not cover all your nails with this design at once. 1-2 fingers on each hand is enough. For drawing, gel paint or thick gel polish is suitable.
Tip: Diamonds can be drawn by hand or use manicure tape, which is glued with a mesh and then filled with color.
How to make a quilted voluminous nail design:
- Prepare your nails for work. File them with buff and degrease them.
- Apply one coat of base and dry it in a lamp.
- Cover your nails with a colored camouflage coating.
- On the fingers where there will be no design, draw a French smile using a thin brush and white gel polish.
- Cover the nails with the design with top coat and dry the layer in a lamp.
- Using a thin brush with white gel paint, draw three diamonds along the entire length of the nail, which are located vertically one above the other.
- Polymerize the layer in a lamp.
- Draw the same triangles on the sides. Don't forget to draw the corners of the triangles at the side bolsters for the integrity of the pattern.
- Apply a second layer of gel paint to add volume to the design.
- It is necessary to dry small areas each time after application.
- Cover your nails with camouflage color over the design.
- Remove the sticky layer from nails without a design.
- Attach small rhinestones or bouillons in the spaces between the diamonds.
The original voluminous quilted manicure, made with gel polish, in the style of “Scream Queens” looks elegant even in the photo.
Exquisite 3D manicure using stickers
When performing 3D manicure, the easiest and most convenient way is to use stickers. Such stickers differ from the usual relief pattern, which is very noticeable on a flat nail plate. To create three-dimensional nail art you will need gel polish of any tone and, of course, the stickers themselves. First, prepare your nails for a manicure, apply the varnish of the desired tone to them and dry them in a lamp. It is best to use a polish with a sticky layer to make the pattern easier to move around the nail. Now let's start applying the stickers. Cut the desired design and place it on a damp cotton pad for a few minutes. Then remove the sticker from the paper and place it on your nail. Finally, cover the nail with topcoat and dry it in a lamp. This manicure will look attractive. Using stickers, you can focus on two nails or decorate all your fingers.
Unicorn horn
Nowadays everything fabulous and sweet is in fashion. Here the creator's imagination is limitless. If you look through your Instagram feed, it is filled with a huge number of things on this topic: macarons, sweet milkshakes, inflatable mattresses in the shape of pink flamingos, colored ice cream and Katy Perry songs. So why not decorate your nails with unicorns? These can be various yoghurt shades, chrome mirror surfaces and an indescribable shimmer of glitter. Volumetric unicorn manicure is a real hit of 2018.
You determine the shape of your nail yourself. It is possible to make a cone-shaped stiletto that follows the outline of the horn of this mysterious animal. Or you can choose a shortened version of a soft square to make the design look neater.
Cornucopia
The substrate in this technique can be any. And the coating itself can be diversified as follows:
- glitter gradient;
- volumetric relief with rubbing (mirror, glitter, mother-of-pearl);
- relief with melange or acrylic powder;
- if acrylic lining is used, it is recommended to add kamifubuki and various sparkles;
- broken glass;
- foil;
- filling the “horn” with decorative elements using aquarium design techniques;
- a soft gradient of bright colors to give the horn a luxurious shimmer.
Unicorn horn manicure technique
If you want to create a stiletto-shaped horn, then you will need acrylic powder and molds for laying out acrylic. To create a design on fingers of a regular shape (oval, almond-shaped or soft square), you need to degrease your nails and cover them with a base coat. If you decide to make an original relief on your own nails, then skip the first 3 points.
- Attach the acrylic molds to the nail.
- Using a flat brush, pick up acrylic powder and roll into a ball in monomer (liquid for acrylic). For convenience, you can use thick acrylic gel.
- Carefully give the desired architecture to the nail in the shape of a horn.
- For the design, you need to cover the nail with any color (it is best to choose white, pink or black).
- Dry the layer well in a lamp.
- Mix several shades of gel paint on the palette (pink, coral, fuchsia, purple). If this is not available, regular colored gel polishes can be mixed with a thick rubber topcoat.
- Using a thin brush, scoop up one color and draw smooth lines that follow the contours of the spiral-shaped edges of the unicorn's horn.
- Dry the layer in a lamp.
- To make the relief more voluminous, duplicate the lines with multi-colored gel polish.
- The coating can be left as is, add glitter on top and secure with a top coat.
- But if you need a special fabulous shimmer, then you should cover the nail with a mirror or glitter rub, gently rubbing in the mirror powder with an eyeshadow applicator or your finger.
Video instruction
A voluminous unicorn manicure looks magical and unusual. Detailed execution techniques and other ideas can be seen in the video.
Sweet Ariel
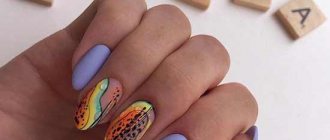
The most complex of the three-dimensional manicure designs presented, but extremely beautiful. The voluminous manicure follows the scales of the little mermaid's tail and has a unique blue-green hue. To perform this you will need acrylic powder with monomer or acrylic structural gel.
Technique:
- Before starting work, your fingers can be coated with iridescent gel polish with shimmer for a better effect, but this is not necessary.
- Attach a mold for laying out acrylic onto the prepared nail.
- Take a small ball of structuring gel and place it on the free edge of the nail.
- Using a manicure hatchet or an orange stick, flatten the ball, creating a scale shape.
- Place another small ball next to the previous one.
- Gently press it, giving it the shape of a scale.
- In this way, lay out all the scales on the entire nail plate.
- File the resulting frame with a file, cutting off excess volume.
- Cover the design with varnish of any color with shimmer (shimmering sparkles).
- Sprinkle with glitter or acrylic powder to make the coating look even more impressive.
- Place small rhinestones on the glue near the cuticle using an orange stick.
A chic manicure with a voluminous design in the style of the beautiful little mermaid Ariel is ready.
Volumetric manicure with gel polish
A manicure with a convex pattern is easy to do even at home. Experts advise performing this design mainly using gel polish. This choice is easy to explain:
- gel polish looks much more sophisticated;
- gels dry faster;
- manicure lasts longer;
- stucco has a clearer, relief appearance.
In order to correctly carry out the entire procedure, you should decide in advance on a specific pattern, choose a color combination and practice a little.
The main stages of a volumetric manicure with gel polish:
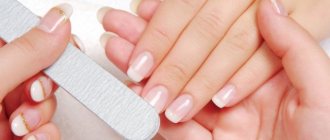
- preliminary preparation of nails;
- mandatory degreasing of nail plates;
- cover the nails with a base and dry them in a lamp;
- we apply a design (usually on two nails on one hand);
- polymerize the design;
- cover the finished 3D drawing with topcoat.
If you are performing a voluminous manicure for the first time, then, on the advice of nail art masters, choose the simplest designs: lines, waves, geometric shapes.
The most pronounced three-dimensional effect can be achieved using light pastel shades of varnish.
What it is
Let's figure out what an original and spectacular 3D manicure is. It is characterized by the application of convex patterns on the surface of the nail. They look great at any party or social event. Usually the modeling is placed on several nails, but if desired, you can decorate all the nails in a similar way. It all depends on the degree of celebration and the original idea.
According to professionals, any colors are suitable for 3D manicure; the main thing is to choose the right combinations that match the style of the outfit and the woman’s inner state.
A voluminous manicure still has one significant drawback - the convex elements often break off during everyday wear, because of this the design quickly loses its visual appeal and must be removed immediately.
What do we need
It is quite possible to create three-dimensional designs on your nails with gel polish at home, the main thing is to strictly follow all the instructions. Truly original nail art will only work if you use all your imagination.
Our valuable tips will help you make a breathtaking three-dimensional design. We will need:
- gel polishes in the required shades;
- if desired, velvet sand, acrylic powder with monomer or acrylic structural gel;
- various decorative elements;
- solution for degreasing the nail plate;
- drying;
- primer solution and detackifier;
- brushes of different thicknesses and a spatula;
- dots (a device that looks like a fountain pen into which gel polish is loaded).
For work, you should choose brushes with stiff bristles. Other options are ineffective when working with three-dimensional images. The most sophisticated and feminine pictures are obtained when working with a thin brush. It should be noted that delicate handwork requires a fair amount of skill from girls. Therefore, you should not immediately take on complex patterns.
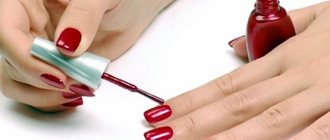
How to draw correctly
A voluminous manicure with gel polish requires maximum composure and accuracy. The more complex and prominent the image, the more experience and skill is required. Most artists say that to begin with, you can get by with just one shade of gel polish; even in this case, the pattern will look great. Gel polishes and shellacs are equally successfully used in this work.
The main rule of enchanting 3D design is to apply the drawing in several layers, each subsequent one is applied after the previous one has dried. For beginning craftswomen, the industry offers a lot of different stencils, the use of which will greatly facilitate the process of applying images and provide an opportunity to hone their skills. Afterwards you can easily switch to using dots and thin brushes.
When using three-dimensional drawings, you should not get carried away with excessive decoration, since such art is effective in itself and does not require additions. Rhinestones and sequins are used extremely delicately.
In addition to drawings with gel polish, there are two more methods of volumetric manicure: applying convex pictures using acrylic stucco or expensive and incredibly plastic gel plasticine. Each method has its pros and cons, and only you can decide what is right for your case.
The features of acrylic powder and stucco made from it include:
- The material is quite difficult to work with, blurs and flows;
- it is necessary to work quickly, as acrylic hardens instantly;
- fragile texture;
- the resulting drawings are incredibly beautiful;
- the pattern is made separately and later attached to the nails with glue;
- Due to the fragility of decorative elements, it is necessary to choose the correct place of attachment to the nail.
Features of working with gel plasticine:
- easy to use, does not spread or stick;
- no unpleasant odor;
- provides the opportunity to work slowly, as it does not harden before drying in the lamp;
- ease of operation, which is important for a beginner in nail design;
- expensive material.
Volumetric manicure MAYBEETLE. Realistic nail design "Chafer bug". Manicure with chafer rub