In the modern world, a woman with unkempt nails feels discriminated against, unfeminine, and it seems to her that she is not noticed. This can be fixed in a matter of minutes by yourself, without the need for many tools and varnishes. Firstly, it is convenient, because... There is no need to make an appointment at the salon in advance and select a time that is convenient for both you and the specialist. Secondly, it is less expensive. Thirdly, the resulting free time can be devoted to your family or your loved one. So there are many more advantages than disadvantages. If you are afraid that you won’t be able to handle the drawing, don’t worry, the “Zebra” print is easy to make and does not require the genius of an artist from you.
Fashionable zebra manicure: stylish design ideas in achromatic colors
Zebra is a symbol of calm and equanimity. According to Indonesian mythology, the zebra symbolizes life's harmony. The zebra is a very cautious animal, which, despite external equanimity, can quickly accumulate its strength and defend itself by any means.
When creating a zebra manicure, girls most often do not think about the symbolism of nail art. They are more attracted by the interesting pattern and many color options for this design. Zebra manicure is a combination of black and white colors. This achromatic combination has been very popular in recent seasons. In addition to these shades, striped decor looks beautiful in pink, green, blue and other shades.
Drawing
The most important rule of this design is that each black stripe is unequal in width throughout its entire length and gradually converges at the end to one point. If you use this rule, then a zebra manicure will be recognizable even if it is made using non-standard and creative colors. The tiger design is also done, you just need to replace the white color with orange.
These stripes are easy to draw by hand using a dots or a thin brush. Even one equipped with special varnishes for nail art will do. For the most complex designs, brushes of varying widths may be needed.
Cover your nail with white polish and dry it. Decide how you will draw the stripes - vertically or horizontally. And start drawing them from the base, which will be wider, to the middle or two thirds of the nail, gradually narrowing towards the end. After drawing several stripes on one side of the nail, move on to the other. Remember that the stripes should not be too geometric and resemble elongated triangles, they should vary in width and be slightly wavy.
It’s easier to make this pattern with a brush, but you can also achieve good results with dots. After the polish has dried, cover the nail with a protective base and dry. The zebra design is very popular in nail design, as can be seen in the photo, so this material contains several video lessons on its implementation.
#1 Classic zebra manicure in black and white
To make a zebra manicure look natural in everyday looks, it is most often created in black and white. This pattern looks voluminous and interesting. Black veins are drawn on a white or milky background.
The shorter the nails, the thinner the pattern should be. It is recommended to perform a zebra manicure in a glossy version. This way it looks much more impressive and brighter. It is better to perform a classic zebra manicure on 1-2 fingers, and paint the rest of the nails either plain black or white.
Zebra style manicure using a needle
Drawing with a needle is also recognized as a common method of applying stripes. The nails are covered with two layers of white or any other varnish, and without waiting for it to dry completely, characteristic stripes are applied. What role does the needle play in this? It just fulfills its main mission - it stretches a small drop of varnish of a different color over a non-dried coating, thereby creating the desired striped patterns.
#2 Zebra manicure with pink color
By adding a pink tint to a striped manicure, you will make it much more original and brighter. The bright pink color harmonizes perfectly with the black and white color palette. Perform a manicure where stripes are made on 1-2 fingers, and the rest of the nails are painted pink.
Nail art looks interesting, where the striped pattern is made on a gradient pink background. In this case, it is better to make the stripes purple or blue. For a pink manicure, choose soft or bright shades of pink such as salmon, deep pink, baby pink and others. Dusty shades of pink are not recommended. They simply won’t be noticeable next to a bright striped pattern.
Design ideas
This manicure can be complemented with different colors and used in addition to well-known techniques. Below are several options for nail designs in the zebra style.
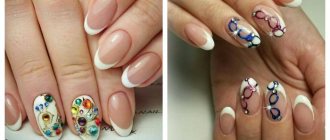
French
Traditional French manicure can be done in this style.
French can be painted with black and white stripes. In addition, black lines can be applied to a plain base without affecting the tips of the nails.
Lunar
This option is performed as follows: while drawing black stripes, a few millimeters near the cuticle are not covered with a pattern. To add expressiveness, separate the lunula with varnish with rhinestones.
Color
For lovers of unusual design, “colored zebra” is perfect. To do this, cover the base with a non-standard tone - red, purple, yellow, orange, etc.
The manicure will turn out very bright, but will not look like the black and white color of a zebra.
With gradient
To create this design, add black strokes to the ombre nail design. This way you will combine two fashion trends of this year in one manicure.
With rhinestones
Those who like to decorate their manicure with rhinestones will love this option. Decorate the stripes with a small amount of them.
#3 Matte zebra manicure
The matte texture ennobles and calms any nail design, even the brightest. The striped pattern in a matte texture looks incredibly gentle and feminine. In the photo below you can see examples of such charming nail designs.
As for the color palette, you can experiment here. Both black and white manicure and bright options look beautiful. For example, the combination of black with orange, pink, purple, and blue looks interesting.
Other options
There are other ways to draw a zebra on your nails. In both cases, the image is more stylized and less realistic. However, due to the popularity and recognition of the color combination, the zebra in this design will be quite easy to spot. The first method is to paint on wet white varnish with black varnish using a needle. Place a drop of black polish towards the edge of the nail and stretch it towards the center using a needle. After drawing the required number of stripes, dry and apply top coat.
Using aquamanicure technology, you can also get a zebra design on your nails, as in the photo. Pour white varnish onto the water, and then pour in a little black and begin to carefully mix, forming stripes. Once the pattern meets your requirements, place your nail on the film on the surface of the water.
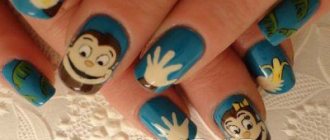
#4 Manicure with zebra print
A manicure with a zebra image looks very bright and expressive. This design is radically different from other nail art, for example, with floristry or geometry.
Zebra looks quite noticeable on nails, so experimenting with shades is not recommended. Start with a black and white color palette, using pink or red only to highlight the zebra's eyes. Nail art with cartoon images of a zebra looks interesting. You can see an example of such a manicure in the photo below.
French zebra design
A classic conservative jacket made in this design can very pleasantly surprise any capricious lady. You can apply black and white stripes on a transparent base and complement them with thin strokes of shiny varnish. Or you can apply the same technique on a nude finish or accentuate the stripes on your ring finger. For a brighter jacket, decorate all your nails with a striped design, and make your smile in a contrasting and bright color. It is no less original to perform a French coat, alternating black and white smiles on the fingers, and apply the characteristic stripes matching the color of the animal with shiny glitter. A striped jacket looks beautiful, decorated with transparent varnish with the addition of multi-colored iridescent sparkles. A classic, but in a completely different version.
#5 Zebra manicure with geometry
A zebra manicure visually looks quite strict, so it would be inappropriate to complement it with florists and other cute patterns. A zebra manicure with geometric elements looks much more appropriate.
One of the manicure options is filling geometric shapes with striped decor. This nail art is also performed with predatory patterns, for example, with a leopard. A geometric manicure with a zebra looks harmonious and natural, so it can successfully fit into an everyday look.
Original water manicure
This method will allow you to perform an original zebra manicure in an equally original way. To do this, you will need a glass of water and the colors you are interested in; in our example, we will turn to the classic black and white duet for help. White varnish is poured into the water, which is then supplemented with black. The main task is to carefully mix the two coatings, forming characteristic stripes, and dip your finger into the liquid. The resulting pattern should dry well, after which all excess is removed and the pattern is fixed.
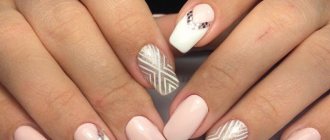
Geometric patterns
Linear geometry patterns in 2021 are especially relevant in combination with the negative space technique: when a base coat or ordinary colorless varnish is taken as the basis for a manicure, and structured or geometric figures immersed in chaos are applied on top of it. The most popular of them:
- circles,
- ovals,
- squares,
- diamonds,
- triangles,
- straight or wavy lines.
Thanks to the two-color design, black figures can easily overlap each other, giving the manicure a three-dimensional effect. But here it is worth noting that a large number of elements on the nail will look unsightly and generally make the manicure heavier.
Editor's choice: Extended nails - fashion ideas for the 2021 season with photos