A wedding is a long-awaited event in the life of every person. For two loving people, the memory of solemn and exciting moments will remain for the rest of their lives. In addition to photographs and video materials, another interesting ritual is now used.
Guests who come to congratulate the newlyweds are invited not only to verbally utter pleasant, kind, and perhaps funny statements, but also to leave them as a souvenir in writing. Several versions of making such a wedding wish book with your own hands have been invented. In the article we will look at several interesting options, and your imagination will tell you many other solutions.
Album
A book of wedding wishes can be made in the form of an album, the pages of which can be left blank, or you can decorate them at your discretion with small drawings or appliqués. The character and hobbies of the partners play a role here. If such little things do not matter to the future husband, then the bride herself can show her imagination and use any ornament, flowers, images of balloons or bows.
Of course, special attention should be paid to the design of the cover. Let's consider options for making a wedding wish book with your own hands. The master class will be described step by step below.
1. You need to buy a thick photo album with regular paper pages.
2. The next step is to prepare the necessary materials: satin ribbons, strong material (linen, wool or thick burlap), PVA glue, scissors, thread, needle, half a meter of lace ribbon or stitching, decorations (beads, rhinestones, seed beads, etc.). )
3. To make a wedding wish book with your own hands, you first need to cover it with material. A paper wrapper also has a right to exist, but such an album will not last long, and it will look cheap. It is better to use scissors, cut a piece of material to size, and, having stretched it well over the first and last pages of the cover, glue it with PVA glue. It is advisable not to move the fabric while ironing, but act carefully.
4. If a girl knows how to embroider, then you can embroider the couple’s names and the wedding date so that the husband does not forget her later. If the bride does not have such talents, then you can completely do without the inscription, or order it in advance from the studio on this material.
The book opens...
You need to answer yourself the following questions
- Will your wedding wish book have a title page? If so, what will it look like, what will be written and/depicted on it;
- how the pages will be designed.
The pages of a book of wedding wishes - you can look at the templates - are usually not empty. They contain orienting subheadings “from whom” (the name of the author of the wish) and “I wish you” or something like that.
You can copy and remake such a template in Photoshop, you can create your own with completely different text, with pictures, with your own photographs (let them leave wishes under them, you can even separately for the bride and groom), even with a funny questionnaire, so that guests certainly don’t “hovered” over the book of wishes, for example:
- Where will we go to travel?
- What will we name our child?
- Our first big family purchase? - etc.
Such questionnaires are then very interesting to read: as a rule, some of the guests take the game quite seriously and answer reasonably: “To Goa, Ivan, a car,” and the rest ... “To Narnia, Polycarp, a throne for the mother-in-law.” But everyone was interested!
On the future pages of your book, you need to accurately mark the puncture locations, work with a hole punch - and please: you can print the prepared template on them!
Or have you decided that it is not needed and will design the pages manually?
Or maybe you could provide this opportunity to guests by immediately placing markers next to the book so that they can not only write something for you, but also draw a picture?
This is also very interesting, especially if the pages contain inscriptions in random order: “draw our dream here,” “draw a portrait of the bride,” etc.
Once you think the pages are ready - printed, colored, or left blank - simply "tuck" them into our cover.
Your completely unique wedding wish book is ready!
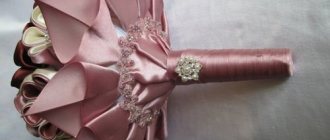
Decoration
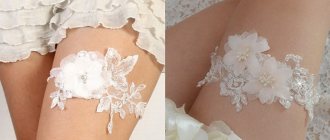
To beautifully decorate a wedding wish book with your own hands, you need to learn how to make decorations from satin ribbons. This can be done by practicing in advance and looking at information on the Internet. Since the base of the book is fabric, the decorations are perfectly attached to the base using threads and a needle. Created by folding ribbon, roses or other flowers are attached to a strip of lace or contrasting fabric. In between colors, you can sew or glue additional elements. These could be butterflies, bugs, dragonflies, beads or bows. Such accessories can be purchased at sewing supply stores.
Composition: learning to design photo albums
Selecting beautiful photos and stocking up on decorations is not all you need to create a photo album with your own hands. All elements must form a visual unity.
Related article: Features of decorating rooms in an apartment
Each sheet is filled out according to scrapbooking rules:
- select the semantic center of the page;
- choose a harmony of shades for photographs, inscriptions and decorative details;
- choose decoration that matches the meaning of the photo;
- balance the proportions of large and small parts;
- make bright accents;
- do not overload the page with decorations;
- outline the triangle “photo – title – signature”;
- place an odd number of details on each page.
Create contrast from one large element and several small ones in the opposite corner. For example, at the bottom right there is a large snowflake, at the top left there are three small stars.
Photo album
An interesting option for making a wedding wish book with your own hands is a photo album. On the outside, its design can be done according to the example of the above-mentioned album, but on the inside, the design is very original. To do this, you will need to prepare in advance. If only your closest and dearest are present at the wedding, then you can paste a photo of the guest on each page in advance. If the wedding is large, with hundreds of guests, including distant relatives, friends and employees, then you can organize a Polaroid photo session. The photographer immediately gives out small photographs of the guests who came to the celebration, and the photo is pasted onto the page in the wish album and the guest writes his wish.
In addition to kind words, the newlyweds will also have photos of joyful and beautifully dressed guests as a keepsake. It will be clear from the image in what mood these wishes were pronounced, the mood of the guest at the moment will be conveyed.
Reader
If you decide to design a book of wishes with your own hands, printed photos will perfectly decorate the page. Maria
Unusual versions of this accessory are listed below.
- A typewriter standing on a separate table at a wedding. Each guest can print a message on it and seal it in an envelope. This option is suitable for retro style.
- Messages can be written on the bride or groom's guitar.
- Playing cards can be used as wish cards for a mafia theme.
- Vase with smooth stones. Guests write their wishes on them with markers; this option is suitable for a seaside wedding. The resulting vase can later be used as an interior detail.
- Wooden dies in the shape of hearts are suitable for an eco-wedding.
- Congratulations written with a white marker on vinyl records will look harmonious at a holiday in the style of a dude.
Attention! The most popular are books in the Provence style and those created using the scrapbooking technique.
Secret wishes
If the newlyweds want to truly find out what their guests really want, then they need to hide the contents of their notes from the prying eyes of the other guests. A master class on creating a book of wishes for guests with separate envelopes for notes will be presented below.
For such an album you need to have simple A4 sheets for the printer. It can be white paper, or you can use a set of colored ones. It is double-sided, but you need to take one that is not very dense so that the album does not become swollen.
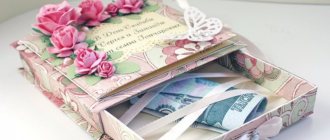
For notes and wishes, you can purchase separately thick rectangles for business cards. They will fit well into envelopes. All that remains is to make a lot of small pockets in which guests will insert wishes.
To do this, you need to take a strip of paper and round off its corners on one side with scissors, cutting off the edges. Next, the strip needs to be bent into three parts: two identical, and one small with rounded ends, which will serve as a pocket lid. The back wall of the envelope is glued to the page in the album.
At a wedding, this album is placed on a separate table, pens and white rectangular leaves are placed. Each guest can come up and write their wishes to the newlyweds, putting the message in an envelope.
Creating the Foundation
The decor should be selected individually, based on many factors described above. And the master class on creating a base will help you make a base for your own unique book. 1. Decide on the size of your book. Most often it is made in A4 format, the sheets are placed horizontally. We made a format of half an A4 sheet - 15 x 21 cm.
2. Having decided on the size of the pages, take the material for the cover (in our case, this is the most ordinary vinyl wallpaper) and cut out 2 sheets, which will be a couple of centimeters larger than the cover on all sides. 3. Take two sheets of ordinary thick cardboard measuring 15 x 21 cm and paste it with wallpaper using Moment Joiner glue. In principle, the material can be secured using a glue gun. We send it to dry under the press. After drying, cover the inside of the cover with scrap paper. Now the cover is almost ready.
4. Using a hole punch, make two holes in each sheet. Subsequently we will pass the rings through the holes. For greater beauty, we insert eyelets into the holes, but you can do without them.
5. To make the cover thicker, you can place padding polyester between the cardboard and the paper, but then the hole punch may not be able to cope with such thickness. 6. For pages we use white cardboard, decorated with various decorations. WE take a glossy business card and use a figured hole punch to punch out the outer corners.
7. Open the rings, put on the cover and insert the inner sheets. The base is ready, and all we have to do is decorate it.
DIY wedding wish book: ideas
Earlier in the article, the varieties of classic options for making wish books in the form of albums were described. More original and creative ideas are in fashion now. In fact, there are a huge number of them, but you can, after viewing the production of several original non-traditional books, be inspired by the variety of materials and choose the most interesting ones for your wedding ceremony. Let's look at some atypical types, which in appearance are far from the word “book”, but bring together all the wishes of the guests.
The simplest fulfillment is a wish on clothespins
If you ask how to make a wedding wish book with your own hands, the answer you will get is simple. It is enough to prepare a small wooden frame on legs; you can decorate it beautifully in the same style as the wedding hall or tent.
From left to right, ropes are pulled, on which there are a large number of clothespins for drying clothes. You will also need a Polaroid camera. The photographer takes turns photographing the guests coming to the celebration and collects the footage in a separate box. Then, at a certain point in the party, the toastmaster distributes their photographs to the guests and below, on the free space, asks them to write a wish for the newlyweds for their future life together. Then everyone comes up and hangs the photo on clothespins on the counter. This procedure can be performed by a family member.
Paper wish tree
A paper souvenir is the best option for a wedding. It can easily fit on a banquet table, where all guests can leave their wishes to the newlyweds. Plus, you don’t need to put in a lot of effort to give this priceless gift.
What materials will you need?
To make a paper craft, you need to purchase high-quality paper, as well as a frame into which the template will subsequently be inserted. The size of the frame depends on the sheet format. You will also need bright plug pillows, a pen and napkins in the future. It is worth saying that ready-made templates for this paper souvenir are now available for sale.
Stages of creation
Follow the step-by-step instructions to help you make a wonderful paper product:
- Draw the trunk, as well as the branches, let the plant symbolize the newlyweds who are creating a young family. It is advisable to sketch with a black pencil or felt-tip pen. In addition, you can buy or print the plant templates you like.
- Insert the template into the frame. It would be nice to decorate the finished craft with beads, artificial flowers, and ribbons - this will make it original.
- During the celebration, guests take turns writing their wishes on a branch, after which they leave a fingerprint using stamp pads. Don't forget to place napkins nearby so guests can wipe off any remaining paint from their fingers.
If you have difficulty creating a paper tree, watch the video master class, which clearly describes step-by-step instructions for creating a wish tree with your own hands:
To ensure that this special moment remains in the memory of the newlyweds for life, take a photo or video during the process of guests leaving wishes. Viewing wedding photos and videos is a great way to refresh your impressions.
Wall panel
If the newlyweds want to put all their wishes together after the wedding, then they can decorate a wall painting or a designer panel. This is also an interesting and memorable version of a book of wedding wishes. How to make such an object of the future interior with your own hands? First you need to purchase the necessary materials. You will need a sheet of plywood or MDF, cut to the required measurements. If you will cover the wooden part with fabric, then you need to purchase fabric of the color you like. If the panel will be covered with paper, then you need to prepare a sheet of Whatman paper.
Then you will need to try hard to cut out several dozen identical hearts. Guests write their wishes on hearts and put them in a box. After the wedding, having rested a little after the celebration, you can begin to design a design object that will decorate the newlyweds’ room. The hearts need to be folded in half to give them volume. You can stick them in different ways: in even rows, as in the photograph, diagonally, along the contours of a pattern, for example, a large heart or a flower.
Cover design
Instructions on how to make a wedding photo album with your own hands step by step begin with preparing the cover. As a basis, take a piece of cardboard the size of the inner pages or a little larger (a couple of millimeters will be enough). Cut out the lining material to similar sizes and glue it onto the cardboard.
Make the top layer with a hem allowance of at least 5 mm. Stick finishing material around the perimeter of the cover, mask the cuts with a sheet of thick paper or cardboard. Cover the base with decorative fabric. Look at ready-made interesting ideas for wedding photo albums to choose your decor. This is done when the cover is ready.
Wedding books or wishing tree
With your own hands you can make a very beautiful object for collecting pleasant words from guests at a wedding - this is a wish tree. You can design such a product either by investing a lot of money or without spending any money at all. It depends on the choice of materials. To design a tree like the one in the photo below, you need to use laser cutting. First you need to think about what material the trunk, leaves and names of the newlyweds will be made from.
The master will quickly cut both plywood and plastic. It is, of course, more convenient to write on a wooden plate. Then you need to prepare the panel. Glue letters to the bottom, making up the names of the newlyweds. You can write the wedding date. Then - the most important and largest part of the picture - the tree trunk. Finally, you need to leave the leaves. They can be made in the shape of hearts or simple elongated leaves.
The panel can be installed on a stand or simply placed on a table. Guests come up one by one and write wishes on each piece of paper. You can store such a picture for quite a long time.
Performance technique
Everything for a photo album can be bought at a specialized art supply store. A finished book is, in fact, a craft, the skill of its design will depend on your talent and efforts. For decoration, they usually use the scrapbooking technique, but no one bothers to rely on appliqués and drawings. Another idea on how to beautifully decorate the cover of a family photo album with your own hands is decoupage. Yes, this is quite labor-intensive, but a very beautiful, voluminous option with a touch of antiquity.
Before you begin, draw a layout by hand, make a page plan, and plan the design. This will help you save on purchasing unnecessary materials (and high-quality consumables are not cheap). Photo albums for anniversaries and weddings are made completely ready; in family and children's versions, they usually provide the possibility of inserting additional pages for photographs.
It is most convenient to design each sheet separately, and then collect it into a single photo book. See how to make a photo album with your own hands for a child with ideas for designing ready-made sheets - among them there will probably be interesting solutions for you.
A simpler analogue
If the newlyweds do not want to decorate the panel, but only want to read the wishes, then they can make a simple tree by drawing it with markers or paints on a sheet of whatman paper. A paper applique made of multi-colored leaves will look beautiful. Simple, fast and creative. After reading the wishes after the wedding, such a panel can be thrown away or stored rolled or folded.
Instead of leaves, you can plant butterflies on twigs or add flowers. Instead of a tree, you can depict a bush by attaching real branches. You can continue to fantasize.
Collection of wishes on a stand
In the photo you can see another interesting way of collecting the wishes of guests at the wedding party. It’s quite simple to make such an object, but it’s unlikely to be possible on your own. The stand consists of a persistent wooden plate in the form of a circle or square. A wooden stick is inserted into the base, on which guests will actually put cards with wishes. They can be in the shape of a heart or a flower; simple circles will also do.
In the photo, the hearts are cut out of thin plywood using a laser. But you can easily replace them with thick cardboard. Office supply stores sell glossy paper. On one side there is a drawing on it, and on the other there is a blank white sheet. You can use such products. And you can cut out any shape from them under a stencil using simple scissors.
Puzzles
Another striking representative of the so-called wish books is a puzzle that folds into a single whole. Of course, it’s impossible to do this yourself, but if you order it from a craftsman, the product will look very impressive.
And it’s convenient to save as a memory. Doesn't take up much space. To prevent the puzzle pieces from falling out, they can be placed on glue.
In the article, readers got acquainted with various options for making a book of wishes for a wedding, workshops on making them, and learned a lot of new creative ideas on this topic. Now decide what suits you best. Or maybe you’ll come up with something new yourself? Good luck!
Source