Advantages and disadvantages
As with any other wedding issue, there are several pros and cons of creating a candy bar at the celebration. Among the positive aspects are:
- it is beautiful and original;
- guests can have a snack at any time, because... the sweet table is always in sight;
- treats have a convenient and miniature shape, they are easy to take and eat;
- After the holiday, guests can take the remaining desserts with them, which will pleasantly please them;
- a separate candy bar is convenient; there is more space at the main table for hot dishes and snacks.
downside to organizing a candy bar is the financial costs. In addition to the wedding cake, you also need to take care of various delicacies, the cost of which can be high.
Each newlywed couple decides for themselves why they need a sweet table specifically for their wedding. But, undoubtedly, this detail of the holiday will only decorate it and give many unforgettable moments and positive emotions.
How to organize a sweet table
It is better to entrust the organization of a candy bar for a wedding to a professional pastry chef or a company dealing with similar issues. Be sure to check with specialists for experience in decorating sweet tables. Professionals must be able to correctly select and arrange dishes, cutlery, decorations and other irreplaceable items.
When choosing a pastry chef, check whether you can try the desserts that will be served at the wedding. This way you can immediately taste the festive sweet dishes.
In addition to the table in the hall itself, you can also prepare a small table with sweet dishes in the bride’s house. Here you will make the first toasts and take photographs before the groom takes his chosen one to the registry office.
Popular treat options
To please everyone present at the wedding, the bride and groom will have to work hard, prepare various treats for every taste and color. Below are some examples (with photos) of the most popular desserts for a candy bar.
Fruits in chocolate. Many people like the combination of fresh berries and fruits with melted milk chocolate. You can prepare several plates of strawberries for the candy bar by stringing them on toothpicks and dipping them in chocolate. An ideal treat for a summer wedding during berry picking season. Any seasonal fruits can also be used. You can place a fondue set on the table. Melted chocolate in a special bowl is kept warm all the time, for which a burning candle is installed. Everyone takes a berry on a skewer and dips it in chocolate.
About
Compliance with the topic
When newlyweds choose a themed wedding, they must think through all the aspects related to the organization. So, if a holiday is held under the dominance of a certain color, then the wedding candy bar must match. Table decoration largely depends on the style of the wedding. For example, you can organize a buffet in blue. Choose a tablecloth of a suitable shade, napkins a tone darker or lighter. The treats themselves may have elements of a similar tone. The decoration will be blue sprinkles on the muffins or pastilles, marshmallows, and marmalade slightly tinted with food coloring.
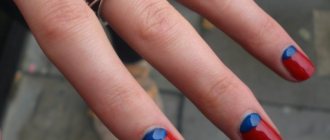
The same technique can be applied to a wedding in red. Choose a tablecloth of the desired tone, white napkins, and light-colored dishes for the candy bar. Hang red helium balloons or Marsala colors near the table and secure the garland. Desserts include cupcakes dipped in red icing, heart-shaped cookies of the main color, red apples, and berries. There can also be drinks on the table: fruit drinks and compotes.
The easiest way is to choose delicacies for a rustic wedding. Because the very concept of the holiday is simplicity and naturalness, the treats should not be elaborate, complex confectionery masterpieces. It can be:
- various cookies;
- gingerbread;
- fruits in caramel;
- popcorn;
- marshmallows, marshmallows and chocolate.
tablecloth and decorate it with patterned napkins. Or choose a beautiful wooden table and not cover it with anything. This option also looks very impressive at a wedding. You can place lighted candles, wildflowers or dried flowers, and ears of wheat on the table. Such a beautiful organization of a candy bar will be an excellent backdrop for wedding photos.
We make a sweet table ourselves
You can easily organize a candy bar with your own hands. To do this, you will need the table itself, a tablecloth of a suitable color, several boxes from which you can make tiers for placing desserts. Multi-tiered dishes are also used; they take up little space, and a lot of treats can be placed on them. If you have beautiful dishes available, then it’s worth using them. You can place cookies, gingerbreads or candies in glass patterned bowls, plates or on a wide dish. You need to use the entire area of the table, so the candy bar will look more impressive in the photo. It is also necessary to designate the location of the sweet table at the wedding, decorating it with balls, garlands, figurines or fresh flowers. You don't have to buy or order expensive, complex desserts. You can get by with regular lollipops, cookies of various shapes, sliced fruits and marshmallows. The main thing is the presentation and the right color scheme.
About
DIY candy bar, ideas
An excellent article about decorating a Candy bar “How to decorate a candy bar or a game without rules on a sweet table.” Candy bar is another Western tradition that we gladly transferred to Russian weddings, children’s parties and corporate events. The candy bar differs from the concept of a “sweet table” five years ago in the large number of decorative elements and ostentatious confectionery chic. We support the theme. The sweet table is designed to support a themed party. There are many examples on the Internet; you don’t need to imagine much. Very elegant! An incomparable sweet accent to almost any celebration. Background, tablecloth and skirt • a background is required. •the table can be stepped to make it easier for guests to find holiday decorations •you need an unusual tablecloth. Buffet skirts and draperies are often used. Dishes for candy bar There are no rules here either, sometimes it is enough to place sweets on trays, but the use of unusually shaped glassware for dragees, marmalade and lollipops has already become a tradition. I think the most important thing in this case is to ensure tightness, because all these sweets quickly air out or, on the contrary, gain moisture. However, the most ordinary baby food jars and colored glass bottles are often decorated. Designer things It is customary to use beautiful objects for decoration on the sweet table, I will quickly list: • porcelain, plastic, metal figurines and figurines • three-dimensional letters and words (“LOVE”, “Family”, names and first letters of initials) • paper decorations • natural and artificial flowers • decorative candles • photo frames with newlyweds and birthday boys • satin ribbons • soft toys • flags, caps, balloons • confetti, streamers, coins The sweets themselves, finally This is, of course, the most important component of a candy bar. Non-perishable products can be delivered in advance; cakes with cream are brought out when guests are present. What can be placed on a festive sweet table: • cake (single-tiered or multi-tiered) • cupcakes and cake pops (I apologize for using these names, but many pastry shops that you will contact, this is what they call small cakes in an edible cup “for one tooth” "and funny cakes on a stick. • meringue (a few drops of food coloring, and the meringue will turn pink, blue and green) • nuts in multi-colored glaze • marmalade • oriental sweets (baklava, sherbet, Turkish delight) • cookies • dried apricots, prunes, dates, raisins and other dried fruits and berries • candied fruits • marshmallows, marshmallows • lollipops • chocolate medals • marzipan figures Source https://snova-prazdnik.ru/kak-oformit-candy-bar/
We continue the idea of sweets, 10 MOST INEXPENSIVE SWEETS FOR A CANDY BAR You will be surprised, but quite affordable and familiar sweets can become an effective and inexpensive filling for a sweet table. 1. PASTILLA, MARMALADE OR SHERBET. Such a treat will look great on a square or rectangular plate, folded into a slide. 2. ZEPHIR. Covered with chocolate glaze, creme brulee, white and pink or just white. This treat will look great on a round, square or oblong dish. Can be supplemented with small toppers. 3. M&MS. Are you having a colorful party and need red, blue or yellow colors? Divide the bag of candies by color and pour into any transparent container. If several of the listed colors suit you, then lay the dragees in layers. 4. CHOCOLATE. White, black, milky. Break into pieces and place in a pyramid on a square plate. 5. MINI CUPCAKES. Regular cupcakes can completely replace expensive cupcakes. Decorate the top with whipped cream and berries. 6. COOKIES. Nowadays there are a large number of different cookies in stores. Placed in a mound on a beautiful plate, it will look great. 7. CAKES: eclairs, bouches, baskets, potatoes. The choice here is huge, just don't overload the table. Choose one or two types. 8. BARNEY BEARS. They will perfectly complement a party where the main theme is teddy bears. It is best to place them on an oblong plate. 9. LOLLIPPENS. Sold in specialized stores in large shopping centers. They can be placed in glasses filled with m&ms. 10. CORN STICKS OR POPCORN. It will look good in large volume vases or special boxes with a holiday theme. Don't forget about fruits, berries, nuts. Source: Workshop Gourmand
Fruits and berries The most suitable option is in the form of canapés, dough baskets or portioned fruit salads. Can be combined with fruit and berry sauces, caramel and cream.
Cupcakes Sponge cakes are small cakes, also known as muffins or mini cupcakes. The cupcake top can be made of cream, glaze, mastic or just powder. They can be empty or filled inside. Moreover, I would choose the option based on the age of the birthday boy and guests. The younger the audience, the simpler the cupcakes should be.
Cake pops Sponge cake on a stick. At first glance, everything is simple, but they are delicious. It is worth noting that cake pops are not only tasty, but also beautiful. In this case, confectioners are akin to jewelers. Small sponge cakes in the shape of a ball on a stick. The dessert is covered with chocolate, caramel or fondant of any color and decorated.
Marshmallow Airy marshmallows are just as easy to decorate. If you dip it in the icing and then into a cup with sugar decorative balls, you get an almost professional product
Macarons or macaroons French two-layer cookies with filling. Using dyes, the dough and cream are colored in pleasant pastel colors. The dessert looks and tastes very delicate. A French dessert made from macaroons and fruit filling. Dyes allow you to make dough of any color: red, blue, green, etc. A simple recipe for New Year's Macarons. Ingredients: - chopped almonds - 110 g - powdered sugar - 200 g - vanilla sugar - 1/2 tsp. - sugar - 50 g - egg white - 3 pcs - for filling chocolate paste, jam or cream Preparation: 1. Add sugar and vanilla sugar to the almonds, mix until smooth in a blender 2. Beat the egg whites until foamy, gradually add sugar, until the mixture reaches the consistency of meringue (not very dry), add the almond mixture and mix quickly (the dough should become liquid) 3. Cover the baking sheet with parchment paper, using a pastry bag, lay out round cookies 4 cm in diameter 4. Set them aside for 30-40 minutes until hardened 5. Bake for 8-10 minutes in the oven at 150 C 6. Cool and grease with cream. 7. Draw with icing. Enjoy your tea!
Eclairs, baskets of cream and other cakes Anything you can pick up in your hand and eat without utensils and practically in one bite. The main attention is on appearance
Cookies are baked in different shapes and decorated according to the holiday theme.
Marmalade, marshmallows, marshmallows, candied fruits Thanks to the variety of shapes and colors, they fit perfectly into any candy bar composition
Trifles are portioned desserts consisting of sponge cake, fruit, berries and cream. Served in transparent bowls. They are easy to prepare, look very beautiful and appetizing, and are eaten with great pleasure.
Sugar crystal on a stick
https://deti.mail.ru/child/kak-vyrastit-saharnyj-kristall-na-palochke/
Bright straw.
You just need to melt the chocolate in a water bath and dip the straw
Drinks For children under 3 years old, I always recommend water and only water in bottles with a nipple. There are too many allergy sufferers, in addition, there are those who simply have not tried juices, and carbonated drinks are completely useless. Lemonade, fruit drink, compote, juice are always in great demand. Such inexpensive but delicious drinks for the children's table. The main thing is packaging. Until the age of 12-13, the jugs on the sweet buffet have nothing to do. All drinks are served in portions in glasses, jars, bottles with personalized labels. Preferably with a straw. Hot drinks (fruit tea, cocoa) can be offered once during the allotted time. So that there is an adult at the distribution and that children do not run around with cups at this time. Milkshakes (milkshakes) Should also be served at a certain time, as they tend to settle
Recipe:
Dark chocolate and orange panna cotta Ingredients: Chocolate cream: Show more…
— Dark chocolate: — Cream (low fat) — 300 ml — Dark chocolate — 125 g — Orange zest Panna cotta: — Cream (low fat) — 300 ml — Milk — 125 ml — Gelatin — 2 teaspoons — Bitter orange confiture - 2 tablespoons - Sugar - 1/2 cup Preparation: 1. Dark chocolate cream: Break the chocolate and put it in a bowl. Boil the cream and pour it over the chocolate, add the grated zest and stir until the chocolate melts. Place the glasses in a saucepan at an angle and pour in the chocolate. Thus, place the pan in the refrigerator for 2-3 hours to set the shape. 2. Orange panna cotta: Pour gelatin into milk (25 ml) and place the bowl of milk in a water bath. The gelatin should dissolve. Bring the cream, sugar and the rest of the milk to a boil over low heat. Remove from heat and pour gelatin into cream, add confiture. Mix the entire mixture thoroughly so that the gelatin is distributed. Add sugar if necessary. Cool to room temperature and pour over frozen chocolate. Refrigerate for 4 hours or leave overnight. Bon appetit!
“HOME-STYLE” ZEPHIR INGREDIENTS: ● 4 cups sugar; Show in full…
● 2 tbsp. gelatin (20 g); ● 1 tsp. citric acid; ● 0.5 tsp. soda PREPARATION: Soak gelatin in advance (2 tablespoons with topping per 100 g of water). Pour sugar into a saucepan, add a glass of cold water and place on medium heat, remembering to stir. From the moment of boiling, time it for 3 minutes and add the prepared gelatin, remove the pan and mix everything thoroughly until the gelatin is completely dissolved. Let the liquid cool a little, but only a little while we beat it while it’s hot. Beat with a mixer for 5 minutes at medium speed, take a break for 5 minutes and beat again for exactly 5 minutes. Add citric acid and soda. Beat again, but with a hand whisk for about 10 minutes. Let the mass stand for about 20 minutes. The marshmallow mass will double in size, so there will be a lot of marshmallows. Prepare trays, cutting boards preferably made of plastic. Place the mass on boards, which must be moistened with water so that the marshmallows didn't stick. When the cakes have hardened, carefully remove them with a thin knife and glue them together in pairs. Zephyr is ready! Enjoy your tea!
Strawberry fudge Ingredients: ●340 ml sugar-free condensed milk Show in full…
●600g caster sugar ●30g butter ●275g fresh or frozen strawberries, chopped ●2 tablespoons lemon juice Preparation: 1. Grease a baking dish (approximately 23x23cm) with butter. 2. Combine condensed milk, powdered sugar, and butter in a large saucepan; bring to a boil over medium heat. 3. Add strawberries and lemon juice. Cook, stirring constantly, until the temperature of the mixture reaches 112-115 degrees or, if you don't have a kitchen thermometer, until it becomes a "soft ball" (if you drop the mixture into a glass of cold water, it should form a soft ball rather than spread). 4. Remove from heat and quickly pour the mixture into the mold. Once the mixture has hardened slightly, you can create patterns using a knife. Let cool completely before cutting.