Knitted manicure, or as it is also called “sweater design,” has maintained its popularity for several years. It is used as a winter or New Year's manicure. It goes elegantly with warm, voluminous scarves, knitted outfits, floor-length knitted dresses and other types of winter clothing. This manicure is incredibly cute and delicate. Most often they prefer to complement it with snowflakes, Christmas trees, Teddy bears and other designs of different styles. And now we will look at a selection of new options for knitted manicure in 2021.
Classic knitted manicure
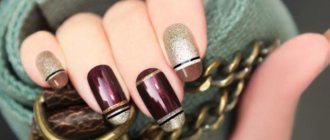
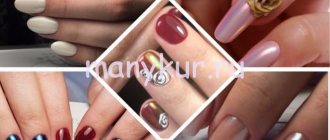
The classic knitted manicure design is most often done in bed colors, similar to the nude style. This manicure option looks very gentle and attractive. You can apply the design to one or more nails. When applied to all nails, alternate the outline of the design for a more subtle effect. Inserts of a knitted design in the middle or on top of the nail look great. For a classic style, choose tones of white, grey, beige or burgundy.
Fashionable knitted manicure 2021: sweater nails of different textures and shades
In this article you will find one-color sweater nails (oh, this nude! it’s beautiful), two- and three-color knitted manicure , voluminous braids on nails, transparent knitted patterns, sliders (stickers) , gold foil casting, matte sweater nails . And this is only a small part of the list. We have as many as 70 coolest designs here. Go watch!
@gelulicious
Multi-colored knitted manicure with gel polish
For girls who prefer brighter colors, there are no limits this year. You can easily combine several different colors. Multi-colored knitted patterns look very attractive. To give a velvet effect, you should add acrylic powder. In 2021, you can’t do without glitter glitter or a few laconic rhinestones. Combinations of milk and chocolate, red and white, peach and gray, blue or blue and white gel polish in knitted nail art look ideal.
How to draw braids
The question of how to make a three-dimensional design on nails worries many novice nail technicians. There is nothing difficult in creating a convex ornament, so if you don’t succeed the first time, then it’s only a matter of time. In order for the client to get what he wants, it is necessary to perform simple steps: after processing and drying the main layer of gel polish, you need to draw the selected pattern with a thin brush, then dry it and apply several more layers on top. Each new layer should clearly follow the lines of the previous one.
- Yeast dough for pies - recipes with photos. How to prepare a baking base with dry or live yeast
- Chiffon sponge cake - recipe step by step with photos. How to make chocolate or vanilla chiffon sponge cake
- Wings in the oven - recipes with photos. How to deliciously marinate and cook baked chicken wings
Knitted manicure with sand or powder
Knitted manicure with sand or powder is the most popular and sought-after manicure among the knitted style. This design option for nails looks plush, natural and very delicate. To complete the design, craftsmen use snow-white classic powder, and for an unusual gradient look they use colored sand. It is important to consider that the entire design depends on the powder. For example, with finely dispersed acrylic powder, the design will look more natural due to the fact that its particles settle on the varnish, acquire its color, and the sand remains permanently white.
Step-by-step nail design using a knitted technique with a gradient
One of the popular types of nail design is the ombre technique. It can be successfully combined with a knitted manicure, and the resulting result will be worthy of admiration. For this option, in addition to the above materials, you will need a sponge and colored powder.
Until the moment of applying gel polish, the process differs little from a classic knitted manicure. Your next steps step by step:
- Colored gel polish of one or different shades is applied to the nails in 2-3 layers and dried under a lamp.
- Nails are degreased.
- A colored gel (of a contrasting or similar shade) is first dripped onto the foil, and then picked up from the foil using a thin brush and vertical or horizontal stripes are drawn on the sponge.
- A sponge with paint is carefully applied to each nail, then the gradient color is dried under a lamp.
- A pattern is drawn on dry nails (braids, diamonds) and sprinkled with acrylic powder over the wet varnish.
- After drying under the lamp, the remaining powder is brushed off with a brush.
Nail design: knitted manicure with adorable Teddy bears
Teddy bears are a type of pattern that is very often found in combination with the knitted style. More experienced craftsmen depict bears with varnish or acrylic paints without much effort. But beginners will find this task impossible, because this drawing is very small and difficult to complete, so it is better to use stickers. Today, in many stores you can purchase various adhesive slides with bears and any other cartoon characters that will look great in combination with a knitted design. This manicure option looks very flirty and cute.
Winter nail designs 2021 – sweater design
This choice is more relevant to the cold season. During periods of frost and dank weather, beautiful textured patterns in the form of knitted braids and arans will add a touch of comfort and warmth. In addition, such ideas look very original and attractive, emphasizing the individuality of the style. The sweater design on nails is suitable for any length and direction of the look. This type of nail art goes well with any type of decor, but can remain discreet and laconic. Let's look at the most current solutions in the latest reviews:
- Ombre
. A gradient color transition looks very beautiful and impressive in an ensemble with a textured pattern. This coloring can be done only on the finish or used as a background.
- Nude
. Ideas in neutral colors look very gentle and elegant. Today, all shades of natural are in trend - from light ivory and delicate ivory to richer coffee with milk and warm shortbread.
- Winter
. A cozy manicure will perfectly complement the idea during the snowy season. To textured braids and arans, you can add snowflakes or images of New Year's attributes - a Christmas tree, garlands, Christmas tree decorations and more.
Sweater manicure for short nails
In modern nail art, the natural length of the nail plates is welcomed. The most popular are soft, streamlined contours – oval, almond, square. However, voluminous textures can visually add fullness to the fingers, which will make the hands bulky and exclude grace. Therefore, stylists recommend making a sweater on short nails in the Feng Shui style, highlighting one, maximum two fingers with a pattern. A matte finish will perfectly add neatness and neatness. There are no restrictions in the choice of colors, but it is better to stick to warm and pastel colors.
Sweater manicure for long nails
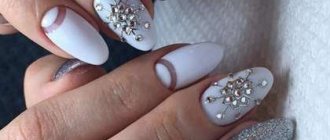
Owners of long “claws” are not limited in choosing stylish nail art. For a large-scale surface, you can use ideas with abundant decoration or stick to a restrained style. Knitted nail designs look especially impressive in dark and rich colors. The current shape is considered to be streamlined almonds and sharp stilettos. Unlike the natural length, here you can decorate all fingers, combine textured patterns with sparkles, rhinestones and stones. To simplify and save time, stylists suggest using sliders or stickers.
Knitted ombre design
In 2021, the spectacular solution of a gradient transition in the horizontal or vertical direction continues to be popular. The option with color stretching and a smooth transition from one finger to another looks sophisticated; you just need to do an ombre on the middle nail, using only 2 colors. An exciting and fashionable manicure with a gradient on one or more fingers, made in three colors, also looks good. This manicure looks incredibly charmingly stylish and fashionable.
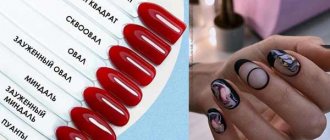
Combination of colors and decor of an oblique French manicure
A French manicure done with a corner does not differ much from the classic one in terms of color combination. The color of the oblique tip and base is selected according to the client’s wishes, the main thing is that the resulting design fits harmoniously into the image. Light pastel colors are mainly chosen for everyday decoration, but dark and bright shades (red, blue, black) are preferable only if the image is well thought out and such a manicure will not have a strong accent.
A French pattern with an oblique line is best done using various decorative elements. To smooth out the transition from the base to the oblique line, use glitter. With their help, you can hide unevenness if the manicure was done yourself.
It looks good to do an oblique French manicure using a lace print and artistic design (drawing flowers, patterns).
Craftsmen often suggest the use of rhinestones. They can highlight the border between the colors at the base and edge or create a unique pattern.
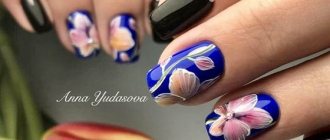
Knitted manicure: photo of Scandinavian design
The knitted design goes very well with Scandinavian style snowflakes, ornaments and deer. This manicure implies exclusively gray-brown or red-white colors. To apply a Scandinavian snowflake with clearer and more precise contours, it is better to make preliminary dot markings. Only then connect them with thin, neat lines and completely paint over them with the main color. The alternation of a knitted pattern with a Scandinavian pattern, complemented by dots and other geometric patterns, looks great.
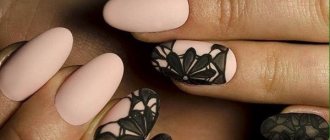
Knitted style with original patterns
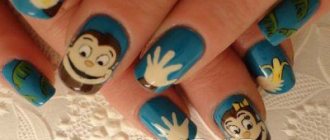
It is very rare to find a knitted manicure with the addition of sparkles, foil, film or glitter. The volumetric pattern itself is already considered a striking element of decoration. But this has nothing to do with the drawings. After all, an elegant and sophisticated image on one finger will in no way interfere with the overall look of the manicure. Popular designs in 2021 include funny scenes, colorful blots, Stone Age or ethnic style designs. It is worth noting that knitted manicure with the addition of stripes is always at the peak of popularity. For those who like sweeter and more modest designs, multi-colored bows, ornaments, grammatical shapes and flowers are an excellent option. You can combine motifs and patterns according to your desire and flight of fancy.
How to make knitted nail art
Before you start making a knitted design, your nails need to be prepared. To do this you need:
- remove the remnants of the old coating with a special compound;
- use an orange wood stick to push back the cuticle;
- trim the shape of your nails using a nail file.
What is needed to create a three-dimensional pattern on nails
Before you start “knitting” patterns on your nails, you should prepare the necessary materials and tools used in the process of performing nail art:
- basic base for manicure;
- gel polish or regular polish of one or more colors;
- thin manicure brush;
- manicure stick dots;
- top (fixing) coating or acrylic powder (or velvet sand);
- ultraviolet (UV) or light-emitting diode (LED) lamp for drying if the design is made with gel polish.
Acrylic powder differs from velvet sand in its more finely dispersed structure, which makes it possible to use it to create sophisticated patterns.
Using different colors you can create interesting knitted designs.
“Knitting” ornaments using gel polish
- First, a base coat is applied to the nail. It should be applied not only to the nail plate, but also to the end of the nail. Thanks to this, the subsequent coating will be stronger, the nails will not only not turn yellow, but will also receive a certain portion of the necessary vitamins and minerals.
- The base is dried in a lamp. The drying time depends on the chosen device: when using a UV lamp it is 1–2 minutes, and when using an LED lamp it is 10–20 seconds.
- The first layer of color coating is applied more thickly. It should also be dried in a lamp. The UV lamp dries for 3-4 minutes, and the LED lamp - 30-40 seconds.
- After this, the nails need to be covered with a second layer of colored gel polish and dried for the same time as the previous layer.
- Then, using a thin manicure brush and a dot stick, you need to apply stripes, zigzags, hooks, snakes, ticks, dots, etc., imitating a knitted pattern.
- Dry the ornament in the lamp for 3–4 minutes. (UV lamp) or 30–40 seconds (LED dryer).
- To make a knitted pattern on nails look more voluminous, the drawn pattern can be made in 2–3 layers . In this case, the drying time is the same as for the first layer.
- The resulting design must be covered with a fixing base and dried in an ultraviolet lamp for 4 minutes, and in an LED lamp for 40 seconds.
- Remove the sticky layer using a cotton pad.
To create a knitted pattern on your nails, you can use acrylic powder or velvet sand, which has its own certain advantages:
- the time required for manicure is reduced;
- 3D ornament made of acrylic powder or velvet sand has a more durable structure. According to experts, manicure does not deteriorate within 2 weeks.
A knitted manicure using acrylic powder or velvet sand is done in the following sequence:
- first you need to repeat the first 4 points described above;
- Cover the nails with a top coat and dry in a lamp for 4 minutes. or 40 sec (depending on the type of lamp);
- remove the sticky layer with a cosmetic disc;
- apply a pattern to the nail plate using gel polish or gel paint;
- Use a spatula to take acrylic powder or velvet sand. Sprinkle the nail.
- Do not remove the colored powder from the nail plate for 5–7 seconds. During this time, it will be firmly absorbed and adhere to the sticky layer of the applied ornament;
- dry the nail in the lamp for 3–4 minutes. in a UV lamp or 30–40 seconds in an LED lamp. It should be noted that in order to wear this design for a longer period of time, it must be dried thoroughly;
- After drying, any remaining acrylic powder or velvet sand should be removed using a soft brush. Manicure is ready.
Advice. To create shining nail art, acrylic powder can be pre-mixed with glitter.
Video: knitted nail art
Knitted motifs on regular varnish
If you don’t have a lamp at home to dry gel polish, then you shouldn’t be upset, because a knitted pattern can be completely depicted on your nails using regular polish:
- nails are coated with base coat and then dried thoroughly;
- colored varnish is applied in 1–2 layers, and each layer must dry well;
- Using a thin brush, the selected ornament is drawn on the nails, which should be dried;
- To obtain the effect of volumetric knitting, apply 2 more layers of varnish on top of the resulting pattern or use a lighter shade for the ornament (you can mix the main color with white varnish in equal proportions).
Video: “sweater” on regular varnish
Unique manicure in a winter “sweater” design
The “sweater” design is definitely considered winter, which is why it looks sophisticated and impressive with voluminous snowflakes sprinkled with glitter or powder. For everyday life, a transparent French manicure with elements of white snowflakes would be an excellent option. It is best to highlight the ring finger with a voluminous, knitted pattern. This nail art is most often done in pastel or white and blue colors.
Advantages and disadvantages of “sweater” manicure
Knitted nail design has become very popular because it has certain advantages over other manicure techniques:
- it looks gorgeous on both long and short nails, because many women, due to their profession, do not have the opportunity to grow or extend long nails, and a knitted pattern on the fingers will significantly decorate their hands;
- “tying” such nail art is not as difficult as it might seem at first glance;
- for a “warm” manicure, you can use both glossy and matte finishes - this is a matter of personal preference;
- knitted design has many options using rhinestones, glitter, confetti, etc. Also, this manicure involves the use of many patterns that can easily be combined with each other on different nails. In addition, a wide variety of shades is acceptable, and colors can change from one another.
- a knitted pattern can be created using not only varnish, but also acrylic powder (velvet sand);
- When creating a knitted pattern on nails, both regular polish and gel-based polish are used.
Knitted manicure creates a feeling of warmth and comfort
“Warm” design also has its disadvantages:
- The pattern on the nails often gets dirty, since the manicure has a voluminous texture, and dust and dirt get stuck under the pattern. This becomes especially noticeable if light colors are used for nail art;
- there is a risk that some elements of the ornament may fall off, and this instantly spoils the appearance of the nails;
- It takes a lot longer than usual to create a sweater design.
Knitted manicure with fluffy pile
In 2021, embossed and flat knitted patterns covered with fluffy pile on top are incredibly gaining popularity. This option indicates modesty, restraint and, at the same time, the ability to emphasize elegance. Knitted motifs on nails also reflect the unusual and original taste of their owner.
Photo ideas for knitted manicure 2021
The trendy knitted design can be created in a variety of ways. These can be voluminous as well as glossy patterns. Masters strongly advise performing a similar pattern with acrylic powder. This gives it a special effect and texture. There are a huge number of options for applying braids, dots, strokes, and so on. You just need to catch your inspiration and completely rely on your imagination.
Necessary components when applying manicure
Before doing a knitted manicure with gel polish, you should collect all the necessary components and know how and what to use them for.
| No. | Name of the component for performing knitted manicure with gel polish | Application area |
| 1. | ultraviolet lamp or LED lamp | hardening of gel polish |
| 2. | base | better adhesion of gel polish and nail |
| 3. | fixer | fixing gel polish |
| 4. | grinding (or buffing) | smoothing the nail surface |
| 5. | dehydrator | degreasing and removing excess liquid |
| 6. | gel paints or gel polishes of different shades | creating a drawing |
| 7. | acrylic Powder | creating an invoice |
| 8. | thin brush | drawing or patterning |
| 9. | brush | removing excess powder |
Helpful information! You can purchase all these items separately, but it is better to save time and money and buy a ready-made kit for applying manicure at home, the choice of which is quite large today.