Home » Beauty » Mirror manicure at home: step-by-step instructions
Today, mirror manicure is the most preferred choice for any situation. Be it a business meeting or a party, this nail design will look appropriate. You can do it yourself, at home.
There are several ways to do a mirror manicure:
- Manicure with gel polish.
- Make up with powder.
- Manicure using reflective film.
Mirror manicure with gel polish
What you will need:
- Buff.
- Varnish base.
- Gel polish with mirror effect.
- Manicure tools.
- Ultraviolet lamp.
Instructions:
This is the easiest way to make the surface of your nails mirror-like. First you need to prepare the nail plates. This is standard procedure. The surface is completely cleaned, cuticles are removed, and the nail is given a beautiful shape.
After this, you need to degrease the surface. To do this, use a buff. The nails are dried and a base coat is applied to them. It will provide maximum adhesion to the base varnish.
This procedure is impossible without a UV lamp. After applying the mirror effect varnish, you should place your fingers there for two minutes.
Little trick! In order to get the perfect result, manufacturers of mirror varnish recommend applying it in two layers and using a topcoat. It will protect your manicure from damage and preserve it for a long time.
What it is?
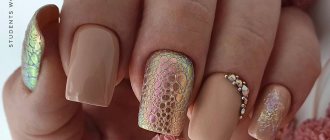
This type is called so because after the procedure the nail surface becomes chrome-plated, or mirror-like. This manicure is distinguished by its uniform coverage; no noticeable reflective particles or brush marks are visible on the nails. An ideal result is achieved through the use of special foil, powders containing finely ground polyester dust and other materials. The most popular colors are gold, silver or graphite. The chic effect creates the impression that this work is very difficult, only a manicurist can do it. However, you can master this technique yourself.
Mirror manicure: various methods of execution
You can achieve the desired effect in several ways:
- varnish (preferably gel polish);
- pearlescent sparkles;
- transfer stickers (sticking is the easiest way);
- foil.
Whatever option you choose from all that may exist, it is preferable to do it at home, since the cost in beauty salons for this procedure is too high. When done at home - minimum cost and maximum pleasure . As an example, here are several pricing options:
- In St. Petersburg and Moscow , a standard procedure costs an average of 600 rubles, with extensions (including shellac) from 1,500 rubles;
- Irkutsk, Volgograd, Samara, Krasnodar and Nizhny Novgorod - from 300 to 1500 rubles;
- Ekaterinburg, Kursk, Rostov, Kazan, Saratov and Barnaul - from 400 to 1800;
- Kazan, Almaty, Krasnoyarsk, Novosibirsk and Tomsk - from 250 to 1600, etc.
The situation is similar in Minsk, Kharkov, Dnepropetrovsk and other cities of neighboring countries.
Make a mirror manicure at home using foil
Foil for mirror manicure is sold in certain sizes and is freely available, i.e. There is no shortage, but you can also order through online stores, which simplifies the process. Note that it can be used in several ways: using one standard option or using decoupage - an original ensemble of a unique pattern is created from several types.
Mirror manicure: rubbing in
We offer a video and photo of the result of the work of masters at home using glitter rubbed into nails . Let us add on our own that the best works are obtained when used simultaneously with gel polish.
Manicure with powder, glitter and French manicure
French has been particularly popular among the fair sex for quite a long time, because thanks to it, hands acquire elegant sophistication and attract the eye. Today it is still relevant, but some fashionistas prefer to combine it with a new trend that tends to reflect surfaces. The latter was given many names: golden, lunar, brilliant sunbeam , and these are not all epithets.
It is best to combine these options using acrylic powder (special powder is sold) and pearlescent glitter , which should be scattered in regular strips along the edge of the nails. The rest of the nail can be protected with cling film. It attaches perfectly to surfaces and can be easily removed after use. With its help, you can create any shape and shape, play with colors, for example, gold glitter goes well with beige, etc. The result is a luxurious design with a durable finish.
Main features
Mirror manicure is distinguished by the fact that the nails are covered with a completely even and smooth layer, like a mirror. The surface can be given a different shade. To create it, the shape and length of the nail are not important. There are many application methods, so you can choose a mirror manicure for short nails. It is allowed to apply it to both natural and artificial surfaces. The coating can be regular varnish or gel. The effect is the play of light and colors, as well as the creation of reflection.
Mirror manicure using rubbing
What you will need:
- Buff.
- Powder with a shimmering effect.
- Manicure tools.
- Top.
- Leveling base.
Instructions:
Standard techniques are used to prepare nails. The nail is cleaned and degreased using a buff. Then you need to make the nail plate perfectly flat. This is necessary when using mirror rubbing. To do this, apply a leveling base.
Next, powder is applied to the nail. It will look good only if it is evenly distributed along the entire length of the nail. Therefore, you need to use a special brush. To consolidate the result, the nails are covered with a top coat.
The powder contains crushed aluminum powder. Its particles have a reflective effect. This looks amazing on any nail shape.
Preparation for the procedure
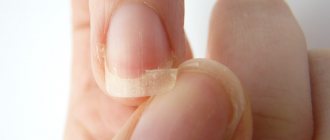
Before you do a mirror manicure, you need to prepare your nails. The first step is to thoroughly wash off the existing manicure. Then you need to hold your hands in a bath prepared from a solution of aloe extract, sea salt and medicinal herbs. Then the nails are treated with a file, a buff, you must not forget to remove hangnails.
Mirror manicure is not recommended if you have:
- peeling;
- wound;
- cuts.
A specialist can implement various designs; many have been invented. There are several ways to create it. They all vary in terms of aesthetics, durability and complexity. What makes them stand out is that most of them can be done independently, you just need to familiarize yourself with how to do a mirror manicure at home. Five methods are considered the most common.
Color selection
Every woman is individual. To choose the right color for a mirror manicure, you should take into account individual characteristics. These include the shape and size of the nail plate, skin color, and the shape of hands and fingers.
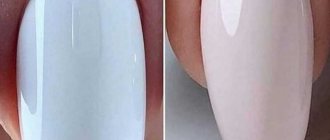
There are several universal colors that will suit almost any nail. These include pink color with a delicate pastel shade. It is neutral and will look discreet and neat. Especially suitable for those with dark skin.
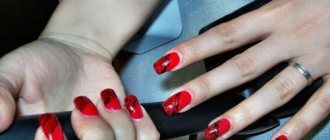
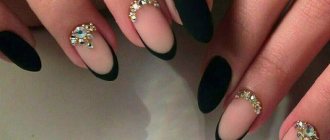
Important! Black color with a mirror manicure will look great on any skin color. Attention should be paid to the shape of the fingers. A contrasting manicure will look good only on slender, neat fingers. The same rule applies to red.
For short nails, a fashionable brown color is suitable. It goes with any outfit and is a universal option. Brown nail polish is chosen by girls who prefer classics. The color is relevant at any time of the year.
Mirror manicure color selection table:
| Thin fingers | Average finger thickness | Full fingers | |
| Light | Black, red, blue, shiny, pink, beige, brown. | Any colors will do except scarlet, green and yellow. You should avoid bright flashy colors. | Brown, pink, raspberry. Bright hues. |
| Beige | White, black, silver. Shades of red, green, blue. Cool tones. | Dark colors. Grey, blue. Cool tones. | Grey, pink, brown. Bright colors should be avoided. |
| Dark | Red, black, peach, bed colors, all shiny. | Delicate bed colors, brown, beige. Not bright colors. | Delicate tones. Bed pink, beige, peach. |
This table provides recommendations only. The choice of color will always be a personal matter for each woman. When doing a manicure at home, you need to follow the instructions.
Important! It is worth paying close attention to the condition of the skin of your hands and nails. The varnish will not look neat if the skin of your hands is dry, there are wounds and burrs. Nails should be hard. If they are soft and break easily, the polish will not last long.
To care for your hands, you should use special masks. Salt baths strengthen nails. They are made in warm water, no more than fifteen minutes.
Little trick! The manicure will remain intact if you avoid frequent contact with water. When doing household work, you should use rubber gloves. They will protect the varnish and skin of your hands.
Frequent contact with water makes the skin of your hands dry. Use nourishing cream after washing your hands. Avoid direct sunlight. This will prevent premature skin aging.
Useful video
Share this post
- Related Posts
- How to effectively whiten your armpit area at home?
- How to create a basic capsule wardrobe for the summer
- How to use coconut oil for hair?
- Eyebrow tinting with henna at home
- What to wear with a pleated skirt?
- Nail polish: why does it bubble after application, drying or the next day?
Extended nails
Manicure “Mirror nails” can be obtained by extending metal plates. This method is quite complicated because the plate must exactly match the shape of the nail. To give this specific material the desired shape, it needs to be heated. The master must have skill and skill. Only then will your nails acquire a mirror-like appearance and the coating will be even for a long period of time.
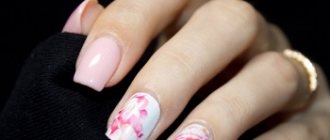
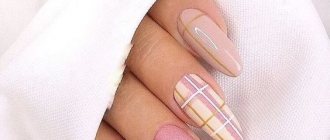
Mirror manicure 2021: photo for inspiration
Mirror moon manicure
Share with your friends!
Subscribe to our Yandex.Zen channel or Yandex.Messenger
Mirror effect varnish
A manicure procedure using varnish with a mirror effect is not difficult to perform at home. It is advisable to use special varnishes that are marked “mirror”. These varnishes have a medium consistency. To obtain a uniform manicure, it is recommended to apply it with a thick, wide brush. The downside is that up close, if you look closely, brush streaks are visible on the nails.
Before the mirror manicure procedure using varnish with a mirror effect, the nails must be prepared. Then they are covered with a layer of base, which makes the surface smoother and also simplifies the distribution of colored varnish. After drying, apply a thin layer of mirror varnish. After it sets, they paint it a second or even a third time.
Manicurists do not recommend applying a thick layer. Otherwise, bubbles will form and the metallized pigment will not be able to distribute evenly. After the polish dries, traces of it may remain on the skin around the nail. This can be easily removed with a special correction pencil; you can use a cotton swab previously soaked in nail polish remover. If desired, apply a glossy topcoat.
Ways to create a mirror effect
Now I would like to pay attention to the ways in which such a design can be made:
- Using foil
. This is one of the cheapest methods. The disadvantages are the fragility and the fact that you can quickly damage and ruin the smooth surface; - Special varnishes
. They appeared on the market not long ago, but immediately gained considerable popularity. The advantage is that they apply and dry quickly. The disadvantages include the fragility of such a design; - Special film
. Glued using a hair dryer (hot air jet). Stays on nails for about a week. But the downside is that you cannot visit the sauna, swimming pool, or take a hot shower; - Artificial nails
. They were especially popular in the 90s. Fashion is cyclical, which is why you can still see women wearing false nails. It’s worth mentioning right away that this express method is short-lived. Remember that an improperly secured nail may fall off at the most inopportune moment; - Sand
. It is rubbed into the nail plate. This method is typical for beauty salons. The procedure cannot be performed without gel, ultraviolet lamp, theoretical knowledge and skills.
As you can see, there are quite a few ways to create a mirror manicure. Let's look at each of them more carefully.
Foil
The method in which foil is used is not common, so it is advisable to learn how to make a mirror manicure yourself at home. Transfer foil is a thin layer of metallic paint applied to a film base. This material has a huge variety of colors. The foil is transferred to the surface of the nails in such a way that they are covered with an even mirror layer, without any stripes.
To obtain this manicure, pieces of foil are cut slightly larger than the nail plates. First, a base is applied to the nails, then colored varnish in one or two layers to hide bald spots - in case the foil lies unevenly.
Then you need to smear one nail with a special glue, which in its liquid state has a milky tint, and after drying it becomes transparent. Hold for a few seconds and place a piece of foil on the middle of the nail, metallized surface down. Afterwards you need to press it a little towards the edges and the center. Using an orange stick, gently, but pressing slightly, smooth the foil to remove wrinkles and bubbles. The product is difficult to adhere to near the cuticle and on the sides of the nail, so special attention must be paid to these places. At the end, you need to smooth the foil to remove any remaining glue; carefully pull the corner and tear off the rectangle.
If done correctly, a metal layer will definitely remain on the nail. Bald spots will appear if there is not enough glue, as well as if the foil is poorly leveled or abruptly torn off. The use of a topcoat is optional.
Mirror manicure at home
This concept implies the creation of a mirror effect on the nails with a real ability to reflect, its distinctive feature is radiance - shine . It fits perfectly into the spectacular glamor trends of today's realities (the Hollywood trend of nail art is now becoming more in demand).
See also...
✅ How to give yourself a manicure at home?
✅ Fashionable gradient ombre manicure: fresh photos, ideas, design
✅ How to do a manicure with shellac at home?
✅ Photos of beautiful nail extensions
Among the color leaders included in the top, we can note: gold , silver (silver or steel sheen) and black . And of course, many women are interested in topics: what is needed for a mirror manicure at home and what varnish to choose for a mirror manicure. Read on for answers and recommendations.
How to make a mirror manicure at home?
The most common option that many women tend to choose is a manicure with mirror polish . To create it, varnishes with metallic shades are used. Most often, girls prefer standard enamels, which are easy to use at home. The bottle is marked with the designation mirror , which indicates its purpose. But their main disadvantage is that they do not adhere well to the nail surface .
https://www.youtube.com/watch?v=f9vFDL4AdXI
A completely different matter is glossemi gel paint , which is designed specifically for creating an ideal procedure at home. Its main advantage is durability. You can read reviews about its use and watch videos on YouTube or a video master class in our publication a little lower.
Create a perfectly long-lasting mirror manicure - step by step
The most time-consuming option is with foil . Therefore, we will describe exactly it. Note that the foil does not have its own adhesive surface and is attached to the nails using special glue or gel polish . To perform the procedure at home, you will need five materials:
- varnish base;
- varnish in the color of the foil (not necessarily mirror, the main thing is that the color matches the shade of the sticker);
- glue for foil (can be replaced with gel polish Corazon, Bluesky, etc. - an excellent product);
- orange stick;
- buff or nail file.
Below are step-by-step instructions (the simplest method step by step):
- Do a standard manicure and degrease your nails .
- Cover your nails with base and wait until dry .
- Apply varnish to match the foil and also wait until it dries .
- Apply glue to the nail and at the moment when the glue becomes viscous (it does not dry out, but viscosity is formed!) Place a piece of foil on the nail with the metallized surface down .
- Press the foil down and spread it evenly over the entire surface with a stick .
- Remove the film from the surface and begin manipulating the next nail (perform the procedure for each unit separately).
- After manipulating all nails, treat them with a buff or a standard file .
Mirror manicure gel - varnish
The shellac procedure in a salon is one of the most expensive , but its positive aspects are obvious: it does not damage the nail plates, is quick to perform and gives a long-lasting effect . Today, shellac mirror manicure has become a trend, which can also be done at home. To do this you will need the following set of materials:
- UV lamp or LED lamp ;
- degreaser or disinfectant ;
- shellac gel polish (color);
- shellac base
- tone (mirror);
- nail file (polishing) and napkins (lint-free).
With glitter
A stylish mirror manicure at home is incredibly beautiful and easy to do, a gold manicure with a mirror shine using sparkles . They are sold in jars, you need to choose the smallest ones, similar to dust or sand, with their help you can achieve an incredible effect. It works best if done with gel polish.
Glitter is applied to the sticky gel in a generous layer (experts recommend adding several layers until the glitter completely covers the nail).
Next, you need to distribute the glitter in an even layer over the entire surface using a light brush or your fingers and remove any remaining residue from the side rollers.
Stickers
This method, as with foil, is not very common. It is the most complex and has a large number of nuances. The stickers have a special adhesive side. Before placing them on the surface of the nail, each sticker needs to be softened. Therefore it is heated.
The advantages of mirror manicure using stickers include:
- obtaining a perfectly smooth coating;
- Possibility of application on artificial and natural nails of various lengths;
- even coverage, including edges;
- availability;
- wide palette of shades;
- low cost.
The stickers are carefully applied to each nail, and the unevenness is smoothed out with a stick. If there are excess parts, they are cut off with nail scissors. The edges of the nail plates are treated with a fine-grained file. If you are not sure about the duration of this kind of mirror manicure, then the stickers on top can be coated with a special gel.
After it becomes clear how to make mirror nails, you need to try to perform a manicure using different coatings. This will help you choose the most suitable option and look excellent, unusual, original and stylish. The above useful and simple recommendations will help you make your nails beautiful at home. If you follow all the recommendations, the result will be a high-quality, beautiful mirror manicure without visiting a salon. This design looks futuristic in some way, because the nails look as if they are covered with fused steel.
Reflective film for mirror manicure
How to make mirror nails yourself without ruining your nerves? Almost every girl asks this question. The simplest and most effective way is to stick on a special reflective film, which is freely sold in any cosmetic store.
When creating a glamorous manicure using film, you will also need orange sticks, a base for applying varnish, transfer foil and varnish that matches the color of this foil, as well as a clear varnish.
Master classes
It is believed that it is very difficult to achieve a mirror shine on your nails at home, but in fact the procedure is quite simple. To begin with, it is important to choose a suitable design. If you are not sure whether you will like this shine, you can make a French one. In this case, choose the polish of the desired color, and you will have a mirror effect on the tips. The metallic sheen can be not only silver, but also gold.
The procedure must begin with hygienic treatment, and then select a suitable shape and remove the cuticle from the nail plate. Before you begin, there should be no unevenness or roughness on the surface of the nails. Next, you need to choose your coating method. Don't forget to use a base to protect your nails.
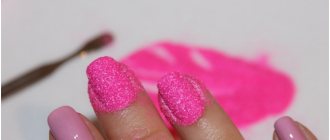
Powder, glitter and pigment
If you choose glitter, you must first dry your nails perfectly after gel polish. Then you can rub in chrome powder using your fingertip, a special eyelid brush or sponge. However, under no circumstances rub the powder in too hard. All your movements should be neat and smooth, then the glitter will not roll off. You can brush off excess glitter with a brush. Pay attention to the cuticle, as there should be no glitter near it. If done correctly, you will get a metallic shine effect, rather than the usual glitter manicure.
Foil covering
The chosen varnish color should not show through the foil, it should complement and saturate it. After transparent varnish or glue, it is necessary to lay the foil cut to the size of the nails with the metal side down. Then you need to smooth it out and press it down with a stick. After removing the foil you will get a beautiful mirror effect.
Using stickers
Cut the film to the required size. Since this material has an adhesive layer, you do not need glue. Heat the film under a lamp so that it becomes elastic. Then the material must be applied to the nail and smoothed to the base, using a cotton swab. Any excess can be trimmed off. As a result, you will get a chic Hollywood manicure.