Pink gel polish comes in many tones - from transparent, almost natural to fuchsia, there are cold and warm shades. Therefore, you can use it for both an everyday manicure with a matte or glossy top, and a bright holiday one. Various rubs, rhinestones, foil, drawings, geometry, and other decor look organic with pink. It is combined with white, black, gray, blue gel polish colors.
Why is pink gel polish often chosen?
Pink gel polish is always popular for many reasons:
- There are a huge number of shades of this color. And with the help of one of them you can give your nails a simply well-groomed, healthy look by performing an everyday design, or make a manicure bold and eye-catching.
- The color can be combined with many other varnish tones. You can match it with any decor.
- The color is suitable for young girls and adult women. It looks good on long and short nails.
- Neutral shades of color are easy to apply. Small imperfections in the coating will not be as noticeable as they are with bright gel polish.
Ideas and options
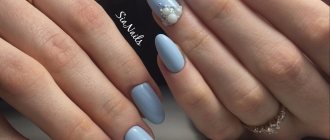
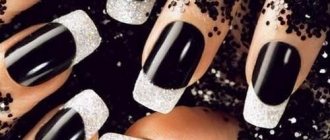
You can get ideas anywhere. So, for example, you can complement the design with rhinestones or bouillons, hand painting and unusual prints. The photo above shows an option that is very popular among young girls. Metallic bouillons on a black background give the manicure volume, and the unusual painting on pink gel polish adds a unique feature and zest.
How to do a manicure with pink gel polish
A manicure with pink gel polish is performed in several stages:
- The nails are prepared for coating, that is, they are given shape, dryness and hangnails are removed from the skin around the plates, and the keratinized layer is removed from the cuticle.
- The surface must be degreased, for which a special product or alcohol is used.
- Apply the primer, and after it dries, apply the base twice.
- Gel polish is applied to the dried base coat for the first time and polymerized.
- Then apply a second layer of flower bed to thicken the shade and eliminate bald spots, distribute it more evenly and under the cuticle with a thin brush.
- After drying, the nails are covered with top coat and polymerized in a lamp.
1 of 5
Stage No. 1
Stage No. 2
Stage No. 3
Stage No. 4
Stage No. 5
Matte pink gel polish on nails
Pink gel nail polish with a matte finish is one of the latest fashion trends:
- Apply the base product to the prepared and degreased plates and place your hand in the lamp.
- The next layer is gel polish of the selected shade, which is also dried.
- In order for the coating to become matte, you need a topcoat with this effect and another polymerization.
- You can highlight the holes using glitter mixed with a glossy finish.
1 of 3
Gel polish should be applied in two layers, usually in one pink stripe. Rhinestones look good on a matte top, if there are only a few of them, on 1-2 fingers. You can create a glossy “dew drop” finish on the ring and middle areas. Or use strips of foil, sticking them along the cuticle and one of the sinuses, in the center of the nail or across it.
Watch this video on how to make a matte manicure with pink gel polish:
Matte manicure 2021: all fashion trends
Matte manicure 2021 is multifaceted. It can be combined with gloss to create interesting and unique design options. The range of color shades of matte manicure is quite diverse. Therefore, absolutely any girl can choose the right option.
- A combined manicure looks interesting and unusual.
It means combining several techniques at the same time, each of which complements each other. In this option, the matte finish can be combined with gloss, velvet, and gradient.
- Manicure with rhinestones and small beads (imitation of rings and decorations on nails).
By adding rhinestones to the matte finish you can get a stylish and luxurious effect. Using small rhinestones, you can frame the nail hole or lay out a vertical strip in the middle of the nail plate. If a large pebble is selected, it can decorate the corner of the tip of the nail. If you are not a fan of fashionable manicure with rhinestones, then you can choose other decorations, for example, small beads, which will complement and decorate any design.
Matte manicure inlaid with stasis and stones
- Manicure with drops
This is a simple but at the same time effective option that combines matte and glossy finishes. Previously, imitation of droplets was performed using stones or rhinestones, it turned out interesting, but completely unrealistic. This design looks great in any color scheme.
How to make a voluminous matte manicure with droplets: step-by-step photos
- Manicure with a glossy pattern.
To create a design you will need gel polishes in one shade. A matte manicure with a glossy pattern made using dark shades looks especially luxurious. The most commonly chosen colors are black, dark blue, burgundy, brown, green, and red. It’s easy to make a matte manicure using the French technique. Monograms, patterns, and geometric shapes also look interesting. Increasingly, craftsmen are choosing designs that imitate zebra skin, vertical or horizontal stripes, and wavy lines. An interesting design can be made using regular tape. It needs to be glued to the nail plate at an angle and the free part covered with gloss.
- A manicure with powder looks elegant and unique.
Try making a gradient with a matte finish and add acrylic powder to it, you will definitely be pleasantly surprised by the result.
How to do a matte manicure: 2 popular techniques
Matte manicure is becoming more and more interesting to fashionistas, so many of them are trying to find information on the Internet on how to do it at home.
It is worth noting that matte manicure can be done on both long and short nails.
There are two main techniques that will help you achieve your goal.
- Manicure with matte gel polish, which does not give the usual glossiness after coating. The downside is that the color palette of such varnishes cannot boast of much variety. With their help you can create original designs and combine them with gloss. This coating is applied to previously prepared nails. To do this, a standard procedure is performed: giving the nails the required shape, softening and removing the cuticle. The oily layer is removed from the surface of the nails. After which a base is applied and dried in a UV lamp. The matte gel polish technique is identical to applying regular gel polish. If there is no matte varnish, then you can cut off the top layer of the top coat with a buff. Of course, this method is quite complicated and you need to entrust it to a professional, since the probability of ruining the manicure is very high.
- Using a matte finish. In order for glossy gel polish to turn matte, you need to use a matte topcoat. After drying it in a lamp, the sticky layer is removed. That's all, the fashionable matte manicure is ready!
4 ways to perform a matte manicure
Matte manicure with a pattern
A plain matte manicure looks beautiful, but drawings will help make it truly impressive. Of course, artists will cope with this task very quickly, but what to do if you are absolutely not friends with art? Special stickers and various stencils were invented just for you. They will help you create an amazingly beautiful design that will evoke admiring responses from your girlfriends and work colleagues.
Matte manicure with marble pattern
Matte manicure with flowers pattern
Matte twig manicure
Matte manicure with monograms
Stylish Origami designs on matte manicure
Origami design
Among the main directions, geometric designs stand out, which even a beginner can do, various patterns, monograms, imitation of animal skins are relevant, it can also be ordinary polka dots, made in contrasting colors, round, elongated drops, openwork mesh.
Matte manicure with openwork pattern
Matte beige manicure with a simple pattern
Matte manicure “veil” with a pattern
Video tutorial on how to create a beautiful summer matte manicure with a voluminous butterfly
How interesting it is to combine pink and white gel polish
Pink and white gel polish gives the image even more tenderness and naturalness; for example, this option is popular:
- On the palette you need to mix 3 different shades of pink varnishes until beautiful stains appear, you can also add lilac.
- This coating is transferred to 2 nails, trying not to disturb the design, and dried for longer than usual.
- Other plates are coated with a rich tone of the base color.
- A glossy top coat is applied to the dried gel polish and it is also polymerized.
- On nails with streaks, curved lines are drawn using white gel polish and a thin brush to outline the cuticle boundary.
- They are covered with another layer of topcoat, and fingers are placed in the lamp.
1 of 5
Stage No. 1
Stage No. 2
Stage No. 3
Stage No. 4
Stage No. 5
There are many other nail art methods that use both colors:
- French. You can draw a “smile” on the free edge, and decorate the nail plate of the middle finger with hearts or white dots to highlight the hole.
- Lunar manicure. Here white represents the hole, but you can, on the contrary, paint over the main part of the nails and use pink at the base. Or do a manicure with negative space, that is, leave areas between the colors of a natural tone.
- Geometry. In fashion are thin, clear lines in white on a pink background, which can be straight or curved, forming shapes. The latter are also painted over with the lightest shade. Or use a different tone of pink.
- Gradient. A wide strip of white varnish is placed at the base of the nail, followed by pink varnish further up to the free edge. While the coating is not dry, use a “comb” to stretch the lighter shade onto the darker one. You can also swap them.
- Monograms. They are painted on a solid pink background or on a part of a natural-colored nail. The result is dense but elegant lace.
Watch this video on how to beautifully combine pink gel polish with white on your nails:
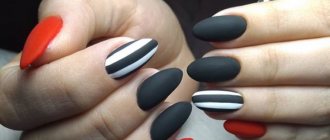
Animal print is a hit
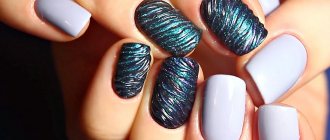
The easiest way is to draw a zebra pattern yourself, as in the photo above. To complete this you will need:
- pink shellac;
- white and black gel polish;
- base and top;
- thin brush;
- UV lamp (preferably LED, which polymerizes the material faster);
- gel polish with dense shimmer (glitter).
After standard preparation and the initial stage, all nails, except two, are covered with a base color. In this case it is pink gel polish. Shellac with shimmer is applied to the middle finger, and white to the ring finger. It is better to dry them all at the same time so that the material does not boil in the lamp. Black stripes are drawn over the dried white tone with a thin brush. As a result, they should form a zebra print; you won’t have to go all out for this. The pattern will take just a few seconds to dry in the lamp. After this, the entire design is covered with a top. An unusual version of the manicure is ready.
Gel polish pale pink in a jacket
Pale pink gel polish is used as a base when creating a French manicure. They cover all the plates entirely, and after polymerization they draw a “smile” in white. But you can do it another way:
- The prepared nails are covered with a transparent base and dried.
- The “smile” is made with pale pink varnish and polymerized.
- Apply top coat on top and place your hand in the lamp again.
With this design, you can paint 1 plate completely pink or draw a voluminous flower using different shades of color.
Pink gel polish with rhinestones
For variety and greater brightness, pink gel polish is complemented by:
- sparkles,
- rhinestones,
- different types of foil,
- rubbing,
- velvet sand,
- plasticine,
- kamifubuki.
The decor is used on all nails or to highlight one or two. It is attached to a damp top or special glue.
We recommend reading about how to apply rub on gel polish. From the article you will learn about the types of rubbing, the advantages of the technique, instructions for applying the rubbing, the technique of applying mirror rubbing, interesting nail designs with gel polish and rubbing. And here is more information about the spectacular nail design with foil on gel polish.
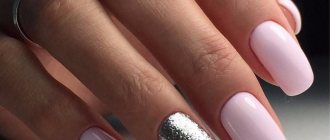
With glitter
Glitter designs can be done in different ways:
- Paint all the nails pink, but on the ring finger of one hand, strew the plate with shining decor. And on the other, a pattern or heart is laid out in natural color.
- Highlight part of your nails with glitter. For example, create a “smile” or holes with clear boundaries.
- Make a stretch with glitter. It looks more natural when the free edge is denser, and there are fewer decorative plates closer to the middle. Or they begin to decorate from the cuticle, stretching it towards the center.
- Decorate the drawing. It is performed on 1 nail; it can be a flower, an insect, or something else. The entire image is not covered with glitter, but parts are highlighted to make it more voluminous and expressive.
The decor comes in different colors, but for pink it is better to use silver, gold or something that matches the main shade. These are red, brown, purple sparkles.
Combinations with other decorative inserts
A modest pink manicure in combination with bright decor becomes more noticeable and eccentric if you use:
- Rubbing . Holographic decor or chrome is used for 1-2 fingers. Otherwise, the main color will be lost under the shining pollen. And you can cover all your nails with pearls.
- Rhinestones . Transparent white, black, emerald or red will do. You can take pebbles of the same shade as the main coating. They decorate 1-2 plates, and if each, then choose medium-sized rhinestones and “broths”.
- Foil . You can stick stripes, dividing your nails into painted and negative space. Or use laying material to make the image three-dimensional. Transfer foil is used to mark free edges, holes, or make a chaotic pattern.
- Velvet sand or glitter acrylic powder . The product can be used to decorate 1-2 nails or cover a pattern. If you use it for all plates, then you should cover part of the surface with it - the holes, the free edge, mark a longitudinal or transverse stripe, divide it diagonally.
- Plasticine . They are used to make voluminous decorative elements, usually flowers. Decorate 1-2 nails.
- Kamifubuki . You can choose any shape and size, and the colors are gold, silver, red or pink. Cover 1-2 plates completely or to a minimum, but on all fingers.
Watch this video on how to create an interesting nail design with gel polish:
Gel polish black with pink
Black gel polish with pink not only looks fresh and bright due to the contrast of colors, but with its help you can correct the imperfect shape of your nails:
- make dark thin geometric lines directed towards the free edge from the base to one point on the free edge;
- draw a “smile” on a lighter general background;
- print patterns using black varnish and stamping, dividing the plate diagonally;
- draw a dark flower on the stem, placing it in the center of the marigold.
- paint the space from the sinuses to the free edge pink and make black the part of the plate from the base to the free edge in the form of an Eiffel Tower.
A manicure looks more delicate when there is more light shade than dark shade.
Matte manicure: photo – collection
Matte manicure is a conqueror of women's hearts. He is interesting and unusual. Associated with warmth, coziness and comfort. It can be done in any color scheme: beige, black, pink and other current shades that can be seen in the photo. Matte manicure in light colors looks especially beautiful. If you cover the pastel shade with a matte top, you can get a very beautiful delicate manicure.
Popular matte red manicure
Matte cat eye manicure
Pink gel polish manicure ideas for short and long nails
Ideas for pink manicure with gel polish for short nails are different from what is suitable for long nails:
- plain;
- with pearl rub;
- with holography located along the plates to visually stretch them;
- with small rhinestones, maybe at the base of the nails or in the form of a belt;
- combination with gray varnish in different versions.
On short nails, you should not use bulky images or thick lines, especially those that cross the plate across. With long ones, you can choose any design and shade of the base color.
Beautiful manicure with rubbing
A beautiful manicure with a pink general background and rubbing can also be used for everyday use and for special occasions:
- If you use glitter powder of different tones, you will get a gradient. It can be done on all nails or one or two.
- Pearl rubbing will make the color brighter. It is best applied to all nails, but can be combined with a matte top on the ring and middle fingers.
- The free edge of the plate is marked with a holographic rub. This way you will get an unusual jacket.
- It can also be used to highlight holes. And it will be a lunar manicure.
- Gold or silver powder will help shade 1-2 nails. The entire plate is covered with it.
- By rubbing “cat’s eye” you can highlight the design. The image should be large, made in one color - black or white.
Pink with gray
Pink and gray gel polish is suitable for everyday wear, but looks non-trivial in many options:
- With a matte top and without additional decor . You can paint the nail of the middle or ring finger of both hands gray, and cover the rest with pink. Or choose the first shade for the index and little fingers on one brush, and for the other fingers on the second.
- They do the opposite - they choose light gray as the main one . And only the nail of the ring finger is covered with pink. But on it the monograms are written in gray and the hole is highlighted. This plate is coated with a matte finish, all others are coated with a glossy finish.
- Gradient . For it, shades need to be taken of different intensities: if pink is bright, then gray is muted. And vice versa. The stretch is done so that the free edge ends up with a lighter tone.
- With an image . All nails, except the one on the ring finger, are covered with light pink color and a glossy topcoat. And on the free edge of one plate, using gray gel polish, they draw, for example, a bow tie, a flower or a bird feather. This nail is coated with a matte finish.
- With alternating colors and geometry. On one hand, the nails of the little and ring fingers are covered with pink, the index and thumb are covered with gray. A gray triangle is drawn on the middle at the base of the plate, the rest is painted pink. There should be a narrow negative space between the colors, repeating the angle of the geometric figure. On the other hand they do the same, but the colors are swapped (gray on the ring and little fingers).
Watch this video on how to make a pink-gray manicure with gel polish:
Ideas with raspberry
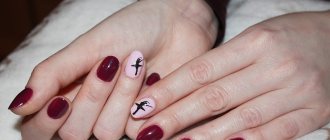
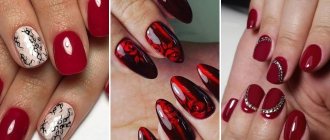
You can wear crimson coating at any age; it looks good for every day and in a festive setting in many designs:
- On the nails of the little finger, middle and index fingers, roses or hearts are painted with a glossy topcoat so that they look voluminous. On the middle one, a drawing of a flying bird is made in black.
- On one of the plates, wide leaves and branches are drawn in white so that they extend from the base to the middle. They are complemented with medium-sized transparent rhinestones.
- All nails are painted crimson, and on the ring fingers - whitened pink. A berry or flower is painted on it with the main color of the manicure.
- Transparent rhinestones are glued in the center of one of the plates from the base to the free edge. And on the next finger it is decorated with velvet sand.
- All nails are covered with crimson. And on the middle and ring fingers, the holes and “smile” are drawn in pale pink.
- On 2-3 nails, small white flowers are depicted in crimson. They should be a patterned path that follows the lines of the cuticle and one of the sinuses.
Design with hot pink
A design with a bright pink finish does not have to be monochromatic; the shades give a huge scope for imagination:
- You can leave areas of natural color on 1-2 nails in the shape of an inverted letter V. Then the cuticle will have a bright pink triangle, on which a transparent rhinestone will look good.
- On 1-2 plates, apply gel polish to 2/3 of the free edge and a little further than the middle. The natural color border follows the line of the cuticle. And on the base of the nail, 2 medium transparent or red rhinestones are glued.
- You can use silver transfer foil. There are several options: print it on the free edges or holes of all nails, decorate 1-2 plates completely.
- Draw a butterfly or another insect the width of your ring finger nail with black gel paint. You can only make the outline and decorate the rest with rhinestones.
- Cover the nails of the ring fingers with white polish and draw a bright pink heart on the side of the free edge. Use a matte top coat on them.
- On the free edge, draw short intersecting lines with white paint. And apply some small silver glitter to these areas.
Manicure with transparent pink gel and pattern
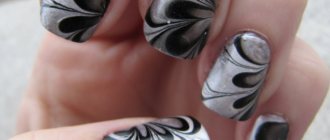
The most fashionable manicure of the season with transparent pink gel and a pattern is marble:
- The main color is applied to 2 layers of dried base, covering the entire nails.
- After polymerization, they paint it again.
- Place a drop of topcoat on the palette and combine it with a small amount of white gel polish.
- Using this mixture, marble stains are made on undried pink using a thin brush.
- The same curved veins are made with white gel polish.
- The finished coating must be dried in a lamp.
- The next step is to apply another layer of pink.
- Using the wet varnish, you need to draw the marble veins again and place your hand in the lamp.
- All that remains is to apply the top coat and dry the layer.
This way you can paint all your nails or highlight 1-2 and add rhinestones.
The pattern can be single; for pink, the following images are suitable:
- Flower bud on a stem. For the first, use a darker and denser tone of the base color. And the stem and leaves are painted black.
- Flamingo. If you depict only the head of a bird, a dark pink varnish color is sufficient. To draw the legs you will also need black.
- Bow tie, glasses, paper airplane, headphones, music notes, etc. Any image is made in a laconic style, that is, thin lines, using predominantly black color.
Watch this video on how to do a marble manicure:
Pink-blue
Pink and blue colors go well together, especially if you choose shades of the same intensity. However, pale and bright is also a good combination. You can choose one of the fashionable options:
- Gradient . Here it is better to take light pink and blue varnishes. Cover the free edge first, and cover the nails from the base second.
- Geometry . A blue triangle is drawn on the ring finger from the base to the middle of the nail, the top is outlined with a thin white line. The free edge from the top of the figure is painted pink. And on the sides of the blue triangle the natural color should remain. On the middle finger, half the nail is painted diagonally with pink, covering the free edge.
The border is also outlined in white. A triangle of natural color is left at the cuticle, and the rest is covered with blue.
- With highlighting the holes and leaving negative space . Most of the nail is painted pink. The holes are made blue, and between them there should be a strip of natural color.
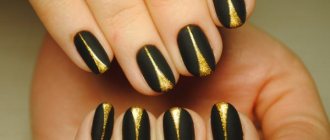
With gold
The pink and gold finish will not go unnoticed, but the design is also suitable for every day:
- If you stick kamifubuki on 1-2 nails, distributing them over the entire plate. The main color should be neutral.
- If you use glitter polish to make lines (1-1.5 mm) at the base of the nails, repeating the outline of the cuticle. It is better to use the design on long ones.
- If you use golden strips of self-adhesive foil as decoration. On the middle finger, they form corners coming from the sinuses and connecting at one point on the free edge. On the nameless one - the same, but from the middle of the side ridges to the center of the cuticle line.
- If you print transfer gold foil on half of 1 nail. And glue a medium-sized yellow rhinestone near the cuticle.
- If you make a stretch with gold sparkles. You can apply them from the cuticle with a gradual decrease in the layer above the middle of the plates or from the free edge. In the second case, less glitter should also be towards the center of the nails.
- If you draw gold monograms on pink. Decorate 1-2 nails, making a pattern along the entire plate from the area of the side ridges to the middle.
We recommend reading about how to do a manicure with red gel polish. From the article you will learn about manicure design options for short and long nails, and techniques for their design. And here is more information about how to make cat eye gel polish.
Pink manicure can be varied - not only gentle and feminine, but also provocative. It all depends on the shade, decor and imagination. Don't avoid this color for fear of seeming banal.
Shellac for short nails 2021 fashion trends photo
A beautiful coating on your nails is a sign of a well-groomed girl. What to choose from the wide variety of materials? Take a closer look at shellac, which is great even for short nails. After all, they are sometimes so difficult to cover neatly. But thanks to our useful tips, you can make your dream of beautiful and neat nails come true. Today on IrenaStyle.ru you will learn the secrets of covering short nails with shellac. Design plays an important role in coating. It can diversify your manicure and give some visual effect to your nails.
Plain coating. A coating without a design is an excellent solution for short nails. This coating does not overload the short length. Short nails love colors:
- Nude: beige, light pink, milky, coffee, etc.
- Red: a bright shade looks advantageous on a short length and does not look vulgar or provocative.
- Black: Unlike long nails, short nails with black shellac look stylish and classic.
Please note that bright shades on short nails look less provocative than on long ones. Pearlescent and shiny shades look beautiful. Avoid white on short nails. It will look as if you painted your nails with a stationery corrector.