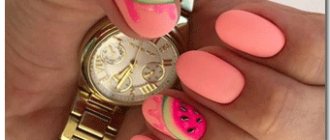
Stamping as a type of manicure art has captivated girls who prefer decorating their nails with artistic painting, but do not have the talent of an artist. Despite the apparent complexity, this method of decorating nails, if you know all the subtleties, is quite simple. With a little practice, you risk achieving incredible mastery in stamping - mastering reverse stamping or even producing your own stamping sliders. Why is this niche of the nail industry so attractive to both beginners and professionals? We will tell you about all this today.
What is stamping and what brands of stamping materials exist.
We have all heard mention of mysterious stamping in one way or another. Some people talk about it like drawings on nails, for others it’s just decals, and still others say it’s just a print. So, let's try to figure out what stamping is?
Stamping
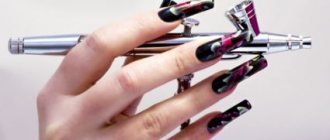
- these are drawings made with special paint, transferred from metal plates to the nail using a stamp. In this type of nail art, in order to get maximum pleasure from the process of making a print and not lose the enthusiasm for decorating your nails in this way, it is extremely important to choose high-quality materials.
Those who are just starting to get acquainted with stamping get lost among the abundance of manufacturers, not knowing which stamping is better and what brands of materials exist
. Let's get to know them better. Today, there are a huge number of brands that produce basic stamping materials (plates, stamps and stamping paint). The most popular ones include: MoYou London, Konad, El Corazon, Masura, Lesly. Girls also know the brands Essence, Kand Nail and Golden Rose Nail, who are just starting to explore this manicure niche. In addition, the market for stamping products is flooded with a huge number of different plates made in China without a brand (from the sites Buyincoins and BornPrettyStore). It is not so easy for a beginner in manicure to understand all this diversity.
Features of reverse stamping
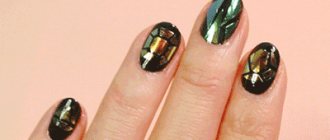
An ideal solution for fans of bright and original design. It is performed like the basic technique, but with minor differences. At the stage of cleaning, applying the base coat and base color, everything is identical. The uniqueness is revealed at the stage of painting over the design on the surface of the stamp. It is covered not with one solid shade, but with several at once. The choice is limited solely by your imagination. You can take black varnish, cover the disc with it and transfer it to the stamp. Then paint the decor with contrasting colors using an art brush. Cover it with topcoat and dry it in an ultraviolet lamp.
Next is the most difficult stage, which requires careful work. Using tweezers, transfer the resulting film from the stamp to the nail. In this case, there is no need to remove the sticky layer from the coating - it will provide additional adhesion. Distribute the pattern evenly over the surface of the plate, apply topcoat and cure in a lamp.
Which stamping is better: the highest quality and most popular stamping manufacturers.
One of the pioneers in the world of stamping was Konad
. This brand's assortment includes 48 stunning shades of special varnishes that have proven themselves to be the best. They have an average drying speed (which is very convenient for beginners), excellent density of most shades and brightness, and medium thickness, making them easy to apply and not thickening much in the bottle after prolonged use.
Also, many people love Konad rubber pad stamps for their reliability and simplicity. They are easy to clean along with the plates with nail polish remover. For cleaning, you should always choose liquids without acetone and oils so that the pattern will be transferred clearly in the future and not smeared. The secret of success in working with Konad dies is that they transfer the design using the rolling method only.
The undoubted leader in the production of the highest quality stamping plates and dies at the moment is the Mo You London
. It is distinguished by a huge assortment of different plates, combined into collections, which is very convenient when choosing and finding the one you need. Sizes of patterns on plates for every taste: from the smallest to the largest, and even solid patterns for the entire board. The high quality of engraving and the colossal number of tiles are attracting more and more stamping adherents to the brand’s products.
MoYou London use silicone pads for their stamps. Their peculiarity is that the silicone pad is very soft, pliable, and easy to use. It is easy to completely “drown” the nail into the pad; the design does not shift or smudge. The peculiarity of such stamps is that the silicone pad cannot be cleaned with HDSL, only remove the remaining paint from the pad with tape.
Of course, there are also some drawbacks to nail stamping from MoYou London and Konad - the price is quite high. However, Konad, unlike MoYou London, provides fully equipped kits with everything necessary for stamping.
Another fairly popular brand is Lesly
. It produces excellent quality slabs suitable even for long and wide nails. The engraving of the plates is of good quality, which allows you to get a clear impression on the stamp. The designs are presented both for the entire plate and on the jacket, and there are interesting small accent motifs. The advantages of stamping from Lesly are original board designs, unique author's drawings, and reasonable cost. The main drawback is the lack of knowledge and the lack of a complete set of everything necessary.
Brand El Corazon
– another famous stamping brand. The boards from this manufacturer are interesting because of their unique engraving (not as thin as that of Konad, but not as deep as that of Moyou London). El Corazon's star products are stamping polishes. They allow you to transfer the most complex patterns in a matter of minutes; the high quality of their texture along with the low price have made the brand one of the leaders in stamping nail art. Tints for regular and reverse stamping are also very popular, allowing you to create an interesting watercolor manicure effect.
The top five most popular brands is completed by the Masura
. The brand was able to win the hearts of millions of ladies around the world with its high-quality and fashionable stamping solutions. Focusing on tints (currently discontinued), varnishes and fixatives - everything that creates stamped beauty, Mazura created affordable products for creating a picturesque stamping manicure with minimal effort and time. At Masura you will find both thick enamels and wonderful shimmer coatings, ideal for subtle, sophisticated designs on the nails. The highlight of Masura stamping materials are the disappearing stamping inks. They appear in the shade or cold and disappear in the sun (currently discontinued).
Execution technique
Beginners have a question about how to do stamping. Let's look at the detailed instructions:
- Apply any coating to your nails: polish, gel polish, extensions. Perform a manicure according to all the rules.
- Choose your favorite stencil plate and nail polish color. You can do stamping with gel polish. If the set is new, remove the protective film. Apply a layer of varnish to the entire surface of the print, avoiding going beyond the boundaries of the design.
- Remove excess varnish from the stencil plate using a scraper blade. The excess will remain on the scraper and the varnish will remain on the engraved surface.
Stamping on gel polish application technology, quick painting. Geometry on nails
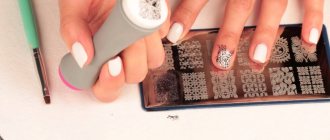
- The next step is to apply the stamp. Place it close to the plate for 3 seconds, so that the entire area of the design remains on the stencil. Be careful not to blur the image. The drawing must be clear and bright, then the print will be of high quality.
- If you are convinced of the quality of the printed image, transfer it to your nail. To do this, attach a stamp with a design to your nail. Press the stamp firmly, being careful not to dislodge it. Evaluate the result.
- Clean any remaining coating from the stencil and stamp using nail polish remover.
- Carry out manipulations for the remaining nails.
- Secure the result with clear varnish or top coat.
- Remove polish from the side rollers using a special marker with a soaked tip or a cotton swab with nail polish remover.
The art of stamping: how to choose a good stamp for nails.
Having decided on the choice of brand, are you in a hurry to start creating manicure beauty? However, in order for stamping creativity to bring you pleasure, let's figure out what it means to purchase really good stamping products, how to do it correctly and what mistakes you need to avoid.
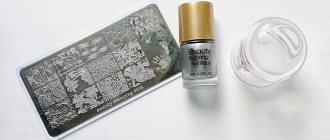
Your typical nail stamping kit should include the following tools: a stamp, a stencil (stamping plate), a scraper and varnishes. How to use them and what are they for?
Stamp
transfers designs from the board to the nail; it is the main element of the set.
When choosing a stamp, evaluate the shape and density of its pad that suits you personally. The scraper
(scraper) removes excess varnish from the plate and evens out the pattern.
Plastic scrapers are considered the most convenient to use. When choosing a plate
, it is important to find the optimal engraving depth.
For beginners, individual small drawings-elements are more suitable for acquaintance, on which it will be easier to practice with transfer to the nail. As for varnish
, it is very important to choose the right base on which you will stamp the designs. You should not choose mirror varnishes for the base, as stamping will not print well on them. Matte (corduroy, velvet, suede) and sand varnishes are ideal for the base surface. Then the drawing will be clearer and stronger. We will talk about varnishes for transferring a picture and coloring it a little lower, but for now we will analyze the technology itself.
Proper use of stamping involves preparing nails and tools. To get a beautiful design, tidy up your nails, giving them the desired length and shape. You shouldn't apply cream (this will degrade the quality of the stamping), but you should definitely apply a base coat. All tools used must be cleaned of traces of varnish (paint), degreased and allowed to dry.
Video instruction
I have selected several video lessons for you. They will show you the stamping manicure more clearly.
The following video shows how to create painted stamping.
Beautiful design, refined and sophisticated, isn't it?
You can find a lot of useful information in the next video. Here the manicurist shows and tells how to do stamping correctly. She also shares her life hacks and work experience. Don't be lazy to watch the entire video to the end!
How to apply stamping tint?
Tints
have become a relatively new product for decorating stamping drawings. These are translucent, liquid, bright varieties of varnishes used for reverse stamping or to create watercolor manicure. They allow you to create a smooth gradient transition on your nails. The tints are applied to a sponge and transferred to the nail with a blotting motion (they must be secured with a transparent top coat). The light textures of the tints do not weigh down the nails, allowing you to conveniently paint the elements of the patterns strictly in the right places in the design. Stamping tints have become a creative toy for food lovers, allowing you to create new colors by layering shades on top of each other. Fans of stamping highly appreciated the speed of drying of the tints and the ease of their removal. The stamping design with them is light, airy and feminine.
What is needed for stamping
The name of this technique speaks for itself. It involves the use of special stamps, usually reusable. The pattern is transferred to the plate from a metal disk, after which it should be secured using a convenient method. The procedure requires the following tools and materials, without which it will not be possible to perform the necessary manipulations:
- nail stamp;
- plate with a pattern;
- leveling scraper;
- varnish or gel polish;
- UV/LED lamp;
- top coating.
There must be a factory film on the plate, which is removed before the session. The stencils themselves are usually made of durable plastic, with a rubber or silicone liner inside. The scraper is also plastic - it is needed to correct the pattern and remove excess paint from the stencil. Varnishes of several colors are needed to apply the base coat and create a pattern; the finished result is secured with a transparent top with a glossy or matte finish.
If you prefer a long-lasting manicure that will look great for up to four weeks, use gel polishes instead of regular ones. Keep in mind that each layer of polymer compounds will have to be dried in a lamp. In addition, you need:
- tools for hygienic manicure (files, buffs, scissors, nippers) or a device for hardware manicure with cutters;
- gel polish remover without acetone;
- means for degreasing the plate and removing the sticky layer;
- acidic or acid-free primer;
- transparent tape for quickly cleaning stencils;
- cleansing wipes;
- nourishing cuticle oil.
With this “arsenal” you can create stunning designs on your nails in the salon or at home. This will also help save time and money that would otherwise be spent on a hand-painted design.
What plates (discs) for stamping are of the highest quality?
It is certainly a shame when the most beautiful stamping polish is transferred to the nails with an unclear pattern. The key to quality stamping is a quality slab. A high-quality plate has an optimal engraving of the design. The engraving should be deep enough to be filled with varnish well, and so that the varnish does not dry out while removing the excess with a scraper. Also, the board should not be so deep that the entire varnish is “sunk” in the engraving. Then you simply won’t be able to transfer anything to the stamp. The engraving must be uniform in depth: no holes or hills, gaps or missing areas, no scratches. The latter, unfortunately, are rarely found even on high-quality slabs and are a manufacturing defect. For a beginner in stamping, a good choice would be a plate that combines accent designs for nails of different sizes (wide and narrow, short and long). We receive good reviews about the quality of plates from Konad and MoYou London brands.
What is the best stamping stamp?
There is no clear answer to this question, since your best and highest quality stamping stamp can only be found by trying out existing options. The shape of the die frame can be round or rectangular. And its imprint pad can be made of rubber, regular or sticky silicone. Let's look at the advantages and disadvantages of each type.
Rubber stamps
have a relatively hard pad. For a high-quality print, a little pressure is required when transferring the pattern to the stamp and nail. The rubber stamp perfectly imprints paint even from not the highest quality stamping plates. With their help, you can accurately transfer the design without distortion at the stage of learning stamping. You can clean them either with nail polish remover or with tape, imprinting excess varnish on the sticky side of the tape. There are also disadvantages. Firstly, such stamps tolerate metallic or pearl texture stamping varnishes worse (paler). Part of the pattern may remain on the rubber pad. Secondly, many rubber stamps have a small pad size (especially for long nails), which causes unsightly breaking of the corners of a large design. In addition, such a stamp tends to leave wide indents and does not perfectly print the design at the side ridges and under the cuticle, which visually degrades the beauty of the design. These stamps are worth choosing for those who have short nails or have a slightly pronounced bend.
Silicone stamps
many times softer than rubber ones. The secret of working with them is that when transferring the pattern, you cannot press too hard, otherwise the stamping may become deformed. Such stamps ideally print varnishes and paints of any texture. If the design did not transfer well upon first use, it means that anti-caking agent may have remained on the pad. Gently run a fine-grit file over the surface of the stamp, without being overzealous. You just need to remove the gloss. The pad will become slightly rougher and will better tolerate the varnish. This procedure only needs to be completed once.
Silicone stamps are cleaned of excess paint only with tape, otherwise over time the pad may become unusable due to acetone. It is worth choosing this type of stamps at the stage of confident and skillful mastery of stamping skills. In addition, silicone stamps are indicated if you have brittle and thin nails. And for very long nails there is a special XL silicone stamp.
The third popular variety is sticky silicone stamps.
. Their pad also perfectly transfers the design, like conventional silicone stamps. Their difference is in the extraordinary softness of the pillow itself, in which the nail literally sinks (which is especially convenient for fragile, thin or injured nails). Despite the stickiness, these stamps do not need to be treated with a buff. You can only clean it with tape. But the method of working with them has its own subtleties:
- It is necessary to transfer the design strictly by pressing, and not by rolling (so that the flexible stamp pad does not distort or stretch the design).
- Stamping with such a stamp must be done as quickly as possible so that the varnish does not have time to dry.
- To ensure that the stickiness of the stamp does not impair the transfer of the design, its surface must be regularly thoroughly cleaned of dust and small contaminants.
- Soft cushions of sticky silicone stamps often tend to fall out of the body, so you need to try to control the degree of pressure, and before starting work, press the cushion more firmly into the body.
An interesting and very useful subtype of silicone stamps that have appeared relatively recently are transparent stamps with a viewing window.
- a hole on the opposite side of the housing. Such stamps are especially convenient because they allow you to ideally center the pattern or part of it on the nail, aiming accurately. This feature of this type of stamps made them simply indispensable for French stamping.
Silicone pads of transparent stamps do not stretch or distort the design when transferred, having optimal elasticity and rigidity. They pick up paint well from the engraving plate. The case fits ergonomically in your hand, allowing you to fully enjoy the process.
Once you've found your perfect stamp, ink, and board, it's time to get creative!
How to use nail stamping? Technology for creating stamping design.
In order for you to succeed the first time, and for the result to last longer on your nail in its original form, follow these steps sequentially:
- After prepping your nails and applying your base coat, paint your nails with your chosen base polish color. The varnish must be allowed to dry completely so that it does not deform during stamping. Drying should not be applied, as this may interfere with the quality transfer of the pattern from the board.
- After drying the base and covering it with a layer of top varnish, paint over the selected pattern on the board with varnish or stamping paint. Apply a layer of paint tightly so that the smallest details are painted over.
- Holding the scraper at a 45-degree angle, remove excess varnish from the disc with a gentle movement. You don't want to press the scraper too hard or too tightly, otherwise you will remove too much paint/varnish from the engraving and the design may not transfer completely to your nails.
- Depending on the type of stamp, transfer the design by rolling or pressing, rather than purely stamping (like a regular document stamp).
- After each nail, thoroughly wipe the stamp, scraper and disk (plate) of the HDSL. For the silicone stamp, use tape.
- Beginners will find it convenient to use the disc holder. It securely holds round boards, helping to keep your work area clean.
- When doing stamping, remember: special varnishes and paints dry without a lamp and very quickly. Therefore, try not to let the varnish dry out on the engraving plate; stamp your nails as quickly as possible.
- Having covered all the nails with the pattern, be sure to secure the pattern with a special stamping top. It will protect the manicure from damage and tarnishing, and give the design a chic shine. Special topcoats do not smear the stamping design if they are applied carefully in 2-3 strokes. At the same time, try to smear the very drop of finish on the nail, but do not touch the design itself with the bristles of the brush.
- Allow the top to dry, and your exclusive stamping design is ready to please you for as long as you want.
Every girl who has tried stamping sooner or later asks the question: what is better - buying products separately or purchasing a ready-made, as complete set as possible? We are ready to answer this popular question.
How to do stamping with regular varnish correctly
Many craftsmen prefer to work with conventional varnishes. Here the recommendations are practically no different from the general ones. The only thing is that all manipulations must be done as quickly as possible, without allowing the materials to dry prematurely. The technique includes the following steps:
- cleaning and preparing the nail plate;
- applying colored varnish in one or several layers;
- coating a disc with a pattern in a contrasting color, leveling with a scraper;
- after the coating has completely dried, transfer the design from the stamp to the nails;
- Applying a clear sealer over the design.
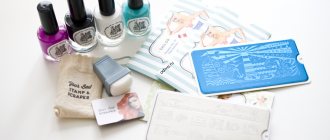
Stamping kits: everything you need is always at hand.
It is much cheaper to purchase ready-made selections of the necessary products for stamping, regardless of whether you decide on a small set or a stylish gift set. All components of such a set are only branded products from well-known, popular and reputable brands. Each set is designed in such a way that the products in it ideally complement each other in quality (both in the quality of materials and in the safety of the compositions of liquid products and preparations). Another advantage of ready-made kits is the presence of recommendations from the manufacturer. If you forgot something or are in doubt, a hint is always at hand, and you don’t need to waste time searching for information.
In the “Starter Kits” section on our website you will find a large selection of stamping kits from both the most popular brands (Konad and MoYou London), as well as kits for getting started with stamping. Any such set will be a good gift for anyone who is interested in manicure and cares about the beauty of their nails. A detailed description of the complete set and photos of examples of work will ease the pain of choice and allow you to purchase that specific set, the components of which are not yet in your arsenal of manicure beauty.
At the end of today’s review, we would also like to give answers to the most frequently asked questions about stamping (all the subtleties and nuances of stamping design are disclosed in the most complete and detailed manner in the “Buyer Help” section, “Stamping” block).