A wedding is one of the most important and exciting moments in the life of every person. An integral attribute of this celebration is the bride's bouquet. That is why many girls prefer to make the composition themselves. A kanzashi wedding bouquet attracts the eye with its originality, brightness and sophistication, and is also a reflection of the bride’s image.
Features of the kanzashi technique
Kanzashi is a technique for making flowers from satin ribbons, silk or other brightly colored fabrics. This type of needlework is especially popular in the decoration of wedding celebrations. A kanzashi flower bouquet always looks special. It attracts attention with its elegant shapes, bright colors and ease of execution.
Another advantage is that the bride puts a piece of her soul into the composition, making it truly unique and inimitable. An added bonus is the durability of these colors. The bride will be able to keep her kanzashi bouquet for a long and bright memory, and perhaps pass it on as an inheritance as a symbol of a happy family life.
Bride's comb
After watching the video below, you can make an original decoration for the bride’s hair and more.
Here we use a slightly different technique than in the master class with a boutonniere.
Editor's choice: Wedding toasts from a witness. Original ideas
We carefully fix the tape in a certain way using a glue gun onto a felt cone. We fix the resulting roses on a felt base, additionally decorating them with beads and twigs with leaves. We attach the resulting composition to the comb.
Tools and materials
To make wedding flowers, you need to purchase special tools and accessories that will be needed during the work process. A few useful tips for beginning craftsmen will help them decide on the choice of materials.
- Satin ribbons. As a rule, experienced craftswomen prefer to use satin. This material is very easy to cut with scissors and holds the desired shape well. However, sometimes, if you don’t have a satin ribbon at hand, you can use satin. But this material has a drawback: it reacts strongly to fire. Therefore, products made from such fabric can burn very easily.
- Wooden stick. This material will be the stem for the flower.
- Styrofoam ball or papier-mâché. This will be a replacement for the floral base.
- Scissors. The most common tool in any craft is scissors. To ensure a neat cut of the material, you should sharpen them well before work.
- Tweezers. Experienced craftsmen advise preparing two tools at once: one of them is straight with thin ends, and the other with curved edges. It will be more convenient for the latter to hold the workpiece during firing. Using a thin tool, small details are created, for example, stamens.
- Lighter, matches or candle. They will help melt the edges of the workpieces, thereby connecting the parts to each other.
- Glue gun. With its help, all the resulting petals are connected to each other into a single composition. Experts advise using a gun with a seven-millimeter rod.
- A ruler or centimeter for measuring pieces of fabric.
- Colored threads and needles.
The finished kanzashi bouquet can be decorated with beads, seed beads, braid, decorative feathers and lace. The design of the composition depends entirely on the imagination of the craftswoman.
Materials for wedding decoration in kanzashi style
For any decoration we will definitely need:
- scissors of different sizes;
- universal glue, or better yet, a glue gun;
- threads to match the finished product;
- thin needle and pins;
- a candle or gas burner (some craftsmen use a hair curling iron);
- accessories;
- and, of course, all kinds of silk ribbons, most often using satin.
Editor's choice: Wedding in August: favorable days and signs
It is necessary to carefully select the material for work. Soft ribbons with uneven tension will most likely ruin the entire product.
DIY wedding accessory
The first step is to create the base. To do this, the papier-mâché ball is carefully wrapped with threads of a certain color. Then a wooden stick is inserted into the base. For greater stability, it can be secured with glue. After complete drying, the flower stem is wrapped with satin ribbon. This is the basis of the bouquet.
The next step is to make the flowers. The easiest way is to create buds with pointed petals. To do this, a square with a side of five centimeters is cut out of satin and folded once. The corners of the resulting triangle are bent on both sides. Then the same action should be repeated.
The petal is fixed with tweezers. The excess piece of fabric is cut off with scissors. The cut must be burned with a lighter. Using thin tweezers, slightly move the edge of the petal so that the workpiece can stick together. For a wedding kanzashi bouquet you will need about 105 of these petals.
The blanks are fixed to the base using a glue gun. Craftswomen recommend gluing the petals in a circle, observing the following sequence: the first, second and third row of the composition consists of 20 petals, the fourth - 19 pieces of such blanks, the fifth row - 15 petals, the sixth - 9 petals, and the seventh row has only two petals. The result is a very effective composition. The final step is to decorate the kanzashi bouquet for the bride with lace, beads and feathers.
Send your photos
Do you also make beautiful crafts?
Send photos of your work. We will publish the best photos and send you a certificate of participation in the competition. Rules and form on this page. Tags: Wedding, Bottle decoration
Attention! It is better to write urgent questions in the comments on the website (form at the bottom of the page) or, better yet, directly by email. There are no notifications about comments from the VKontakte form! This form is more for feedback. 
Discussion: there is 1 comment
- Olga Parfenova:
May 28, 2021 at 03:59 pmPainstaking work, but the result is simply magnificent.
Answer
Master class for making a wedding comb
You will need:
- White ribbons (sizes 2.5/50 and 2.5/25);
- Green ribbon;
- Glue (hot);
- Candle or lighter;
- Felt;
- Fishing line and beads.
Let's start by making roses. For this product you will need 3 roses.
First you need to make a circle of felt with a diameter of 5 cm, for this you will need a compass. Two lines are drawn from the center of the circle and a triangle is cut out. After the edges are glued together you will get a cone.
KNOWLEDGE BASE: Decorating wedding wine glasses with your own hands - from simple to complex
Next you need to glue the tape to the top of the cone on the back side of the funnel using glue. Then on the back side the ribbon is folded over and glued over the previous curl of ribbon.
Now we roll up the tape and form petals, securing them with glue. The petal is formed using the method of tucking the ribbon over the previous petal so that a triangle is always formed.
Now the triangles are laid out around the entire circumference of the cone. When they completely fill the felt cone, you need to cut the tape at a certain angle and wrap it into the inside of the cone. Now all that remains is to glue it well.
This exclusive comb will decorate your hair and complement your wedding look.
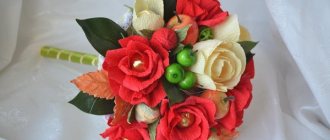
Wedding bouquet of ribbons
The next product is one of the most important attributes for any bride. Often, wedding bouquets consist, of course, of fresh flowers. But recently, due to the growing popularity of handmade works, brides are trying to find an original approach to one or another wedding attribute. A bouquet of ribbons is just one of these original methods that will not go unnoticed at your wedding.
In order to make a bouquet of satin ribbons using the kanzashi technique, you need to prepare the following set of materials and tools:
satin ribbons of various shades, the width of which ranges from two to six centimeters;- white organza (about ten centimeters wide);
- for decoration, select beads to match the ribbons;
- pins with beads already attached to the tips;
- glue;
- newspaper;
- scourge;
- wooden stick (diameter two cm, length about 20 cm);
- dense material;
- a thread;
- igloo;
- scissors;
- pencil;
- ruler.
We begin the master class by preparing the base on which the wedding bouquet consisting of roses and other flowers will be attached.
To create a round base, the following technique is used: prepare a newspaper and form it into a ball with your own hands, approximately ten cm in diameter. After this, it must be wrapped using twine for this purpose. Do this carefully so that the ball does not lose its appearance. In the resulting ball, make a depression where, using glue, fix a wooden stick. In this way, we created an element thanks to which brides can hold their wedding bouquet. After installing the handle, be sure to wait until the glue dries. The wooden stick itself is also wrapped with twine, on top of which a satin ribbon of the selected shade is already applied.
Having made the base for the wedding bouquet, at the next stage, the master class moves on to creating roses. In addition to roses, the bouquet will also contain two more varieties of flowers.
To create a satin kanzashi rose, take a ribbon of a suitable shade. You can create a monochromatic light wedding bouquet or choose a material of a contrasting color in order to make a bright product.
On a dense piece of the selected material, you need to draw a circle whose diameter is three to four centimeters. We divide each such circle into cells, as in the photo. Next, the circle is cut out, and the cells are cut along one of the sides. After this, it needs to be sewn. Thus, we get a cone-shaped figure.
Now, take a ribbon, the width of which is two centimeters, and bend its edge, and sew a square in the center of the resulting cone, as shown in the MK photo. The next step is to wrap the ribbon over the corner to the opposite corner and secure with threads. The photo shows how to correctly carry out this process. Thus, these steps need to be repeated sequentially, while the angle of rotation of the satin ribbon will have to increase. As a result, you will get the first type of kanzashi roses, which will be used to make up your wedding bouquet.
Having made two types of kanzashi roses, we proceed to the preliminary assembly of the bouquet. We take the base and begin to fix the roses made from satin ribbons on it using decorative pins with beads. This will help securely fix the roses and additionally decorate the wedding bouquet. Try to place roses at equal intervals, maintaining relative symmetry. Secure the pins among the flowers, thereby filling the resulting part of the space among the petals.
It remains to make one more flowers, which are somewhat reminiscent of chrysanthemums made from ribbons. These light and airy pieces are made from organza. Take a piece of this material, the width of which is seven centimeters and the length is more than 300 cm. Fold it in half relative to the length. Place a seam along the folded side and tighten the tape. This easy way will help you quickly make a lush flower. To complete the tutorial, attach it to the base in the empty space at the base of the bouquet.
In this fairly simple way, with your own hands, you can make a beautiful wedding bouquet from satin ribbons for the bride, which is based on the kanzashi technique.