A wedding is a very joyful and solemn event. And at the same time, such scope for creativity! You need to think through every little detail, from invitations to room decoration. Making your own wedding decoration is not at all difficult. For example, decorations for the bride and groom, hall, newlyweds’ table, photo zone, car. With minimal costs you will get original and beautiful things.
For newlyweds
For the bride you can make a necklace, earrings, bracelet, garter, hair decorations, wedding bouquet, etc. And for the groom - a boutonniere. Let's take a closer look at how to make them.
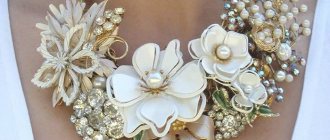
The bride's jewelry can be made from beads, precious stones, pearls, fabric, feathers, fur, etc. It is desirable that they combine well with each other and create the impression of a single whole.
Possible options in the photo:
Master class on creating a wedding necklace from polymer clay:
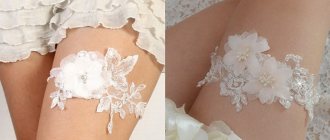
What bride can do without a garter? Of course there are none. Meanwhile, it is very simple to make from ribbons, lace, and fabric. With minimal cost and effort, you get very cute, delicate things:
The bride puts a veil on her head. You may need a headband or wreath for it. You can also decorate your hair with a tiara, crown, comb, hoop, hairpins, barrettes, flowers. You can use hats, veils, scarves, headbands. A forehead decoration - feronier, teak, lalatika - will help to add zest to the image and decorate the hairstyle.
Master class on creating hair jewelry on video:
And what wedding bouquets turn out like! In this case, there may be completely unusual solutions - a bouquet of fruit or a huge rose. Bouquets-brooches or a ball of ribbons also became very popular. Such bouquets will remain as a keepsake.
Ideas for creativity:
Article on the topic: Women's knitting patterns. Magazine with diagrams
Lesson on creating a bouquet:
The bride is dressed up, but what about the groom? A man won't need that much jewelry, but he should have a beautiful boutonniere! Depending on the image, the outfit of the bride and groom, and the style of the wedding, you can use corrugated paper, ribbons, lace, beads, pearls, and seed beads to create it.
Master class on making a groom's boutonniere from ribbons:
Fashionable bracelets
First of all, these are all kinds of baubles, different in width and color.
For example, these delicate flowers/daisies.
If you want a slightly simpler option, then you should choose the next one.
An openwork decoration will decorate any hand.
A wide bracelet seems complicated only in appearance, but the diagram shows that the implementation is very simple.
Bracelets are woven not only by hand, but it is also possible to use a homemade machine or a machine purchased at the appropriate store. This technique helps create dense knitting with various images, patterns, names, etc.
You can see how to make the machine yourself in the video below.
For the table
The table can be decorated with an embroidered tablecloth, an unusual composition, candles, and glasses. Of course, we need wedding champagne, which stays with the newlyweds until their first anniversary and the birth of their first child. The bottles can be decorated with symbolic outfits of the bride and groom made of ribbons, fabric, and paper. Examples of champagne decoration:
Decorating wedding champagne and glasses step by step:
There is usually a wedding composition in the center of the table. Watch the video to create one of them:
Candles in unusual candlesticks, as well as floating in wide transparent vases along with flowers, will harmoniously fit into the decoration of the newlyweds’ table. We should not forget about the symbolic family hearth.
And this is a master class on decorating wedding candles:
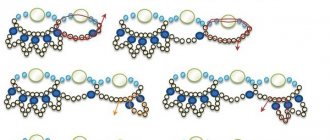
Product assembly procedure
You need to measure 16 pieces of thread and tie a knot at the end of each piece, leaving a short tail.
Then put a row of beads on each piece. The order is special: first a pair of the same color, then 6 pieces. another. The upper, final beads are of the original tone. You need to tie a knot at the end.
We make the rest of the blanks in the same manner. We lengthen each segment with beads already strung in half, fastening the upper parts with wire, see photo. To make the folds look neat, we string the hat. Next, you need to form a special loop from the wire and fasten the earrings (bases for earrings).
Even inexperienced needlewomen can make this entire simple journey. By the way, it’s easy to make the brushes longer or shorter, or significantly thicker.
In addition to the idea of creating earrings using this method, you can weave an original decoration for keys or hang such a tassel on a backpack.
NOTE!
Washing a down jacketWhat you can make from foamiran with your own hands: interesting ideas and photo examples of crafts
- Nutrition for pregnant women
For photo zone
This is a relatively new trend - the creation of a separate photo zone at a wedding, but has already won love and recognition. To decorate the photo zone, you can simply pull up a large banner with an inscription or photo of the bride and groom. You can order it at any photo salon, and come up with the external design yourself. The slate board also looks unusual, where each guest can leave his wish to the young people.
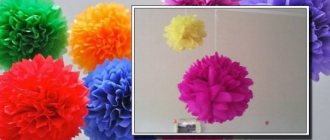
A more traditional option is a flower wall. It looks very bright and festive. Flowers can be either real or made of paper. A more unusual option is a wall covered with greenery and moss.
Flowers or hearts can hang from the ceiling like a garland. Instead, you can use multi-colored ribbons.
Hanging picture frames look beautiful. Arches and balloon compositions can also be used as decoration for a photo zone. A few photo ideas for creativity:
Related article: DIY pasta angel: master class with photos and videos
Master class on creating a wedding photo zone:
Interesting video: “Ogalala” necklace – master class
You will need: margaritas (pearl beads) No. 10 in different shades, beads in the amount of 41 pcs. under pearls, fishing line No. 02, scissors and a lighter. Process in detail:
We string a small bead onto the fishing line and move it to the end of the fishing line, stepping back a little, leaving room for the clasp. Next, we put 16 margaritas on the needle, then a bead and pass the needle into the third typed margarita from the bottom up.
We tighten it and in the opposite direction we pass through the pearl again. The bead turns out to be in a ring. We pass the needle into the outer margarita near the bead from top to bottom so that it turns towards the next pearl. Next, we collect 13 margaritas, a pearl, count three beads from the key (previous) and draw a needle into the 4th from bottom to top.
We tighten, unroll the needle and pass again into the cast-on bead, then into the first bead from top to bottom, as in the previous step.
You need to remember that the first time we score 16, and all subsequent times – 13 margaritas. The pattern is repeated until the length you need is approximately 43 cm.
In the next row from the beginning of the chain, we pass the needle through the 2 outer margaritas, put 3 on the needle and through the next two we insert the needle into the third. Again we dial three, skip two and go to the third with a needle. Small ruffles form. In this way we go through the entire second row. In order for the flounces to lie flat, the weaving must be tight.
Interesting! You can read more about beaded necklaces here. This material also makes beautiful bouquets. Here are examples.
At the end of the second row, we put 5 margaritas on the needle and go through the middle bead of the previous row. We select the pattern so that the product is facing you. We go through the entire row in this way. At the end of the rad, to start the next one, we insert the needle through two beads to get into the third. We collect 7 beads and pass the needle into the central bead of the previous row.
The next row is 9 pieces, we continue in the same way as the previous ones. If you want to make the product more magnificent, you can continue weaving, if not, then you can leave it like that. We trim the final row with silver beads.
We bring the needle to the middle of the previous row and collect 3 beads, making an indent after two. The result is a picot pattern. We go through the entire row and fasten the clasp - we make it according to your desire, you can lengthen the product with a chain.
For a car
To decorate your car, you can use a combination of different textures and materials. Ribbons, organza, and satin are often used. The car is decorated with flowers, bows, hearts, rings, and balls.
An unusual solution could be painting the car. To do this, you can draw any picture, make any inscription. A large assortment of easily washable paints allows you to paint even the entire car if desired. The only drawback is that the paint is easily washed off by rain. Therefore, this design option is only suitable for good weather. If you don't know how to draw, a set of stencils will help. You can make them yourself. All you need to do is print the design on plain paper, glue it onto cardboard and cut it out along the outline.
Decoration options in the photo: