Paper wedding decor does not lose its position year after year due to its simplicity, originality and low cost. If you do not have the opportunity to order complex and expensive decorations from a professional, you can easily create colorful and unique decor on your own. All you need is a few rolls of special paper from which you can create amazing compositions.
Don’t be afraid to ask for help from your girlfriends and groom: with a large and cheerful group, you can create the necessary decor much faster, and your loved ones will be pleased to take part in the wedding preparations.
Advantages of paper wedding registration
Decorating with paper will make your wedding unique, since you can come up with your own decorations, combine them with each other and create a unique design. The wedding website svadebka.ws is confident that paper decor has many more significant advantages:
- You can save a significant portion of your budget because paper wedding decor will cost you very little.
- You can create your own paper decorations, which will allow you to feel even more involved in the holiday and show your creativity. Moreover, to create paper flowers or garlands you do not need serious creative skills: just watch a few video master classes so that you can create beautiful decorations.
- Paper wedding decorations with voluminous flowers, fans and garlands will help disguise the pale and boring walls of the banquet hall.
- You can use paper to create decorations in any color scheme, so they are suitable for celebrations in any palette.
Paper wedding decor
The portal for lovers Svadebka.ws is confident that paper decorations for the holiday will be in demand among newlyweds for a long time. What options for paper decorations can you use to decorate your celebration?
Wedding flowers made of paper
Decorating weddings with paper flowers is one of the most favorite ways to decorate a festive space. Paper wedding flowers can be of different colors and sizes, which allows you to fit such decorations into any wedding style.
Volumetric buds are suitable for decorating the walls of a banquet hall, as well as chairs and tables. Paper flowers for the bride and bridesmaids are often used in photo shoots, which allows the photographer to take quite original pictures.
If you like decorating your wedding with voluminous paper flowers, you can decorate your wedding arch with them for off-site registration. Such decorations will cost you much less than fresh flowers, and you won’t have to worry about the freshness of flower arrangements. If you are worried that a wedding arch made of paper flowers may lose its presentable appearance due to bad weather, you can use special paper, for example, foil, which is not afraid of moisture.
Paper garlands
You can also decorate your celebration using paper garlands, which you can easily make yourself from hearts, circles, triangles, cranes, doves, etc. You can use such decorations both in the banquet hall and at off-site registration.
Paper letters
Letters for a wedding photo shoot, made of paper, can be an excellent accessory for a banquet: they can be used to decorate the wall behind the newlyweds’ table or their main table.
You can make paper letters using special layouts and templates that you can easily find on the Internet. For such decorative elements, thick paper that will not wrinkle is best. In addition, you can use a cardboard base to create voluminous accessories.
Paper fringe
Paper fringe is widely used by newlyweds to create a bright and stylish decor. Making it is quite simple: you should cut thin strips of paper, combining them into bunches, or hang long garland strips, in which the right and left sides will be finely cut, which will create a fringe effect. You can decorate a photo zone, the wall behind the newlyweds’ table, the ceiling, chairs, etc. with such decorations.
Decorating the hall
The decoration of a banquet hall can be not only a screen with paper flowers, but also the most ordinary chairs and tables.
They can be decorated with large paper buds or garlands of not very large sizes. Also, almost any unremarkable room can be transformed by hanging paper flowers from the ceiling or beautifully placing them on the walls.
DIY paper decorative elements
Decorating a wedding hall with paper accessories will require a minimum of physical and financial costs from you, since you can make such decorations yourself. To make it you will need paper, glue and scissors. Moreover, some elements, for example, large wedding flowers, can be made from both colored paper and newspapers!
To make large paper flowers, you will need to cut out a large number of petals of varying sizes. Each of them needs to be given volume using scissors, making the petals not straight, but slightly curved. Next, you just have to collect all the petals together, starting from the larger ones and ending with the smaller ones. You can secure the composition with glue or a needle and thread. Paper wedding flowers can be supplemented with a small core to make them look as natural as possible.
Decorating the wedding registration and hall with flowers and other paper accessories is very popular among newlyweds who have a limited budget. However, such decorations can be present at the most expensive and exclusive celebration. If you really want to have a hand in creating a festive atmosphere, don’t be afraid to realize your creative ideas: make decorations to match the tone of your celebration and decorate the festive space with them!
Today I have collected several simple, but quite effective ways to decorate a hall (assembly, music) for a children's party.
The downside of this idea is that creating paper decorations takes a lot of time, so if we are talking about decorating a school hall, I advise you to conduct several master classes with children of middle and high school age. This is the only way to get many of the same elements for your holiday decoration.
How to make an arch from paper flowers. Wedding decorations. Master class “Paper flower”
In recent years, decorating with paper flowers has become increasingly popular.
And this is not surprising, given that interest in so-called eco-weddings and other “eco-friendly” special events is growing every day. If you think that paper decor looks cheap and will not help you create a truly chic and memorable holiday, you are very mistaken.
Naturally, even high-quality decoration with large paper flowers will cost you significantly less than similar decor, for example, made from fresh roses or peonies. But in beauty it will not be inferior to the latter.
Separately, it is worth mentioning that creating the flowers themselves also requires considerable effort from decorators. They have to choose and offer clients a great idea, and put it together, bringing the idea to life. Today, wedding decorations with paper flowers are relevant literally everywhere. Let's consider several interesting options.
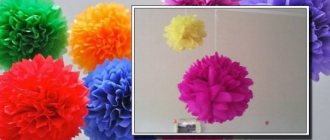
Large voluminous flowers and pompoms
Pompoms of different colors and sizes can be bought in online stores. They will be delivered folded, all you have to do is fluff them up.
If you have time and free hands, you can do it yourself.
I won’t repeat myself, I’ll just point you to my article, which contains three examples of fairly large paper products. Just be careful, some flowers are made from crepe paper, while hanging balls and floor flowers are made from tissue paper.
We follow the picture, there is a description:
How to decorate a hall with such flowers?
- can be hung from the ceiling
- attach to the edge of the stage (as a rule, there is always something to cover there :-))
- hang vertically on ribbons along the edges of the stage
- lay along the edges of the “carpet” path along which graduates solemnly walk
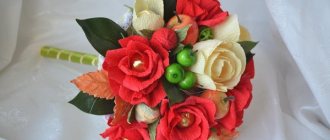
Corrugated paper flowers
There is no way to do this without collective creativity. But! If you make a sketch 2-3 months before the event, you can quite manage to do everything. Again I’m sending you to my article with 10 master classes on making flowers and bouquets that will decorate not only the stage, but also festive tables (follow the picture):
By the way, ideas can be taken from newlyweds, whose tables are decorated with living plants. What a difference, actually! These are charming examples of flower arrangements that will look very festive even on paper!
Master class on making paper flowers
There are various workshops on making flowers. Even if the flowers are made using the same technology, depending on the size of the flower and the number of petals, they can look different and at the same time look original in their own way.
KNOWLEDGE BASE: How to make your own wedding invitations in the form of an ancient scroll
Option 1 (making small flowers).
Necessary materials:
- Cardstock (thick paper for scrapbooking) is white, you can use embossed one;
- Distress ink;
- Patterns of flowers of different diameters;
- Brads;
- Half a bead;
- Glue;
- Scissors;
- Hole puncher;
- Container with water, with a sprayer;
- Awl or knitting needle.
First you need to cut out flowers (at least 4 pieces of different sizes). In order to make the flower more magnificent, it is better to make 7 blanks, or even more.
Then the blanks, using a sponge or cotton pad attached to a pencil, need to be painted with ink from the center of the future flower.
The painted blanks are stacked one on top of the other and the middle is punched using a hole punch.
Then the layers of petals are distributed in a checkerboard pattern and fastened with brads.
The next step is to sprinkle the flower with water.
Using an awl, it is necessary to lift and at the same time crush the petals, thereby, as it were, closing the bud around the brad.
As a result, the resulting bud must be squeezed tightly in your hand, and then carefully unfolded and the flower left to dry.
After the flower has completely dried, you need to remove the brace, glue all layers of petals, and decorate the core with a bead.
KNOWLEDGE BASE: Making wedding table decorations with your own hands
Option 2 (making giant flowers).
Necessary materials:
- Corrugated paper, preferably in different shades;
- Thick cardboard;
- Scissors;
- Petal patterns;
- Glue.
First you need to cut out the petals, the larger, the more magnificent the flower will be, and a large circle of cardboard. Then, flatten each petal on one side (the blunt end) and glue it onto the cardboard in a checkerboard pattern, layer by layer. The core can also be made of corrugated paper and glued in the center of the resulting flower.
Option 3 (pompoms).
Necessary materials:
- Corrugated paper;
- Scissors;
- Clip;
- Strong thread.
Fold sheets of paper of the same size into a “stack” and then into an “accordion” and fasten the center with a paper clip. Then use scissors to trim the ends of the paper into a semicircle or a pointed shape. Next, you need to remove the paperclip and tie a thread instead; the ends should be long, since they will be used to attach the pom-pom to the ceiling or with other pom-poms. Then carefully separate layer by layer and fluff the petals.
With paper flowers you can decorate not only the hall where the celebration will take place, but also tables, chairs of the newlyweds and guests, as well as a table with sweets and a wedding cake. In addition, paper flowers can be used to make a magnificent bouquet for the bride and a boutonniere for the groom.
How to decorate a hall with voluminous garlands
The point is this: you need to make three-dimensional figures from paper, which are then strung at some distance from each other on threads, fishing lines or thin ribbons. Such garlands hanging from the ceiling will greatly decorate a music or assembly hall.
Here is my example - pigeons in the clouds: I print out a diagram of a paper dove (by the way, you can print 20 more diagrams of different animals from here). For one garland we need two such birds. Cut out and fold along the folds, looking at the drawing in the right corner.
We will alternate pigeons with paper clouds like these. I don’t give you a diagram - we randomly cut out identical parts from 2 sheets of A4 format, bend them and fasten them in the center with a stapler. In a large figure, I cut out a small detail inside. This will also be a small cloud.
All! All that remains is to assemble our voluminous garland onto a string! I did this with a needle, securing the parts simply with a “step back” seam so that they would not roll down.
How do you like my pigeons in the clouds? By the way, these garlands spin very beautifully from any air movement. In the diagram the dove has legs, but we don't need it to stand on the table, I just made a curve at the bottom.
Wooden arch
Working with this material must be very delicate. Oak, beech, mahogany are suitable, but pine is no worse in strength - durable and inexpensive wood. Any wood must be well dried so that it does not warp or dry out.
The arched part is made together with the door, being its upper part. The door ramp should also have the same top configuration. A solid arched opening is made from wood, preferably with one beam.
Let's consider not an arch compatible with a door, but an open arched opening. The work occurs through a number of stages:
- the fastening frame is mounted;
- prepared parts are stacked and connected;
- possible voids are foamed and puttied;
- external cladding is applied.
Cardboard letters
The inscriptions on the back of the stage are a weak point almost always and everywhere. The letters are poorly painted, the letter spacing is not maintained, and everything, as a rule, looks unprofessional.
If possible, it is better not to do this at all :-). But there are times when inscriptions or numbers are required. For example, a school anniversary.
I suggest decorating large cardboard letters with small flowers from colored napkins. The work is painstaking, but the effect is quite interesting.
The napkins are the most ordinary, small ones. One flower requires 2 napkins. Place them folded one on top of the other, draw a circle using a saucer, and cut them out. We fasten it in the center with a stapler. What to do next can be seen in the picture. We fix the resulting flowers with glue on a cardboard blank with numbers or letters.
Ready-made three-dimensional paper decorations
Please appreciate my enormous work - articles with pictures that I have prepared for your convenience. She found the best examples of design, gave advice on installation and assembly :-). All these elements are quite LARGE, perfect for the hall, the price is quite reasonable.
I wish you pleasant viewing (click on the red words):
Read more about accordion balls here (many examples).
Here's everything about ready-made paper pompoms with a link to the site.
Large voluminous stars (56 cm in diameter) - here with examples
Multi-colored paper pom-poms-tassels are also a great decoration, look at the pictures
And here are some more honeycomb balls. What a beauty, look!
Do you know what forfeits are? These are fans for decoration. Adore!
An important decorative component of a wedding is the wedding arch. This element of the ceremony is used outdoors, but is often installed in the festive hall after registration. You can make a wedding arch yourself.
Functions
The founder of the tradition is Ancient Egypt. The Egyptians believed that the wedding ceremony held under the vault was blessed by the gods.
In the West, an arch of flowers for a wedding is the main element of the ceremony.
Modern newlyweds are increasingly decorating outdoor weddings and banquet halls with this fashionable accessory. Various shapes and materials allow you to design your own wedding arch. The photo shoot against her background looks touching and unforgettable.
Today, this fashion accessory can be rented, bought from a designer, or made with your own hands.
What are we decorating?
Paper flowers are universal, as they can be used to decorate almost any moment of a wedding celebration. First, let's list what can be decorated with them:
- wedding procession;
- arch;
- screen - background for the bride and groom;
- the hall where the ceremonial part takes place;
- various pieces of furniture;
- use during a photo shoot.
However, these are not all the possible options for how you can use paper flowers for a wedding.
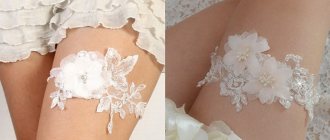
Brides who care about the environment and strive to keep as many flowers alive as possible are happy to bring a floral bouquet made of paper to the ceremony, and decorate the buttonholes of the groom and his friends with unusual boutonnieres made of the same material.
Forms
The “vault of heaven” comes in different shapes:
- rectangular (letter P) symbolizes home comfort, prosperity, well-being in the family;
- the oval one represents a horseshoe that brings good luck (in the classical variation it is decorated with a large number of flowers);
- the suite identifies absolute happiness in marriage (represents a corridor formed from several arches);
- in the form of a heart as a symbol of love;
- square ones mean stability;
- triangular indicates the desire to develop;
- hexagonal (hexagon arch is the most popular shape).
Geometric wedding elements are becoming more and more desirable among young people. They are wooden, metal or plastic. A round arch for a wedding is an excellent photo zone.
What forms are there?
In the form of an arc or horseshoe
One of the most common and simple forms, it can be decorated with anything: flowers, balls, and ribbons. It is generally accepted that this option promises good luck and success to newly-made spouses. Therefore, it is perfect for couples who believe in folk signs.
If you have a classic wedding celebration, then it is appropriate to decorate the “Horseshoe” with flowers and white fabric, you can also add some bright satin ribbons or balloons. For the “Eco” style that is popular this season, decorate the accessory with tree branches and greenery. On the “Sea” holiday the following is used in decoration:
- shells;
- corals;
- anchors;
- shells;
- paper fish;
- plants and fabrics in gray, blue and white tones.
In the form of a square or rectangle
This option is a symbol of home, reliability, prosperity, prosperity, family comfort and hearth. A structure with a roof will protect the family from envy and the evil eye.
These arches most often turn out to be large and bulky, and therefore it is recommended to make them from durable metal or thick wood.
Heart shaped
Undoubtedly, the most romantic form for a wedding, which will once again emphasize the love, passion, tenderness and sincere feelings of the couple. In order for the “Heart” to stand steadily, the frame is made of metal-plastic, but sometimes it is replaced with another option - balloons, which are mounted on a specially equipped stand.
Enfilade
A peculiar series of arches, consisting of several identical shapes. They create a beautiful corridor, following one after another, through which the newlyweds solemnly walk to the ceremony site.
The enfilade can rightfully be considered the most luxurious option, which looks very impressive and symbolizes the endless happiness of a young family.
In the form of a circle
When choosing a round arch, a ready-made frame of the appropriate shape is used. It is most often decorated with flowers, greenery, ribbons, fabric, various vintage items, paper lanterns, lace and much more.
Shaped like the letter "P"
The U-shape is the easiest to make; it is only important to secure the base of such a structure well, for which it is best to use PVC or wood.
For an outdoor celebration, decorate the accessory with light fabrics - organza or a veil. For a “Russian folk” wedding, use chintz; for a “Retro” wedding, use velvet, silk or satin. Flowers, greenery, balloons, ribbons and much more are also suitable as decoration.
Alcove
Another variation associated with home comfort and warmth. The easiest way is to find a ready-made building and decorate it in the desired style. To decorate a wedding gazebo, use light, flowy fabric, organza and veil, bright satin ribbons, flowers and balloons are suitable.
In the form of doors or gates
Antique doors or gates will also look very interesting at your ceremony; you can decorate them with anything:
- tree branches;
- greens;
- flowers;
- beautiful fabric, such as velvet or organza.
Required tools and materials
An arch for a wedding is easy to make with your own hands. The basis of the structure is made from any available means.
Most popular material:
- tree branches that are tied at the top with ribbon to form a vault;
- metal pipe (collapsible frame);
- plywood;
- wood (carved);
- plastic.
The materials for decoration will be:
- live, artificial, paper flowers of various sizes;
- all kinds of plants;
- helium balloons.
Drapery with fabric and tulle is a wonderful decoration for a wedding arch.
Decor
When choosing an arch for a wedding, newlyweds first of all pay attention to its design. Let's look at the most common decorative elements used to decorate this holiday accessory:
- balloons are one of the simplest and most budget-friendly ideas. A fishing line is tied to the frame of the structure, and balls are placed on it;
- flowers are a classic that will suit any wedding celebration. You can decorate with both live and artificial ones; the first option will be more expensive. To prevent plants from wilting, they are placed in capsules with a special solution. And the flowers are attached using fishing line, multi-colored ribbons or tape;
- fabric is another common way to decorate arches for off-site registration and weddings. Designers advise using translucent lightweight fabrics, for example, organza, tulle or veil. If you are planning a canopy or lambrequins, then it is better to take a heavier material, it could be silk or satin. The fabric is secured with ribbons and pins.
We make a wedding arch with our own hands
Master class - an arch made of balloons for a wedding.
To make it, you will need white and blue balloons of the same size, which are immediately fastened together in pairs.
Let's look at how to make a “vault of heaven” using a step-by-step example:
- We connect 2 pairs of balls together, forming a four.
- We make the required number of fours.
- We string fours onto the fishing line.
- We attach a garland of balloons to a rigid frame made in advance.
Rigid fastening is especially necessary if the wedding takes place outdoors. Balls can be easily replaced with large paper pompoms and peonies.
Another DIY wedding arch and step-by-step instructions:
- Make a drawing of the future arch, calculate the dimensions according to the premises of the banquet hall.
- The frame is installed in wooden formwork, filled with cement, first leveling it with a level.
- After 2-3 days, check the structure for strength. She shouldn't wobble.
- Decorate the frame itself with beautiful flowers, greenery, autumn leaves, ribbons, and garlands.
This decorative element will help you save money and spend your time productively.
DIY wedding arches, photos of which are above.
How to make it yourself
Many people make such an interesting element for a wedding as an arch on their own. In this case, the whole process can be divided into two stages: preparing the frame and decorating it.
Making the base
Made from wood
The tree is often used to decorate a wedding day. Its advantages include:
- low cost of production;
- does not require any special skills;
- just find the material.
The only negative is the limited choice of shapes, since it is best suited for a “U-shaped” arch.
Option 1. Logs.
The easiest way to make it yourself, but the result is no less beautiful. We will need:
- Saw.
- A screwdriver and screws or nails and a hammer.
- Shovel.
First, we look for suitable trees. The goal of the search is three not very thick trunks more than 2 meters high. We cut them down and cut off the branches, because we won’t need them. Next, measure the required length of the side supports and saw off according to the measurements. Usually they make 2-2.5 meters, but in general the choice depends on the height of the newlyweds. Then we prepare the upper beam. On average, its size is 1.8-2.2 meters. The main thing here is that the bride and groom feel comfortable going through it together.
When the basic preparations are complete, it's time to put the resulting parts together. We do this using self-tapping screws or nails, whichever is more convenient. After all the details are fixed, we dig in the arch in the place where the wedding ceremony is planned. That's it, the base is ready, all that remains is to dress it up.
Option 2. From poles.
For self-production you will need:
- 2 flower pots or buckets;
- 3 thin logs, the length you need;
- dry building mixture, such as cement or tile adhesive, but something with a gypsum base is best, as it dries faster. Or you can get by with regular sand;
- 2 PVC pipes, approximately equal in length to the height of the pot or bucket from point 1;
- some greenery or decorative moss;
- plastic clamps or strong thread.
First of all, dilute the mixture according to the instructions. We take a bucket, install a PVC pipe in its center with the hole facing up and fill it with solution. Let it harden, but the duration of this process will depend on the type of mixture chosen. To hide the pipe and concrete, we mask the top with greenery. The base of our arch is ready.
Further preparations will take place at the site of the wedding ceremony itself. We insert the poles into the holes made from pipes. We fix the top log with the side one using clamps. That's it, all that remains is to decorate the resulting frame.
Option 3. From bars.
Before you start making such a wedding attribute with your own hands, take care of the material and tools:
- Planed timber, in the amount of 9 pieces and 2 meters long, can be found in any hardware store.
- Metal corner, 20 pieces will be enough.
- Jigsaw.
- Screwdriver.
- Self-tapping screws.
First of all, let's cut the pieces of wood to size. We will need 4 pieces of 50 cm each, 2nd pieces of 1 m each, and leave the remaining 6 bars of 2 m each. Next, we fix the parts using corners, take two two-meter boards and screw a 50 cm board on top and a meter board on the bottom. Then we repeat the same sequence again. The result will be two sidewalls of our arch.
There are still two two-meter and two 50 cm boards left, we also connect them together. This will be the top of the structure, which can only be screwed to the sides.
From plastic and its derivatives
- inexpensive and relatively simple option;
- the material can be found in any store;
- Suitable for creating almost any shape.
But the downside is the low strength of the structure compared to metal and wood. For example, you can hang as many balloons and ribbons as you like, but you most likely won’t be able to withstand too many fresh flowers.
Idea 1. Metal-plastic pipe.
- Two metal-plastic pipes 3.5 meters long and 20-50 millimeters in diameter.
- Two buckets or flower pots.
- Dry construction mixture or sand.
- Building level or plumb line.