Hardware pedicure - what is it?
Hardware pedicure has gained great popularity and fame due to the fact that this type of foot treatment is more durable. If, after you have trimmed the calluses and polished off the corns, the skin begins to get rough on the second or third day, then after hardware treatment, calluses and corns begin to appear only after the second week.
This is due to the fact that a trimmed manicure always injures the skin, cutting off the rough area under the finger, you always touch the top layer of living tissue, the skin begins to regenerate and protects itself with rapid growth. It is much more effective to remove calluses and corns with pumice stones, brushes, etc. But this is long and tedious.
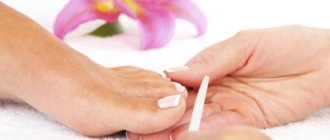
Hardware pedicure is the treatment of the skin of the feet and nails using a device and special attachments, cutters and caps. They come in different shapes and are made from different materials. Due to rapid rotation on the nozzle, the device removes rough skin, cuticles and forms the nail bed.
The device has different rotation speeds and power and is adjusted depending on the condition of the skin and the type of attachment installed. What are the features and advantages of hardware pedicure:
- removal of rough skin without steaming;
- effectiveness - removal of calluses and corns;
- therapeutic effect - removal of ingrown nails and cracks;
- you can learn to do it yourself at home;
- Suitable for any skin, even particularly sensitive ones.
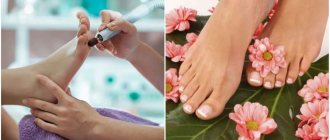
Device for hardware pedicure
Removal of rough skin on the feet occurs using a special apparatus and attachments. If you go to a specialist, there is no need to study the characteristics of the device, but when choosing a device for home use, it would be a good idea to remember the main characteristics.
- power - devices above 35V are suitable for manicure, pedicure and gel polish removal, less - for home use;
- rotation speed per minute – the quality of processing itself depends on the speed, it should not be lower than 25,000 rpm;
- foot control – convenient for professional craftsmen;
- reverse – rotation of the nozzles in different directions.
Devices with greater power and size are purchased for salons, compact devices are purchased for home use.
Nozzles, caps and cutters are made of dense and soft material, come in different sizes, and are suitable for their processing speed. Nozzles vary in grain size:
- Coarse-grained - intended for treating the skin on the feet.
- Medium-grained - designed for pushing back and removing cuticles.
- Fine-grained – for polishing nails and skin ridges.
Nozzles are divided according to the material used to make them.
- Ceramic - a mixture of ceramic abrasive and glue, safer for use. They differ in the degree of grain size.
- Diamond - a mixture of glue and diamond chips, more durable. They also have different degrees of grain, which vary in color. The red ones are the toughest, for removing rough skin and removing varnish, blue, green for sanding.
- Metal - made using notches on metal tips. Designed for treating calluses and corns. Do not create dust during operation.
- Silicone - made using silicone and abrasive particles.
The cap is a replaceable part for removing keratinized epithelium and polishing the skin of the feet. The caps are made of rubber and abrasive and can have a pointed, rounded or cylindrical shape. Remember, the salon must use disposable caps, and the technician must open the packaging in front of you.
A cutter is a tip made of steel with the addition of abrasive particles. Milling cutters come in different shapes:
- cylinder - for removing calluses and old skin;
- ball - care for nail sinuses and cuticles;
- ellipse – removal of core calluses;
- cone – treatment of ingrown nails;
- disc – polishing and shaping the nail.
It is certainly necessary to understand the design of a pedicure machine if you are just planning to buy a device for yourself, but it is much more important to learn the order of what and why you need to do in a home hardware pedicure.
ORDER AND BUY NOW for 70 rubles.
Milling cutters
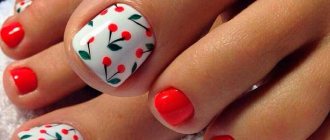
As mentioned above, in order to perform a high-quality hardware pedicure, as in the photo, you need to select the right cutters. Masters say that in order for a really high-quality pedicure, you need to change at least five attachments - cutters. They differ from each other in the material of manufacture, shape, and, accordingly, the scope of application. According to the material they can be:
- Ceramic;
- Sand;
- Felt;
- Diamond, etc.
Their shapes vary from various types of cones (wide, narrow, truncated) to prisms and even balls. Each of them performs a specific role. They also differ in abrasiveness. Thus, felt ones are the most low-abrasive and are used only for polishing.
Hardware pedicure - step by step for beginners
Be prepared for your first pedicure to take two hours. Once you master the technique, this pleasure will last no more than an hour. What steps will you have to take.
Step-by-step hardware foot pedicure
- Before starting the procedure, the feet must be disinfected. Simply put, wash your feet first.
- Nail plates must be shortened using special clippers, if required.
- A remover is applied to the skin of the feet to soften it and removed after a few minutes.
- We set the power of the device to 10-12,000 rpm and a coarse-grained cap with 60/60 abrasive and process the foot.
- Next, you need to polish your feet using a fine-grained nozzle with 100/100 abrasive until the skin is even and smooth.
- Rub remover into your toes.
- We polish the toes using a cone-shaped ceramic nozzle.
- Lastly, you should treat the cuticle and side ridges with a special cutter - a diamond-coated ball.
- Using a felt cap, polish the nail until it shines.
- Apply a nourishing product to the skin of the feet.
- After this, we proceed to applying nail polish.
If you use gel polishes, remember that such pedicures are dried in LED lamps.
VIEW NOW
Step-by-step instructions for hardware pedicure
Every girl can learn how to do a hardware pedicure at home, because this technology is very simple. To do this, you need to know the sequence of procedures and be able to correctly influence different areas of the legs using special cutters. We invite you to learn everything about how to independently perform hardware treatment for skin and nails. The training will appeal to both beginners and girls more experienced in hardware pedicure, as it will be accompanied by visual material. Interesting video lessons, colorful photos and useful recommendations from experts will help you master the art of foot care. Next, you will find a step-by-step master class, after studying which you will be convinced that a pedicure performed at home using an electric set can be an excellent alternative to a beauty salon.
A properly performed hardware pedicure at home guarantees excellent results over a long period of time. Want to know more about this? Start learning now. Our educational video lessons will help you quickly master a simple technique for performing high-quality foot care. An important condition for pedicure, which is based on a hardware processing method, is a certain sequence of actions presented below.
- Treat your foot and the area between your toes with an antiseptic.
- Then, using a diamond cutter in the shape of an inverted cone, you need to model the nail. In this case, the pedicure device should operate at 10-12 thousand revolutions per second. Carefully bending the side rollers, adjust the shape of the nails.
- To treat the cuticle, take a ball-shaped bur and start moving from the center of the nail. The nozzle should rotate in the opposite direction relative to the movement of the hand. To avoid a burning sensation on the skin, you need to constantly move the machine. Pedicure, which is based on a hardware treatment method, requires strict adherence to this rule.
- Using a corundum attachment, sand the cuticle and periungual space. Some girls prefer a combined pedicure, which is based on both manual and hardware methods of treatment. The beauty of this option is that each girl can independently choose procedures performed with conventional tools or an electrical device.
- After removing the remaining residue with a cotton pad, use a pusher to remove dirt from under the free edge and from the cuticle area.
- Process the side ridges and sinuses of the fingers using a needle-shaped cutter. The device must be held like a ballpoint pen.
- Using nozzles with a rounded end, final polishing of the front cushion and side bolsters is performed. The rotation speed should be 10-15 thousand revolutions.
- To polish the nail plate, use silicone pads of different abrasiveness. As a rule, a professional manicure and pedicure apparatus contains more than three cutters, the use of which ensures perfect polishing of the nail surface. You need to start with a coarser nozzle, gradually moving to soft polishers. The device should operate at a speed of no more than 10-12 thousand revolutions. Don't stop at one area, your hand should be in constant motion. This is the main rule of the hardware method, without which a high-quality pedicure is impossible.
You have learned how to properly treat your fingers and toenails using an electric manicure set. Reinforce your knowledge by watching a cool video, which provides a step-by-step master class on how to perform a hardware processing option in even more detail.
Now let's move on to processing the foot. For this purpose, carbide tips are used, designed for rough areas of the foot, or special sand caps.
- Carefully process the area of the metatarsus and heel, moving in the opposite direction of the rotation of the cutter. At this stage, the manicure and pedicure apparatus should operate at a speed of 18-20 thousand revolutions. Treat problem areas of the foot with intermittent movements, without stopping for long at one point.
- Then use a softer pad to sand the sawed areas of the foot.
- Use a coarse abrasive polisher to polish the heels, and then complete the procedure with a softer cutter.
- Cracks on the foot require more careful and delicate treatment. In the area near the crack, work with a carbide cutter, then remove excess skin, grind and polish the problem area of the foot.
- When completing a hardware pedicure, apply moisturizing cream to your feet, and lubricate your fingers and nails with nourishing oil.
Pedicure lessons are easier to master if learning is fun. We invite you to watch a video about how a professional salon foot pedicure is performed using an electric set.