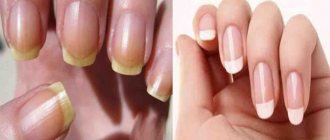
In summer, most women wear shoes that are as open as possible, so the condition of the feet should be ideal. Pedicure can be performed in different ways, depending on the type and quality of the skin, but most often they prefer the trimmed version. It is considered the most neat and aesthetic.
What tools are needed for a pedicure?
Here is a list of basic tools for a classic trim pedicure:
- Bath;
- Wire cutters;
- Grater;
- Scissors with rounded edge;
- Double-sided pusher;
- Scraper (razor);
- Napkins.
For a hardware pedicure you will need: a milling cutter with attachments, disinfectants and cosmetics for the care of nails and skin of the feet.
Pedicure involves treating the feet and toes. In this case, the following are used: apparatus, files, grinders, cosmetic keratolic preparations that exfoliate dead skin cells. There are additional procedures: treatment and prevention of ingrown nails, treatment of calluses, hyperkeratosis, prosthetics of nail plates.
Types of pedicure
There are several types of pedicure. Let's look at each in more detail.
- Medical. Who needs a medical pedicure and why? People suffering from certain foot and nail diseases often seek help. It is provided by a podiatrist.
The medical pedicure procedure is aimed at preventing and getting rid of problems such as ingrown toenails, calluses, heel spurs, etc.
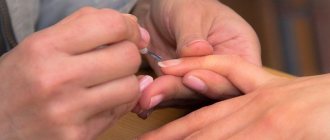
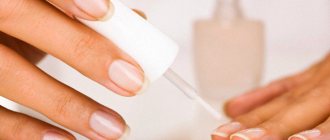
- Classical. It is divided into edged and European. They differ only in the way the cuticle is processed. In a classic trim pedicure, the legs are first steamed and then the cuticle is carefully removed with rounded manicure scissors.
- Dry. There are several names for this type of pedicure: European, French and unedged. With a dry pedicure, your feet do not need to be steamed - the entire procedure is carried out without water. It is replaced by special disinfectants (keratolics), which make it easy to treat the feet from the remnants of old dead skin.
The cuticle is removed using cosmetics or the film is pushed back with an orange stick to the base of the nail. The advantage of a dry pedicure is that it eliminates the possibility of infection with fungal diseases, as, for example, with a classic pedicure.
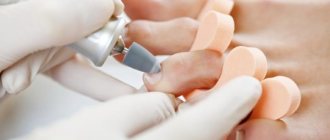
- Hardware. A pedicure is done with a special device with several attachments. They have different purposes. For example, a diamond cutter is used to cleanse the foot of old and rough skin. Silicone ones are designed for polishing nails.
During a hardware pedicure, cutting objects are not used, and water for steaming is also not needed. The keratinized skin is removed with special cosmetics, and the cuticle is simply trimmed with a nozzle.
Despite the universality of the pedicure procedure, it is extremely important to choose a good and trusted specialist whose tools are always sterilized and whose work area is neat and clean.
If it’s too expensive for you to contact a professional, you can learn pedicure for yourself or read the step-by-step instructions in this article and carefully apply the knowledge in practice. Read on!
Also, some types of pedicure are contraindicated for pregnant women and diabetics.
Techniques and methods
There are several types of pedicure that can be applied at home:
| View | Peculiarities | Advantages | Flaws |
| Classical | Steamed feet are treated with pumice, a razor or a grater. The cuticle is trimmed with scissors and the nails are polished with a nail file. | The technique is simple and a beginner can master it. To perform a pedicure you need simple and affordable products. | There is a high risk of skin injury. If you use undisinfected instruments, you can get infected. Often the procedure accelerates the growth of rough skin. |
| European or unedged | The cuticle is not cut out, but softened with a special compound, and then pushed back. The rough skin is removed using special graters. | The technique is safe and virtually eliminates the risk of injury or infection. | The procedure is extremely delicate, so it will take 5-6 sessions to tidy up neglected feet. |
| Hardware | It is performed using a special device and milling attachments. The legs are not steamed before the procedure. | This type of pedicure is safe and effective. The feet remain soft for a longer period. | The apparatus for the procedure is quite expensive. In addition, it requires some experience to use it. |
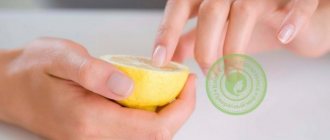
| Acid | The feet are treated with a special composition containing fruit acid. After this, the dead skin is removed with a file. | The method is safe and allows you to get rid of any corns and calluses. The acid product is inexpensive and can be easily used at home. | Do not use if there is fungus or wounds. After the procedure, the skin often peels off for 5 days, which looks unattractive. |
For beginners, it is advisable to stick to the unedged method.
It consists of the following stages:
- Preparation.
- Removing dead skin.
- Filing of nails.
- Skin moisturizing.
- Coating.
Required materials and tools
To do a pedicure at home, you will need the following:
- Scissors, tweezers, nippers. It is important to choose sharp tools made from quality steel.
- File . For filing nails, it is advisable to choose a glass file. But it’s better to sand the surface with a buff.
- Pumice . As an alternative, you can use a special pedicure machine or a fine-grain grater to remove rough skin.
- Ceramic or plastic container for steaming legs.
- Towel , cotton swabs and discs.
- remover .
- Emollient cream or oil, scrub.
- Finger spacers and wooden stick.
- Sea salt , herbal decoctions or a special emollient for heels.
You will also need varnish or gel polish, as well as decorative elements if they are used to create a pedicure.
Preparation
At the initial stage, it is necessary to remove the remnants of the old varnish. After this, you need to steam your feet in a warm bath. Then the rough skin will soften, and subsequently it can be easily removed.
To enhance the effect, you can add different ingredients to the water:
- Sea salt . Strengthens nails and promotes rapid softening of the skin. Goes great with essential oils.
- Baking soda. Kills germs and is used to treat and prevent foot fungus. Excellent at removing unpleasant odors. For 3 liters of water, 4 tbsp is enough. l. soda
- Chamomile or calendula decoction . Adding these products not only disinfects and softens the skin, but also relieves stress. To prepare, pour 2 tbsp of boiling water into a glass. l. vegetable raw materials, leave to infuse for 30 minutes.
If the skin on your feet is very rough, you can take an express bath. To do this, add a few tablespoons of table salt to the water. Next, you need to soak your feet in this solution for 5-10 minutes, and then pour 2 tbsp there. l. hydrogen peroxide.
The resulting reaction will help quickly remove even severe calluses and corns. After 10 minutes of this bath, you can proceed to the pedicure itself.
How to perform the procedure
Pedicure at home for beginners is carried out according to the following algorithm:
- Steamed feet should be dried with a towel. After this, you should remove the rough skin using a pumice stone, a machine or a nail file. Movements should be smooth and careful. Particular attention should be paid to corns and keratinized areas. To remove dead cells from your fingers, you need to treat them with a scrub.
- After peeling, you need to wash your feet and apply nourishing cream or oil to them. To ensure that the products are better absorbed, it is advisable to massage the skin for 5-10 minutes.
- Using a wooden stick, you need to move the cuticle and then remove dirt from under the nails. This procedure must be carried out extremely carefully so as not to injure the skin.
- Using tweezers or scissors, you need to trim your nails. But don’t be too zealous at the edges, otherwise they will grow into the skin later. In general, it is better to trim your nails in a straight line, without touching the tips. After this, you should file the edges, giving them a slightly rounded shape. The upper surface of the nail needs to be polished with a buff.
All that remains is to apply the coating, which can be matte, glossy, with a design or plain - it all depends on your imagination and the desired result.
How to do a classic pedicure at home?
Step 1. Getting ready for a pedicure.
- First you need to steam and soften the skin of your feet. Prepare a bath with warm water.
- Add soap solution and a little sea salt for better effect. Soak your feet in the water for 5-10 minutes.
- If your feet are very neglected, then you can make the water hotter and keep your feet for about 30 minutes.
- After the skin on your feet has steamed, pat them dry with a towel and proceed to the next step.
Step 2. Tidy up your nails.
- Focusing on the natural shape, cut your nails with clippers in a straight line.
- There is no need to cut them too short, otherwise there is a risk of inflammation. Afterwards, use a file to go over the cut of the nail and trim it.
Attention! The nail shape should be square with no rounded corners. Otherwise, the nail may grow into the skin.
- Then use an orange stick or a special spatula to carefully push back the cuticle. You can remove it using a special cosmetic product, which you need to apply, wait 5 minutes and remove the residue with a cotton pad.
- Using a manicure spatula, remove dirt from under the nails and polish the nail plate with a buff.
Step 3. Process the feet.
You will need a double-sided grater. Using a coarse grater, remove rough skin from your heels, feet, and big toes.
- Go over old calluses and corns. Using a fine abrasive grater, carefully smooth out any small imperfections in the skin on sensitive areas of the foot.
Step 4. Moisturize and care.
- After all manipulations, apply a colored, transparent or protective coating to your nails. It can be colorless or any other varnish. You can paint with gel polish. Choose according to your taste.
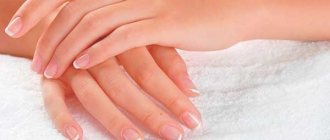
- And lastly, but most importantly, don’t forget to lubricate the skin of your feet with a nourishing cream!
It is best to moisturize your feet daily. Then the legs will be soft and well-groomed, and the number of cracks on the heels will be reduced.
How to do a trim pedicure?
In order not to worry about introducing infection into the bloodstream from accidental cuts, and to save time and money, many women treat their toenails themselves. A trimmed pedicure at home is easy to perform; the procedure requires accessible tools and household appliances. The more often you carry out manipulations, the less time they will take.
What do you need for a trim pedicure?
Before processing the nail plates, it is better to prepare all the necessary accessories in advance.
Trim pedicure at home is done using the following kit:
- foot bath or basin;
- antiseptic;
- nail polish remover;
- cotton pads;
- towels;
- paper napkins;
- finger separators (“spreaders”);
- sharp scissors and nippers;
- pusher, scraper;
- files of different roughness;
- machine for removing calluses and rough skin (foot grater);
- antifungal spray;
- healing, softening cream.
Classic pedicure - stages
Giving your feet an aesthetic appearance includes not only treating the toenails, but also the surfaces of the feet, fingers and heels. Knowing how to properly do a trim pedicure, it is important to learn how to remove calluses, corns, rough areas and smooth out cracks. The softer and smoother the skin on your feet, the better your nails will look.
How to do a classic pedicure:
- skin cleansing;
- softening of feet and nails;
- removal of rough epidermis, calluses, corns, hangnails;
- nail trimming;
- shaping the plates, filing the edges;
- removal of cuticle and pterygium;
- polishing the nail surface;
- prevention of infections;
- moisturizing, nourishing the skin;
- coating application.
Trim pedicure - step-by-step technology
It is important to start working on your nails with enough free time. Performing a classic pedicure requires accuracy and caution. Rushing increases the risk of skin damage, cuts and punctures.
It’s quite possible to do a classic pedicure in 30-60 minutes, step by step technology:
- Wash your feet well with soap.
- Soak your feet in a bath with the addition of soda, salt or acetylsalicylic acid. You can use ready-made mixtures for pedicure.
- Dry your feet with a towel and treat with antiseptic.
- Remove keratinized areas, calluses, hangnails and corns, smooth out cracks.
- Cut the nails to the desired length, file the edges, and shape the plates.
- Lift the cuticle and pterygium using a pusher and scraper.
- Trim off excess skin with scissors or wire cutters.
- Sand your nails with a soft buff.
- Apply an antiseptic and antifungal agent to the skin.
- Lubricate your feet with nourishing cream.
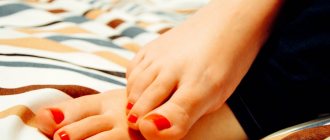
Classic pedicure with coating
Carefully crafted nails are the ideal basis for design. It can be made as simple as possible; trimmed pedicure goes well with both a plain, discreet finish and a laconic, bright design. In summer, many women prefer to apply nail art to their toenails. A beautiful classic pedicure with unusual designs, patterns and accessories will successfully complement the look.
How to do a hardware pedicure yourself?
The hardware pedicure procedure cannot be called fast. It lasts about an hour and is considered the safest and most gentle.
During the procedure, there is no damage, cuts or pain, as, for example, with a classic trim pedicure. However, this type of pedicure requires skill and practice. It may not work the first time, so proceed carefully.
For a hardware pedicure you will need:
- Disinfectant. It is best if it is a product that does not require the use of water.
- Remover for removing dead skin. This cosmetic product penetrates rough skin and exfoliates it.
- Pedicure device with a set of cutters.
- Foot cream.
Step 1: Prepare and soften the skin on your feet. First, disinfect the skin of your feet and apply remover. This product softens and exfoliates the skin.
Step 2: Treat your feet. Clean the skin on your heels and then on your feet using a machine.
Pay special attention to the skin on the outside of the thumb. After general treatment of the foot, gently sand the cuticle.
Step 3. Give your nails smoothness and the desired shape using cutters.
Step 4. Cover the nail plate with colored or clear varnish and apply a moisturizing or medicinal cream to your feet.
How to perform a classic pedicure yourself
When all the instruments are prepared, you can begin the procedure.
- Softening bath. Warm water (37-40 degrees) is poured into the basin. If desired, add a few drops of antiseptic, a little sea salt or liquid soap. This bath will soften and disinfect the skin. You should keep your feet in the water for 10-20 minutes.
- Removing varnish residues, correcting the length and shape of nails. It is worth polishing them, this will give the nail plate a well-groomed look.
- Foot skin treatment. It is now recommended to use a pedicure machine. Correctly remove rough areas, moving from the middle to the edges of the foot. When working with the machine, you should not rush; movements should be made smooth, measured. Special care is required when treating areas of skin with scratches and other damage. Upon completion of the treatment, the surface of the leather is additionally sanded with a file.
- Cuticle removal. Apply the emollient correctly first. Use scissors or tweezers to cut off cuticles and hangnails.
- Foot massage.
- Apply moisturizing cream to the skin of the feet.
- Decorative nail treatment. It is better to apply the base product first, then the varnish and sealer.
The whole procedure will take one and a half hours. There is no general rule on how often to get a trim pedicure. Experts advise doing it at least once a month. Depending on the characteristics, the procedure can be performed more often.
How long does a pedicure take?
The duration of a pedicure in most cases depends on the condition of the feet.
- Steaming the skin - 5-10 minutes;
- Treatment of heels and feet - 20–30 minutes;
- Nail treatment - 10–5 minutes;
- Varnishing - 15–20 minutes;
- Drying the varnish - 20 minutes.
If the coating is done with gel polish, then coating + design + drying are taken into account. This adds another 1 hour to the procedure.
Tools
To do a classic pedicure at home, you need to prepare the following tools:
- Foot bath or regular basin;
- Several sanding files with different grits;
- Nail file;
- Tool for removing cuticles (this can be scissors, nippers or a trimmer);
- Disinfectant;
- Foot scrub;
- Nourishing composition for skin;
- Various nail coatings (base coat, hardener, colored varnish if desired).
Pedicure socks are an effective innovation in modern cosmetology.
Classic pedicure is best done in the evening, before bed. If this is not possible, you should set aside at least two hours to completely relax your legs, then the effect of the procedure will be much higher.
How to become a pedicure master?
You can become a good specialist yourself by watching lessons on YouTube and reading articles on the Internet.
Online lessons can teach you how to do a pedicure for yourself, and with due persistence, accuracy and diligence, you can do it just as well as a professional.
However, to work in a good salon, you will need a certificate to prove your qualifications.
If you decide to start making money from your skill, you should take specialized courses.
You need to do this not only for the certificate, but also in order to understand the nuances of the procedure at an even higher level, as well as learn the basics of working with clients.
To avoid regretting wasted time and money, pay attention to the number of hours devoted to theory and practice.
- There should be either as much practice as theory, or an order of magnitude more.
- Find out how many people are studying in the group. In overcrowded groups, the teacher will not be able to devote enough time to each student and you personally.
- The optimal option is 5–10 people in a group. Smaller is certainly better.
- Read reviews about the school, look at the work of former students: do you like the quality of everything?
- Please also pay attention to the course instructor. How competent is he, do he have awards and certificates of advanced training, how long has he been teaching.
After completing a full pedicure course, you will gain the knowledge and practical skills necessary for your work. But don't stop there!
Attend seminars and advanced training courses, track pedicure trends on the Internet, read magazines, specialized blogs and don’t be afraid to experiment.
Useful tips and tricks for pedicure beginners
To keep your legs looking beautiful and well-groomed for longer, you should follow some recommendations.
Remember that keeping your feet hydrated is key to making your pedicure last longer. It is necessary to moisturize the skin with creams and care for the cuticle every day. To keep your heels smooth and soft for a long time, exfoliate with sea salt.
The professionalism of the master, regular pedicures once every 2-3 weeks using the right enzymatic cosmetics will make home care easier.
Anna Korovaeva
So, anyone can do a pedicure at home. The main thing is to arm yourself with the necessary arsenal of tools, to be careful and attentive. And then your feet will become soft, well-groomed and beautiful. Good luck!
Preparing for a pedicure - what you shouldn't skip
Now it’s worth learning the rules of a real pedicure step by step. It is important to maintain order and take your time here. The preparatory procedures take the same amount of time as painting your nails, but they should never be skipped. After all, a crack in the heel will ruin the entire aesthetics of a beautiful nail.
ORDER AND BUY NOW for 70 rubles.
Bath. First, prepare a foot bath with the addition of sea salt. Keep your feet in it for 10 minutes, you can stand in the bath while showering. After the salt bath, it is advisable to take a contrast shower, or at least just pour cool water over your legs, especially your feet.
Removing the old varnish layer. The second stage of preparation is the removal of old varnish. If you painted your nails with an acrylic component, I think you will not have any difficulty removing it, and if you had a pedicure done with gel polish at home, then here are all the details on how to properly remove gel polish...