General recommendations
A pedicure at home for beginners can be done using regular polish or gel polish. The first option is inexpensive and easy to apply, but such a coating is very short-lived and will last no longer than 3-5 days. Gel polish is more durable and will remain unchanged for 2-4 weeks, but it costs much more.
And to dry such a coating, you will need a special lamp, as well as a top and base. A beautiful pedicure can be either monochromatic or multi-colored. It can be supplemented with decorative elements or drawings. But in any case, a pedicure is not just painting with varnish. This procedure involves caring for the skin of the feet, because even the most beautiful design will look unattractive with rough heels.
Techniques and methods
There are several types of pedicure that can be applied at home:
| View | Peculiarities | Advantages | Flaws |
| Classical | Steamed feet are treated with pumice, a razor or a grater. The cuticle is trimmed with scissors and the nails are polished with a nail file. | The technique is simple and a beginner can master it. To perform a pedicure you need simple and affordable products. | There is a high risk of skin injury. If you use undisinfected instruments, you can get infected. Often the procedure accelerates the growth of rough skin. |
| European or unedged | The cuticle is not cut out, but softened with a special compound, and then pushed back. The rough skin is removed using special graters. | The technique is safe and virtually eliminates the risk of injury or infection. | The procedure is extremely delicate, so it will take 5-6 sessions to tidy up neglected feet. |
| Hardware | It is performed using a special device and milling attachments. The legs are not steamed before the procedure. | This type of pedicure is safe and effective. The feet remain soft for a longer period. | The apparatus for the procedure is quite expensive. In addition, it requires some experience to use it. |
| Acid | The feet are treated with a special composition containing fruit acid. After this, the dead skin is removed with a file. | The method is safe and allows you to get rid of any corns and calluses. The acid product is inexpensive and can be easily used at home. | Do not use if there is fungus or wounds. After the procedure, the skin often peels off for 5 days, which looks unattractive. |
For beginners, it is advisable to stick to the unedged method.
It consists of the following stages:
- Preparation.
- Removing dead skin.
- Filing of nails.
- Skin moisturizing.
- Coating.
Required materials and tools
To do a pedicure at home, you will need the following:
- Scissors, tweezers, nippers. It is important to choose sharp tools made from quality steel.
- File . For filing nails, it is advisable to choose a glass file. But it’s better to sand the surface with a buff.
- Pumice . As an alternative, you can use a special pedicure machine or a fine-grain grater to remove rough skin.
- Ceramic or plastic container for steaming legs.
- Towel , cotton swabs and discs.
- remover .
- Emollient cream or oil, scrub.
- Finger spacers and wooden stick.
- Sea salt , herbal decoctions or a special emollient for heels.
You will also need varnish or gel polish, as well as decorative elements if they are used to create a pedicure.
Preparation
At the initial stage, it is necessary to remove the remnants of the old varnish. After this, you need to steam your feet in a warm bath. Then the rough skin will soften, and subsequently it can be easily removed.
To enhance the effect, you can add different ingredients to the water:
- Sea salt . Strengthens nails and promotes rapid softening of the skin. Goes great with essential oils.
- Baking soda. Kills germs and is used to treat and prevent foot fungus. Excellent at removing unpleasant odors. For 3 liters of water, 4 tbsp is enough. l. soda
- Chamomile or calendula decoction . Adding these products not only disinfects and softens the skin, but also relieves stress. To prepare, pour 2 tbsp of boiling water into a glass. l. vegetable raw materials, leave to infuse for 30 minutes.
If the skin on your feet is very rough, you can take an express bath. To do this, add a few tablespoons of table salt to the water. Next, you need to soak your feet in this solution for 5-10 minutes, and then pour 2 tbsp there. l. hydrogen peroxide.
The resulting reaction will help quickly remove even severe calluses and corns. After 10 minutes of this bath, you can proceed to the pedicure itself.
How to perform the procedure
Pedicure at home for beginners is carried out according to the following algorithm:
- Steamed feet should be dried with a towel. After this, you should remove the rough skin using a pumice stone, a machine or a nail file. Movements should be smooth and careful. Particular attention should be paid to corns and keratinized areas. To remove dead cells from your fingers, you need to treat them with a scrub.
- After peeling, you need to wash your feet and apply nourishing cream or oil to them. To ensure that the products are better absorbed, it is advisable to massage the skin for 5-10 minutes.
- Using a wooden stick, you need to move the cuticle and then remove dirt from under the nails. This procedure must be carried out extremely carefully so as not to injure the skin.
- Using tweezers or scissors, you need to trim your nails. But don’t be too zealous at the edges, otherwise they will grow into the skin later. In general, it is better to trim your nails in a straight line, without touching the tips. After this, you should file the edges, giving them a slightly rounded shape. The upper surface of the nail needs to be polished with a buff.
All that remains is to apply the coating, which can be matte, glossy, with a design or plain - it all depends on your imagination and the desired result.
Step by step guide
A competent pedicure consists of several stages that can be done independently at home.
Preparation
First you need to remove the nail polish.
Moreover, you should prepare all the necessary equipment to perform the procedure.
Steaming your feet in a bath
You will need to prepare a container with warm water and add a cosmetic product that forms foam.
For better effect, you can add a small amount of sea salt to the water. Purpose – helps soften the skin, which facilitates further procedures. Don't be overzealous and use too hot water or steam your feet for too long. The optimal time is 15 minutes.
After completion, you need to dry your feet with a towel to remove moisture.
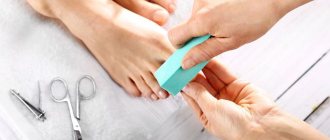
Removal of dead skin
To get rid of dead skin, you will need to use a pumice stone.
It is worth paying special attention to the most problematic areas, which can manifest themselves in the form of corns; they should be treated with special care.
However, it is important to know that there are areas on the feet that are difficult for pumice to reach. Here you can use a special foot scrub. They should treat hard-to-reach areas of the feet well.
At the end of the procedure, you need to rinse your feet in clean water to remove any remaining cosmetics and dead skin cells.
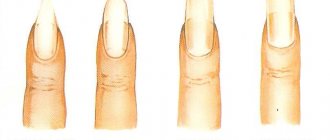
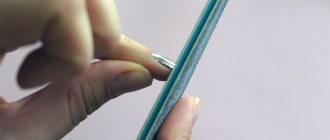
Shaping your nails
An important point is that the nail plate should be filed only in one direction.
All nails must be given the correct shape. Experiments with the shape of nails are not appropriate for pedicure. The required shape is square, as this will prevent the nail from growing into the skin. Using a file, you need to trim the ends of the nail plate, moving from the edges to the center. The result of improper filing is the possibility of ingrown nails. At the initial stage, this problem can be dealt with at home. Solution - you will need to treat the affected area with a solution of soda and potassium permanganate. However, at an advanced stage, it is already worth seeking help from specialists.
Afterwards you should polish the nail surface. To do this, you will need a double-sided polishing file. The first stage is to use the rough side, this will help eliminate minor irregularities and completely eliminate the remnants of the previous varnish coating. The second stage is treating the nails with the less harsh side. You need to polish all your nails well. As a result, they will not only sparkle, but also become smooth.
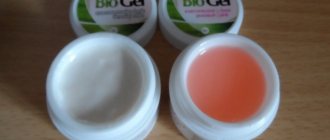
Cuticle treatment
To work with cuticles you will need an orange stick.
By this point, the cuticle has already been sufficiently steamed, and you can work with it without much effort. To facilitate the procedure, you can use a special composition that effectively softens it and eliminates excess skin. After 5 minutes, you only need to remove the residue. Using an orange stick, you need to clean the surface of the nail from adherent cuticle particles.
The final stage is to run a stick under each nail to clear the space of any accumulation of dirt and dry skin cells.
An interesting point - some experts say that you should not cut the cuticle, but only push it back on a regular basis. However, you can use nail clippers to remove excess. Moreover, using this tool it is necessary to cut off all burrs.
Hydration
This stage goes well with massage.
You should massage your feet using a nourishing or moisturizing cream. If your feet are prone to excessive sweating, you can use special foot cosmetics that have a deodorizing effect.
If you have been on your feet all day and feel very tired, then an excellent solution would be to use creams with a pronounced tonic effect.
If for some reason there are no cosmetics nearby, then experts advise using regular vegetable oil. Olive or sunflower oil perfectly restores the water balance of the skin of the feet.
Applying varnish
Before applying varnish, you should degrease the nail plate with a special acetone-free product.
Otherwise, the coating will lie unevenly and will end up lasting only a short time. The first layer is a colorless base. Its purpose is to protect the nail plate from harmful components contained in the colored varnish coating. As a result, the surface will become smooth and the varnish will be fixed for a long time. The best option is to apply two layers of varnish. Finally, you should coat your nails with a fixative, which will add additional shine and prolong the pristine appearance of the pedicure.
Also, as an alternative to colored varnish, you can paint your nails with a clear coating, which will add shine and strengthen the nail plate.
To make the procedure easier and to be careful when applying polish, it is best to use special toe separators. They carefully separate the fingers, preventing them from touching. As a result, this will ensure uniform application of the varnish and its drying without smudging.
True fashionistas can decorate their own nails with bright paintings. This is more suitable for the summer, when it is possible to wear open shoes. There are no limits to imagination - intricate ornaments, French, rhinestones or original patterns.
Monochromatic pedicure master class
The monochromatic finish looks attractive and is suitable for everyday pedicures. Those who want to stay on trend should choose coral color. It will be at the peak of popularity in the autumn-winter season. Shades of blue, beige, red, gray, as well as classic black and white do not go out of fashion.
Those who love unusual tones should choose purple, fuchsia, burgundy, gold, orange, mint. Neon varnishes are popular in the last season. They look catchy and defiant, and are suitable for a club or beach look.
A plain pedicure with rubbing, shimmer or glitter looks no less impressive. This coating looks festive even without additional decor, and is suitable for an evening look. If desired, you can cover only one nail with glitter, and paint the rest with glossy varnish of the same shade.
The matte monochromatic finish looks stylish and elegant. For the approaching autumn season, burgundy shades will be especially relevant.
How to do a plain pedicure:
- After preparing the feet, it is necessary to treat the plates with a degreaser to remove any remaining cream or oils from them.
- Then you need to apply the base to your nails, and after waiting for it to dry, cover it with varnish in 2-3 layers. Each of them is applied only when the previous one has dried.
- The coating needs to be secured with a finish, then the result will last longer.
Combined foot care option
When performing a combined foot pedicure, you can combine hardware treatment with manual treatment to achieve an ideal result. The main advantage of this type of processing is that you can choose which areas to process manually and in which cases to use the machine. For example, the most popular combined pedicure is a hardware version of foot treatment, which includes the removal of calluses and corns, and work with the nail plate, carried out using conventional manicure tools. Some girls are used to using a nail file to shape their nails, and do the rest of the pedicure steps using a machine. Combined pedicure is the most individual treatment option that allows you to properly treat problem areas of the skin of the legs .
To complete our training, we invite you to familiarize yourself with the excellent video lessons. You will learn how a combined pedicure is performed in a salon and see what main stages it consists of. We hope that you enjoyed the lessons presented. Now you know that in skillful hands, a pedicure machine is an excellent assistant in the fight for beautiful legs!
Options in different shades
Pedicure at home for beginners can be made bright and memorable if you use a technique such as gradient or ombre. It is based on the play of color, and can be created from several shades that smoothly flow into each other.
To create such a design you will need the following:
- 2-3 shades of varnish of the same or different color schemes, but suitable for each other;
- sponge;
- base, fixer.
To make a gradient pedicure at home, you need to treat your nails with a base. Then you need to apply varnishes of different colors to the sponge. The strokes should be as close to each other as possible. While the polish is still wet, you need to quickly transfer it from the sponge to your nails using patting movements. Beginners should remember that the result must be secured with a topcoat.
The gradient on all nails looks no less impressive. In this case, a different varnish of the same color is applied to each plate, starting from lighter on the thumb and ending with dark on the little finger.
Mani Pedi
Here are free video tutorials on manicure and pedicure. Manicure comes from the Latin manus - hand, and cura - care. In general, manicure is taking care of the beauty and health of fingernails. This is a cosmetic procedure that may include: giving nails a beautiful shape, baths for the skin of the hands and nails, hand massage, removal of keratinized periungual skin and hangnails, polishing nails covered with varnish, rhinestones, etc. (decorative manicure). Manicure can be performed either by specialists in beauty salons or independently at home. Pedicure is the care of your toes, i.e. removing calluses, polishing nails, etc. Learning manicure using online video lessons will be useful for both beginners and more experienced people in this matter. You can watch video tutorials from the Manicure and Pedicure category for free at any convenient time. Some manicure video tutorials come with additional learning materials that you can download. Enjoy your learning!
Total materials: 11
Materials shown:
1-10
Pages: 1
»
Sort by: Date · Title · Rating ↓ · Popularity
Watch lesson online
How to do a classic pedicure correctly - training for beginners
Here we talk about how to properly do a classic trimmed pedicure - training for beginners. This master class will show you the basic tools for working with pedicure, as well as provide recommendations and tips for working with these tools. Training will be carried out during the work of the master with the client. Tools you will need for work: A grater for removing dead skin and calluses on the heels and soles of the feet. The grater has a double-sided working surface. One…
- Personal care
- Mani Pedi
- Duration: 11:31
- Date: 05/25/2014
- Views: 1558
- Rating: 5.0/2
Watch lesson online
How to make a long-lasting manicure with a mirror shine - nail polish and foil
The online lesson “How to make a long-lasting manicure with a mirror shine - nail polish and foil” is devoted to the question of how to make mirror nails at home. A manicure with a mirror shine can be achieved using special foil and gel paint. In this case, we will use foil and GLOSSEMI E.Mi nail polish, which can provide long-lasting color for up to four weeks. In addition, the resulting coating is resistant to moisture and temperature influences. This video tutorial provides many...
- Personal care
- Mani Pedi
- Author: Ekaterina Miroshnichenko
- Duration: 27:56
- Date: 05/23/2014
- Views: 364
- Rating: 5.0/2
Watch lesson online
Shellac nails - manicure with gel polish at home (set, lamp, how to apply and how to remove the coating)
This online lesson tells you how to do a manicure with gel polish (shellac) at home. Here you will learn what shellac is, what a shellac kit is, how to apply and how to remove the coating at home. Shellac is a durable polymer coating for nails. Gel polish is a hybrid of a hard and durable gel and a much lighter plastic, but less durable traditional varnish. Shellac is applied to nails just like regular polish, but requires exposure to dry...
- Personal care
- Mani Pedi
- Duration: 8:24
- Date: 10/01/2014
- Views: 645
- Rating: 5.0/1
Watch lesson online
Hardware pedicure - how to get rid of cracked heels and corns
This video is devoted to the question of how to get rid of cracked heels and corns using a hardware pedicure. This master class will show the process of treating the heels of the feet. Calluses, corns and cracks on the heels of the feet are the most common ailment in middle-aged and older people. First, keratinized areas of skin - corns - appear on the legs, then cracks may appear and, if they are not eliminated, this can lead to more serious consequences...
- Personal care
- Mani Pedi
- Duration: 20:15
- Date: 05/25/2014
- Views: 1465
- Rating: 5.0/1
Watch lesson online
How to make a gradient manicure at home (smooth color transition on nails)
The lesson “How to make a gradient manicure at home (smooth color transition on nails)” is devoted to the question of how to paint your nails in different colors with a smooth transition. One of the most beautiful and effective techniques in nail design is creating a gradient transition of two or more different colors. In this case, a gradient from blue to cyan will be used. Of course, you can experiment with the colors that you like best. The main thing is to know the technology...
- Personal care
- Mani Pedi
- Duration: 4:57
- Date: 05/24/2014
- Views: 186
- Rating: 5.0/1
Watch lesson online
Trimmed classic manicure - how to do it, execution technology
This video talks about how to make a classic edged manicure, the technology of execution. Here you will learn what tools you can use to do a manicure at home, and also see the process of doing a manicure. The set of tools that will be used in this tutorial consists of a special spatula for separating the cuticle from the nail, a glass nail file, cuticle tweezers and tweezers for cutting off excess parts of the nail. If nail tools...
- Personal care
- Mani Pedi
- Duration: 12:38
- Date: 05/24/2014
- Views: 527
- Rating: 3.5/2
Watch lesson online
Manicure on short nails at home
This video tutorial explains how to do a manicure on short nails at home. The process of creating an easy and original manicure is shown here with an explanation of what is happening. Before you start, you'll need to prepare your nails by filing your cuticles and buffing your nail beds with a nail file. To create this manicure, two nail polishes will be used. One of them covers the thumb and index finger, as well as the little finger. The rest of the nails are covered...
- Personal care
- Mani Pedi
- Duration: 4:36
- Date: 09/30/2014
- Views: 249
- Rating: 0.0/0
Watch lesson online
How to quickly make beautiful nails - hard varnish, how to apply false plates and how to remove them
The online lesson “How to quickly make beautiful nails - hard varnish, how to apply false plates and how to remove” is devoted to the question of what hard nail varnish is and how to use it. With hard polish you can quickly and easily create beautiful nails. The use of hard varnishes is good for short nails. For long nails there is an option using gel. Solid varnish is a set of thin overlay plates that are selected according to the shape of the nail and, in the case of…
- Personal care
- Mani Pedi
- Duration: 6:48
- Date: 05/27/2014
- Views: 131
- Rating: 0.0/0
Watch lesson online
Pedicure at home
This online lesson tells you how to properly do a pedicure at home. In order for your legs to look good and attract the attention of men, you need to take care of them. One of the most important foot care procedures is pedicure. In addition to directly caring for nails and decorating them, this procedure also includes removing dead skin on the legs, getting rid of corns and calluses that often appear on the heels and soles of the feet. IN…
- Personal care
- Mani Pedi
- Duration: 23:51
- Date: 05/25/2014
- Views: 418
- Rating: 0.0/0
Watch lesson online
Pedicure socks - how to use (foot skin peeling at home)
The video lesson “Pedicure socks - how to use (peeling the skin of the feet at home)” is devoted to the question of what pedicure socks are and how to use them. The purpose of this procedure is to completely get rid of dead skin, calluses and corns that often appear on the heels and soles of the feet. Pedicure socks contain a special composition that helps gradually soften the skin and exfoliate it. Of course, this process does not happen in one...
- Personal care
- Mani Pedi
- Duration: 14:02
- Date: 05/25/2014
- Views: 103
- Rating: 0.0/0
1-10
11-11
Pedicure master class with simple patterns and drawings
Even without artistic skills, you can make a beautiful pedicure with a variety of designs. Moreover, there are several different painting techniques that even beginners can handle.
Using tape
Thanks to this material, you can create geometric shapes, diagonal or vertical lines, thin or wide stripes. To do this, you need to cover your nails with varnish of the main color.
After waiting for the layer to dry completely, you need to stick strips of tape to the plate so that you get the desired design.
Pedicure at home for beginners is easy to do using tape.
The photo shows an example of a manicure, but a pedicure is done in a similar way. After this, you need to cover your nails with varnish, the color of which contrasts with the base. After waiting for the layer to dry, you should carefully tear off the tape and secure the result with a finishing coat.
Drawing with a needle
The simplest design can be made using 2 varnishes of a contrasting color and a regular needle. And you will also need a fixer to work.
Algorithm of actions:
- Apply base polish to prepared nails. Before moving on to the next step, you need to wait until the layer is completely dry.
- On the nail you need to put several dots of varnish that contrasts with the base. Then you need to stretch the needle through these points, drawing monograms and curls.
- When the pattern is dry, you should cover the nail with the finish.
And you can also use a needle to draw thin lines or outline a pattern.
Dots drawings
It is easier to draw patterns with dots than with a needle. After all, with the help of the tool you can control the volume of the drop, which makes the lines even. To create a design, you need to apply a base polish to the nail. And after waiting for it to dry, you should dip the dots “ball” in a contrasting color, and then apply the desired design with it.
Tulle lace
Using a piece of old tulle you can make a lace pattern on your nails. This pattern looks gentle and elegant, and is suitable for both festive and regular pedicures.
Execution algorithm:
- Apply a base to prepared nails and then cover it with a layer of varnish. It is worth considering that it will be the main color in the design.
- After waiting for the polish to dry, you need to apply a piece of tulle to the nail. Then you need to paint the material with varnish of a contrasting color.
- You should wait until the layer is completely dry and carefully tear the tulle away from the nail.
- The obtained result must be secured with a finish.
If desired, this design can be decorated with rhinestones, sparkles or crystals. Then the pedicure will turn out to be more festive.
Pedicure master class with decor
A pedicure at home for beginners can be done with the following decorative elements:
- rhinestones;
- kamifubuki;
- foil;
- stickers;
- metallized strips;
- stamping.
It is worth considering that you should not overload your nails with decor. Otherwise, the design will look vulgar.
Rhinestones and crystals
Similar decorative elements come in different colors and sizes. They look solemn and festive, and you can lay out entire paintings from them. But rhinestones and crystals quickly come off, so they are not recommended for everyday pedicures. But for an evening look they are irreplaceable.
To make a pedicure with rhinestones and crystals, you need to attach these decorative elements to the finishing coat that has not yet dried. If necessary, they can be covered with another layer of transparent top.
Kamifubuki
This is what colored confetti or sequins are called. Similar decorative elements can be either round or unusual in shape (triangles, stars, hearts).
And they can be used both as single decorations and to create compositions. Kamifubuki, like rhinestones, are attached to the finishing coating. They are suitable for summer design and look impressive against bright and dark backgrounds.
Foil
With foil you can make an original and unusual pedicure that will look appropriate in both everyday and festive looks. And with this decor you can decorate one or more fingers, or in general, highlight some part of the plate.
To do a pedicure with foil, you need to prepare your nails and then attach the decorative sheet to the still wet polish. If desired, you can make various patterns by drawing them with a colorless base. You need to wait 1-2 minutes, and then tear off the foil with a sharp movement.
Stickers
Stickers and sliders help you create an unusual design in a matter of minutes, and even a child can use them. The main thing is to remember that it is advisable to apply white or nude varnish under such decor. It is advisable to treat the top of the stickers with a transparent fixative.
If this decor is used for a pedicure with gel polish, then it must be attached to a non-dried topcoat. And only then should you dry your nails under a lamp. After completing work, avoid contact with water for 30 minutes. Then the stickers or sliders will look perfect for 15-20 days.
Metallized strips
This decor is ideal for creating geometric motifs that have not gone out of fashion for several seasons.
Stripes also help to hide the joints between two contrasting colors of varnish, for example in a French jacket, and they can be used for both everyday and festive looks.
Stamping
Stamping is the application of patterns using stamps. This technique helps you create an unusual and original pedicure in a matter of minutes. It is necessary to apply a base, preferably matte, to the prepared nails. Then the drawing will turn out clear and bright.
You need to apply a bright varnish to a plate with an ornament or pattern, and then use a stamp to transfer it to your nails. You won't be able to get uniform patterns the first time, so you'll have to practice. At the end, be sure to secure the result with a colorless finish.
Master class on combined hardware pedicure
Part 1: foot treatment
Part 2: nail treatment
A hardware pedicure will give your feet a healthy and neat look in a short time. Having spent once on a device for it, you will not have to waste your precious free time on trips to beauty salons and financial resources on carrying out a simple procedure that you can easily do yourself.
After a hardware pedicure, you can use any toenail design option - every fashionista will be able to choose the most suitable option for herself, which will be in perfect harmony with her entire image.
I highly recommend choosing nail coloring options that suit your personality and the clothes you wear. Don't forget that rhinestones and sparkles are always relevant and never lose popularity, allowing you to present a beautiful design in a more favorable light.
It seems that I told you about everything and forgot nothing. Use the information for your health! If you have any questions while reading the article, feel free to ask them, I will definitely answer. Share your successes with me and show the result in photographs, if possible - I will be glad to see that you succeeded. Good luck with your experiments!
Fashion trends in 2019
Monochrome pedicure remains fashionable. Moreover, it is not necessary that it repeat the color of the nails on your hands. On the contrary, such a combination is considered provincial. For those who don’t particularly like a monochromatic pedicure, you can diversify the design with a pattern on one or more fingers.
As for shades, bright colors are in fashion: coral, green, gold, transparent blue. Lovers of a discreet style should choose burgundy or wine red. These colors look especially impressive in a matte pedicure.
In 2021, complex and intricate patterns are no longer in fashion. They were replaced by unobtrusive, simple drawings, but at the same time thought out to the smallest detail. Geometry, abstraction and funny prints, polka dots, flowers and ornaments are trending. Those who prefer laconicism should choose an ultra-fashionable marble pedicure.
The classic French jacket never goes out of style and remains relevant this year. But instead of the traditional white color, it is recommended to use red, blue, and golden shades for stripes. Lunar nail art is popular.
This year, the hole can be designed either traditionally oval or triangular, double or unfolded. Moreover, even beginners can easily handle this technique at home. If desired, such a design can be decorated with rhinestones or a metallic strip. But here it is important not to overdo it with the decor, otherwise the pedicure will look vulgar.
Article design: Oleg Lozinsky