At any big wedding, questions always arise related to the organization of guests. This applies not only to the entertainment program, but also to seating arrangements. If a large number of people enter the hall at once, real turmoil will begin. To avoid such problems, it is worth making a seating chart for guests at the wedding in advance. The option with an easel is one of the best.
Peculiarities
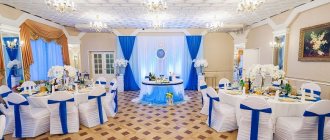
A large wedding in a classic European style involves placing round or square tables throughout the banquet hall. In order for guests to immediately find their place, an easel is placed at the entrance, thanks to which the seating of guests becomes convenient. Cards with names are attached to it - they are grouped by table numbers.
Of course, there are several basic ways to help distribute invited people to tables. But in any case, you will need a plan that will allow you and your guests to navigate.
How to organize everything correctly
The seating plan for guests on the easel is the final result of your work. Before you can complete it, you need to go through several steps.
- Make a guest list. This point is very difficult, because you don’t want to offend anyone. In any case, when planning the number of guests, proceed from your budget.
- Print invitations and get responses from people to get an idea of who will go and who won't.
- Now, having a new list, divide the guests into groups based on acquaintance or family ties.
- Agree with the organizers to arrange the tables in the hall according to your wishes.
- Print out cards with table numbers and distribute the names of the guests on them.
- Make or order an easel for your wedding.
- Decorate the cards and easel as you wish.
- Place an easel at the entrance to the hall on your wedding day.
- Place cards with numbers on the tables, as on your plan.
Attention! If you take into account all the points, then quarrels and unpleasant situations with a lack of places at the wedding will not happen. Therefore, worry about the location of your guests in advance. By the way, we wrote more about how to properly draw up a seating plan here.
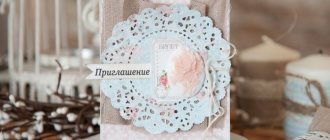
Seating plan: classic and original ideas with photos
The plan for seating guests should be beautifully designed and produced in 3-4 copies, depending on the number of participants in the celebration.
To do this, you can take classic design methods as a basis, or come up with an original idea and implement it. The simplest version of a seating plan is to lay out banquet cards containing the names of guests and their seat numbers on a separate table. It is done taking into account the layout of the hall.
It is also quite simple to attach the cards to a large piece of paper or cardboard and place them on a stand or hang them on the wall in a convenient place. Such a seating list is usually placed at the entrance to the celebration hall.
It is not original, but it will simplify the process of finding seats for participants in the seating plan, which simply shows the arrangement of tables in the hall with their numbers and names of guests. Accordingly, you need to prepare signs with table numbers in advance.
Regular alphabetical lists on paper will easily lead invited guests to the right table.
live or carved tree from plywood
looks elegant with card leaves hanging on its branches, arranged according to the chosen pattern.
Captured on glass or a mirror and placed in a frame (colored or classic bronze), the seating plan looks elegant.
drawn by hand with a marker on them with the corresponding signatures suits any style of wedding organization.
A large glass with a printed plan , installed and secured with special fasteners directly on the floor or table without a frame, looks great.
A guest list written in chalk on a blackboard is a fairly colorful way to easily add new guests or remove those who don’t show up.
Placing a plan on a geographic map or globe is a great option for travel enthusiasts. Cards are hung on them in a certain order, or, if only the outlines of objects are depicted, a diagram is drawn. In this case, the tables can be assigned not numbers, but the names of cities, continents, seas, islands - in general, any objects at your own request.
, designed in the form of a “key holder,” will allow everyone to plunge into the festive atmosphere. It is installed in a place to avoid crowding.
Instead of banal cards with names, you can use pre-taken photographs of guests. They are pasted on canvas or paper around the table numbers they must follow.
For a wedding in a vintage style, a frame from an old window , inside which banquet cards are placed on clothespins and strings.
The background for the plan can be wallpaper, landscapes, paintings, etc. There are no restrictions here.
You can entrust the production of a planting plan either to the decorator of the hall or to do all the work yourself. You shouldn't limit your imagination. This will lead to an original, unique result. Wedding signs placed throughout the event will add creativity.
Decor is also important
In addition to the important organizational part, the seating of guests at a wedding on an easel should look good and fit into the overall style of the wedding.
Depending on the general design of the identity, the following options can be distinguished.
- Light-colored easels with a frame like a painting are suitable for the classic European style. Whatman paper or plywood with cards is inserted into the center. In this case, everything can be decorated with fresh flowers, ribbons, or left as usual. Cards should be decorated with beads, brooches and other decor to suit your taste.
- Easels with windows attached to tripods combine beautifully with country, rustic and eco styles. Names with tables are written on the glass with a marker. The decor should be made of fresh flowers. This design looks laconic together with an arch in the form of doors. Another variation: stretch burlap over the top of the easel, stretch ropes horizontally across it, and attach name cards to them with clothespins.
- For vintage, Hollywood and shabby chic styles, you will need separate frames for each card containing the table number. They can be secured together at the back and placed on a tripod, or hung in one large frame with plywood in the middle.
Decor
When the mirror base for the seating plan is ready, you can start filling and decorating it. By this point, the bride and groom should already have a list of guests ready, distributed to separate tables. The seating chart can be transferred to the mirror in the following ways.
- Write the first and last names of the guests under the table number using a white, silver or gold marker. In some cases, a red tint is suitable. Instead, you can use paint of the same colors.
- Paste pre-prepared numbers and names from self-adhesive paper. If there are few guests, you can cut out the blanks yourself, but for a large-scale wedding it is better to purchase ready-made inscriptions.
- Glue standard cards with the table number and guest list onto double-sided tape.
- Attach to the mirror a diagram of each table with the names of the guests in the same frame as the base, but smaller in size.
A mirrored seating plan does not require a lot of decoration, since the main idea is to have as much detail of the surrounding space reflected on the surface as possible. If the mirror is not framed, then you will need to decorate it with flowers, mostly fresh and with a lot of greenery.
Ideally, these will be hanging plants, cascading along the perimeter of the seating plan. You can make a frame with light bulbs, similar to those installed in the artists' dressing rooms. In this case, the mirror will look especially attractive in the evening.
Interesting! You can also make a wish book and invitation cards with your own hands.
Small mirrors are hung from the base - each of them corresponds to a specific table, and the names of the guests should be written on the surface.
How to make it yourself
In order to make an easel for seating guests with your own hands, you will need:
- easel tripod;
- frame;
- frame-sized plywood;
- glue or glue gun;
- wallpaper or decorative paper;
- ribbons, lace, rhinestones and beads;
- cards with table numbers and names;
- scissors.
Instructions are below.
- First make the main part of the easel. Apply wallpaper or paper to the plywood and paint it if necessary.
- Glue the decorative pieces to the plywood.
- Then attach it to the frame.
- Cut out the cards and decorate them as you wish.
- Attach them to the plywood.
- Attach the frame with plywood to a tripod.
Important! This type is suitable for a classic celebration for a large number of people. You can conveniently place all the cards on the easel, just select the desired size of the cards and the frame itself.
How to make your own place board for a wedding: 3 examples, templates
To do the work yourself, you will need simple tools. Available materials are also used for this.
It's easy to make a board in the form of a key holder, an easel with a stand, or a stand. Everything you need for this is contained in the table below.
| Materials | Tools |
| glue, tape | stapler |
| cardboard or plywood | knife |
| foam rubber (batting) | scissors |
| fabric, wallpaper, colored paper, paint | wood saw or jigsaw |
| colorful ribbons | miter box |
| wooden blocks, screws, nails | drill or screwdriver |
Guest seating plan in the form of a “key holder”
The process of making a “key holder” is as follows:
- take a ready-made frame or make it from wooden blocks;
- cut out cardboard and foam rubber (batting) for it, which are glued on top of each other;
- cut the selected fabric to the size of the base, leaving 2 cm from the edges;
- use it to wrap cardboard with foam rubber and secure it on the back with tape;
- inserted into a frame;
- stick decorative needles;
- The “key holder” is ready - hang up the place cards, prepared yourself or purchased in advance.
You can also place photographs, messages to guests, some things and other paraphernalia. The “key holder” is hung on the wall or placed on a stand, or placed on a table.
Creating an "easel"
The “easel” is made according to the following algorithm:
- make a frame and stand with a shelf for the picture from wood;
- they are painted, for example, with spray enamel;
- cut out plywood for the frame;
- they cover it with guipure;
- then fasten the plywood with self-tapping screws to the frame;
- The “picture” is placed on a stand;
- insert cards in various designs.
The “easel” is installed on its own stand in a place convenient for guests to familiarize themselves with the seating plan.
The easiest way
Making a plan in the form of a stand is even easier and faster than making a “key holder” or “easel”. To do this, do this:
- print out guest lists on white paper, indicating the corresponding table numbers;
- cut out squares for each table with a list of guests;
- cut colored cardboard into squares half a centimeter larger;
- glue the fragments on top of each other;
- stick “tables” onto a large cardboard sheet according to their location in the room;
- decorate the stand with a ribbon bow glued under the newlyweds;
- the plan is placed in the right place.
Video: DIY seating chart
Watch the video master class on creating a seating chart:
Ready-made templates
To create a seating plan, you can use the ready-made templates presented below. You can simply copy them and print them in the required format . Next, the names of the guests are written on them and placed on a sheet, card, board, or other version of the base.
Ready-made seating plan template for 4 tables
Ready-made seating plan template for 5 tables
The following are card templates. They are printed and cut out. Table numbers and guest names are entered or printed on the computer. Such cards are placed on the branches of a small tree, hung on a “key holder”, and glued to cardboard or a thick sheet.
Set of cards
Implementation of the considered options takes from 1 to 2 hours. No special skills required. Your own imagination will lead to a beautiful result.
It’s up to the newlyweds to decide whether to make a seating plan themselves or use the services of organizers. Working with your own hands will require some small investment of time, but you can get satisfaction from the process. There are many options for making cards. The choice is determined by personal desires and style of celebration. Proper placement of guests contributes to the success of the banquet for all participants.
A couple of details
A few more important nuances.
- The most important thing in terms of seating is to form groups correctly. Distribute people according to interests or family connections so that everyone feels comfortable.
- If you don’t want to make an easel yourself, then you can rent it from specialized organizations. They have ready-made solutions suitable for different styles, and, on the contrary, extraordinary options, such as an easel for seating guests “Eiffel Tower”.
- Do not forget the law of any good designer, which states that you should not overload the details with decor. If you have a brightly decorated frame - for example, with fresh flowers - then leave the cards almost undecorated. If you add rhinestones and bright ribbons to the paper, then simply paint the easel itself white or beige.
- For a rough seating plan, use plain paper that can be secured to the plywood with tape.
Summary
Such a thing as an easel will fit perfectly into many wedding themes as decor. But this detail has not only a decorative function, but also an important organizational one.
A wedding seating plan on an easel looks beautiful, and you can always decorate it to your liking. If you are afraid that something will not work out for you, then contact a wedding agency that provides various easels with frames for rent.
admin 115
Previous article
A selection of bright and daring couples - an invitation in the style of “Hipsters”: text and decor
Next article