» Beauty » Nails » Nail design » Creating a design with seashells on nails
0
248
Article rating
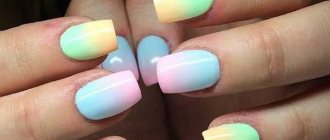
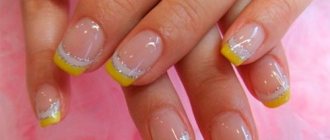
The “Shell” nail design has many variations; its execution depends solely on imagination and creative skills. If you don’t set yourself too difficult tasks, you will be able to create a neat and beautiful relief on your own. This manicure is appropriate in summer. It will go perfectly with a bright dress and will remind you of the sea coast.
Nail preparation
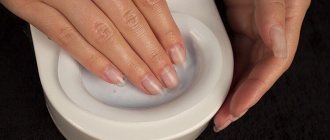
This manicure is quite difficult to perform.
It is unlikely that you will want to redo it often, so it is very important to properly prepare your nails:
- remove the remnants of old varnish using special products. It is preferable to make a choice in favor of those that contain natural oils;
- give your nails the desired shape with a nail file;
- be sure to soften the cuticle with a salt bath and then remove it with nail scissors;
- Apply the moisturizer with massaging movements, allow it to be well absorbed;
- immediately before applying the varnish, remove any remaining cream with any degreaser;
- Apply strengthening gel to the nail plates - it prevents the nail from splitting and hides all imperfections.
Using acrylic powder
To create this delicate manicure you need to prepare:
- basis;
- white shellac or regular nail polish;
- thin brush;
- top coating;
- UV lamp;
- acrylic powder.
Instructions for implementation:
- prepare your nails;
- apply varnish to the nail plates and dry them in a lamp;
- as soon as the first layer is dry, apply the second and dry it;
- secure the layers with a top coat and also dry the nails in a UV lamp, remove the sticky layer;
- use shellac to draw straight or curved vertical lines on the nail plates;
- fix the gel polish in the lamp;
- The last step remains - to give relief, apply acrylic powder to the nails, remove the excess with a brush. This way you can give the shell a velvety look.
Step-by-step instruction
We bring to your attention the shell nail design step by step.
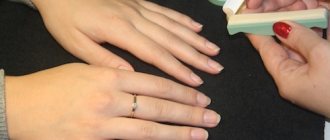
- Nail preparation. This stage should be given priority attention, since the further result will depend on it. We remove the old coating if necessary. We give the nails the desired shape, remove the cuticle, and treat the nail with a buff. Do not overdo it. Do not try to make the nail plate thinner with a buffer, because it is needed solely to eliminate shine.
- Apply primer to prepared and cleaned nails.
- Then we cover the nail with a base and dry it for a few seconds or minutes under a special UV lamp.
- Apply the first layer of varnish. Let's dry it.
- We repeat the previous point.
- Apply the top coat, dry it and remove the sticky layer.
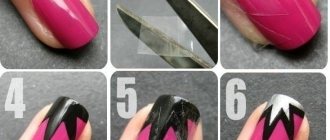
- Next we begin to draw the pattern. Take a thin brush and the polish you used to paint your nails. Using gentle movements, draw vertical stripes on your nails. Do not make very large distances between the strips. It is not necessary to bring them to the end of the nail, you can leave a couple of millimeters. Often, this is how a manicure looks more elegant. The lines can be either straight or arced.
- We dry the layer, but there is no need to remove the sticky layer.
- Apply a second coat of varnish to the vertical lines. Do not skimp on varnish, because this way the shell will be as similar as possible to the real one.
- Add acrylic powder to create volume. Dry in a lamp. It is important to understand that shell and relief play a huge role in making nail designs.
- If you want to keep the shell velvety, then you don’t need to cover it with anything.
- Topcoat is only needed if you do not have the opportunity to use acrylic powder.
Editor's choice: Gradient manicure: how to do it? Tips with photos
Without acrylic powder
To create a pearl shell relief without using acrylic powder, prepare:
- basis;
- gel polish or regular nail polish (white or pink);
- thin brush;
- top coating;
- UV lamp.
Execution steps:
- prepare the nail plates;
- Apply polish to your nails and dry them in a lamp;
- after the first layer has dried, apply the second and dry it;
- Using transparent white or pink gel polish using a brush, draw a shell relief on the nail plates, leaving a small distance between the stripes;
- dry your nails in a UV lamp;
- Complete the manicure with a top coat.
To add some zest to your manicure, you can create a marine-themed design on your ring finger nail.
How to do a “Shell” manicure?
Method 1: “Shell” manicure with gel polish step by step
A new popular method of creating shells on nails is done with gel polish. Carefully study all stages of the work.
- Nail preparation, buffing, applying primer
- Coating with a base layer, drying in a lamp.
- Paint your nails with two layers of varnish, each of which is dried under a lamp.
- Cover the plates with top coat, dry them, remove the sticky layer.
- We begin to draw thin vertical lines with gel polish of the same color. This must be done with a thin brush. The lines should pass at a short distance from each other. It is not necessary to carry them to the hole; you can leave about 2-3 mm. Approximately 6-7 lines will fit on the nail. They can be made straight or slightly arched from the free edge, as in the photo.
- Dry the coating in a lamp. We do not remove the sticky layer.
- To give the design an expressive relief, generously sprinkle it with acrylic powder of a similar color or mirror rubbing. Shake off excess with a brush.
- The shell on your nails is ready! In order for the delicate velvety to remain on the plates, there is no need to cover it with topcoat. But you can further decorate the design. This will make it even more impressive. To do this, glue rhinestones near the cuticle, creating a kind of lunar manicure. An alternative is to decorate the design with other sparkly details, such as pearls or a small faux shell.
Method 2: shell-shaped manicure without powder
Its implementation differs little from the previous one. The same lines are drawn with gel polish. After drying in a lamp, a top coat is applied. The design is less voluminous, but very delicate.
For manicure, choose pastel, delicate colors: cream, light pink, white, peach, beige. These are the shades that dominate in nature. Therefore, the shell on your nails will look more like a real one. And this is exactly the result we need.
Option 3: “Shell” manicure: relief with gel paint
Apply lines to a layer of colored gel polish with a regular transparent gel, and you need to take a lot of product onto the brush so that the relief is sufficiently noticeable. Top it with gel polish of the same color as the base. Then seal with topcoat. We get a beautiful relief manicure.
Using a stamp
For girls who prefer not to spend a lot of time creating a spectacular manicure, stamping can be an excellent option. Stencils with shells and a miniature stamp will help you create a beautiful design without unnecessary problems.
You will need:
- clear nail polish;
- stencil;
- stamp.
This manicure is very simple to perform:
- prepare your nails;
- Apply varnish to the stencil and remove any excess with a scraper;
- using a stamp, transfer the patterns to the nail plates;
- secure the resulting images with colorless varnish.
Manicure with shells: interesting decor for sea lovers
Method 4: natural shells on nails
Small shells, which you can find in a manicure supply store, can be used to decorate the finished design! Metal, plastic or natural shells look so impressive on records! You can assemble small decor yourself on the sea coast. Just before applying to the nails, they must be thoroughly cleaned of sand and dirt.
Although small shells look incredibly attractive, it is better to decorate one or two fingers with them. Such decor on all nails will look sloppy.
It can be an excellent complement to a nautical manicure or other designs in turquoise, blue, green, gold, silver, yellow or orange. It is necessary that the design and decor be in the same theme.
Use deep blue and light aquamarine for the base. They are among the top ten fashionable shades of 2021.
Method 5: broken shells with 3D effect
Incredibly beautiful decor has appeared on sale: broken shells. Small particles of natural shells are painted in different colors, have an incredible holographic effect, and shine with mother-of-pearl. They cover the plates completely or partially. The design is simply dazzling! Small multi-colored particles play beautifully in the sun, shine like mother-of-pearl, and create an incredible 3D effect. But keep in mind that this design is a little impractical in everyday life: the sharp tips of the shells can snag on fabric and hair. Therefore, manicure is recommended for festive occasions, and you need to learn how to use it.
Method 6: drawings of shells on nails
The masters in the salon create wonderful designs on the nails with a thin bone. The shells on the nails take on different shapes and shine with mother-of-pearl. Along with them, the nails are decorated with starfish, golden sand, and anchors. Everyone knows that to create such paintings on nails it takes many years of improvement in the art and a lot of training. Accordingly, the price of such masterpieces is very high.
Method 7: spamming “Shells” for nails
Fortunately, in our time, pictures on nails can be recreated using innovative methods: stamping. Stencils with images of shells and a small stamp will help you create designs on your nails yourself. In minutes!
The method of execution is already familiar to many women. Varnish is applied to the stencil, then all excess is removed with a special metal scraper. After this, the images are transferred from the plate to the nail using a rubber stamp. Technology has its own secrets that need to be learned in order for the drawings to come out clear.
And in order for the crown to “lay down” on the nail exactly as you intended, use an innovative discovery - a transparent stamping stamp.
Method 8: “Shell” stickers for nails
The simplest and most universal method. The abundance of nail stickers also includes marine-themed designs. We have known how to use stickers since childhood. Sometimes the drawings look quite similar to the creations of artists. But in this interpretation, we still do not recommend using this method often, since in comparison with others it clearly loses.
Seashells look great on both long and short nails. The most acceptable nail shape is round or square. This shape allows you to add more naturalness to the shell on the plates. But bone drawings can also be done on sharp extended nails.
Design with stickers
Manicure with stickers is also considered very simple, because everyone knows how to apply them since kindergarten. Seashell decals look great on nails of any length. As for the shape, round and square nails look good with this pattern.
Many stores offer a wide selection of nautical themed stickers.
To create a manicure you will need:
- the basis;
- light-colored varnish;
- seashell stickers;
- nail polish remover;
- cotton buds.
Creating a manicure consists of several stages:
- pre-prepare your nails;
- apply a protective layer on them;
- cover them with one layer of varnish and wait until it dries completely;
- apply a second layer and attach stickers;
- wait until the varnish is completely dry;
- remove excess from the skin using nail polish remover and a cotton swab.
Other interesting ideas
A manicure with shells can be done using different techniques, such as rubbing. In addition, the design with the effect of a broken shell, as well as the use of plastic elements, looks unusual.
Broken shell effect
This design has a very unusual look. To create such a manicure, you do not need to use artistic skills; you just need to buy your favorite small decorations from a specialized store.
These details are sprinkled on the base coat of the nails, dried in a UV lamp, and at the very end they are secured with a top coat. This manicure has a significant drawback - sharp fragments of shells create scratches on any surface and injure the skin. Therefore, a manicure is definitely not suitable for daily use, but it will be just right for relaxing in a nightclub on the seashore.
Plastic blanks
If you need to urgently decorate your nails, plastic shells will come to the rescue. Creating a manicure with such blanks will not require painstaking work and is almost as stylish as other designs.
To perform a manicure, you will need to attach a pre-purchased plastic blank to your nail using special glue. This design is in harmony with sea and sandy shades of varnish and small stars.