Do you dream of having a beautiful wedding? Then our 4 master classes on how to unusually paint a bottle of champagne for a wedding are definitely for you! Economical, hand-made decoration will not leave guests indifferent and will significantly reduce spending on trifles. But a beautiful bottle, painted with safe acrylic paint, is also pleasant to open and pour into glasses!
Do you want to know how to paint a bottle of champagne for a wedding so that guests exhale in admiration? Then hurry up to prepare the necessary tools and let's get started!
Painting with gold and glitter
Champagne bottles covered with gold paint
To make wonderful gilded bottles we will need the following tools:
- Newspaper/fabric that you don’t mind getting dirty;
- Decorative gold sparkles (gold glitter) - you can buy ready-made ones, or you can work a little and cut them yourself;
- Aerosol gold paint;
- Empty bottles/alcohol bottles;
- Glue – you can use both aerosol and special liquid for decoration;
- Paper towels;
- Gloves;
- Shallow bowl.
Step 1
Let's start by clearing the bottles of labels - you can rub them with dishwashing detergent, soda, or try heating them with a hair dryer , from which the label should easily come off the bottle.
Paint bottles with gold spray paint
Lay out newspapers or unnecessary fabric, arrange the bottles. Wear gloves so you don't have to worry about scrubbing paint off your hands later. We begin to paint the bottles with gold spray paint.
To prevent the paint from flowing and to apply evenly, spray it at a certain distance, without coming very close to the bottles.
Apply 2 layers and let the paint dry. If this is your first time painting, then you should read in detail the technique of painting a bottle with spray paint in this article.
Painted bottles in 2 layers
Step 2
- Place decorative glitter in a bowl.
- Spray/coat the bottles with glue and sprinkle them well with glitter.
- If you notice that you missed areas of the bottle, don’t be afraid, add glue and sprinkle more.
To make sure the napkin holds better, secure it with tape
STEP 3: how to cover only part of the bottle with glitter.
- To decorate part of the bottle, take a paper towel and wrap it around the bottle a few centimeters above the bottom .
- Make sure the paper line is straight. Cover the rest of the bottle with glue and sprinkle with glitter, wait for it to dry and remove the napkin.
This way you can decorate a variety of bottles and build your own collection!
Also, based on this master class, you can experiment with color and texture. For example, champagne in red or covered with colored glitter looks chic at a wedding.
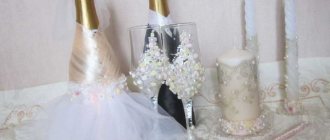
Also, don’t forget to decorate the glasses for the newlyweds in the same style. You can also use glasses to make chic candlesticks for table decor - just click on the button!
Candlesticks made from glasses for a wedding - 30 ideas
Universal decor
The combination of white and gold colors is considered wedding and is suitable for a celebration decorated in any style. This range gives positive emotions and emphasizes a joyful atmosphere. Decorating champagne bottles with gold and white ribbons is relatively easy. For this you will need the following materials:
- foam sponge;
- glue;
- gold paint;
- acrylic paint;
- primer mixture (can be replaced with white acrylic);
- rhinestones;
- white ribbons;
- gold leaf;
- twigs and leaves cut from gold paper;
- 5−7 polymer colors for each bottle.
Before the creative process begins, the artist coats both bottles with white acrylic or a primer mixture. Leave them until they dry, after which they begin to decorate. Instructions for decoupaging wedding champagne bottles with your own hands:
- The neck and stopper are decorated with gold foil.
- Golden branches with leaves are glued diagonally to the bottle.
- The elements are placed taking into account the fact that later there will be polymer flowers in these places.
- Glue the flowers so that the leaves are visible from under them.
- The surface, free of decor, is painted with a thin layer of gold acrylic paint, scooping it up with a foam sponge.
- The lower edge of the foil covering the neck is coated with glue, then wrapped with tape.
- The edges of the ribbon are tied with a bow, and to hide the knot, a large semi-precious stone or several beads are attached.
- A pattern of rhinestones is made on the neck.
- The entire bottle is treated with a fixative.
Painting silver and creating texture
Dot painting of dishes and using stripes
To transform these bottles you will need:
- A bottle with colored glass and a bottle of unusual shape;
- Adhesive tape or paper;
- Spray silver paint;
- Volumetric paints for design;
- Gloves;
- Newspaper/fabric that you don’t mind getting dirty.
Step 1
Take a bottle with colored glass and remove the label from it. We glue tape or paper onto the bottle the way your imagination wants. Be sure to run your finger over the glued part to remove any air bubbles.
Step-by-step technique for creating stripes on a bottle
Step 2
Lay down newspaper/cloth and wear gloves. Apply 2 coats of paint and let dry. Carefully remove the paper or tape;
Take your time to avoid jagged edges.
Apply volumetric paint, then apply 2 coats of paint
- We take an unusually shaped bottle and remove the label from it.
- dotted volumetric paints to the bottle Let it dry.
- Apply 2 coats of paint to the bottle and let dry.
TIP: Volumetric paint can be replaced with any thick glue, such as “liquid nails”
Using the same technology, you can make letters of the newlyweds on a bottle: first we apply adhesive paper in the shape of the letter, paint it and remove it after drying.
Making letters on a wedding bottle
You can use the same method to make vases from a bottle: photos and Master classes in this article
How to beautifully decorate a bottle of champagne for the New Year
An unusual bottle of champagne for the New Year can be both an excellent gift for friends and a table decoration. A lot of things are used to decorate it, from multi-colored napkins to sequins and beads. In general, everything is bright, shiny and colorful.
To decorate a bottle of champagne for the New Year you need:
- Champagne;
- Paper, fabric, garlands or other wrapping materials;
- Candies;
- Paints;
- Glue;
- Glitter.
After clearing the bottle of labels, cover it with paper and create the effect of unevenness. Apply a layer of paint one at a time, let it dry, then glue on glitter, candy, beads and other available materials. Tie the New Year's bottle with ribbons to complete the decor.
Champagne bottle in white
Decoration using white acrylic and salt
To create such a beautiful thing we will need:
- Newspaper/fabric that you don’t mind getting dirty;
- Gloves;
- Bottles of different shapes;
- White spray paint;
- Epson salt/plain coarse salt;
- Flat dishes larger than a bottle;
- Glue – you can use both aerosol and special liquid for decoration.
Step 1
We clean the bottles and prepare the area for painting. Don't forget to paint from a distance for even application. Paint in 2 layers.
After applying glue to the bottle, “roll” it in salt
Step 2
Pour salt into a flat dish. We apply glue to the bottle up to the neck, roll it in a bowl and get a lovely snow-white bottle!
You can use absolutely any bottles for this - they will all look extremely elegant.
Snow-white and fluffy bottles are ready
Look at the different options for bottles and their shading. It looks very extraordinary! They fit perfectly into any room, giving it uniqueness.
How to decorate a painted bottle of champagne - fashionable options
Wedding champagne bottles with exclusive modeling from polymer clay are gaining popularity.
An ensemble of pink buds of different sizes under a protective layer of glossy gel is itself a work of art and does not require bright coloring in natural shades. For greater solemnity, it includes plain beads that reflect light rays.
You can make flower buds from satin ribbons and attach them ready-made to any place on the bottle and set of glasses using a glue gun.
To make the fabric look natural on the painted surface, additional details made from threads or braid are added to the created composition.
The finished drawings are placed on a bottle of champagne on an almost imperceptible basis using paper napkins. Fragments of thin paper with a pattern are glued into place and opened with glossy gel. The thickness of the napkin is practically no different from the paint layer.
A creative solution to decorating bottles for a themed wedding was the use of stencils, with which, after applying the main image, you can create an elegant frame with a brush.
This video will show several options for decorating champagne for a wedding:
You should not overload the champagne bottle itself with decorative details - you need to remember that to complete the composition, it is better to distribute secondary and background elements around the place where it is installed. The groom should be able to comfortably pick up this masterpiece, uncork and fill the glasses without significantly losing the appearance of the bottle.
Decor with thread
It will turn out original if you carefully glue any thread onto the bottle before painting. To do this as accurately as possible, it is best to place it using tweezers or an ear stick.
After the glue has completely dried, we cover it with acrylic paint as usual.
TIP: You don’t have to buy special acrylic paint. You can cover it with regular one from a hardware store. For example, if you have left after a recent renovation
What paint to choose for a plastic bottle
How to paint a plastic bottle for crafts? For decoration, you can use exactly the same paints as for glass. It is best that they are not aggressive.
- Acrylic paints are perfect for painting plastic bottles, but to protect the surface, you need to coat them with colorless acrylic varnish.
- Colored acrylic varnish is an ideal way to paint plastic bottles for crafts.
- Spray paint is also suitable for decorating a plastic bottle.
- The most durable and beautiful effect is produced by car paints ; plastic bottles painted with this paint will not change their color for several years.
- You can also paint with regular enamel paints.
The bottle is structured by the shell
Wedding bottle with hearts
To create this magic bottle we will take:
- A simple glass bottle;
- Eggshells;
- Liquid glue special for decoration / you can experiment with other glues;
- White napkins/toilet paper;
- White acrylic paint;
- Medium hard brush;
- Colored pencils/crayons;
- Scissors.
Step 1
- Take napkins or toilet paper; if you took paper, separate the second layer, otherwise you won’t be able to complete your plan.
- Using pencils or crayons, draw hearts on a napkin the way you like and cut them out, slightly retreating from the drawing.
Take napkins and draw hearts on them
Step 2
Let's take the shells and break them into small pieces. Let's let them dry and start applying glue to the bottle.
Apply eggshells onto the still wet glue with your hands.
Step 3
- We will leave only the base of the neck and the bottom of the bottle free of shells.
- We paint the bottle with white acrylic paint, carefully painting over the joints of the eggshell.
Apply any acrylic paint with a brush.
Let it dry well
STEP 4
Carefully glue the hearts using glue and a brush
Carefully apply the napkin with hearts to the bottle and, with careful movements, from the center to the edge, apply a brush with glue. Don't forget that this paper is very thin and will tear easily if you work hastily.
STEP 5
Take your time and you will succeed! You can apply the design to the entire bottle or to part of it. To consolidate the result, it is ideal to coat it with matte or glossy varnish.
These are the stages our bottle went through before becoming a real beauty!
This decorated bottle will fit into any interior, adding romance and comfort.
This master class showed only a small part of the ways you can decorate bottles for a wedding, adding original bright accents to them.
How to paint a bottle of champagne for a wedding with your own hands
The general concept of the celebration design largely determines how to paint a bottle of champagne for a wedding so that it organically fits into the style, becomes an effective decoration and is remembered as an original design solution.
Options for work largely depend on the thematic focus: for modern high-tech styles and colored weddings that emphasize status, metallic shine is perfect; shabby chic or Provence require soft tones, ostentatious aging in conjunction with decoupage; country, Hawaii, vintage - contrast and brightness. In all styles, it is appropriate to match the image of the bride and groom.
How to paint a bottle of champagne for a wedding - ideas
To apply a fine design on glass, it is advisable to choose alcohol-based paint - it will last longer on such material.
However, painting can be done with any other non-toxic composition that artists or builders use.
For this purpose, the following paints are used:
- acrylic;
- water-based;
- stained glass;
- aerosol.
The durable coating formed by the acrylic composition is durable and allows you to attach decorative elements to it or cover created reliefs from applied elements (napkins, threads, grains, clay).
By purchasing a white base paint and a set of pigments, you get the opportunity to combine and create smooth color transitions and halftones. Water-based compositions for interior work dry quickly; they are good to use in the following cases:
- to paint the bases while preserving their texture - twine, threads, ribbons are wound around the bottle, an applique is made of paper or fabric;
- freshly painted glass is rolled into decorative chips;
- Glitter is spread over the base layer and opened with varnish.
The color palette for water-based emulsion is not limited. Among stained glass paints, choose a non-fired type, which does not require heat treatment of a wine-filled bottle before working with it.
This option for painting wedding bottles yourself requires starting preparation in advance, since the product dries from 3 to 5 days . Stained glass compositions form a transparent coating that gives the striking effect of colored glass.
Spray paint (aerosol) forms a uniform thin film, which allows you to maintain the elegance of the form and avoid the appearance of a noticeable difference between the painted fragment and clean glass.
It is these compounds that make the gold, mother-of-pearl, or silver coating of wedding bottles.
Here is one of the options for decorating a wedding champagne bottle:
Spray paint is the only type that does not use a brush or swab.
To mark the boundaries of the fragment being processed, it is covered with adhesive tape . A weightless design with spray paint makes it possible to easily and quickly decorate in the same style with a bottle of wedding champagne, beautifully decorated glasses for the newlyweds, a vase for a bouquet, candles with a candlestick on the table of the bride and groom.
The effectiveness of using aerosols gives rise to amateur solutions for decorating bottles with your own hands.
An example of an almost instantaneous change in the appearance of a vessel with champagne is to apply a layer of hairspray from the bottle, distribute glitter on it, and cover it with another layer of hairspray.
How to paint wedding bottles with your own hands - master class
It is better for a novice designer of wedding champagne bottles to first familiarize themselves with a master class on the chosen design style.
The general rules for the sequence of operations for decorating glass containers can be stated as follows:
- In most cases, when working with paints, stickers from the bottle must be removed - they are washed off with warm water, the glass is degreased with acetone or alcohol. The foil on the neck can be left on, although some concepts prefer to expose the wire and plug.
- The use of thick paints gives the matte effect of ceramics and allows you to apply textured patterns to them, which can be conveniently applied with a foam pad. Liquid paints are distributed with a brush. Aerosol spraying is best done in 2 passes, without bringing the can close to the surface to be treated (to avoid drips).
- The effect of sophistication and aristocratic minimalism can be achieved by carefully selecting the color of a single-layer coating and 1 - 2 overlay elements, which are secured with a glue gun. For decoration, you can use pearl beads and simple lace ribbons. Instead of verbose poetic wishes, limit yourself to a monogram made up of capital letters of the names of the newlyweds. If you keep this bottle as a souvenir, it can be opened for any wedding anniversary or other family occasion.
- Multilayer compositions are applied in this order: allow the base layer to dry, cover selected areas with glue and sprinkle with glitter. Having removed the excess that has not adhered to the sticky surface, repeat the operation in those places where there are gaps. After this, the bottle remains to be decorated with ribbons, beads, and rhinestones.
- Relief or inscriptions under a layer of paint can be made from paper, acrylic or liquid nails. To perform the reverse task, first stick a pattern/letters from self-adhesive onto the glass, and after painting, carefully remove them. The surface of the bottle, which was thickly sprinkled with small crystals (freshly painted, rolled in a tray with Epson salt) and covered with a layer of acrylic paint, looks beautiful.
- Aerosol painting requires covering adjacent surfaces with film or paper, protecting hands, respiratory organs and face from the vapors of the sprayed composition. These precautions are not comparable in cost to the resulting effect of the process.
For such a thin layer of paint, the bottle is completely cleared of stickers and foil. Metallized coatings make the proper impression if they are covered with 1 (maximum 2) contrasting bright color.
Ideas for decorating champagne bottles
If you want to make your wedding more unique, or maybe add a little coziness to your home, we recommend that you look at more ideas for decorating and painting bottles. Unusual candlesticks, bride-groom attire, original pots and much more - all from ordinary glass bottles! You are sure to find the very option that fits perfectly into your life!
DIY wedding champagne: photos of decorated bottles
More ideas for decorating wedding bottles using various coloring techniques can be seen in the gallery. Keep in mind that you can paint both the bottles for the newlyweds and the rest of the champagne for the guests.
You can cover wedding bottles with aerosol and acrylic paints, silver and gold, broken New Year's toys and glitter.
The top can be decorated with ribbons, bows, satin and polymer flowers, petals, tulle and lace.
Use your imagination, and you will definitely get exclusive wedding bottles that will perfectly fit into the wedding concept and emphasize the individuality and creativity of the couple.