Lily
Now you will learn how to properly make a lily flower from polymer clay:
- From polymer, cut out three larger and three smaller petals. To do this, first draw the outline of each petal on the rolled material with a toothpick;
- Squeeze out a textured pattern on the petals using a special form;
- If necessary, paint the petals using a brush and acrylic paint;
- Bend one edge of each petal outward;
- Make white stamens and brown pistils from thin rollers;
- Align the paper clip;
- Attach the stamens to a paper clip, small petals around, large ones in the last tier.
Roses and blueberries
- plastic (polymer clay) yellow, blue and white;
- floral wire and ribbon;
- flowerpot, basket, etc.;
- foam base.
Tulips made of polymer clay / Decor of mugs and spoons with polymer clay / Polymer clay tulip | #2
From yellow plastic (we can mix in a little white for a more delicate color), we first form balls of different sizes, and then roll out the petals on the palm of our hand from the center to the edge. Moreover, you can do this with the pad of your finger, but you can take a special tool with a ball at the end. When all the petals are ready, roll up a droplet from the same plastic and begin to apply petals to it, starting with small ones. We place the petals overlapping each other.
Moreover, starting from the second row, we bend the top edge outward.
We stick a wire into the base of the flower and set it aside so that the plastic sets. If you choose baked clay, first put it on a skewer, stick it into a ball of foil and put it in the oven. See the plastic packaging for time and temperature.
This is important: CABOCHON WITH YOUR OWN HANDS
Now let's move on to the blueberries. We take several pieces of blue plastic and mix different amounts of white into them. Then we roll them into balls. To give it a natural look, lightly squeeze the ball and put a dimple on top with the rod from the handle. We string each berry onto a wire and form a twig, wrapping it with floral tape.
We make leaves using the same principle as in the previous example. The only thing is that you can take a pure color and roll it out on your palm.
We attach them to a blueberry branch. Moreover, as we see in the photo, the berries on the branch below are not only blue, but also white, simulating unripe ones.
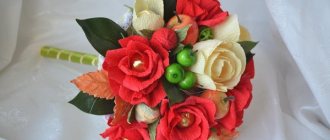
Now we place the foam base in a flowerpot or other container. And we begin by sticking blanks of flowers and berries into it to form a bouquet.
As you can see, the principle of working with polymer clay is quite simple. Both a novice craftswoman and an already experienced needlewoman can make flowers with their own hands. And having learned how to make individual flowers, you will be able to create amazingly beautiful bouquets that at first glance will be impossible to distinguish from real flowers. Such compositions can be suitable as decorations for the interior, from which you only need to sweep away the dust, as a wedding bouquet and boutonniere for the groom, or just a bouquet as a gift. Below is a selection of videos of some color options.
1) Polymer clay for beginners flowers. Polymer clay kala
These simple calla flowers are super easy to make and only take a few minutes to make. In this case, the flower is decorated with beads and attached to a hook, so the result is very simple but cute earrings.
What you will need:
— Clay of two colors
— Beads and hook-earrings
Let's get started:
Take two small pieces of polymer clay in different colors that match each other. You will need two colors in order to get a “marble pattern”. You can practice on clay of the same color first.
Roll each piece into long sausages.
Wrap one around the other.
Then roll into a ball.
Do this process again from the beginning. This is necessary to obtain a marble effect. Wrap one sausage around another and then tear it into several pieces. After this, roll into a ball, as shown in the photo:
Divide the ball into two equal parts with a sharp knife.
Then start sculpting the flowers. Make a flat, round plate and slightly extend the edge. Pinch the edge with your fingers, carefully fold the other edge in the same way as paper bags are folded to make a funnel.
Straighten the edges of the flower so that the bud appears to open. Use a toothpick to make a hole to insert the beads and earring.
The blank for the future earring is ready. Insert accessories and beads.
Useful tips
To make your work enjoyable, read tips for beginners on creating flowers from polymer clay:
- when baking, insulate the figurine with a cooking sleeve, because the soot that settles on the walls of the oven is toxic;
- You can paint the mass in two ways: apply a few drops of acrylic paint to a piece of clay and knead it thoroughly or paint the finished product with a brush;
- be sure to ventilate the room after baking;
- do not remove the flower immediately after baking, wait until it cools in the oven;
- Store the polymer clay bag in a plastic bag in a cool place.
And finally, don’t take on complex things right away: experiment with simple shapes, master the technology of working with plastic materials. When everything starts to work out, you can think about selling finished products, and from the hobby category, your hobby may well move into the category of business.
Flowers made of polymer clay (master classes)
Polymer clay is a unique material
, with which you can create amazing sculptures, jewelry, crafts and bouquets.
It was invented in Germany in 1930 for making dolls, but later in the 1960s clay became widespread and was used to make all sorts of things
.
Very popular products made from polymer clay are flowers and flower bouquets.
. To learn how to sculpt flowers, you don't have to be a sculptor or have super artistic abilities. It is enough to have good taste, know the basics of modeling, be patient and practice a lot.
There are several types of clay: self-hardening and fired
.
For flowers and floral arrangements, as a rule, the first one is perfect. After manufacturing, after a certain time, the product will harden on its own. Fired clay is usually used for products that need to be very durable
, such as jewelry.
Required materials and tools
Prepare or buy in advance:
- white, red and green clay;
- acrylic mold for forming a leaf;
- floral tapes, wire, tape;
- base for boutonniere;
- clear puzzle pins;
- PVA glue;
- wire cutters
When working with clay, including Japanese ClayCraft by DECO, you should take into account that it completely sets within 24 hours. To prevent the material remaining in the box from drying out, it is recommended to place a damp cloth in it. Beginning craftsmen who have not yet learned how to quickly work with clay should cover the workpieces with damp material.
Making flowers
Everything is ready, let's start the creative part. Since we don’t have much experience working with plastic mass, we’ll start with a master class on creating flowers from polymer clay.
Calla lilies
Sculpting calla lilies is a great way to instill confidence in a beginner’s abilities. Form two small blocks of clay of different colors. Twist them together in a spiral, make a ball out of the mass and knead until the colors are mixed.
Divide it in half with a knife and form a petal from each part. To do this, roll out the material with a rolling pin, pull out one edge with your fingers and pinch, and wrap the other like a “ball”. You can use a knitting needle to form shallow grooves on the petals, and decorate the core with a bead.
If you make several flowers and glue them to stem blanks (they can be purchased at any craft store), you will get a delicate bouquet. Decorate it with ribbon, give it to your mother or friend and get ready to receive words of admiration and gratitude.
Lily
It's time to move on to creating more complex flowers. Tip: before sculpting, look at a photo of the flower you like, this will make it easier to realize your ideas. Cut a piece of clay and roll it out. Mark the future leaves: three large ones (along the edges), three smaller ones (in the middle).
Cut out the petals and shape them, apply veins with a knitting needle or toothpick. To decorate the core, you will need to mold the pistil and stamens: cut small strips from the mass and give them the desired look. Let's start assembling the lily: we attach the core of the flower to a straightened paper clip, and sequentially attach the petals, starting with the smallest ones. The finished product can be glued to a hairpin or brooch.
Rose
Making a rose seems difficult only at first glance: with practice, you can create bouquets and decorate photo frames, make refrigerator magnets and earrings. So, we make 9 balls of different diameters from clay.
We form the petals like this: we flatten the mass with our fingers, while making the base denser, the edge thinner, and twisting it outward a little.
We collect the rose: we twist the core of the bud into a tube and begin to attach the remaining petals to it according to the principle: from smallest to largest. Your first rose is ready.
bear
Everything works out with the flowers, let’s move on to making the figures. In order to make a bear, you will need a metal mold. With its help, we press the figure onto a rolled out plate of brown clay. Attach a white mass to the lower half of the muzzle - this is the base of the mouth.
Press the ball from the bottom in the middle with a toothpick. Make a triangle (nose) and strengthen it in the middle of the white workpiece. For the eyes you will need a couple of black balls of mass. We will have a bear-girl.
To do this, we will make a bow from pink clay and secure it under the ear. From the same material, make two round buttons and use a toothpick to form two holes on each, attach the figures to the body. Glue a magnet onto the finished product: the souvenir is ready.
Required Tools
You will need a workspace with good lighting. Equip it with a glass or plastic work surface. Since you are a novice craftsman, there is no need to buy tools for complex shapes, so stock up on the essentials:
- acrylic rolling pin;
- stationery knife;
- needles, knitting needles;
- glue (for joining parts);
- sandpaper, cloth (for polishing), protective varnish;
- extruder (syringe with different nozzles);
- gloves.