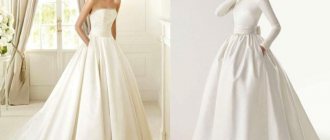
The choice of outfit style depends only on the preferences of the bride herself, but in the majority, girls choose decorations with a classic full skirt. Rings, crinoline, and a cover under a wedding dress help create that very pomp. You will learn below how to choose the right accessory and complete the look.
How to choose the right one
Content
The crinoline is selected depending on the model of the wedding attire, style and stiffness. Each type has its own advantages and disadvantages.
First of all, it should be noted that, contrary to popular opinion, a correctly selected crinoline does not hinder the bride’s movements, but on the contrary allows her to feel comfortable. The newlywed should only correctly determine her goal and her wishes. To add volume to the dress, you can take a petticoat with a different number of hoops. But in order to decide which petticoat will suit your wedding dress, it’s worth understanding their types.
Crinolines for dresses with trains
Complementing a dress with a train with a matching crinoline is not an easy task. It will be difficult to find and you will have to invest a considerable amount. Although a dress with such a crinoline will look magical, until the bride wants to sit down.
In this case, the train from the dress will lie on one side, and the crinoline with all its mesh and frills will lie on the other.
No matter what stylists and fashion designers think, no matter how much bad things are said about crinolines, they will still be present in the image of brides. You just need to choose the right crinoline and get used to wearing it.
Source
Kinds
When choosing such an accessory, it is very important to determine the correct length. Experts recommend choosing a petticoat so that 10-30 centimeters remain to the floor. This distance is optimal for the perfect image.
Crinolines are:
- With flexible rings. They are in highest demand among brides due to their convenience. First of all, such crinolines are very light, do not hinder the bride’s movements and are invisible under the main skirt. Girls note that with such an accessory it is easy to sit in a car or at a banquet table, and it is not hot. But such crinolines have one significant drawback - the plastic rings are very weak and, if moved incorrectly, can simply break, ruining the entire appearance of the outfit.
- With hard rings. A classic petticoat that serves as support for the skirt. They are comfortable to wear, as they give the bride enough space to move, the rings are strong enough, so the appearance of the outfit will not deteriorate. But hard hoops stand out when walking under a skirt, and sometimes even show through under the thin fabric of the dress. Problems may also arise when sitting in a car or at a table, because they lift up quite strongly and are disobedient.
- Multilayer without rings. Such petticoats allow the garment to look simply fabulous, because the fabric of the dress will gently flow and create a complete look. But stylists recommend using such crinolines for short skirts. The downside of this accessory is that a lot of fabric is used to make the skirt fuller, and it becomes heavier. In such attire, the bride will not feel particularly comfortable.
- For dresses with a train. They are quite difficult to find; they are mostly made to order and have a specific shape and design. Such crinolines are used to take beautiful wedding photos, because they are absolutely not practical.
- Made from tulle or mesh. They are designed specifically for fluffy dresses. But it should be remembered that such petticoats are made on the basis of a rigid frame, because it is thanks to it that the decoration will have the appropriate appearance.
LiveInternetLiveInternet
Quote from Elena_laitdream message
Read in full In your quotation book or community!
we sew a crinoline to match a wedding dress.. The journey from engagement to wedding... part 7
Not always a ready-made crinoline to match a wedding dress suits... The reason in our case is simple: not a single salon wants to rent a lush crinoline (the so-called “turkey” is when the crinoline itself has 5 rings and lush satin or silk frills are also sewn on top of the rings, which prevents the rings from showing through even in the event of a headwind..)... They give rentals, and even free, but if you take a dress from them... and that’s only a purchase, with The price of such a purchase is quite attractive - a little cheaper than a dress...
The usual crinoline, which we have had since the days of our daughters' beauty contests, does not suit our bride: it is not fluffy enough, it only fits three rings..))) There is nothing to do - we will also sew...)))
I collected everything that I found convenient and practical on this topic on the Internet, including notes from the comments...))))
Here I liked the sewing principle - it was conveniently explained, it was clear... In addition, this sewing principle can be taken into account when sewing any other model...
https://www.justlady.ru/articles-149671-kak-sdelat-krinolin
Textile. Regular calico is best. Economical and very convenient to use. It just needs to be pre-washed in warm water, dried and ironed, because... Cotton shrinks a lot when washed. If you wish, you can also use a grid. It looks aesthetically pleasing, but will cost you much more. The yardage of the fabric will depend on the width and length of your crinoline. The wider the skirt, the greater the fabric consumption. Approximately, with a fabric width of 150 cm, you will need three lengths of the product. If we assume that the approximate length of the skirt is 1 m, then you will need 3 m of calico or mesh. The most painful question is what to make the frame from. At first glance, the wire is suitable for this purpose. But the petticoat will be heavy. In addition, the wire bends easily and is not able to restore its shape on its own. A creative option is sticks for balls. These plastic tubes are sold in packs of 100 pieces along with fasteners (a very important detail) and are incredibly cheap - 40-60 rubles per pack. The crinoline will be sewn on the basis of the six-piece skirt pattern. To get all six pieces, you will only need a pattern for one piece. The upper side of the wedge is 1/6 of your hip volume, the length of the wedge is 1 m, the width is at your discretion (for example, 50-60 cm). The wedges must be cut out (don’t forget to allow 1 cm seam allowances) and sewn together. Then you need to stitch 5 rows of fabric strips across the skirt and 12 vertical stripes. Important: the rings are sewn on the inside, and the vertical ribs on the outside. The most important thing is not to stitch the intersections of the ribs and rings. Otherwise, you won’t be able to install the frame later. Then sew on an elastic waistband to hold the petticoat in place. Now you need to make a rigid frame out of a simple skirt. To do this, carefully trim the tips for the balls (remove the rosette and burr). You will get a real connecting nut for sticks. Insert sticks for balls on vertical strips, connecting them with “nuts”, cut off the excess length and seal the entrance. Do the same with the rings. As a result, you will get a fluffy and very light crinoline.
Since the topic has already come up about inserts into crinoline, how to make it both rigid and comfortable, then here are the options I dug up:
If you live in a small town and do not have a specialized store with accessories, then you can use a lawn mower line as a flexible frame, only without teeth, it is flexible and dense. Sew it along the edge of the petticoat. You can also use a plastic edging. It is used in sewing car seat covers.
Regular tulle net, only a bit harsh + hat ribbon (by the meter, it is mostly white, sold in almost all sewing stores in ACCESSORIES) , can be replaced with packaging twine (the market is full of boxes with goods, market traders simply throw it away when they open the goods) .It is better to sew tulle with a seam to the dress, and not to the body...it scratches very unpleasantly.Usually there are 3 tiers, the bottom 20-25 cm from the floor, the upper tier is placed on a wide elastic band 4-5 cm.
You need to take thin foam rubber, cut it into strips of about 10 cm, sew these strips along the length literally over the edge - you will get such tubes. Make 4 rings out of them, the bottom two are identical, the 3rd is smaller, the 4th is even smaller. The first two should be approximately equal to the width of the skirt at the bottom. And connect these rings with strips of the same foam rubber, 4-6 pieces in height equal to the length of the skirt, you can connect them with a needle and thread. In this way, you form a frame so that it is more reliable, you can attach it to the lower tulle petticoat. You can add regillin to the petticoat - you don’t even need a drawstring - it looks neat and quite comfortable. The easiest way: soak the skirt in a saline solution for 2-3 hours (proportion of 1 kg of fine salt per 3-4 liters of water), then iron the wet product, only there should be no metal (such as a button) on the item, otherwise rust will appear after simple action, the thing will become snow-white and will keep its shape very well. When you need a full skirt, then make a petticoat and sew tulle on it from top to bottom every 5 cm (the stiffer it is, the more magnificent it is).. The tulle is folded with bow and double bow folds, the bottom I trimmed the edge of the tulle with bias tape...
These are all possible options...)))))) 2. I prefer this type of crinoline - it will be exactly like the notorious “turkey”, especially if the petticoat itself and the frills are made of dense fabric that stands on end well when assembling...
3. Well, such a petticoat is ideal for a wedding dress... There are no rings here, only lushly gathered fabric... I’ll calculate how much and what kind of fabric is needed for such a petticoat, maybe it will be just that!))))))))
This skirt is without wire rings, crossbars, corset bones and other intricacies. It is fluffy due to the splendor of the tulle frills. This type of skirt can be made up of three or more skirts... and on each of the three, frills made of hard tulle are sewn to the base of the lining fabric, in two levels... not so wide, simply because that the tulle is folded or gathered, the desired volume is created... and the circumference of the skirt is not wide.
These are the researches on the topic...))))) Everything seems to be known, but just in case...))))))
I collected everything I found convenient and target = /
Series of messages “our wedding diary”:
Part 1 - Journey from engagement to wedding...))) Part 2 - Journey from engagement to wedding...)) addition: list of everything necessary for a wedding... Part 7 - Where to start a towel.....Another puzzle!! (journey from engagement to wedding, part 5) Part 8 - And we bought rings...))))) Journey from engagement to wedding... part 6 Part 9 - sewing a crinoline for a wedding dress.. Journey from engagement to wedding weddings... part 7 Part 10 - tricks of sewing a corset... The journey from engagement to wedding, part 8 Part 11 - making an action plan... The journey from engagement to wedding, part 9 Part 12 - We bought a suit!!!...)))))the journey from engagement to wedding, part 10 Part 13 - The minimum program has been completed - let's move on... (the journey from engagement to wedding, part .11) Part 14 - Bless my towel...)))))) journey from engagement to wedding, part 12
Selection rules
Choosing the right petticoat for a wedding dress with rings is not so easy. Here it is necessary to start from the style of decoration, taking into account the pomp of the dress required, and the general atmosphere of the wedding.
For a full-length dress, a heavy crinoline is used. Such outfits look chic; they are mainly used at the official part of the event and photo shoot. For a celebration, you should choose lighter outfits where rings are not needed. Using multiple dresses allows the bride to stay fresh and not tired for the rest of the evening. At the same time, changing several clothes will surprise the guests and give the wedding itself a special touch of chic.
How to fold wedding dress rings
Folding the hoop skirt of a wedding dress can be tricky, so pay close attention to the bridal salon staff as they pack it for you. And in order not to miss anything, you can use our step-by-step instructions on how to fold rings for a wedding dress:
- The first ring is the base. We carefully straighten it and do not fold it, but put it down.
- Each subsequent ring must be carefully held and stacked one on top of the other, turning it over in figure eights.
- After this, you should pack the folded petticoat tightly so that the structure does not unfold.
How to choose a style
There are many styles of wedding dresses: a dress with a full skirt, Greek style, a completely lace dress, a fishnet dress. An integral part of any attire are petticoats of various variations.
It should be noted that not all petticoats can be suitable for various styles of wedding decorations. In order to make the right choice, you should listen to the advice of fashion designers who will help you combine a dress and the perfect petticoat.
For a fishnet outfit, a tulle petticoat is suitable, or give preference to a net with just one hoop. Special petticoats are made for the train, which allow it to lie correctly all day.
Empire style wedding attire and A-line dresses require a petticoat with two, three and four rings.
When your choice falls on a dress made of satin, tulle, or silk, then you will need five hoops. For a curvy style, you should use seven crinoline rings.
What is crinoline
The word “crinoline” is foreign and may not be understandable to everyone. And it means a wide petticoat made of stiff fabric, or a skirt with hoops in its design.
The material for making these hoops can be:
The last two options are the most common and in demand.
The number of hoops can start from one and go up to seven. It is clear that the splendor of the dress increases as the number of these rings increases. But the choice of crinoline type also plays a significant role in changing the shape of the wedding dress.
Stages of sewing a fluffy colored petticoat with your own hands
To make a wedding petticoat with your own hands you will need:
- tulle (minimum 3-5 m in width);
- cambric or any other natural fabric for lining, count approximately 1 m);
- elastic band for the belt (according to your waist measurements);
- threads of a suitable color.
Following these instructions:
- Find on the Internet the simplest and most understandable diagram or pattern for you, there are plenty of them on the Internet.
- Take measurements from the model (hip circumference and skirt length from the waist)
- Start sewing by cutting out the circle skirt pattern. This will be the basis of your work. To sew a skirt correctly, you need to find out the total waist circumference (calculate the hip circumference + 10-12 centimeters using the formula. The resulting result is divided by the number “Pi” (3.14). You also need to choose the correct length of the skirt (add the necessary length of the petticoat).
- Decide on the placement of frills on the petticoat. Depending on the length of the skirt, there may be 3-4 frills. This is an openwork tulle folded in half. Layers of fabric can be added if it is not stiff enough.
- Sew the top frill at a distance of 10 centimeters from the waist, the rest evenly along the distributed length of the skirt.
- It is important to correctly calculate the length of the frills. To do this, you need to measure the length of the line along which it is sewn. The frill should be three times as long as this line.
- Next, sew the parts of each frill into one long one. To do this, place them with short ends one on top of another by 5 mm and stitch them on top of each other with an overlay seam. Do not sew frills into a ring!
- Unfold the frill in one layer and along the fold, sew a landing stitch using the widest stitch on the machine. On the skirt, mark their locations and sew all the pieces.
- The last step is sewing the elastic to the waist area.


