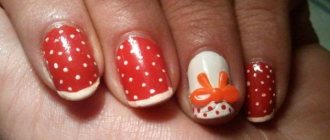
Ways to fix a broken nail
Method No. 1. Fake nails
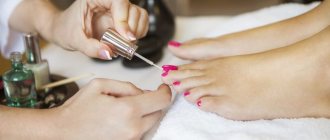
With this method of eliminating damage, square-shaped false nails are needed. You need to prepare glue, nail polish remover, nail scissors and a cosmetic file.
Use nail polish remover to remove excess oil from the surface. Then apply glue to the damaged plate and to the inside of the overlay material. Not many girls know how to fix a broken nail this way. Carry out the procedure at home with caution.
Apply an artificial nail over a broken one. Do not hurry. After a few minutes, trim the unnatural plate so that it matches the natural nail. At the end of the procedure, it is necessary to level the surface with a nail file and glue the joints.
Method No. 2. Adhesive tape
The nail can be restored by gluing a piece of tape with a margin of length onto the nail crack. Then, having distributed the device over the plate, cut off the excess. This method helps to temporarily fix the problem.
Method number 3. Tea bag
This repair option is used if the plate breaks along the arc line. You will need a nail file, glue, nail polisher, a piece of tea bag, an orange stick and a disinfectant.
You need to start by disinfecting the surface to avoid infection. Then, using a nail file, make the plate smooth. You need to use 2 pieces of tea bags. One will be applied directly to the crack area, and the other will be applied over the entire surface.
To begin, coat the broken area with glue and apply the first piece of the bag. Using an orange stick, press the patch and apply glue again. Then you need to polish the surface of the plate.
To consolidate the result, repeat this procedure again. Use the second piece of the bag over the entire area of the plate.
What to do if your nail breaks in the middle?
This usually happens in the case of overextension of coverage, when clients ignore the words of the master and come for correction less than once every 3 weeks. This happens after 5 weeks of wear, the apex line shifts significantly towards the free edge. Therefore, the stress zone remains open and has a very thin layer of material on it.
Thus, the free edge outweighs, which can cause a crack right in the middle of the nail. This is very inconvenient and often painful, because not only the artificial coating cracks, but also the natural nail plate.
The nail is broken in the middle, instructions:
- Blood may also be released. In this case, it is necessary to remove the coating using a milling cutter, disinfect the wound with alcohol or another antiseptic, and remove all shaggy hair and fringe that has formed at the site of the crack.
- Now you need to choose a nail repair method. It is best to use special gels with proteins that heal the nail plate, promote fusion, preventing the emergence of bacteria and fungi in the area of the crack or wound.
- However, it is worth understanding that only professional craftsmen have such products; in addition, such a gel quickly becomes unusable under the influence of water and acetone-containing liquids. Accordingly, when doing homework, you must wear rubber gloves.
- There are special means that podiatrists use. These are gels that can be applied directly to living tissue, even if it is damaged. Typically used for extensions and patches for onycholysis or fungal nails. Accordingly, you can fix a broken nail down to the meat in the middle using this gel. The nail plate is prepared in the standard way, the top coat is removed, and a thin layer of base is applied, and then the gel. It is dried in a lamp and sawdust is produced.
Nail repair
There are a huge number of methods for repairing nails at home. It all depends on the materials you have and how well you know the gel polish or nail extension technique. Ordinary home users most often choose the simplest methods for nail repair, using silk, cotton wool, tea bags and superglue.
Every woman wants to look attractive and charming, and for this she needs to constantly take care of herself. Care is needed for the body, face, hair and hands; special attention must be paid to nails, because beautiful well-groomed hands and nails indicate the health of a woman or girl. More and more often, girls are resorting to such a procedure as nail extensions; it is very popular, and most importantly – very beautiful. But it happens that nails begin to peel off almost immediately. Today our website Beauty-Hands.ru will tell you what the reasons for this are, how to avoid it and what to do if your extended nails peel off. Let's look at these issues in more detail, and also consider some reviews from girls regarding this issue.
Strengthening nails at home
1. Violation of the integrity of the nail plate is a sign of the presence of any diseases. Problems with immunity, pathologies of the endocrine system and much more. It is necessary to consult a doctor to eliminate any health problems that may arise.
2. A common cause of breakdown is a deficiency of microelements in the body. It is necessary to take retinol and a group of B vitamins, which strengthen nails, hair and promote the appearance of new cells.
3. Eat fresh vegetables, they are rich in vitamins. Eat potatoes, whole grain bread, onions, and seafood. They contain calcium, which helps strengthen bone tissue.
4. To maintain healthy nails, take a closer look at folk remedies. Moisturize the periungual fold using various cuticle oils. To soften the skin and speed up blood circulation, use baths.
6. A bath with oils is considered very effective and useful. To do this, you need to add a little ether to warm water and hold your nails for 10-15 minutes. After this, be sure to moisturize your hands with everyday cream. By performing this procedure every week, you can improve the condition of your skin and nails.
To cope with such a nuisance, you do not need to have special skills. Of course, it all depends on the complexity of the situation. Try to fix the problem yourself. If you are not confident in your abilities, seek help from a specialist.
Hi all! This is Nastya and today I will show you how to quickly and reliably fix a broken nail
by your example.
As you can see, my break is unpleasant; it extends into the nail bed, which has not yet had time to grow. So I'm going to tape it
so that the nail grows back and can be easily cut off.
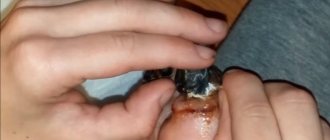
You won't believe it, but you can do this with a regular tea bag
. We will need its upper, clean part. Carefully cut off a piece.
To patch we need a piece that completely covers the break.
. If desired, you can apply a patch to the entire nail. To glue the patch, we need special nail glue. I advise you to buy one to have at home just in case. I generously apply glue to the broken area, but do it carefully so that it does not flow onto the skin.
While the glue is not dry, I put a piece of tea bag on it
and straighten it so that it sticks well. I secure it on top with another layer of glue. I press the broken nail so that it sticks evenly into place. When the glue dries, I lightly sand the surface of the patch with a soft file or buff to smooth it out a little.
At this stage, the patch already holds the broken nail perfectly. If you want, you can continue to coat your nails with varnish.
. Base, color, top - the nail looks great and no one will ever guess that it was broken half an hour ago. The main thing to keep in mind is that after removing the varnish, we need to update our patch - either add a layer of glue, or completely change and update our patch.
How to remove a patch when it is no longer needed?
Cut a piece of regular foil. Take a piece of cotton pad, moisten it with acetone-containing nail polish remover, apply the cotton pad to the patch and wrap the nail in foil. After 10 minutes, we remove this entire structure - the glue has dissolved, remove the rest of the patch and wipe the nail. All!
This is a great way to save a broken nail, which, it would seem, can no longer be helped.
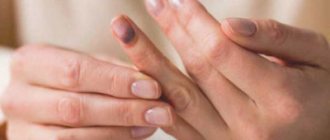
Basically, the nail plate breaks at the place where its contact with the finger ends - along the “smile” line. In this case, part of the nail may not break, but simply crack a little on the side. This situation also causes a lot of trouble. A broken nail will cling, scratch, and leave puffs on nylon tights or clothing.
In this case, it can be repaired. However, it should be said that you should not try to glue a broken or cracked nail with “superglue” or any other similar means. They will begin to corrode living cells, which will lead to disastrous results - you can ruin the structure of the nail or even lose it.
What you need to fix a broken nail
You need to start fixing a broken nail as early as possible, before the crack appears. For this you will need:
1. Disinfectant. It is preferable to purchase one that not only degreases the surface of the nail plate and removes dirt, but also removes excess moisture without drying out the nail itself.
2. Special fabrics. You can use either natural materials (silk, linen) or artificial ones - for example, fiberglass. It is most convenient to work with or fibergasse. You can purchase such fabrics either in ribbons or cut to fit your nails.
Today there are special kits on sale that include all of the above materials. Purchasing such a set will allow you to save not only time, but also money.
3. Special glue for nails that will not harm them. Usually this glue is liquid and hardens quite quickly.
4. Nail files, as well as buffy. A high-quality file that will not harm your nails should have an abrasiveness of no more than 240 units. Buffy is a special polishing file for working with fabric on the nail, with which you can make the coating smoother.
How to fix a broken nail
After purchasing all the products described above, you can proceed directly to fixing the broken nail. First you need to clean the area around the crack with a soft file. This is best done by moving from the base of the nail to its edge. Then treat the surface of the nail plate with a disinfectant and place a small piece of cloth on the crack.
You need to apply a special glue to this fabric, and then give it time to dry completely (usually this happens quite quickly). Then use a nail file to file down the surface of the fabric. In this case, it is necessary that it is as level as possible with the surface of the nail plate. At the end of the procedure, you need to apply oil to the treated nail and thoroughly polish its surface with a soft file.
To completely disguise the damage, cover your nails with colored varnish.
Of course, such repairs to the nail plate will not last too long, but as an emergency solution this method is quite effective. Here, a lot depends on the degree of damage and the load on the nail.
The condition of your fingernails and toenails is a true indicator of the health of the body as a whole. Most changes in the texture, color and strength of the plates are the result of internal causes, so it is important to carefully monitor your nails. You should not ignore even small changes, not to mention serious ones, such as cracks. Having discovered a problem, you must immediately start looking for its cause.
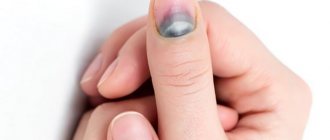
Onychomadesis
The scientific name for the separation of the nail plate from the bed is onychomadesis. The insidiousness of the disease lies in the fact that you do not experience any discomfort during the development and progression of the disease, both on the thumb and on any other finger.
The disease itself does not pose a serious danger to human health - the exposed area of skin does not bleed or become inflamed. However, this sharply increases the risk of infection, which can lead to fungus or purulent inflammation.
The reasons for the nail cover to lag behind the bed on a finger or toe are as follows:
Previously acquired fungal infection.
Mechanical damage to the fingertip.
Reaction to antibiotics and chemicals.
Incorrect development of the plate.
Acquired or congenital pathologies.
It is worth noting that the problem most often develops on the big fingers, and then spreads to the rest of the nails on the hand or toe. At the same time, there is a rapid development of the disease - in six months you can completely lose your nail. Therefore, treatment should begin when the first signs are detected, especially if the disease affects a child.
Causes of cracking fingernails and toenails
Before you worry about the condition of your nails, it is worth understanding the scale of the problem - what exactly is cracked and how seriously it is cracked. Perhaps the damage only affected the decorative coating - gel polish or the material of the extended nail. A true crack that appears on the nail plate itself can be the result of both external and internal factors.
External reasons
Most often, fingernails and toenails crack due to aggressive external influences. Constant contact with chemical compounds (low-quality cosmetics, including bad nail polishes and nail removers, household chemicals) causes destructive processes in the nail plate, it becomes drier and brittle, as a result of which it is easily injured and deformed. External reasons also include:
Internal reasons
Pathological types of nail splitting have their own names:
A crack appears due to dystrophic changes in the nail plate, its thinning and loss of density. The causes of splitting may be:
Reasons depending on surface type
Natural nails
On natural nails, gel polish can also crack.
The following factors contribute to this:
- frequent hand washing;
- changes in hormonal levels during the procedure;
- long-term use of antibiotics;
- low-quality manicure accessories;
- hormonal changes in the body;
- some diseases;
- incorrect application of the gel.
An unhealthy nail plate is a common cause of cracks.
Extended nails
Reasons that can trigger the formation of cracks on extended nails:
- non-compliance with extension techniques;
- incorrect application procedure;
- mechanical damage;
- poor quality material;
- applying a thick or thin layer.
Contact with water and household chemicals also negatively affect the gel on extended nails.
What to do if your nails are cracking
A crack that appears on the nail plate often not only spoils the beauty of the fingers, but also causes physical discomfort, especially if it is deep. Longitudinal fractures that cross the nail from base to tip often diverge even with minor physical impact, exposing soft tissue and becoming a risk area for infection. Eliminating cracks in nails consists of two stages: neutralizing the root cause and repairing the nail itself, which can be done in different ways.
Cosmetic correction
To restore the integrity of the nail, you should contact a manicurist; he will be able to restore the plate, thereby allowing the damaged area to grow back. An important point is that if the crack is a consequence of an infectious lesion, in particular nail fungus, then cosmetic correction is not carried out until the disease itself is eliminated, since the pathogen will simply develop further under the artificial material, causing more harm to the nail.
The following methods can be used for cosmetic correction of cracks:
If the nail is not just cracked, but broken off down to the flesh, then the restoration procedure will have to wait. The first thing to do is treat the wound with an antiseptic and cut off the free edge so as not to cling and aggravate the condition. Covering with biogel and restoring the shape can be done only after complete healing of open wounds and in the absence of an inflammatory process. Until then, you will have to carefully handle the injured finger.
Cosmetic correction methods in combination with a decorative coating give an ideal result - the nail appears intact, and if the main cause of the break is eliminated, it will no longer crack. Otherwise, the episodes of cracking will not stop.
Drug therapy
The use of medications is necessary only if the cause of cracking is pathological in nature. Treatment is prescribed by a dermatologist, prescribing medications in accordance with the source of the problem:
- for fungal diseases, the use of antimycotic agents of local and (or) systemic action will be required. The most commonly used are medicinal varnishes (Loceril), creams and ointments (Nizoral, Fudnisol, Exoderil), sprays (Lamisil), tablets (Terbinafine, Fluconazole, etc.);
- If there is a deficiency of nutritional components, they need to be replenished by taking vitamin-mineral complexes. Lady's formula, HSN-W Hair, skin, nails, Evisent is suitable for strengthening nails;
- in case of dysfunction of the thyroid gland, long-term hormonal therapy is prescribed, drugs for which are selected after a number of examinations;
- treatment for psoriasis involves the prescription of immunosuppressants (Ekoral, Ralef, Leflaid), glucocorticosteroids with anti-inflammatory and antipruritic effects (Cloveit, Fluorocort, Beloderm), products with vitamin D analogues (Curatoderm, Daivonex);
- for eczema, drugs with antihistamine action are prescribed to reduce the body's sensitivity to irritants, including those with a sedative effect (Suprastin, Claritin, Diprazin), and B vitamins.
Proper nutrition
Proper nutrition plays an important role in restoring nail health. Correcting the diet not only ensures the supply of all necessary vitamins and minerals, but is also part of the complex treatment of a number of diseases, including diseases of the digestive system, psoriasis and eczema. The following products will be beneficial for healthy nails:
- white meat;
- vegetable oils;
- cereals;
- vegetables and fruits (carrots, tomatoes, apples, citrus fruits, cabbage, bell peppers);
- eggs;
- dried fruits and nuts;
- fatty fish (sardines, salmon), seafood;
- cheeses and dairy products.
An important point is to drink enough clean water per day. The average norm for an adult is 2 liters, which does not include other liquids, including coffee, tea, drinks, juices, etc.
Proper drinking regimen is of great importance for healthy nails.
Home treatments
You can speed up the recovery of cracking nails at home using useful procedures:
- a bath with sea salt and lemon - whitens the nail plates, prevents them from coloring and cracking. In a liter of warm water, you need to dilute 2 tablespoons of sea salt, add a tablespoon of lemon juice. Keep the nails in the resulting composition for 15–20 minutes. It is better to carry out the procedure every other day for 2 weeks;
- oil bath - strengthens nails and makes them less brittle. You need to heat 3 tablespoons of olive oil in a water bath, add 2 tablespoons of liquid honey and mix thoroughly. When the composition has cooled, add a raw beaten egg and dip the nails into the resulting mass for 15 minutes. After the bath, it is recommended to apply the cream and repeat the procedure for a month, 2 times a week;
- sealing with wax - allows you to cover the smallest irregularities and damage with a substance with a restorative and nourishing effect. To carry out the procedure at home, you need to purchase a special composition, or prepare natural beeswax mixed with vegetable oil (almond, olive or coconut) and essential oils (cedar, pine, patchouli). The sealing itself is simple: warm wax cream is applied to previously cleaned and polished nails and rubbed in with your fingers. After treatment, hands are immersed in cold water for a few seconds to harden the composition.
Repairing cracks yourself
If the nail is cracked and it is not possible to immediately go to a specialist to eliminate the defect, then you can temporarily revive the damaged plate yourself. For this you will need:
- file;
- tea bag;
- clear nail polish;
- nail scissors.
To seal a crack you need:
- Remove the decorative coating, if any, from the nail and, with careful movements, slightly file down the damaged area, removing the shiny layer.
If the crack is severe, you should not use acetone; it is better to immediately remove the varnish with a file. At the first stage, you need to remove the decorative coating from the damaged nail and remove the shine with a file or buff. - From a tea bag, cut a small strip of material comparable to the size of the crack.
You need to cut a piece of material from a tea bag - Apply a little clear varnish to the damaged plate and apply a piece of tea bag, carefully leveling it.
Apply clear varnish to the crack and apply a patch. - For reliability, it is recommended to make another layer of patch in a similar way.
For strength, apply another layer of varnish to the patch and apply a second piece of the bag. - When the structure is dry, it can be filed down a little around the edges, smoothing out the differences.
- The finished nail must be coated with clear or colored varnish.
This method is only suitable for natural nails; if an artificial nail breaks, the bag will not help. Remember, you cannot use household superglue or instant adhesive that is not intended for this purpose to seal a crack.
What should a nail technician do if a nail is cracked under gel polish?
If a nail is cracked under gel polish, the master must do a full repair and strengthening, using for this:
- plastic gel if damaged in the center of the plate;
- more rigid materials - polygel, fiberglass, fiberglass with a defect formed on the side;
- gel for extensions when broken at the root.
You don’t need any special tools for this; those that nail artists usually have are enough.
Watch a video on how to repair a cracked nail:
Tools to fix
You can fix a broken nail so that the crack is not visible using several devices:
- silicone “hoof” or orange stick;
- buff with abrasiveness 240 grit;
- flat brush;
- clinser;
- polygel;
- scissors;
- jelly gel;
- gel for nail repair, sealing;
- silk, fiberglass, fiberglass.
Liquids traditionally used to perform gel polish manicure are also needed.
If it's broken in the middle
If the nail is broken in the middle, it can be repaired in several stages:
- Remove the material down to the natural plate, that is, the base, even in the absence of detachments on it.
- Wipe with degreaser and apply primer.
- The next layer is the base, which needs to be spread in a thin layer, polymerized, and the stickiness removed.
- Using a silicone applicator or an orange stick, take a portion of the polygel and place it on the crack.
- A flat brush is dipped in a cleanser and wiped on a napkin so that the bristles are not too wet.
- The tool is used to distribute the material so that the crack is closed and the surface of the nail becomes smooth and anatomically correct.
- It must be dried in a lamp.
- The next step is to remove the sticky layer with a damp cloth.
- The end of the nail must be filed to remove unevenness.
- Then it can be covered with a leveling layer of base, flower bed and top, successively drying each product and removing stickiness.
Broken on the side
If the nail is broken on the side, you need a more rigid material than polygel, and the repair procedure looks like this:
- A base is applied to an uncoated nail treated with a degreaser.
- This layer is dried in a lamp, and the surface is wiped with a cleaner.
- A rectangle is cut out of fiberglass approximately ¼ of the nail plate.
- The material is removed from the substrate and placed on the damaged area.
- A base is applied to the fiberglass, soaking it until transparent.
- You need to dry the coating in the lamp again.
- To model the nail, use liquid gel, first applying it with a flat brush in a thin layer.
- Then a portion of the same material is taken with a silicone applicator, placed on a plate and also distributed with a brush.
- After drying in the lamp, you need to file the nail from the end, sides and top, and wipe with a clinser.
- The thickness is also reduced from the inside using a machine and a carbide nozzle.
Side breaks can also be repaired with fiberglass:
- The material is smoothed on a flat surface so that the elastic threads lie in one layer.
- A base is applied to the area with the crack and is not polymerized.
- The fiberglass is applied to the area to be repaired.
- Use the applicator to distribute it over the nail.
- Apply another thin layer of base product on top.
- The finger is placed in the lamp to dry.
- Excess fibers are cut off with scissors.
- And you can use liquid modeling gel, as in the previous case.
How to glue if under the root
Gluing a nail if it is broken at the root is the most difficult thing, but it is also possible with the help of modeling:
- The remaining free edge is cut down to return the plate to its natural shape.
- Apply a thin layer of base gel.
- This layer must be polymerized.
- Prepare the top form for extensions and apply it to the nail for fitting.
- You need to cut it with scissors in accordance with the outlines of the end part.
- The form is placed on the nail for modeling.
- Coat its surface with an even thin layer of gel.
- The same material is placed onto the mold in drops using a rigid applicator.
- Using a brush, distribute the modeling gel over it, forming a free edge of the desired length.
- Place your finger in the lamp without removing the mold yet.
- After drying, the sticky layer of gel is removed, and the paper auxiliary part is also removed.
- The resulting substrate of material is sawed off from the sides and end.
- Modeling is continued with the same gel, taking a drop with a brush and spreading it over the plate in a thin layer.
- Then take a larger drop of material using an applicator and place it in the middle of the nail.
- Using a flat brush, apply it more evenly, maintaining proportions.
- The finger must be turned over so that the gel is properly leveled, and then sent into the lamp.
- After removing the sticky layer, the excess material is filed away.
- Coating can be done in the usual way.
These manipulations should be carried out if the nail breaks without bleeding. Otherwise, you must first allow the damaged tissue to heal and prevent infection. The finger is washed with chlorhexidine or peroxide, antibacterial ointment is applied, and a bandage is applied. The latter needs to be changed daily and the wound treated.
Watch a video on how to fix a cracked nail:
Prevention of cracked nails
Following these recommendations will help reduce the likelihood of cracks in your nails:
- avoiding direct contact of skin and nails with aggressive chemical compounds, using household chemicals only with gloves;
- maintaining a correct drinking regime during the day;
- the use of moisturizing and nourishing compositions for nail care;
- regular disinfection of your own manicure tools, control over this process when visiting a manicurist;
- promptly consult a doctor if alarming symptoms appear and follow recommendations for the treatment of identified diseases.
Causes of cracks in extended nails and how to get rid of them
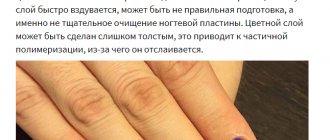
Artificial nail coating also often cracks and peels off from the natural nail, and there are many reasons for this:
- low quality of the material itself, which does not provide it with the necessary strength;
- incorrect placement of gel or acrylic, incorrect preparation of the natural nail for coating;
- too thick layer of gel and insufficient drying. In such a situation, the material remains soft inside, which not only affects the density of the structure, but also creates a favorable environment for the development of bacteria;
- mechanical damage, and the longer the nail, the easier it is to break.
If a crack appears on the extended nail, you need to go to a specialist as soon as possible, who will have to redo everything on the damaged finger. The extension materials are applied in a fairly thick layer and are distinguished by significant strength, which makes cracking dangerous - touching an injured finger can greatly aggravate the situation, and even tear out part of the nail with meat. During a visit to a manicurist, he will file off the cracked nail and apply the material again, from the very beginning - this is the only way to reach the planned correction of all fingers and not cause serious damage to your own plate.
Video: eliminating cracks in extended nails
Cracks in the nail plates can occur not only from mechanical injuries; they can also be caused by dermatological and even thyroid diseases. As part of the treatment of the problem, it is important to eliminate its source and only then carry out cosmetic correction of the defect.
Well-groomed and beautiful hands are a real source of pride for every girl. An ideal manicure and unusual nail design create a harmonious image.
Recently, nail extensions and strengthening their surface with various materials have become popular. Every second girl walks around with extended nails. This manicure looks very impressive and requires care only once a month.
However, even an extended nail can accidentally break. This becomes a big problem for every girl. What to do if your nail is broken? Don’t immediately panic and file off the rest of your nails. The situation can be completely improved.
Reviews:
Olga, 24 years old
“I am familiar with this problem: after nail extensions, literally after a few days they began to rebuild, for a long time I could not understand what exactly was the reason. It turned out to be very simple, the master just didn’t properly prepare the natural nail itself, I don’t know exactly what the reason was, according to my friends’ reviews, I went to another master, now everything is fine.”
Karina, 27 years old
“I also know firsthand what peeling nails are. My natural nails are very brittle, so I have to resort to this procedure. At first everything was fine, but then literally a week later I noticed that the extended nails were peeling off. It turned out that the whole problem was that I was not taking care of my nails correctly. I asked my master everything in detail, she said what could be the reason, after that this never happened again.”
Marina, 30 years old
“And my nails were peeling off only because I really love doing manicures, I constantly take care of my nails, nourish them with various oils, since natural nails constantly crumble and flake, and this became the reason for the peeling of my extended nails. I read reviews on the forum and found out that this should absolutely not be done before the extension procedure, now everything is fine, the problem has been solved.”
Skipina Anastasia for the site Beauty-Hands.ru
Cosmetic repair of extended nails
It doesn't matter how the extension was done. No material (tips, molds, acrylic) guarantees the durability of the coating.
Note!
You can easily deal with the problem at home.
Let's look at a simple technique for restoring an ideal manicure. It takes very little time, and the effect is simply amazing.
To work we will need the following tools:
- File
- Clear nail polish
- Super glue or glue 101
- Tea bag
Let's get started:
- We need an empty tea bag, so carefully open it and pour out the tea leaves. Now cut a strip out of it, equal in size to the chip on the nail.
- Treat the nail with a nail file.
- Apply a drop of glue to the nail and press the paper strip onto it.
- Add more glue on top.
- Wait for the glue to dry and apply 1 more layer.
- After the glue has dried, carefully trim the paper around the edges of the nail.
- Treat the surface with a nail file.
- Use nail polish remover to remove excess glue.
- Apply a layer of clear varnish on top to seal.
Note!
To prevent pathogenic bacteria from entering the nail cavity, it is necessary to treat the broken area with any antiseptic (lidocaine, hydrogen peroxide).
A toenail came off: a solution to the problem
If you do not treat nail fungus, it will gradually peel off more and more. As a result, the nail may even come off. Actually, complete detachment of the nail can be the result of some kind of injury, for example, a severe bruise. If you have a similar problem, but the nail has not completely come away from your foot, you should immediately go to the emergency room. The surgeon will remove the entire nail and treat the wound. Under no circumstances should you try to deal with this problem on your own; you may get an infection.
If the nail comes off completely, the wound can be treated without medical intervention. To do this, you can use hydrogen peroxide or a chlorhexidine solution and a gauze swab. After disinfection, apply a small amount of streptocidal ointment to the wound. When moving your fingers, pain may occur, but this is quite acceptable. Of course, not everyone will be able to comply with bed rest. Therefore, before leaving, be sure to apply a bandage with streptocidal ointment to the damaged area and carefully cover it with a band-aid. Don't panic if your remaining toes become swollen. This is a completely natural reaction to trauma.
Serious nail damage
If the damage is serious and a simple patch is not enough, it is recommended to treat the nail with an antiseptic and seal it with a medical plaster. This will prevent the nail plate cavity from breaking.
- If you damage your nail at a party, see if anyone has clear nail polish. Find a paper towel and cover the broken area with it. Secure the napkin with varnish.
- The fracture site can be sealed with ordinary transparent varnish and, after drying, a colored coating can be applied.
- Visit a nail salon. You will have professional extensions done using natural materials such as silk or bio-acrylic. The coating must be cut off as the nail grows.
- If you notice that your nails have become brittle and often crack, reconsider your diet. Perhaps this is simply due to a lack of vitamins. Take calcium supplements and various vitamin complexes to improve the condition of your nails.