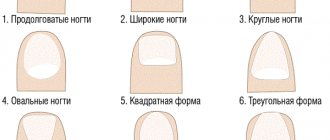
How to choose the perfect shape
Nail industry professionals advise choosing a shape so that it decorates your fingers and does not cause discomfort when worn. For example, almond-shaped nails look feminine and natural, hands become more graceful. However, there is also a minus - very long plates will seem unaesthetic. Sharp almonds are uncomfortable for everyday wear, unlike the rounded version. It is recommended for women with weak and brittle nail plates; there are no restrictions in shades or design.
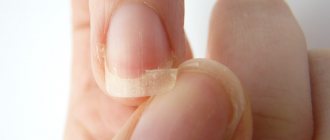
The square is suitable for many, even with a minimum plate length. It can have sharp or rounded edges, but the problem with a square is that the corners often break off. Oval plates are considered an excellent idea - they are elegant, rarely damaged, and allow you to grow your natural length.
Changing the shape of your nails just for reasons of popularity is not entirely correct. You need to read factors such as the length and appearance of the fingers, the condition of the plates, the size of the stock, the type of activity, and the presence of damage to the hands. Extended or natural nails are also taken into account - the latter are more fragile and are not suitable for some types of manicure. Almonds are suitable for thin, long phalanges; plump fingers will not look good with this shape.
How to choose your nail shape
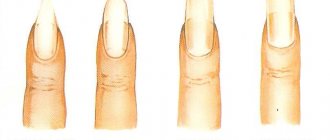
When choosing a shape, you need to pay attention to the structure of the cuticle, the length of the fingers and the shape of the nail bed. “According to the classics, the shape of the nails is set as a mirror to the cuticle. That is, if it is oval, then the oval shape is your choice,” says Roman Titov, technologist and expert on CND products.
“For shorter fingers, a rounded nail shape is recommended. Round nails look good if they are short or medium. They are perfect for everyday manicure. Square nails suit women with thin fingers, as well as long ones,” says Marina Kovtunenko, manicurist at the Art’Up beauty salon on Patriarch’s.
“If the base of the cuticle is square or oval, then it is better to opt for a square and round shape; if the base is oval or triangular, then an oval or almond shape is suitable,” adds Svetlana Merkulova, master of the nail art studio “Alice in ZAZERKALYE.”
Almond-shaped
This shape resembles an almond and is slightly pointed at the tips. Looks good on medium length nails. “The choice of one or another form of free edge depends primarily on the length of natural nails. For example, almond-shaped and triangular are worth doing when there is a decent size at the free edge. Otherwise it won't look good. The almond shape has a tapered tip. This shape visually lengthens and makes the fingers slimmer,” says Oksana Rachinskaya, technologist at the nail supermarket Lakk & Roll.
“This shape is comfortable to wear and, due to the lack of corners, is less likely to break,” adds Svetlana Merkulova.
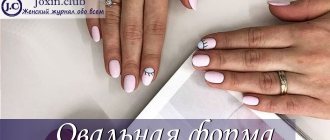
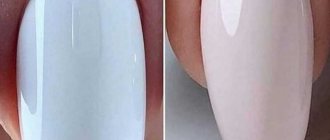
Oval
The oval shape is the natural shape of the nail plate and suits absolutely everyone. This feminine nail shape will help make wide fingers look thinner and short fingers look longer. “Dark colors look impressive on short nails, but there is a little trick - you need to leave the side parts a little unpainted, about three millimeters, creating the illusion of a narrow nail plate,” recommends Elena Chugunova, nail service master at the Manicuroff studio chain.
Round
These shapes are universal for wide fingers and palms. “If you have this kind of hands, then it’s better to choose a round shape. However, you should not make your nails too long. Round and oval shapes look good if you choose a medium or short length,” says the master of the nail art studio “Alice in ZAZERKALIE.”
The shape of the nail is absolutely symmetrical along the cuticle and free edge. Round nails look good at any length, are comfortable to wear, and with a nude finish they will visually lengthen your fingers.
Square
One of the most popular shapes is square. It looks best on long and thin fingers, and looks good on short nails. “This shape is also suitable for those with a narrow nail plate; in fact, the square will visually expand it. The square shape can be emphasized with geometric elements, various stripes, triangular holes in combination with bright shades or glossy shine,” advises Elena Chugunova.
"Ballerina"
In the West, this form of nails is called coffin nails. Kylie Jenner brought it into fashion in 2021. Coffin nails mean extreme length and eye-catching designs. This shape suits narrow nails. “The highly tapered square resembles a ballerina’s pointe shoe. This form is often done when doing nail extensions, as it looks beautiful on long nails,” says the master of the nail art studio “Alice in ZAZERKALYE.”
“The “ballerina” shape is a kind of symbiosis of almond, square, triangle. The latter gave rise to a slightly tapered free edge. The square can be traced in the clear corners of the free edge and its smooth perpendicular line. Almonds left their mark on the length and smoothness of the lines of most of the nail,” says Oksana Rachinskaya.
Stylet
Another form for lovers of extended nails is stilettos. They are sharp cat nails. “Stilettos were in fashion in the 40s of the last century, actresses and singers loved them. Now they are chosen by outrageous girls,” says a technologist at the nail supermarket Lakk & Roll. Since this shape is usually created by extensions, it is suitable for naturally short and round nails to visually lengthen them.
Tools for work
For manicure you need to prepare the following tools:
- nail scissors or tweezers - to correct the length and remove the cuticle;
- sawdust file (180-100 grit);
- grinding and polishing blocks;
- pusher/orange sticks to push back cuticles.
First, the plates are cut to the same length, then they proceed to sawing. For natural nails, do not use hard files; fine-grained tools are needed. After giving the desired appearance, the plate should be sanded and polished, paying attention to the free edge.
Almond shape: what is its highlight
On which fingers do “almond” fingers look most impressive?
A manicure for almond-shaped nails is best done if the nails are of medium length. With long nails, the almond configuration also looks good.
It must be remembered that for an almond-shaped manicure, the fingers must be long and thin.
If your fingers are chubby, then the almond shape of your nails will look unsightly - it will disrupt the overall proportions of your hands.
This manicure is also ideal for natural nail plates, as well as artificially modeled using gel or acrylic.
The uniqueness of this configuration lies in its versatility. It goes well with any clothing style and goes with all accessories, even the most extravagant ones.
Disadvantages of an almond shape
The almond shape of nails has one main drawback - it is not practical for daily use.
Therefore, it is most often recommended to be used for special occasions.
In addition to being impractical, nail art experts often say that almond nails are traumatic and not long-lasting. And it’s also more difficult for women with such a manicure to do daily household chores. Such nails should be especially carefully and carefully cared for. With heavy load, nails may crack and chip.
How to achieve an almond shape
Regardless of the original type of plate, first make a square using scissors or a file - this is the basis. When filing, do not press too hard on the tool to avoid deformation. At this stage, all novice craftsmen have a logical question: “How to make almonds from a square shape?”
Cutting almonds from a square
In fact, there is nothing difficult here: just mark the middle, and then carefully cut off the sides. It is important not to touch the growing points, as problems may arise after a few weeks. Gradually, the square should turn into a trapezoid, not a triangle. Next, you need to gradually round off the free edges, achieving the desired look.
If the trapezoid is not elongated enough, the result will be an oval rather than an almond-shaped nail. You need to feel free to file down the sides of the plate; you can even use a rough file for this.
If you managed to make the form and are completely satisfied with it, you can move on to the next stage. You need to sand the edges to make them smooth. Then go over the entire surface with a polishing block and remove dust with a napkin.
Cutting almonds from an oval
Of course, it’s easier to trim the plates evenly and then make almonds from the square, but this will result in a loss of length. In cases with an oval shape, to maintain the length, it is recommended to proceed as follows:
- mark the middle of the plate;
- narrow the oval using a file to the marked point;
- At the same time as giving shape, round the tip.
This execution is a little more difficult, especially if the length on all fingers was different. You will have to work by eye. It is difficult for a beginner to achieve the perfect result the first time.
What to do with short nails?
Short almonds have a right to exist, but there are several nuances here too. It will only look good on long, straight fingers. If they are plump, curved, then it is better to choose a square or oval. A sharp edge will draw more attention to imperfections, but you can choose a soft option. The form in this case is cut out according to the following algorithm:
- find the center of the plate, focusing on your finger;
- place the file under the nail (45 degree angle) and slightly round the free edge;
- form side arcs, retreating from the growth points;
- check the symmetry of the sides (to do this, look from different angles);
- sharpen the tip with gentle movements, and then put the file under the plate again to cut off the lower parallels.
In the end, all that remains is to check whether you managed to cut out the almond shape of your nails or if something needs to be corrected. The plates should look the same before they can be sanded.
How to give almond shape to your nails: basic rules
Important: An almond shape can be given to those nails that have an average or slightly longer than average length of the free edge. This manicure will not work on short nails! You will have a rounded triangle, but no almonds.
The free edge should be at least equal to the middle of the nail bed or at least 5 mm. In this case, you will get a beautiful, elegant and sophisticated almond manicure, which will make your hands feminine and elongated.
Consider the length of the free edge
- The almond manicure itself is similar to almond kernels - rounded at the base of the nail and a narrowed but smooth edge of the nail plate.
- For work we need a file from 180 grit! If you are working with natural nails. For artificial materials, we take a higher abrasiveness - from 100 grit.
- We hold the file in the “lock” position: on one side you place all 4 fingers, and on the other - your thumb.
- First of all, find the center of the nail! Sometimes the upper phalanges or the nail itself grows slightly at an angle, to the side. You can’t leave it like that, especially when creating an almond manicure. To do this, we need to find out the center of the finger itself, from the base. We place the edge of the file in the middle of the finger and find the center on the nail plate.
Finding the center
- For convenience, we mark a small point - this is the center, our landmark. Of course, you are doing this only for illustrative purposes while you are learning. During the cutting process it will be removed. And in the future you will be able to see the middle of the axis by eye.
During training, you can put a dot with a marker
- After which we look at the client's nails. But we do this from the position as a person will see them on himself - that is, we bend the arm at the elbow, turn it over and look at the back of the hand. We find the shortest nail among other fingers!
We take into account the length of each nail or possible flaws
- If the nails are all of the same minimum length, then we make a reference point to the longest nail bed. First we cut the length on all fingers!
Important rule: The middle, index and ring fingers must be the same length! Therefore, it is worth starting to work with them. Especially with an almond-shaped manicure, the little finger, but also with others, can be literally 1 mm shorter. But on the big one, on the contrary, it’s 1 mm longer!
Remember two important rules when forming any shape:
- We make smooth and long movements with our hands! The shorter your movements, the more uneven the edge of the nail will be.
- We do not go to the nail platinum growth points! We work from them, diagonally, under the nail. We take the file into the void, and not onto the nail!
First we cut the sides, and then we cut out the shape!
Right
Wrong
When you file the corners to make almond edges:
- We make long, smooth movements, bringing the file to the center of the nail from the growth points, thereby forming a smooth almond tip. We do this with movements in two directions, without going into the area of the nail plate.
- As a little tip: Your joint needs to work wide to create long movements. Imagine that you are playing the violin. Both the elbow and even the shoulder joint should be involved in the work.
We work not only with the hand, but with the whole joint!
- It is strictly forbidden to lift the file upward, bring it directly to the base of the nail, or, even worse, reach the cuticle. We move the nail file diagonally, without touching the growing point!
- At the same time, hold the file at an angle of 45°. As a guide, the side of the file, the end, should be looking at you. We form our smooth angles.
Movements are smooth, sliding
Sharp, strong movements or movements that extend to the base of the nail are not permissible!
- When we form the lower parallel, we put a file under the nail! We work from the growth point!
- As a little advice: If you need to level the plate, move the center point by carefully cutting off the side walls. We work smoothly and slowly on the side where the nail will be displaced so as not to saw through.
We put it strictly under the nail!
First we saw the fingers on the left hand, then on the right hand!
- We also don't buff up and down or side to side. Your movements should be sliding from the base of the nail growth and smoothly move towards the free edge.
How to work with a buff!
Design for almond-shaped manicure
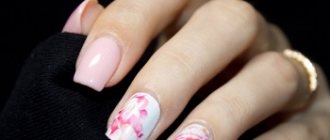
Almonds are now considered a classic, but it’s easy to make a manicure look vulgar. When choosing a design for such nails, it is preferable to choose French, pastel or nude shades if additional design is expected. You can decorate the colored coating with stamping, stickers - sliders, small rhinestones and bouillons.
When choosing a design, you should be careful, as it is easy to make the manicure too provocative. Watercolor painting, which looks good on long and short nails, is gaining popularity. You can learn how to create beautiful drawings using video tutorials.
Shiny tapes glued vertically or horizontally will help to visually lengthen the plate. By abandoning rhinestones, patterns, and decor, it is permissible to paint the coating with rich or dark varnishes. A matte top will look good as a modern design.
Almond shaped water nail design
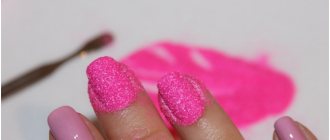
Water nail design not only looks very beautiful, but is also fun to create. With this type of design, it is recommended to use no more than 4 colors so that the design is beautiful. For water design you will need: varnishes (gel polishes) of different colors, a glass of water and a toothpick (can be replaced with a needle). Drip varnishes onto the surface of the water, alternating colors. Each subsequent drop falls into the center of the previous one. The result will be a circle that resembles a target. Next, you need to arm yourself with a needle and imagination, creating patterns on the surface of the water. Once the drawing is ready, the finger is lowered into the water. The nail needs to be placed under the design and lifted out of the glass. Remove excess varnish from the surface of the skin.
Almonds and extensions
Before making an almond shape, it is recommended to grow the length. For natural plates it will take from 2.5 to 4 months depending on their characteristics. It is not uncommon for one or two nails to break at the most inopportune moment. The way out of the situation is to increase the missing ones or all the plates at once to achieve the same length. Strengthening is often done with biogel.
Almond-shaped extensions wear well if done well. At home, you can also increase the length with various materials: acrylic, gel, acrygel, biogel. However, you will have to not cut out the almonds correctly, but also take into account the architecture. To do this, you should learn more about different technologies and choose the right one for yourself. Top tips, which require virtually no sawdust, are popular. Extended almonds look no worse than natural ones.
Fashion trends often force women to do manicures that they don’t like or that cause discomfort. Almond looks elegant, feminine, and suits almost all girls. It's easy to make from a square, but you can try cutting it from oval plates. Every craftsman should know how to make an almond shape and choose a design for it.
How to make an almond shape on extended nails
When working with acrylic, choose rough files that are comfortable to work with. The cutting pattern is the same as for natural nails. But it should be remembered that nippers are not suitable for artificial plates. Under their influence, the acrylic nail can crumble, which will ruin the manicure and will not give anything else. It is better to replace the nippers with a file. Of course, you will spend more time with it, but there is simply no other choice.
It is worth noting that it is better to initially make extended nails in the shape that you like. After all, remodeling will require time, resources, and will not look as high quality as on natural nails. If you really want to change the shape of the extended plates, then it’s better to do it with a specialist. This, of course, will cost money, but it will also guarantee a good result.
If it is not entirely clear how exactly to make the shape, watch the video at the end of the article on how to make almond-shaped nails. It will be informative for you, since you can not only find out how the whole process goes, but also see it. In an area like manicure, this is important. While watching how to make an almond nail shape video, you can simultaneously follow the master and thus learn.
Photo from the site: french-foto.ru