A neat manicure is a decoration for women's hands. Unfortunately, due to the frantic pace of life, many girls cannot find time to visit a salon. What to do in this case? Everything is very simple! You need to learn how to do simple procedures yourself, at home. To do this, it is absolutely not necessary to attend expensive courses, because thanks to video lessons posted on the Internet, you can learn not only how to properly design your nails, but also how to make beautiful designs using various tools.
Working with the cuticle
A DIY manicure at home starts with the cuticle. Where to start processing it? In order for dry skin to become more pliable and be removed painlessly, it should be softened, and a bath with warm water will help with this.
SIMPLE HOME MANICURE
To do this, pour water into a small bowl and add sea salt if desired. In this case, you can get a comprehensive procedure that will help soften the cuticle as much as possible and at the same time strengthen the nail plate, soften the skin on your hands, and eliminate irritation. The time for taking such a bath is 10 minutes.
Use a terry cloth to blot your hands and use an orange stick to push back the cuticles.
Remove it using special pliers.
Then rub in cuticle oil or regular rich hand cream.
Today, a lot of different products are sold to make cuticle removal easier. For example, salons actively use a special product to soften the cuticle. It allows you to get rid of the skin without the use of cutting tools, but when working with it you need to be very careful, since if you leave the composition on your nails too long, you can get a burn or cause excessive dryness of the nail plate.
CUTICLE SOFTENERS
| Brand RUNAIL. The remover contains aloe extract. The cuticle softens within 3-5 minutes and is removed with a stick or a special manicure tool. Not suitable for very rough skin. | |
| Brand ORLY. Medium consistency, specific aroma, removes cuticle well. The exposure time is only 20-30 seconds. | |
| Brand INGARDEN. The remover has a liquid consistency, is convenient for home use, and perfectly softens the cuticle. Application time also ranges from 3 to 5 minutes. | |
| Brand Be natural. Acts quickly, maximum time 45 seconds. Very quickly softens the cuticle. It is better to apply in stages, several fingers at a time. Suitable for rough cuticles. | |
| Brand OPI. The product is in the form of a light cream with a pleasant aroma. Exposure time 3-5 minutes. Not suitable for very rough cuticles; it will soften them only slightly. | |
| Brand CND. A good remover that removes cuticles very carefully. But not very suitable for home use due to its large volume. | |
| Brand MASURA. Remover with algae extracts. Well softens and nourishes the cuticle. | |
| Oriflame brand. The remover has a pleasant smell and softens the cuticle well, but the bottle is not very convenient to use. | |
| Eveline brand. Not a very comfortable tube. The product is difficult to distribute accurately. It greatly softens not only the cuticle, but also the nail plate. |
Hardware manicure for beginners
Probably everyone has already heard about hardware manicure. More and more fans of this technology are appearing. Its trick is that it allows you to free it from dead cells without damaging the cuticle. Of course, here you will have to master a special apparatus, which is equipped with various cutters. It will help you forget about wire cutters and other devices. Hardware manicure is performed quickly and painlessly.
HOW TO DO A HARDWARE MANICURE CORRECTLY STEP BY STAGE
It is performed on dry skin. At home, it is better for beginners to work at low speed to prevent accidental damage.
Stages of work:
- If there is old coating, it must be removed. How to do this correctly, see the section: How to remove gel polish.
- Treat the skin with an antiseptic liquid.
- Use a stick to push back the cuticle. Using a cone-shaped nozzle, remove the skin. Hardware manicure for beginners should be performed at medium speeds. Movements should be neat and smooth. The cutter should not be pressed too hard against the skin. To remove the cuticle you need to move from left to right.
- Give your nails the desired shape. The disk attachment is designed for this purpose.
Video tutorial on hardware manicure
European manicure at home
A trim manicure is not the only way to get your hands in order. European manicure, which has a lot of advantageous characteristics, is considered its worthy competitor. Its essence is that the cuticle is treated with a special softening compound, and then pushed back with a stick. After applying the decorative coating, a special oil is applied to the cuticle, which slows down its growth. The beginning of a manicure for beginners is giving the nails the correct and suitable shape. To do this, use a file of medium hardness. After that, the nails are covered with regular varnish and the coating is secured with a special product.
The advantages of European manicure are obvious:
- The risk of infection is reduced.
- Does not cause pain.
- It will be an excellent choice for people with thin, sensitive skin.
EUROPEAN HOME MANICURE
- The first step is to remove the old coating from your nails. Detailed instructions in the section: How to remove gel polish.
- In the second stage, you need to shape your nails using a natural nail file and lightly sand them.
- Apply remover (a special cosmetic product for softening and subsequent removal of the cuticle). The exposure time is different for everyone, from 30 seconds to 10 minutes (on average 3-5 minutes). Read the instructions carefully, because... the recommended time cannot be exceeded. Then you need to remove the remover with a cotton pad or wash it off.
- We push back the cuticle and clean the edges if necessary.
- At the final stage, we roughen the nails using a buff and degrease them using a special de-sticking agent.
It is better to degrease your nails with special lint-free cotton pads for manicure to avoid getting small fluff on the nail, which can subsequently ruin the appearance of the coating.
Nails are prepared for applying gel polish. You will learn about the sequence of stages of a gel polish manicure below in the step-by-step photos.
Video tutorial on how to perform a home European manicure
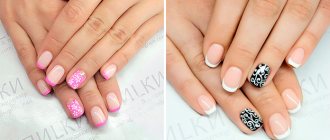
How to do edged manicure at home?
Despite the popularity of European manicure, many girls still prefer the edged version, thanks to which a manicure with gel polish or other coating looks very impressive.
Performing a trim manicure for beginners in stages is as follows:
If there is an old varnish coating, it must be removed.
- File your nails and give them the desired shape.
- Prepare a bath to soften the cuticle (you can additionally apply remover).
- Then push back the softened cuticle with a stick or metal pusher. You can also clean out the pterygia with a spatula.
- Using nail scissors or nippers, carefully trim the cuticle along the edge and clean the area of the side ridges. After this procedure, the cuticle can be wetted again and pushed back again.
- Apply nourishing oil or cream with massage movements until completely absorbed.
Video tutorial on trimming your own manicure
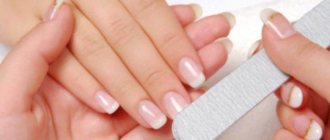
How to make the right nail shape
Before making a beautiful nail shape, it is recommended to choose the style that you want to achieve as a result, since there are quite a lot of design options.
Previously, craftsmen made three basic styles - circle, oval, square, but now there are many more options for surface correction, but when choosing them, the original proportions of the hands and fingers must be taken into account.
Before you properly shape your nails, choose their type that looks harmonious:
- Circle. It looks well-groomed only on short, plump fingers of women who naturally have a small nail bed.
- Oval. A universal option suitable for almost all girls, regardless of the genetic characteristics of the fingers and palms themselves.
- Square. Recently the type has been quite common, it is quite comfortable to wear due to the short length of the plate. Suitable for thin and long fingers, since the square can visually shorten them. However, you need to be careful with it if you have a thin build, since the disadvantage can only be emphasized.
- Almond. It looks quite feminine and impressive. Due to the pointed tip, almond-shaped fingers are recommended only for girls with short, plump fingers. In general, it almost always looks noble; you only need to change the length of the manicure.
Stilettos are a derivative of the almond-shaped type, since it implies a stronger sharpening of the tips of the nails. Shaping nails in this way does not always look noble, sometimes even vulgar. In addition, not all masters know how to create a sharp nail shape so that it looks feminine and harmonious.
Before filing your nails, choose a design method that will suit your individual structure of palms and fingers.
What will you need?
An important step before filing your nails is to prepare the supplies and tools you will need during the job. Poor quality of devices can negatively affect the deterioration of surface finish.
You will need several tools:
- File;
- Orange stick or metal pusher;
- Nail scissors or clippers;
- Buff for polishing.
To speed up the processing of the cuticle, you should use a remover - a special liquid that is applied to the keratinized epidermis, helping to soften it. At home, it can usually be replaced with hydrogen peroxide.
If you are making a decorative coating, prepare all the materials you will need for it. For example, when working with gel polish, in addition to the pigments themselves, you need to use a primer, base, top, as well as an ultraviolet or LED lamp to dry the result.
Additionally, before the procedure, you need to treat all instruments with an antiseptic to prevent infection from entering the body if the periungual area is damaged.
Basic recommendations
Even a nail technician cannot always correctly design a manicure, giving it a noble, well-groomed style, so take into account the recommendations for performing the procedure if you are going to do it at home.
As for the method of performing the correction, the main recommendation is to use a file, not manicure scissors. Moreover, it needs to be moved in one direction so as not to damage the location of the stratum corneum of the bed. If you do not take into account the rule of how to properly file your fingernails, there is a risk of detachments and thinning.
Shaping nails also has several features:
- Symmetry. When creating a design, always make sure that it is absolutely symmetrical. To do this, you can turn your finger with the back side and check if the nail is tilted in any direction.
- Length. The length of all nails should be absolutely the same; for this, during a manicure, be sure to place your fingers in the same position and bring them to perfection.
- Minimum size. To choose the length of the nail plate, it is recommended to find the finger on which it is minimal. Adjust its free edge and use it as a guide when working with the rest of your fingers.
- Prepare a picture of the result you want to get. If you hold it in front of your eyes, the likelihood of getting a beautiful effect will be higher.
- Clear your work surface. Your hands should be positioned and move freely; if something interferes with them, the manicure may turn out sloppy.
Also, give yourself 1.5-2 hours in advance, since transforming the initial state of the nail into a completely different one can take a lot of time for a beginner. But the result will please you.
Manicure with gel polish for beginners: step-by-step lessons
Manicure with gel polish is a common occurrence, because ordinary varnishes are already fading into the background due to their impracticality. Gel polishes allow you to get a high-quality coating that can please the eye for 2-3 weeks. Of course, there were some downsides. After 2.5 weeks, the overgrown part of the nail catches the eye, which spoils the impression of the manicure done. It’s okay if you have the opportunity to visit a specialist, but there are situations when going to the salon is impossible for certain reasons. In this case, a manicure with gel polish under the cuticle will help.
This technique increases the wear time of gel polish. Within 2 weeks, your nails will look as if you just recently had a manicure. Of course, making it at home will be problematic. To get a good result you need to have certain skills.
The secret of applying gel polish under the cuticle
First, using a standard brush, apply the gel polish to the nail as close to the cuticle as possible. Then the side ridges and cuticle are pushed back with a light finger pressure and gel polish is carefully applied to the unpainted area of the nail with a linear brush. The result is recorded in the lamp.
If you still want to try it, it is recommended that you first watch video tutorials that are dedicated to learning how to do a classic manicure with gel polish.
Video tutorial: How to carefully apply gel polish under the cuticle?
STEP-BY-STEP INSTRUCTIONS WITH PHOTO FOR APPLYING GEL POLISH
- The first stage is preparing the nail plate.
Roughen the surface of the nail using a buff.
We remove dust and degrease the nail using a special product for degreasing and removing stickiness from nails. We carry out all manipulations using lint-free manicure napkins.
Apply primer.
- Second stage - coating.
The first layer consists of the base (base coat). Dry in UV (2-3 minutes) or LED lamp (30-40 sec).
Next, a color coating is applied (gel polish in 1-3 layers depending on the consistency). Each layer is also polymerized in the lamp (the exposure time is similar).
At the end of the manicure, a finishing coat (top) is applied. Also dried in a lamp. If necessary, remove the sticky layer using a special product that was used to degrease nails during the preparation stage.
Thus, the minimum kit for a beginning manicurist looks like this:
To remove gel polish:
- Gel polish remover;
- Foil or special finger pads;
- Cotton pads;
- An orange stick, or a pusher, or a special cutter.
For a manicure:
- Manicure set with scissors, clippers, pusher, spatulas, etc.
- Orange sticks;
- Remover (cuticle softener);
- Cuticle oil;
- Files;
- Manicure machine (if you want to do hardware manicure at home).
To prepare nails for applying gel polish:
- Buff;
- Lint-free wipes;
- Means for degreasing and removing stickiness;
- Primer.
For applying gel polish:
- UV or LED lamp;
- Standard set base top;
- Colored gel polish;
- A linear brush (for manicure under the cuticle) and a set of brushes for artistic manicure (if desired);
- Nail decor (if desired): foil, rhinestones, microbeads, acrylic powder, stickers, stamping kit and much more.
Which nail shape suits you?
During a manicure, the most important problem is choosing the right shade and design. But, unfortunately, this is not all the difficulties.
It is worth remembering that today there are four types of different nail shapes.
But which one to choose, everyone decides for themselves completely individually. It is worth remembering that several years ago the shape of nails changed in accordance with the trends of the season, but nowadays these clear boundaries are gradually blurring.
Now, there are no certain boundaries and rules. Nowadays there are only wishes that the manicure reflects the style, matches the image, and the shape ideally matches the shape and length of the fingers.
First of all, you need to learn the most important rule - all nails, regardless of shape, must have the same length.
If one nail is broken, there is no need to feel sorry for the rest, because only in this case will the nails look aesthetically pleasing.
All experts say that the shape of the nail should completely mirror the shape of the cuticle. During the manicure process, nails must be given either an oval, round, pointed, rounded, or square shape.
The most ideal nail shape is considered oval, since it is suitable only for those with perfect and graceful hands.
The most convenient, comfortable and practical shape is considered to be round, since in this case, the nail protrudes quite a bit beyond the tip of the finger.
In this case, all free edges must be periodically sawed off in the form of a crescent. If the edges are filed in a straight line, you can get a square shape.
Well, the length depends entirely on individual preferences.
Also, do not forget that the nail should protrude from the edge of the fingertip by at least one millimeter. Well, the shape of the nails must be chosen depending on the cuticle, the shape and length of the fingers, as well as the nail bed.
Before making a decision, first of all, you need to visually imagine how each of the shapes will look on your hand. Ideally, you can cut out each nail shape from plain paper and apply the templates to your fingers. As they say, it’s better to measure seven times and cut once. Only if you are confident in your decision can you begin to take action.
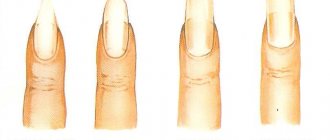
Choosing a nail shape based on the shape of the cuticle
The cuticle comes in three main shapes: triangular, square and oval. Also, the shape of the nails can be selected according to the convexity of the nail plate; it can be flat or convex.
In the event that the cuticle is oval in shape with a flat shape of the nail plate, absolutely any shape is suitable; for a convex shape of the plate - square.
In the event that the cuticle has a square shape, but the nails, accordingly, should be square.
If the shape of the cuticle is close to a triangle, then it is better to opt for pointed or oval nail shapes.
Choosing a nail shape based on the shape and length of your fingers
The round shape of the nails is ideal for those who have large hands, large fingers and wide palms. The round shape of the nails looks good if the nails are short, that is, they do not protrude beyond the tip of the finger by more than three millimeters.
The square shape of the nails will look great on the hands of those representatives of the fair sex who have thin long fingers, narrow hands and if, of course, they naturally have round nails.
When choosing this nail shape, you can choose absolutely any length, since square nails look great both short and long.
The oval shape of nails is ideal for any shape of fingers and hands, and in addition, this shape of nails visually lengthens the fingers. And if the fingers are short and plump, this is generally considered an ideal option. In this case, the length of the nail can be any.
Pointed, or as it is also called, almond-shaped nails, are perfect for those who have either long or medium-length nails.
It is worth remembering that the fingers must necessarily be thin and long.
If the fingers are chubby, then the pointed shape of the nails can simply disrupt the overall proportions of the hand.
Nails of this shape will look great with nail piercing, exotic or fantastic manicure, or a classic French manicure.
Having this nail shape, you can experiment with manicure.
How to remove gel polish correctly
Gel polish is a very durable material, which is not so easy to remove. It is possible to perform the procedure at home. This will require time, a certain tool and a special composition for removing gel polish from nails.
For use at home, people most often buy inexpensive gel polish remover from the Severina brand. There are two types on sale: “Severina Professional” liquid for more expensive gel polishes, which are easily removed from nails, and “Super-effective gel”, which dissolves almost any gel polish (even from an inexpensive price category). For professional use it is better to use more expensive products. Also, almost any brand that produces gel polishes in the line has its own recommended compositions for removing coatings.
INSTRUCTIONS FOR REMOVING GEL POLISH FROM NAILS BY YOURSELF AT HOME
- First, cut off the finish layer (top) with a rough file;
- Next, take cotton pads, soak them in gel polish remover, place each pad on the nail and tightly wrap each finger with foil.
The exposure time for each product is different, as a rule, it is 20-30 minutes.
- After the product has taken effect, remove the foil and carefully clean off the gel polish with an orange stick. If there are small irregularities left, you can clean them up using a buff.
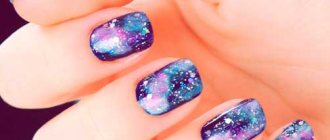
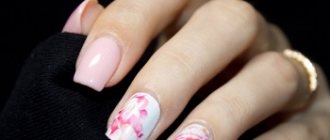
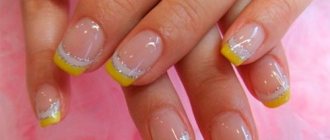
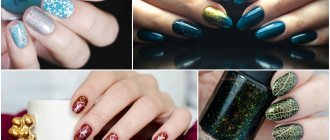
Simple designs for the beginner manicurist
Step-by-step photos of fashionable manicures and video tutorials on manicure at home will allow you to quickly master popular techniques. You just have to stock up on free time and patience. Enjoy watching!
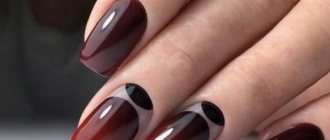
- Simple drawings
- Flowers and patterns
- Rhinestones
- Kamifubuki
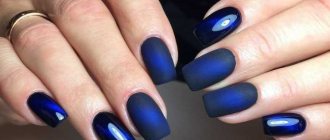
- Rubbing
- Broken glass