Today, manicures made using a relatively new American product called Shellac are extremely popular among fashionistas all over the world.
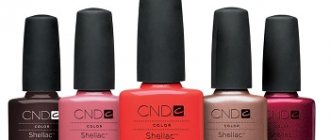
It all started in 2010, when the American company CND introduced the world to an innovative series of gel polishes. Since then, many similar products have been released, others have become a household name.
When we talk about shellac manicure, we mean coating the nail with a special gel polish . You shouldn't compare shellac with nail extensions. Coating a nail with gel polish is a simple procedure that resembles a regular manicure with colored varnish applied to the nail.
The difference lies not only in the composition of shellac, but also in the fact that after applying each layer, the nail must be dried in an ultraviolet lamp.
This manicure can last three weeks, remaining just as bright and intact. After three weeks, the shellac should be removed, as the overgrown nail becomes too noticeable.
A manicure using shellac can be done not only in a salon, but also independently at home . Remember that the beauty of a manicure and its longevity depend on the correct execution of each stage of the work.
Preparing nails for manicure
In order to do a shellac manicure yourself at home, you will need to complete the following preparatory steps:
- Any manicure should begin with tidying up the nails, giving the same shape and length to all nails, and removing dirt and varnish residues. To do this, we will need a nail file, manicure scissors and other manicure set accessories.
- Treat cuticles with cuticle remover or soften with cuticle oil and then remove. Try to remove as much cuticle as possible. Since you plan to have a manicure for at least two weeks, it is advisable that the cuticles are not visible for a long time.
- In order for the base to fit well on the nail, you should first sand it. A medium abrasive buffer is best suited for this job.
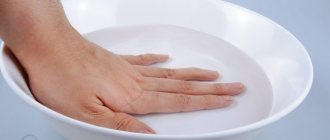
- Now the nail needs to be degreased. Before you begin degreasing your nail, clean it thoroughly. It is best to wash your hands and dry them with a towel. There is a special product for degreasing, which is not cheap. You can replace it with regular alcohol wipes or acetone.
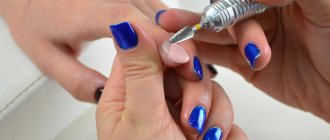
How to properly apply shellac at home?
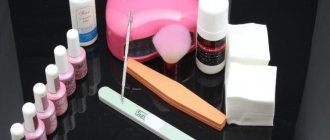
How to properly apply shellac at home? In order to use shellac yourself, you need to equip yourself with a set of all the components that are needed for shellac coating. This can be somewhat expensive, especially if you buy high-quality products and tools, but it will all pay for itself very quickly when compared to salon coating. Having bought all the basics, then you can only supplement your palette with new colors, sparkles, broths and other decorations for every taste.
The effect and durability of the manicure depends on the correct technique for applying shellac. Only a complete complex can guarantee the quality result that any master strives for. So, in addition to shellac itself, which essentially performs a decorative function in itself, a novice craftsman will need to purchase the following products:
- Degreaser. Otherwise it is also called gel bonder. It is needed to degrease the surface of the nail for better adhesion to subsequent layers and to prevent peeling of the shellac. Its composition may vary somewhat, but the main component is alcohol, so if it is not possible to purchase a store-bought degreaser, you can make an analogue at home from clean water and alcohol to obtain approximately a 40% solution.
- If we apply shellac correctly, then the next important tool is the primer. It is applied immediately after degreasing the nail plate and is responsible for good adhesion between the nail and the base layer.
- The base is the basis on which the shellac itself will then be applied. In order for the decorative layer to look good, you need to make sure that the surface of the nail is smooth, without stripes or irregularities. These shortcomings are precisely eliminated by the base layer, moreover, slightly strengthening the nail plate.
- Finish is the product that is applied last, already on the decorative layer of shellac. It is transparent and its purpose is to create the final coverage effect. Previously, only glossy options were available, now there are finishes with a matte effect, which also looks very interesting. One finish is enough to start with, but you can purchase both options and combine them, or alternate them - as your imagination dictates.
- You may also need a means to remove the dispersion layer; it is also called sticky. But, in principle, you can use the same degreaser for this purpose.
- To prevent the skin around the nail and cuticle from suffering from exposure to UV radiation in the lamp after drying, cuticle oil is needed. There are many varieties, but the main thing is that it softens and moisturizes the skin well.
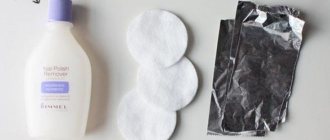
- The shellac remover mentioned earlier. You can remove such a manicure using simple nail polish removers containing acetone, but this may not have a very good effect on the condition of the nail plate and cuticle, so you should not skimp at this stage if long-term results and the condition of the skin of your hands and nails are important.
Knowing how to apply shellac on nails and what products will be needed is not enough. You will also need some additional “accessories”, which you also cannot do without. Some of the main tools are nail files and polishing buffs. Files are needed not only as an element of giving shape to the free edge of the nail plate, but also to remove the remnants of the previous shellac after removing the coating by other means. It’s good if you also have a glass file in your arsenal, which is ideal for natural nails, injures them less and gives a good effect. A buff is a kind of very fine-grained file, the purpose of which is to polish the surface of the nail, eliminate small irregularities, and make it smooth. You also need special wipes for degreaser and liquid for removing the sticky layer, which do not have lint. Ordinary cotton pads or cotton wool leaves particles and can stick, creating difficulties in work and taking up time.
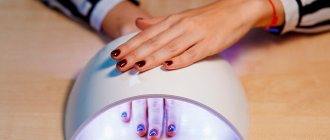
And, of course, shellac is impossible without a drying lamp. This is usually a UV lamp, but you can also purchase an LED lamp. Different manufacturers provide a wide selection of lamps in terms of design, power, and drying speed. You can choose any one that meets the basic criteria of safety and convenience.
Let's consider in what order and how to apply shellac correctly.
First of all, first you always need to prepare your nails for varnishing. This applies not only to shellac, but is especially important for it, because we are focused on long-term coverage, and everything must be perfect. Nails are shaped, cuticles are trimmed, hangnails are trimmed - the appearance of nails and hands must be neat and clean, otherwise even the most beautiful and high-quality coating will not save the impression of uneven, bumpy nails with protruding cuticles.
Primer
Immediately after degreasing the nail plate, apply a primer.
The primer is a kind of primer before applying shellac..
It is thanks to this cosmetic product that any varnishes and gels will stay on the nail for a long time.
The primer functions not only as an adhesive, but also as a disinfectant. Despite the fact that the primer dries out the top layer of the nail plate, it does not have a harmful or destructive effect.
The primer is applied along the edge of the nail. You should not dry a nail coated with primer in a lamp; it is better to wait for it to dry naturally, especially since this stage will not take much time. As a rule, one minute is enough.
Manicure ideas
You can create different types of manicure using shellac.
To make your manicure beautiful, you need to choose colors that will harmonize with each other. You should not choose glossy and matte varnishes at the same time.
It is better to take coatings of the same texture. It is better to draw a smile by hand without using stencils, because they can remove the previous layer. Each applied layer must be dried thoroughly.
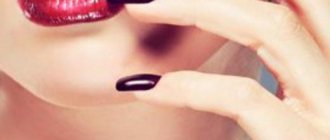
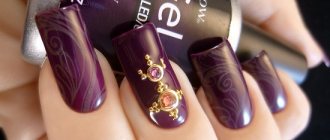
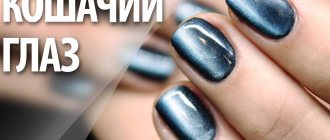
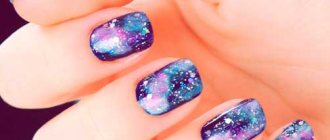
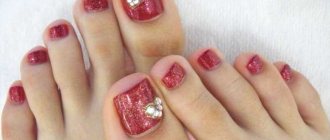
You can make designs on your nails, glue rhinestones, and stickers. Ombre manicures and moonlight manicures have become especially popular lately.
Ombre manicure is a smooth transition of colors along the nail plate. Moon manicure is something similar to a French manicure, but the smile is located at the base of the nail.
Base and top
The desire to do a manicure using shellac at home is most often explained by the desire to save money. If you're getting a manicure for the first time, the total amount of all the necessary purchases can be scary.
Only after a few months will your investment begin to pay off. Despite the large expenses, don’t even think about giving up buying a shellac base. Applying varnish directly to the finish is a big mistake and will lead to disappointment and cracked colored varnish.
If the primer protects the nail from the effects of the coating, then the base is responsible for preserving the color and integrity of the varnish for several weeks. A manicure done without a base may peel off within a week.
The top protects the colored layer of manicure on top. This product is also very important for manicure using any type of varnish. Every day our nails are subjected to various tests. In order for the color coating to last as long as possible, it also needs protection. This is exactly the type of protection that the top is.
Creating a manicure using shellac has many nuances, due to which this manicure looks luxurious for a long time. To obtain the desired result, you need to observe all the subtleties of craftsmanship.
Benefits of shellac
This type of manicure quickly surpassed that performed with conventional varnish for a number of characteristic reasons and advantages:
- Persistence. If a simple varnish can last on nails for no more than a week, then shellac lasts much longer - up to a month or more. This saves a lot of time, eliminating the need to constantly renew your manicure or completely repaint all your nails.
- Easy application technology. Shellac gel polish is applied in almost the same way as regular polish. The only significant difference is the need for polymerization in a lamp.
- A variety of colors, textures and decor options. This may make someone feel dizzy and their eyes may run wild. But it is also an excellent basis for implementing interesting ideas even within the framework of home performance.
- Strengthening the nail plate. Shellac is a healthy alternative to extensions and a savior for women with thin and brittle nails. Gel polish coating, just like classic gel, creates the effect of a dense and hard plate.
- Harmlessness. Nail extensions greatly affect the health and appearance of the natural nail plate, which after such a procedure requires special care and long-term recovery. Shellac, in turn, does not damage the surface of natural nails, maintaining their integrity.
Editor's choice: How to do a gradient manicure: subtleties and methods
Color layer
The color palette from CND is updated annually, so you have a large selection of different shades, the choice can only be limited by your preference. Apply the color coat carefully and dry your nails in an ultraviolet lamp for about 2 minutes at 36 W.
Try to apply the layer as thin as possible. If you apply a thick layer of varnish, it will swell during the drying process, and you will have to go back to the very beginning and do the whole job again, starting with degreasing your nails.
One coat will look pale and will be almost transparent. Therefore, a second layer is necessary . It, just like the first one, should be thoroughly dried with a lamp.
Shellac lamp
A lamp plays a big role in manicure using shellac . The process of drying a nail is called polymerization. For this process, one of three types of lamps will suit us:
- Ultraviolet;
- LED;
- Gas-light, cold cathode.
The most popular are ultraviolet lamps, largely due to the fact that they were the first. LED lamps carry out the polymerization process much faster.
Where an ultraviolet lamp requires 2 minutes, an LED lamp requires 2 seconds. But it should be borne in mind that LED lamps do not dry all types of gels and varnishes.
Cold cathode lamps are considered the most functional today.
This lamp dries all existing varnishes, does not have a negative effect on the skin of the hands, and polymerizes quickly enough.
Remover
Shellac can not only be applied independently, but also removed independently. The CND company has provided the market not only with products for creating long-lasting and colorful manicures, but also with products for removing shellac.
It is the CND product that large beauty salons prefer to use; they are also used at home.
This product is intended not only for easy removal of manicure, it also contains caring components that allow not only not to cause harm to the nail, but also to provide nutrition and care during the procedure.
Shellac removers are not only produced by CND.
Many companies offer their own analogue products. Domestic manufacturers are trying not to give in and are already ready to offer their product called Severina.
This product is not much inferior to its foreign competitors, but it is more affordable. Therefore, among professionals and amateurs, it is the Russian shellac remover that ranks second in popularity.
We can highlight such companies as Lady Victory, Jerden and Bluesky. Their products are also worthy of attention.
In order for a manicure at home to be as good as a salon one, you need to treat each stage of the work carefully and do everything strictly according to the instructions.