Features of geometric nail art
- Can be adjusted to any nail shape.
- A correctly selected design can visually correct the imperfections of the natural nail plate.
For example, a vertically placed pattern or stripes visually lengthen and narrow wide nails. - Geometric manicure universal.
Moderate or muted colors are suitable for work environment and even a strict dress code.But a bright or impressive design with beautiful decorative elements will delight even extravagant fashionistas .
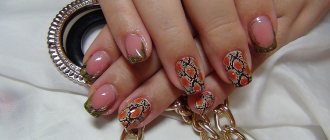
Geometry on sharp nails
Rainbow geometric manicure
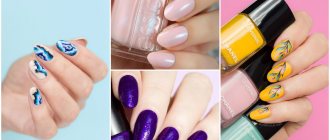
Geometry on nails: fashionable ideas
A pattern in the shape of a geometric figure is increasingly in demand among active women busy with work and career. A calm palette of varnishes will help you achieve a successful color scheme, and manicure design ideas are presented in the photo selection.
Original and fresh new items pleased with their interpretation. Interesting combinations using modern materials are on the horizon. The graphic matte design with absolutely any color content looks stylish.
The angular origami style is perfect for accent nails. As an option, use an image of a sphinx, tiger, flamingo or diamond.
You can diversify the appearance of your nails using rounded shapes, so to speak, a mediant, a volumetric figure or part of it. It is better to choose a bright color scheme, for example, black-lemon or pink.
Geometry and length of nails: the best options
Long nails are a real springboard for manicure using any technique.
But even if you don’t have any, you can’t refuse interesting experiments.
Knowing a few rules, you can emphasize the grace and beauty of your hands.
- To create a picture, do not take a lot of saturated shades of varnish, 1-2 bright colors .
- On a short nail plate, large patterns and wide transverse stripes of dark color are not welcome.
- pastel varnish colors as the main coating .
- If the outer edge of the nails protrudes at least 1-2 mm from the edge of the finger, feel free to get creative with colors and shapes.
Geometric manicure in soft pastel colors
Leopard print manicure DIY nail design video
6. Nail design with ready-made applications . Stickers, rhinestones or sparkles of any theme are applied to the base color, depending on your mood or the event you are going to. The top is covered with colorless varnish.
Once you have experience in applying these simple types of patterns, you will be able to experiment and come up with something of your own, more complex and interesting, perhaps using several components at once. DIY nail art requires persistence and experience. You will achieve much more than you think if you are not afraid to do it.
Coating for geometric manicure
To successfully implement this design, it is not necessary to purchase a special coating.
- The democratic nature of manicure with lines and shapes explains its incredible popularity: you can use ordinary varnishes.
- For a clearer drawing, it is recommended to use acrylic paints .
They are quite easy to apply, and the color is rich. - Professionals can offer Shellac or gel polish , and this is quite justified: after all, gel and shellac last much longer than usual.
True, each color of such a coating is applied and dried under a lamp separately.
Simple patterns
For those who are just starting to master geometry nail design, it is better to start with simple patterns.
Here are some of them:
- The lines are simple but effective. A base - varnish or gel polish - is applied to the nail, and then straight horizontal or diagonal lines are drawn with a brush. If some of the resulting rectangles are painted with varnish of a different color, you will get a mosaic.
- Alternating multi-colored stripes are a fashion trend in 2017. For example, you can make a geometric design in a marine style using blue and white colors.
- Chess is a simple pattern that won't take much time to create. The base is black varnish. A mesh is drawn with white gel. It is based on five lines - two vertical and three horizontal. The resulting squares are painted in a checkerboard pattern. Instead of black and white, you can use other contrasting colors.
- Triangles. Glue a triangle of adhesive tape to the base of the pink-coated nail, with an upward angle. Apply dark blue varnish on top. Remove the sticker as described earlier. The result will be a design in the form of a pink triangle on a dark blue background. You can take other colors.
- Zigzags. To create them you will need special scissors. You need to cut the tape in the form of zigzag strips with them and do everything similarly to the previous option. This is also a type of geometry, the difference here is only in the shape of the figures.
Color palette: basic combinations
Here, as in most nail designs, there are rules for combining shades:
- Monochrome , i.e. different tones of the same color range. To prevent visual merging of segments, the boundaries between them should be clearly defined.
- Contrast – colors that are on opposite sides of the spectral diagram.
- Neutral tones (black, beige, white, gray) highlight any of the shades well.
- When making a drawing with chaotically located figures or multiple elements, you can use several bright colors .
An example of a contrasting manicure with geometry
Design in a geometric style is a continuous flight of fancy, so you should not give up the search for fresh ideas. Your own artistic perception will help convey your individual character in manicure.
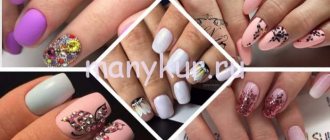
Original geometric design with rhinestone decor
How to make a manicure with a geometric pattern?
There are several techniques for applying geometric patterns.
Adhesive tape
Adhesive tape helps nail artists achieve clear contours and lines in geometric designs. You can use it as a stencil or decoration on your nails. The sequence of a simple drawing:
- The design contains bright and neutral colors. Let's take purple and powder.
- Apply nude polish.
- Glue strips of different sizes onto the fingers where the design will be. The location of the tape depends on your idea.
- Paint the gaps with bright gel.
- Secure with clear gel polish.
In this case, adhesive tape was used as a stencil. If you wish, you can apply the ribbon as a decoration.
Stencil
Using a stencil, a spectacular pattern is applied - Chessboard:
- Get your nails done first.
- Cover your nails with black polish.
- Cut the adhesive paper stencil so that one top of the plate is open, in a square shape.
- Cover the open corner with a light varnish, experiment with silver or gold.
- Turn the template over so that the open area is in the bottom corner diagonally.
- Do the same manipulations.
- Secure with top.
If you have stamping, then using iron stencils and simple movements you will get stylish designs.
Brushes
Strict lines are difficult to draw with a brush. In the absence of experience, they turn out blurry. To work, you will need a tool with natural long bristles. For beginners, a thin liner brush is suitable. To apply an abstract design:
- Cover the prepared plate with a bright background, such as lilac.
- Make arbitrary brush strokes, take a shade lighter or darker than the base one.
For ease of use, choose a gel paste - the contents do not spread and lie tightly.
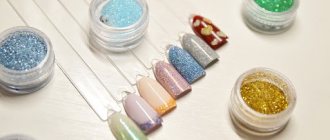
Design “geometry”: tools and materials
To make a clear, high-quality drawing for work, in addition to varnishes or acrylic paints, you may need additional tools:
- thin brush for drawing fine lines;
- dots , with which it is convenient to draw perfectly even circles and dots;
- manicure tape . Instead of black varnish or paint, it is convenient to use thin manicure tape to highlight the border area, which is glued directly to the painted but already dried surface.
- various stencils . A good helper for weak drawing skills will be stamping - a kind of “stamp” for transferring an image to the surface of the nail.
A video tutorial will show you how to make a geometric manicure in the “cat eye” style using stencils.
If you are doing geometric nail art at home and there are no special tools available, you can use tape instead of stencils, and replace the dots and brush with a regular toothpick or ballpoint pen.
Performance
This design can be achieved in several ways, the main of which are two. This is the use of stickers - films or hand drawing. The undeniable advantage of stickers is that they allow you to get a fairly complex geometric pattern. However, they are not easy to apply and will not save time. Additionally, you will be limited to the colors and decal designs that are available to you.
Application of simple films occurs on partially dried varnish. A section suitable for your nail in size is cut out from a sheet with a pattern and separated from the base. After which the center of the sticker is applied to the center of the nail and smoothed towards the edges. The nail must first be thoroughly polished and leveled. The top of the sticker is covered with a transparent top, and the edge is carefully sealed.
If we are talking about thermal stickers, then before applying they need to be heated under a lamp or hairdryer. This causes them to expand and fit tightly around the nails, shrinking as they cool. It is believed that this achieves better adhesion to the nail.
Geometric designs on nails can also be done manually using special stencils. These can be either special manicure stencils or strips cut from masking or ordinary tape. To obtain very thin lines, it is recommended to use special manicure tape (manicure tape). They can be used both as a stencil and as a design element. They allow you to create a thin strip about 1 mm wide.
You can create a geometric manicure, as in the photo, by hand. To do this you need to have sufficient accuracy and patience. If you don’t have much experience in drawing, then to get straight lines you can use a nail art varnish equipped with a thin brush. For more experienced users, dots may also be suitable.
[yandex2] [google2]
Another way to get a geometric pattern on your nails is stamping. On sale, sometimes, there are quite interesting stencils with geometric patterns. The advantage of this method is that the edges of the design are clear and neat, which is almost impossible to achieve manually without the use of an adhesive stencil. In addition, you can create a small and complex pattern.
Geometric design at home step by step
If you are new to manicure, nail art with a simple geometric pattern is perfect for gaining experience or honing your skills.
You should start by choosing a pattern, then you need to prepare the necessary materials on the working surface.
- We trim off excess skin and push back the cuticle.
- After degreasing the nail surface, cover it with base .
- We divide the nail plate into segments using thin strips of adhesive tape or manicure tape. Make sure that the adhesive side fits as tightly as possible.
- We paint the areas with any shades you like and let them dry completely.
- Carefully remove the tapes .
In their place, you can stick new ones, silver, gold or darker ones, then the pattern will be more contrasting. - Cover with fixative and enjoy the result!
Make your own beautiful geometric manicure together with a master:
Variations of “geometry” in nail design
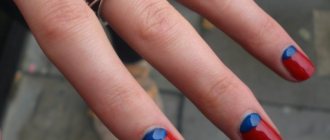
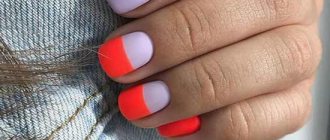
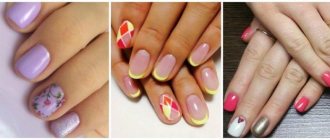
- Lunar manicure (French in reverse), which consists of highlighting the lunula area with a different color. A semicircle, triangle and other elementary shapes at the base of the nail would be equally appropriate here.
- Design with stripes and triangles . Applying several strokes in different directions or at the same angle with minimal effort will definitely help create an original image.
- Painting - mosaic, squares, chess . These painting techniques may seem complicated only at a superficial glance. In fact, a few varnishes (paints), tape or a thin brush are all that can be useful for a novice craftsman.
- Polka dots in manicure are one of the simplest and most effective options. You can apply dots of the same size or combine circles of different diameters and shades within one nail.
- Zigzags are a common motif in geometric nail art. By choosing zigzag stencils or cutting them out of tape, you will get a fashionable pattern on your hands without any extra effort.
- To complement the image, you can use other types of decor: rhinestones, foil, sparkles , etc.
Lunar geometric manicure
Stripes and triangles in geometric manicure
Checkerboard design with rhinestone decor
The combination of geometry and manicure in manicure
Bright manicure with zigzags
Beautiful geometric manicure with rhinestones
Useful tips
When starting to transfer your intended design to your nails yourself, do not forget about several important points:
- Before starting work, thoroughly clean the surface of the nail plate;
- use fresh varnishes ;
- wait until the varnish or paint dries before removing the tape and applying the next layer;
- You can design all your nails in the same style or focus on one or two fingers.
Manicure using the “geometry” technique is an option that can be adapted to both everyday and evening looks. Relatively simple to perform and not requiring special skills, nail art looks great on your hands. Experiment with shapes and color combinations to create your own unique design.
More interesting articles: