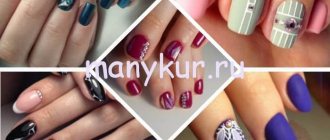
Nail polish “mirror shine” is the most current trend of 2018 in the field of manicure and pedicure. The unusual name is explained simply: the pigment is rubbed into the nail plate. In appearance it resembles sparkling polyester dust or powder.
Mirror rubbing - fashionable manicure
It goes on sale in miniature jars, similar to those in which ordinary glitter is sold. The containers differ only in their “filler”; unlike glitter, the rub is more reminiscent of crushed sand. Also included with the package is an applicator for applying mirror pigment.
Silver rub for nails
Thanks to the reflective surface, the powder sparkles and shimmers on the nails. It is convenient to use; no special knowledge or skills are required to apply it to nails.
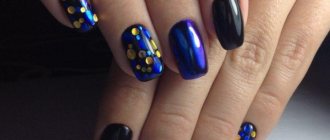
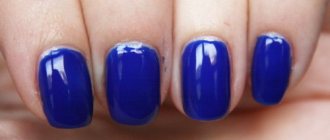
Blue nails with mirror polish
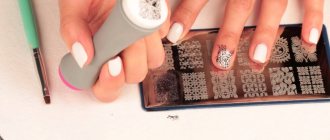
How to apply rub on gel polish correctly
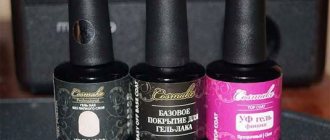
The gel polish should be rubbed in after the topcoat has been used and dried. This is done with a silicone brush, sponge or finger. You can choose any type of product - from delicate pearl to metallic chrome. The manufacturer doesn’t matter either, the main thing is good quality of the rub. Bluesky, TNL, Grattol, Ingarden, Runeil and many other companies have products of this type.
You can apply the rub on any gel polish, but it is important to choose the right shades of both products. For example, pearl looks more organic in light colors. And it is better to combine the rainbow one with a coating of the same color that is in this rub.
It is equally important to avoid errors when using:
- Uneven nail surface. If they are wavy, the rubbing will not give the desired effect, as it will lie unevenly, get stuck in the grooves and quickly fly off.
- Poor performance of other stages of manicure. For example, poorly dried gel polish, top coat, or untreated nail ends that were not coated at the final stage.
- Strong pressure on the plates when applying the product. Because of this, it will lie unevenly, may wear off in places, and later detachments and chips will appear.
- Excessive savings in decor. This makes the design unimpressive.
We recommend reading the article about spectacular nail designs with foil on gel polish. From it you will learn about how to apply foil to gel polish, the secrets of using foil with gel polish, current trends in manicure with foil and types of designs. And here is more information about how to make a matte manicure with gel polish.
Types of rubs
Any rubbing is a shiny, sometimes multi-colored powder, consisting of tiny particles, but is divided into the following types:
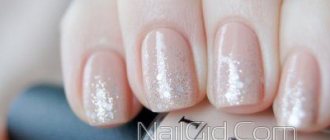
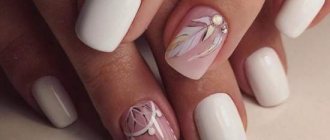
- Pearl . Creates the effect of a mother-of-pearl surface, available in pink, blue, grayish, and white shades.
- Rainbow . With this one product you can create a gradient, since the powder contains several colors.
- Prism . It consists of the smallest particles and provides the effect of shimmering frost.
- Chafer . These are green and purple tints, similar to the surface of the back of an insect.
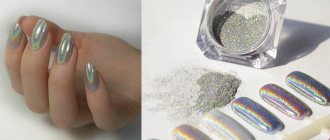
- Holographic . Gives a voluminous shine to the nails.
1 of 5
Pearl
Rainbow
Prism
Chafer
Holographic
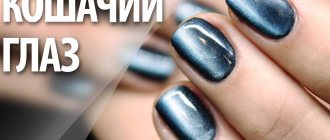
In addition to those listed, there is also melange, chrome with a golden or silver sheen, “chameleon”, cat’s eye, a product with small flakes of yuca, “northern lights”.
Popular brands
Rubs are produced by the same manufacturers as gel polishes, and not only by them:
- Bluesky;
- Masura,
- TNL,
- Catrice Luxchrome;
- In Garden;
- Grattol,
- NelTes;
- VeraNail;
- RuNail,
- El Corazon,
- Blixs,
- Pink Up;
- IRISK,
- Patrisa Nail,
- Vogue Nails,
- Belle Pro;
- Essence Metal Shock;
- Milv.
And it is not necessary to use all the products of one company when creating a design.
Advantages of technology
Recently, rubbing has been very popular for many reasons:
- the decor is easy to use, you don’t need to be a super-master and have special tools;
- the abundance of funds makes it possible to create a unique design;
- the powder is not washed off from the nails with water, the effect will last as long as the gel polish is worn;
- if desired, it can be easily removed without removing the rest of the coating;
- can be used for any color of gel polish, on a glossy or matte top;
- the range of rubs is constantly expanding;
- the product has an affordable price and is used very economically;
- it goes well with other types of decor.
Watch the video about life hacks for applying the rub:
What to apply
To cover nails with rubbing use:
- fan brush,
- special sponge or applicator;
- silicone brush to distribute decorative agent at the cuticle.
With these tools, the powder is spread over the plate, rubbed in, and excess is removed. You can simply apply the product with your finger, but then you will have to wash off small shiny particles. And in this case, the rub will fly off the nails faster, since sebum does not help keep it on the surface.
Fan brush Applicator Silicone applicator
Let's talk about the benefits
Unlike the usual gel polishes with a metallic or foil effect, the rub-in is well resistant to moisture, sunlight and solvents. If you learn how to apply it without the help of professional artists, you can change your look every day without damaging your wallet.
Multi-colored nails with mirror polish
Advantages of rubbing in “mirror shine”:
- Easy to apply, no need to purchase special tools, can be used at home;
- It can be easily removed from nails without damaging them;
- Using rubbing, you can create not only a metallic, but also a sparkling effect;
- Suitable for French manicure, in this case the rub is applied only to the “smile” area;
- If you apply pigment to gel polish, the effect will last for three weeks;
- Securely attaches to nails;
- The “mirror shine” nail rub is applied to the varnish coating, so the nail plate is not injured;
- Perfectly matches any outfit;
- Low cost, consumables are affordable.
Rubbing powder
There are powders on sale in a variety of color options; the most popular are gold, silver, blue and purple colors. The absolute hit of 2021 is the color chameleon.
Mirror manicure
It is important! When purchasing a “mirror shine” rub, pay attention to the manufacturer and price of the cosmetics. A low-cost product may be of low quality and will not highlight your original manicure, but will only ruin it by forming unsightly stains on the surface of the nail.
Variety of nail polish colors
How to apply mirror rub on gel polish: technique
Apply mirror rubbing to gel polish:
- on all nails or one or two;
- covering the plate entirely or only a design, pattern, or individual areas;
- Having first leveled the coating well, since the bumpiness will be very noticeable.
The technique of applying this rubbing onto gel polish involves:
- performing hygienic manicure;
- degreasing, using a primer;
- applying 2 layers of base, after drying them - colored gel polish;
- use and polymerization of top;
- distribution of the decor itself over the plate until the top coating has cooled;
- shaking off excess powder from nails with a fan brush or brush;
- sawing the ends;
- applying finishing agent to plates and ends, drying.
Watch the video about the technique of applying mirror rubbing:
The last time the topcoat is applied in 2 layers. A drop of top needs to be transferred to the palette; use a brush not from the bottle. The first layer of finishing agent should be thin. When applying it, you need to make sure that the rubbing particles from the skin do not cling to the brush and do not end up on the nail plate.
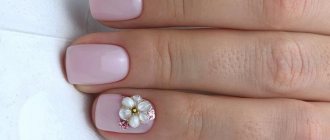
Pearl rub
Pearl rub is used as follows:
- Nails are prepared as usual, that is, manicure is performed, degreased, base is applied twice, and dried both times.
- Paint the surface with gel polish; it is better to choose delicate pastel shades and apply them in two layers.
- Another polymerization follows.
- The nails are coated with a finishing agent without a sticky layer and dried.
- Then, using a sponge or gloved finger, apply a rub over the entire plate.
- The ends of the nails must be filed down to remove protruding decorative sparkles.
- The pollen is brushed off the skin with a brush or wide brush.
- The ends need to be coated with primer, so the decor will last longer.
- Then a thin layer of base is applied to the nails and polymerized.
- The top coat is used last and is also dried.
This type of rubbing is best applied to the entire nail plate or large areas of it. This will make your marigolds look more like pearls.
Sequins
It is better to apply glitter on a single tone, covering 1-2 nails. You can use it with geometry, monograms, patterns, but again not for all fingers at once. This decor is very bright, expressive, and if you take too much of it, the design will turn out vulgar.
The technique is almost no different from applying other types of rubbing:
- Gel polish is placed on the base, after drying it, a top coat with a sticky layer is applied.
- Next comes polymerization in a lamp.
- Apply glitter to the sticky layer with a silicone brush.
- Then you should go over it with a brush, or a dry lint-free cloth.
- Now you need to file down the ends with a soft file.
- The next layer is the top, which is also dried.
The second stage requires a coating with a medium tack top layer. It will hold glitter more reliably. And the decor will not slide off the nails along with the sticky layer. Glitter can be applied both to the entire plate and to its individual sections, highlighted with a different color or geometric lines.
Holographic
If we talk about the technique of the procedure, holographic glitter powder is applied in the same way as all other types, that is, on top of the flower bed and covered with a top coat.
It is more important to choose the tone of the varnish, since the decor looks completely different on light, bright and dark. Pink and nude colors disappear under the holographic rub. The overall tone becomes silver, with rainbow stains and highlights clearly visible on it. Bright and dark gel polish are better visible, but their intensity and shades under the holography also change.
Prism
A prism differs from holography in that its particles are smaller. Therefore, the coating is denser. So the nuances of use are the same as with holography, that is, saturated colors look better under a prism. You can cover the nails entirely or partially - a pattern, any part of the plate.
It is important to apply the product evenly so that the highlight comes out even, ellipsoidal, and the colors are not randomly distributed, but equally on all nails.
Chafer
The Maybug rub shimmers in green, gold and purple shades at different lighting angles. And therefore it looks most advantageous with the same colors of gel polish, as well as with black, burgundy, blue, and emerald.
If you apply the product to a light tone, it will disappear, but the radiance of the rub will not decrease. Therefore, you can experiment with shades of varnish. And the application technique is no different from those described earlier.
Watch the video about the varieties of pigment “Chafer bug”:
How to use pigment correctly?
Before you start applying mirror nail polish to gel polish, you should familiarize yourself with some nuances:
- To get a rich tone, you should choose a dark gel polish. Pastel shades will help create a delicate design; you can also use a backing;
- The nail plate must be sanded well, otherwise the powder will rub in unevenly and all imperfections will become more noticeable;
- In the interval between applying gel polish, rubbing, base and top coat, it is important not to overexpose your nails to the lamp. If you “linger” for a few seconds longer than the allotted time, the pigment will not rub in;
- The powder is applied immediately after removing the nails from under the lamp, otherwise it will not adhere well to the nail plate;
- If after the first application there are gaps or imperfections in the nails, the pigment can be applied again;
- Want to increase the mirror effect? Apply a glossy top coat over the rub.
Important! Before rubbing the mirror pigment into your nails, cover them with a non-sticky topcoat, otherwise you will not achieve a “metallic” effect.
In the photo you can see how the “mirror shine” rub looks on the nails.
Applying nail polish
Shellac and rubbing: how to apply, use
Rubbing and shellac are also an acceptable combination, despite the fact that flower beds of this type are less durable than gels. The base and top must be appropriate, that is, intended specifically for such coverage.
Rub in shellac as follows:
- Lightly polish nails and degrease.
- Apply the base, dry in a UV lamp, do not remove the sticky layer.
- Paint your nails with shellac in 2 layers, polymerize each one.
- Apply the topcoat first in a thin layer and dry.
- After cooling, you need to remove the stickiness from the surface of the nails.
- Next apply the rub using a silicone spatula.
- After sharpening the ends with a file, the plates are covered with another layer of topcoat.
- All that remains is to dry it again and remove the stickiness.
You should use the rub on shellac carefully, with gentle movements. Otherwise, the decor will begin to wear off and become thin. During its application, you need to make sure that particles of the rub from the skin do not cling to the brush and do not end up on the plate.
Application instructions
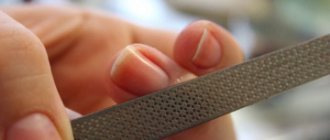
To achieve the desired result at home and get the coveted mirror shine on your nails, you should follow the step-by-step instructions:
- At the first stage, do a classic hygienic manicure. Get rid of cuticles, give your nails a beautiful shape and polish them. It is the grinding that determines how smoothly the rub will lie on the nails;
- Do not forget to degrease the nail plates;
- At the next stage, apply the base coat, then dry the nails in a UV lamp for two minutes or in an LED lamp for thirty seconds;
- Cover your nails with gel polish and dry them again;
- Next, apply a non-sticky topcoat to the nail plate and put it back into the lamp to dry;
- The powder comes with an applicator or brush, use it to apply the dust;
- Rub the powder in with light massaging movements, you can use the applicator. However, using your hands will give you a more even application;
- If necessary, add more “mirror” dust and rub in;
- Brush off any product that gets on the cuticle;
- Next, you need to apply the finishing coat twice, between each coat you need to dry it in a lamp;
- If you want to enhance the metallic effect, repeat the rubbing procedure and apply the finish.
Stages of applying nail rub
To understand in detail the rules for applying mirror powder, you should watch a training video with detailed explanations from specialists.
Is it always possible to rub in gel polish?
You can apply a rub on gel polish with any color of coating, if the following conditions are met:
- a flower garden of good quality, with an unfinished shelf life, does not curl or wrinkle during drying;
- between the varnish and decorative pollen there is a layer of topcoat;
- There is no allergy to the rub.
The latter can make itself felt during a manicure. The decorative product consists of small particles that fly into the air at the slightest wave. No intolerance occurs due to contact with nails, since it is absent. After all, the rub is not placed on a bare plate, but on a substrate of several layers.
Types of rubbing and the most popular brands
There are several types of rubbing, allowing you to create a wide variety of designs. The most common types include the following:
- Melange – represented by particles of different colors that do not form shine;
- Prism - the end result of using this type of rubbing resembles rainbow stains;
- Holographic sparkles - used only on gel polishes and form a pearlescent coating;
- Northern Lights – the shades of this type of rub resemble the iridescence of a beetle’s wings.
- Pearl - forms a delicate coating with a pearly pearl sheen.
These types of rubs can be found in the assortment of many companies producing manicure and pedicure products. The most popular manufacturing brands include:
- Zoo Nail Art - the company creates its own unique and inimitable shades of rubs;
- Masura is a Russian company that produces not only rubs to create shine or a mirror effect on nails, but also special tools for implementing such designs;
- Nika Nagel – this company’s assortment includes 4 shades of nail rub.
Interesting nail design with gel polish and rubbing
Nail design with rubbing gel polish will make it even more attractive if you use one of the following options:
- highlighting the free edge with decor, as with a French jacket, or holes (for example, white varnish and silver pollen);
- gradient with colored rubs on 1-2 nails with a dark base;
- ombre gel polishes and application of pearl decor;
- a combination of kamifubuki and shiny pollen, when the nails of adjacent fingers are decorated with both;
- using rubbing on 1-2 plates and matte top on all others;
- emphasizing a large minimalist design made with black or white gel paint;
- dew effect, when drops of a glossy top coat are applied to the coating over the rubbing;
- a combination of different types of decor, for example, gold or silver for the ring fingers, pearl for the rest on a nude background;
- combining matte and rub on one nail plate, dividing it diagonally;
- addition of rhinestones to the manicure in small quantities.
We recommend reading the article on how to do a manicure with red gel polish. From it you will learn about manicure design options for short and long nails, and techniques for their design. And here is more information about how to make cat eye gel polish.
It is no coincidence that many people like rubbing, the application technique is simpler than for other elements, and the effect of different types of decor is noticeable and unusual. The product is cheap and will last a long time. With just one rub and different gel polishes you can come up with dozens of designs and ideas.
What is a nail rub?
Nail rub – finely ground polyester powder or shiny pollen. It is applied to painted nails, giving the original shade a unique effect. Powder can create highlights, rainbow tints, and a shimmering effect. It adheres well to different types of substrate, giving an ordinary manicure uniqueness and sophistication.
They sell nail rub in small jars with different volumes. The structure of the decorative material is light, airy and crumbly. Depending on the design, they decorate the nails completely or partially. The powder can be used in classic, French, gradient designs. It goes well with matte, translucent, glossy coatings.
Advantages
Manicure powder is easy to use. You can give your nails a fashionable effect not only in the salon, but also at home. The material does not limit the scope of design ideas. Pollen can be used to decorate the arches of regular and lunar manicures. They draw on top of it, it harmoniously combines with rhinestones, sparkles, and stones. Nail rub is a practical and affordable material; it is easy to remove. The powder is economical to use: a purchased jar lasts a long time. The glow effect lasts for more than 3 weeks. At the same time, the shining layer is very thin, it does not make the nail unnatural.
Varieties
In the manufacturers' lines there is a rubbing with different effects. The most popular materials among nail service professionals are the following varieties: • prism and holography (with a holographic effect); • metallic (imitation of chrome, silver, gold surface); • northern lights (mermaid, unicorn, with rainbow lights); • pearls (with mother-of-pearl shimmer); • chafer (with the effect of an iridescent chafer shell); • chameleon (with the effect of changing shade depending on the lighting); • mirror (with reflectivity in neutral and colored pigments).
How to rub?
Often an applicator for rubbing in is sold complete with the powder. It is convenient for working on the cuticle area and side ridges. If you don’t have it, you can rub in the manicure powder with your fingers, an eyeshadow sponge, or a regular flat or silicone brush. Masters believe that the best effect is obtained when working with your fingers (with or without gloves).
Rub pollen onto a warm top without dispersion. The drying time for the top coat is reduced, taking into account the power of the drying lamp used. For example, if a master uses an LED lamp with a power of 48 W, instead of 1 minute, he dries the top-coated nails for 30 seconds. The UV device dries the nails for no more than 60 seconds.
After the top layer has dried, take a little powder from the jar and cover the nail plate with it. For a good result, a few seconds of gentle rubbing is enough. The remaining powder is brushed off with a soft brush. After this, the pigment is covered with a layer of topcoat, securing the result. The base for the rubbing can be not only gel polish. In addition to shellac, regular varnish and transparent top, it can be rubbed over extension gel. Moreover, it can be not only transparent. Nails with shimmering glitter applied to camouflage gel make a woman's look special.
Advantages of gel polish with glitter
The brightness of any beauty’s unique image can be complemented by a superbly executed manicure. The main advantage of coating with glitter gel polish is the variety of manicure options. You can mix colors, play with texture and auxiliary elements. Rubbed glitter will give your hands a special elegance, emphasize the shape of your nails and perfectly emphasize the thoughtfulness of your image.
Another advantage is that shiny nails can be easily achieved at home; you just need to rub the glitter into the gel polish using a certain method.
As an important point, it is worth highlighting preparation for the process and the preliminary acquisition of all required materials. Before you begin the process, you should purchase a set of essential attributes for proper nail decoration. A manicure created by rubbing glitter into a sticky layer of varnish requires the presence of the following materials:
- base coat;
- gel polish;
- fine glitter or fine sand;
- glossy top with a sticky layer;
- UV lamp for drying nails after coating;
- round and quite fluffy brush.
Before covering your nails, you should do a trim or European manicure; you will also need the appropriate tools for this. These could be orange sticks or cuticle nippers. You will need to give your nails a neat shape using a file.