What is rubbing? "Holography" and "Prism": similarities and differences
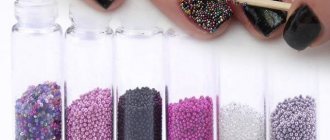
What is a nail rub? Rubbing is a crushed micronized pigment. These can be either ultra-fine particles or larger microgranules, or decor in the form of mica flakes. Depending on the color, texture and size, they create a different visual effect, similar to popular coatings - chameleons, holographics, mother-of-pearls, microglitters. Rubs are produced in small jars (similar to other small decor for nail art). The choice of tool for applying (rubbing in) them - a fan brush, a sponge applicator, a silicone design brush, a master's latex gloves - also depends on what effect you want to achieve in the finished image.
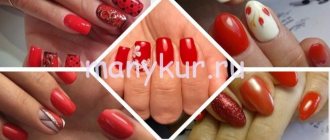
Among the variety of existing products that love the bright sun or strong artificial light, fashionistas pay tribute to the beauty of holographics and prisms. Like no other, they create a special, festive mood. In summer - emphasizing sunny weather and creating a positive mood. And in winter - driving away the blues and bringing to mind thoughts of a pleasant series of holidays. What is the difference between these two beauties?
Incredibly popular prism (aka rubbing-mirage)
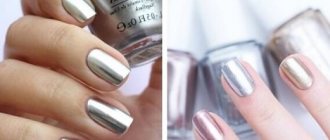
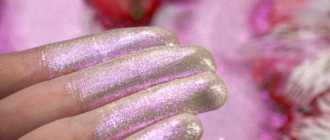
is a colored finely dispersed pigment. Its particles are so small that the coating with them produces an impressive deep 3D effect. The mesmerizing rainbow tints are visually similar in part to the veil of the northern lights, but most of all - to gasoline spilled on water. Particles of pigment rubbed into varnish or gel polish form a homogeneous, reflective, smooth canvas, without clearly visible shining particles.
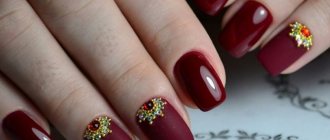
Holographic
The rub
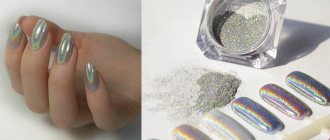
is an almost identical twin of the “mirage” pigment. It is very easy to confuse them in photographs, since under certain lighting and the angle of incidence of light, the “gasoline” beauty can also appear. The key difference between holographics is that their particles are larger. Even with perfect application (in one or two layers), the shine of individual grains of glitter is clearly visible. And scattered (fan) or linear holography, which is so popular at any time of the year, is visible.
Holographics give the effect of a diamond crushed into dust, and prisms are closer to the delicate beauty of pearls. Mirage rub is the choice of those girls who are not afraid to shine to the maximum. Modest holographic designs are an ideal compromise for the office, as their shimmer is more graceful and calmer. Due to their textural properties, mirages are better suited to varnish designs, since it is easier even for a beginner to rub them into almost set varnish. And the holographic glitter pigment is ideal for gel and gel polish, in the thickness of which it shimmers beautifully and does not rub off when worn.
Prismatic rainbow tints make the design original, stylish, and effective. When creating such images, it is important not to overdo it, but to demonstrate sophistication, a sense of proportion and taste. It will be much easier for you to do this if you know all the advantages and disadvantages of both types of rubs.
Designs with holographic rubbing and prism pigment: advantages and disadvantages
Decorative pigments “Prism” and “Holographic” are worth choosing and purchasing for many reasons. They will become worthy representatives of your decorative arsenal for self-manicure with varnishes and gel polishes both in the salon and at home.
Positive features of “sunny” decor:
- a design coated with a thick topcoat for varnish or gel polish is not afraid of color fading, changes in texture or dulling of the radiance of the rub. Your manicure is always impeccably beautiful and expressive;
- Although it seems that nails with holographic rubs are too simple and uncomplicated in design, nevertheless, you can create unique images using the rub as a canvas base. Painting, stamping, and even rubbing through a stencil will make your manicure expensive and stylish;
- both on short and long (gel or acrylic) nails, these types of rubbing are the easiest and fastest way to create a festive and fashionable look;
- Rainbow holographic rubs are ideal for summer manicures and pedicures. As a solo design, they will favorably emphasize the tan and well-groomed hands and legs;
- pigment in a “dust” texture is more convenient for beginners to work with rub-in designs. And the “holography” decor, due to its larger particles, can be used both for a mirror effect and as a product for painting nails (if you mix it in a top coat for polish or gel polish). The result is a very popular effect of “sparkling volumetric tears”;
- “Prism” and “Holography” rubs are very easy to apply, remove, and correct in the process of creating a manicure. They are very economical and affordable;
- These decorative elements can be mixed with other shades (for example, creating rub-prism duets from several halftones). This will allow you to create unique, almost designer color schemes on any substrate color.
Negative points of iridescent rubs:
- “solar” pigments attract maximum attention to the nails. This means your manicure should be impeccable: well-groomed cuticles, soft and delicate skin of the hands and feet;
- The most durable and chic rub-in manicure is in gel and shellac versions. This means you will have to fork out for a lamp to cure the design;
- the effect of holography and overflow of gasoline is most attractive when distributed as evenly as possible. This is more difficult to do on nail polish than on a gel polish top coat. This means you will need a lot of practice;
- Manufacturers of shining pigments often call your creations synonyms (rubbed “holographic prism”) or, due to the similarity of the effect, call holographics a mirage rub and vice versa. Which makes it difficult to create an image, since different types of rubbing require their own topcoats for gel polish (with or without stickiness). It is because of this confusion that the design often does not turn out as beautiful as it is intended to be. And beginners are unreasonably disappointed in rubbings in general.
So how can you quickly, correctly and without complications create a chic and unforgettable prismatic-holographic nail-look?
Step-by-step instructions for working with pigment
Let's look at a design with pigments and figure out how to work with it. First of all, I would like to say that it is better to apply the pigment on a black background. Many manufacturers have already released additional products that are best used in conjunction with dye. The auxiliary material for the dye, or more precisely, the substrate, can be ordinary black varnish, gel paint, or extension polymer.
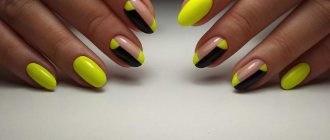
We will take a closer look at manicures with accent fingers. To do this, you need to select a pigment that matches the color scheme of the gel polish. Let's take beige shellac and gold pigment as an example. We also need a black base. To do this, you can take black gel polish or use black gel paint.
- Remove the natural gloss from the nail, degrease and apply primer.
- Apply the base and send it to dry in the lamp.
- Use black varnish to paint the middle and ring fingers and paint the rest beige. Let's dry it.
- Using rubbing movements, we begin to apply gold pigment to the sticky layer of the middle and ring fingers.
- Remove any remaining pigment with a dry, lint-free cloth.
- We cover all the fingers with top coat and send them to dry.
- Remove the remaining dispersion layer using a degreasing agent or liquid to remove the sticky layer.
You can use different nail design options, for example, regular polka dots, arranged randomly. Using multi-colored powder, you can color polka dots and make nail art juicy. You can create a beautiful gradient with a smooth transition, any space designs with partial rubbing of the substance into the nail.
Features of iridescent manicure: how to rub “prism” and “holographic” into polish and gel polish.
Creating a monocolor look on all nails or using rubs as an accent on 1-2 fingers differs significantly when working with polishes and gel polishes. If for the usual classic varnishes there is no difference in the application of holographic and prismatic pigments, then with gel varnishes there are important nuances for each type of this spectacular decor. Let's look at everything in detail.
Rubbing-prism and rubbing-holography for nails on regular classic varnish
How to use holographic rub and prism nail rub on classic nail polish? Let's look at the step-by-step technology for creating an image:
- We carefully prepare the nail and treat the adjacent skin (polish the nails with a soft buff and remove the cuticle and pterygium with a remover or Fraser);
- We shape our nails with a nail file, adjusting the length and shape. Don’t forget to polish the free edge as well to prevent delamination;
- We apply a base (for problematic nails - healing or strengthening);
- Apply one or two coats of your chosen shade of cream polish to your nails. Dry the coating until the varnish is no longer smeared, but is still slightly soft;
- For varnish, work with a soft applicator, lightly rubbing the mixture in the direction from the cuticle to the free edge of the nail;
- Secure the result with a thick top. If desired, use a varnish dryer. Without topcoat, on day 2-3 the glitter of the rub will thin out due to friction on various surfaces;
- The amazing design of your dreams is ready!
As for the technology of using mirage and holography on shellac and gel polish, each type of decor has its own nuances. Let's look at them one by one.
How to rub prism pigment into gel polish:
- We perform classic trimmed or untrimmed nail preparation: remove the softened cuticle with an orange stick or manicure scissors, file the nails and shape them to the desired length. Remove the light layer of the top keratin layer with a light buff;
- If you carry out the design immediately after removing the previous image, then you skip the buff polishing stage. We degrease and disinfect the nails, apply primer, bonder, and base. For severe aesthetic problems of nails, we use a base with healing and strengthening properties. For brittle and thin nails, you should prefer a rubber base;
- Dry the base in an LED lamp (2 minutes or 30 seconds, respectively);
- We paint the nails with gel polish in 1-2 layers, drying each one thoroughly in a lamp;
- We cover the finished color base with a non-sticky topcoat, which is also baked in a lamp in accordance with the manufacturer’s recommendations. The exception is some rubbing prisms from Tnl. They need to be rubbed onto the sticky top;
- Using soft, smooth, polishing movements, apply the rub using the tool of your choice. We try to carefully work on the area of the cuticle and side ridges. The direction of rubbing is from the lunula (semicircle near the cuticle) to the end of the nail;
- We continue polishing by rubbing until a homogeneous and uniform shine is obtained. Using a fan brush, carefully brush the rub off the skin and cuticles, working through the nail sinuses as well. Apply the top finish in two thin layers: with stickiness, if you want to further decorate the resulting image. And without a sticky layer, if you want to enjoy a shining solo manicure;
- Let's contemplate the incredibly attractive beautiful space design!
Rubbed glitter “Holography” on gel polish.
- We repeat steps 1-4 from the previous master class;
- Apply a non-sticky topcoat to the colored coating and dry it in a UV lamp for 2 minutes. In case you don’t have such a top on hand, apply the finish with a sticky layer, dry and remove the dispersion layer with a special liquid and a lint-free cloth;
- Using a brush or applicator without strong pressure, gradually and smoothly rub in the holographic rub, carefully crushing all the grains of pigment into an even layer;
- We remove excess holographic powder and re-coat the design with finish. We select the type of top depending on the desire/unwillingness to further decorate the nails;
- As in the case of varnish design, manicure with a prism, do not forget to apply each layer of coating, sealing the free edge for greater durability of the image;
- A breathtaking and stylish “rainbow” look is ready!
When working with rubs in general, and with mirage and holographic in particular, it is worth keeping in mind some of the features of this manicure in order to complete the design correctly and without errors. Let's study them!
How to add pigments
By its origin, pigment is a powder material consisting of small particles. Each of them has a rich color that can color any material it touches. How to apply pigment correctly? It is better to do this with gel polish, but it can also be mixed into regular varnishes, gel pastes, or combined with velvet sand or acrylic powder.
Colored powder is also used for stained glass nail designs. Using a dye, you can create a translucent formula that is suitable for aquariums and other types of nail art.
It is better to add pigment to the nail material in small portions, thoroughly mixing to a uniform consistency.
If this is not done, lumps or gaps may form, unmixed areas that will lie unevenly on the plate. To get the right shade, mix the pigment with a transparent base, such as top or base.