Types of tips
Tips are plastic overlays or template forms that are used by masters as a substrate or as a stencil for forming an artificial nail plate.
This is the most convenient and popular extension option for beginners. It is also popular among experienced craftsmen, especially if it is necessary to reduce time and simplify the procedure. There are several varieties of tips, each with its own peculiarity in operation and design nuances.
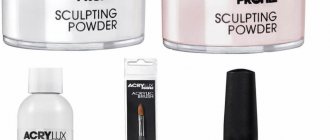
To form an artificial nail plate, acrylic, gel, biogel and acrylic acrygel, which is a combination of gel and acrylic, can be used. Acrylic dries in air, and gels dry in a lamp.
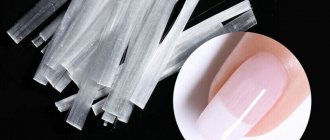
Tips-tips
These are plastic nail tips with a convenient transition zone for high-quality adhesion along the smile line. Disposable. They are attached using a special glue that comes with them or can be purchased separately.
They come in different sizes within one set. It is necessary to select it individually for each nail, and, if necessary, pre-file it in width so that it perfectly matches the width of its plate. After gluing, the length is cut and filed. Next, everything is covered with camouflage extension material to create an outwardly complete nail plate.
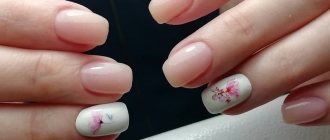
White tips are very convenient for extending French manicure. This is a ready-made perfect smile line; you just need to cover the nail with a thin layer of base or camouflage gel or acrylic, and then with a top coat to add shine.
Camouflage nail gel - let’s figure out what it is and how to use it correctly
Upper forms
Upper forms - used for working with acrylic, gel, acrylic and biogel. The material is applied to the form, pressed against the prepared nail along the entire length under the cuticle or from the middle of the plate, then dried in a lamp and filed.
The top molds are made of a dense material compared to the more flexible liquid molds, and have a more curved design. Thanks to this, they allow already from the first layer to form a convex stress zone or fold zone, which is subject to the greatest loads when worn. The top forms are reusable. On average, they are enough for 100-250 extensions.
Liquid tips
They are used for extensions with all liquid materials, hence their name. Often opaque, with a matte surface. They have short “removal handles” at the ends. Unlike top forms, liquid patterns are more flexible and flat. They do not immediately form a stress zone, but only create the first base layer. Then you need to paint the architecture manually - with camouflage gel or acrylic using a brush.
When working with liquid tips, the material is applied to a mold and pressed against the nail plate. Smile lines are already drawn in the form, which is very convenient for beginners when laying out a French jacket. After drying in a UV or LED lamp, the tip is removed and the plate is filed down. Liquid tips are also reusable, like the top forms.
Depending on the desired result, you can work with any of the three types of tips. Try everything one by one to choose the most convenient and practical for yourself.
Extended nails: how long do they last?
When doing extensions, every woman dreams that her beautiful nails will immaculately please her for a very long time. However, not all representatives of the fairer sex can last this beauty for a significant period of time. A completely fair question arises: extended nails, how long do they last on women’s fingers? What determines the duration of this period? Let's figure it out.
During extension, the surface of the natural nail is significantly filed down, and in its place a new acrylic or gel plate is formed, which can last for 6 months. Correction of an extended nail should be done when, due to the growth of your own nail, the precuticular area becomes not covered with gel or acrylic. This usually happens after 3-4 weeks. In this case, you need to immediately contact your specialist for the next adjustment.
If the changes are minor, then the specialist will not remove the tips and build up a new plate. He will simply eliminate the detachments that have appeared and make cosmetic correction of the nail. Thus, this procedure must be carried out at least once a month, otherwise, after the gel is detached, the tips will need to be removed.
Basic set of materials
In addition to the templates themselves, you will need:
- glue for extensions
- length cutter
- sawing machine
- UV or LED lamp
- file and buff
- pusher
- tassel
- lint-free wipes
- material to choose from: gel, biogel, acrylic, acrylic in base and camouflage shades
- degreaser/dehydrator
- acidic or acid-free primer
- base
- top or finish to add shine
- varnish and decor as desired
Preparing the nail plate
This stage is the same for all types of extensions using tips and consists of the following mandatory steps:
- Manicure . Before extensions, you need to do a trimmed, hardware or combined manicure to remove the cuticle and remove the pterygium. They are most often the cause of detachments of artificial material.
- Filing the top layer of the nail . To improve adhesion to the artificial material, it is important to remove the top layer of the natural nail. Don't get carried away, it will be enough just to remove the natural shine. Experienced masters use either a buff or a file for natural nails for this.
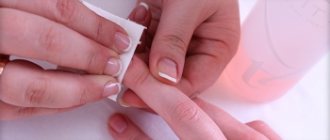
- Degreasing and dehydration . First, apply the cleaner to a cotton pad and remove the dust after filing. Then apply a special degreaser to your nails with a brush.
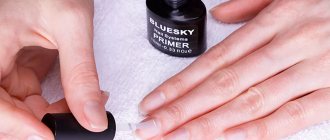
- Application of primer . This product lifts the scales of the nail plate and ensures adhesion of the artificial material. After applying the primer, wait until it is completely dry, otherwise peeling may occur in the future. When working with gel, an acid-free primer is used, and when working with acrylic, an acidic one is used.
- Applying the base . The base is applied in a thin layer under the cuticle, especially if the extension occurs not on the old layer of material, but on your own nail plate. Dries in a lamp. The sticky layer does not need to be removed.
Now let's move on directly to the extension procedure with various tips.
Technology
There can be quite a wide range in how much different nail extension tips cost. Depending on this, the cost of such a procedure yourself at home may vary. The price for tips from luxury brands is less than 2,000 rubles per 100 pieces. The price for cheap brands, such as ruNail, can be 500 rubles for the same quantity. Add here all the auxiliary means and you can understand whether it is profitable to carry out extensions at home or whether it is easier to visit a salon.
- Start by processing the hand of the tools. If you are a master, then you need to treat both your hands and the client. This can be done using a special-purpose antiseptic (for manicure) or antiseptic hand gel, alcohol wipes, hydrogen peroxide, etc.;
- File the nail plates so that the circumference of the free edge is similar to the hole of the tip. In this case, it is better to significantly reduce the length, since this way the tip will stick better;
- Choose the appropriate sizes for each nail. Pay attention to the fact that both the shape of the hole and the actual width of the nail, as well as its bend, must match;
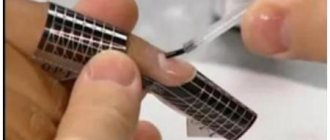
- Apply glue to the edge of the plastic. By the way, the price of such glue can be quite high. However, it can be used for more than one extension. Attach the tip to the nail plate, as in the photo. Make sure there are no air bubbles between them;
- Cut off the excess length, file if necessary, as in the photo;
- Using a polishing buff, polish the border between the tip and the nail. Try not to touch the natural plate;
- Remove gloss from the nail, as well as from the tips;
- Use a degreaser and then a primer;
- Apply gel only to natural nails and dry it under a lamp. Then apply the gel to the entire nail, as in the photo, and dry again;
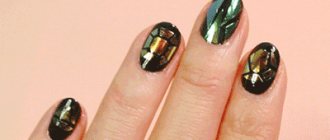
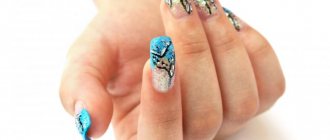
- On this layer you can start making your design. You can use the design ideas presented in the photo in this material. Once the design is complete, coat the plates with topcoat and dry.
Extensions using nail tips, even if done at home, are not characterized by the lowest price. Although, of course, it is lower than when performing the procedure in the salon. To the greatest extent this is true because you can use all purchased materials and tools repeatedly and not only for extensions.
Extensions using tips - step-by-step instructions
- We select templates according to the size of each nail
- Glue the tips with glue onto previously prepared nails
- We remove the length with a tip cutter and file the edges
- We apply camouflage gel with a brush, build the architecture, and dry it in a lamp. When using acrylic, apply the material in a translucent or pink shade and distribute it evenly with a brush, wait until it hardens
- Remove the sticky layer from the gel
- We file down the length and thickness
- We apply a top coat or decorative varnish and design as desired
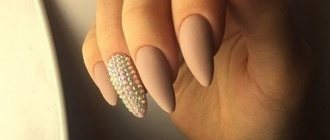
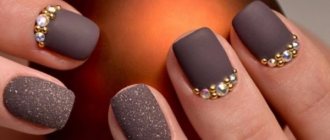
pros
- The fastest extension option
- The ideal smile line with French extensions
- A simple and convenient way for beginners to practice
Minuses
- Sometimes nails peel off due to poor-quality glue or incomplete adhesion of the artificial nail.
- Template blanks still look artificial; experience and skill are needed to achieve naturalness in their design
- Gel and acrylic can run at the tips, which makes the nails excessively thick in these areas, additional filing and understanding of architecture is necessary to achieve a natural result
Tips: what is it?
This is a synthetic material made in the shape of a nail. It is elastic, with a long wearing period. False nail tips are used to lengthen the nail plate. The size and type of this accessory must be selected individually, taking into account the shape of the nail plate.
They are made in sticker format, so application takes less time than regular nail extensions. Due to the simplicity of the procedure, its price will also be lower. Lengthening the nail plate using this method can be done at home yourself, without involving a specialist.
Types of tips
The range of stickers for manicure is very large. Therefore, any woman can choose the shape she needs. Manufacturers make the following types of records:
- Plastic. Very elastic, adheres well to the nail.
- Nylon. More elastic, resistant to mechanical damage. However, they are more difficult to apply than other types.
- Polyflex. Also elastic, they tolerate contact with household chemicals well. Easy to apply and long lasting.
- Liquid. They can be used to lengthen your natural nails.
There are other differences:
- Contact area. They can be deep, short or non-contact.
- Form. They are made rounded, straight, and so on.
- Purpose. Standard, for problem nails.
- Size. Depends on the length and width of the nail plate.
- Color. Usually false nails are made colorless so that they can be painted with any shade of varnish. But there are also color options.
Advantages and disadvantages
The choice in favor of such a manicure is quite understandable. After all, it has undeniable advantages:
- the nail is not weighted;
- you can make long nails with your short ones;
- tips do not cause harm to health;
- hide imperfections of marigolds;
- can be applied at home;
- do not require special care;
- can be varnished;
- easy to remove with your own hands.
They also have disadvantages:
- It does not allow air to pass through, which means it is undesirable to wear them for too long.
- If you choose a bad glue, the cover may fall off at any time.
- It has a thickened tip, which users often do not like.
- If the shape of the plates is not satisfactory, you will have to spend a little more time adjusting it.
Extensions on the upper forms - step by step instructions
- We select the shapes according to size, slightly file the width at the side rollers, if necessary
- Using a brush, apply acrylic, base gel or acrylic into the mold, spread it in a thin layer and apply it to the nail. It is necessary to apply the form slightly from the tip to the cuticle so that the material is not squeezed out at the cuticle
- Remove excess material with a brush
- We send it to dry in a lamp or air dry (for acrylic)
- Removing the upper forms
- Using a brush, apply a layer of camouflage acrylic, gel or acrylic, and build the architecture of the nail
- Dry in a lamp for 2 minutes, acrylic in air until it hardens
- We cut the length and width
- Apply top or finish, dry in a lamp
pros
- Easy to use
- Nails are more durable than nail tips due to the absence of an additional grip zone along the smile line
- Reusable
- Due to the characteristic volume in the stress zone, it can be formed already at the first stage of working with acrylic, base gel or acrylic
Minuses
- When extending very long nails, they may initially have a “pecking” shape.
- The absence of a drawn smile line in the inner part of the form, which is inconvenient when forming a jacket
A detailed description of the extension technology on the upper forms with instructions for popular designs:
Extensions on top forms with examples and instructions
Liquid tips extensions step by step
- Selecting liquid tips by width
- Apply material for building up the base layer to the inside, distribute, remove excess along the edges
- Apply the form to the surface of the nail, press slightly
- We remove the excess squeezed onto the surface near the cuticle and side ridges with a brush.
- Dry in a lamp or air dry if it is acrylic
- Removing liquid tips
- Apply a second layer of camouflage with a brush, forming the architecture of the nail
- Dry in a lamp for 2 minutes or in air (for acrylic)
- Apply top or finish
- We make the design with varnish as desired
pros
- Durable, flexible, comfortable shapes
- Reusable, will last up to 250-300 uses
- The presence of markings of the smile line in the inner part for the convenience of forming a jacket
- It is convenient to remove using the special “tips” on the sides of the tips
- Indispensable for practice for beginners
- Allows you to create natural nails that do not differ in appearance from natural ones, unlike tips.
Minuses
- Unlike the upper forms, they provide a flatter base-plate, without a reinforced stress zone
If you have never tried to grow your nails yourself, then tips are the ideal material for beginners. Start with the adhesive tips and then move on to the top molds or liquid tips. Ready to get started? Write to us in the comments if you have any questions.
4.4 / 5 ( 14 votes)
Sequence of build-up
Knowing how to properly extend nails with tips, you don’t have to worry about the quality of the work. The forms significantly reduce the procedure time and require virtually no sawdust. The result will please you the first time, but you need to know the technique in detail and look at photos of the process.
Preparatory stage
First of all, you need to prepare the bed. This step cannot be skipped, otherwise there will be detachments. It is necessary to remove the cuticle with the pterygium, file it, and sand it for better adhesion.
This is done carefully, removing only the shine with a buff or a soft file. After that, all that remains is to degrease the surface, apply a base, and then dry it in a lamp. Many masters advise not to remove the sticky layer.
Using Top Forms
Nail extensions begin with the selection of overlays. Enough material is applied, but so that it does not squeeze out when pressed. How to properly increase tips:
- on the reverse side, evenly distribute the substance and apply tightly to the nail (this must be done carefully, otherwise the material will be squeezed out near the cuticle and side ridges);
- remove excess gel with a clean brush, put your nails under a lamp (acrylic dries on its own);
- carefully remove the products by pressing lightly;
- apply camouflage and dry again;
- file to achieve the desired length or shape.
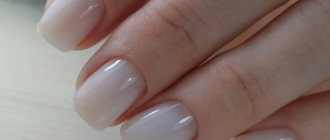
All that remains is to apply the color to your taste. Nude shades are often left without colored varnish, covered with a finish.
Ready-made molds with glue
You need to start by choosing the right size. Perform a manicure, sand and degrease the surface. Sequence of nail extensions:
- Apply a little glue into the hole and spread evenly. You can replace it with a special gel, which needs to be dried in a lamp.
- Place the form on your nail, press lightly with your finger, wait a few minutes. The exact time must be indicated in the instructions.
- Cut off the excess length with a tip cutter; this cannot be done with scissors. Then you need to file down the edge so that there are no sharp corners.
- Lay out camouflage, as well as colored gel, make a design as desired. Be sure to cover your nails with top coat.
The sticky layer should be removed between coats of varnish. Transparent tips for nail extensions are suitable for varnish, and white tips are suitable for French. The work does not take much time, it is better to do it one finger at a time so that the glue does not harden ahead of time. For a better understanding, it is recommended to watch the video, which shows the step-by-step process.
Use of liquid forms
The technology is almost no different from the first method, but you still need to remember, step by step, how to extend nails with tips. You should start with a manicure and selecting products according to shape. Then apply a base layer to the inner side, apply it to the nail, and press gently. Wipe off excess cuticles with a brush and then dry everything in a lamp. After removal, the procedure does not end; you still need to apply a camouflage agent. The extended nail is also dried in a lamp, then top coat, varnish, and decor are applied.
Even beginners can grow nails using tips if they have a set for this in their arsenal and know the sequence of actions. A proper manicure will last 2-3 weeks; wearing it longer is not advisable. As it grows, a transition from a natural plate to an artificial one will be visible. In addition, it can break at the root, causing severe pain.